
Configure a custom domain with SSL on AWS CloudFront


You just deployed a fresh website accessible through AWS CloudFront, as I did for a static website with AWS S3. You now want to use a more human-friendly domain name you bought from a domain registar different from AWS (route53), such as Namecheap, GoDaddy, OVH, etc.
You want the website to be accessible from the main domain name or a subdomain and have an SSL certificate generated to secure the requests between the website and the client.
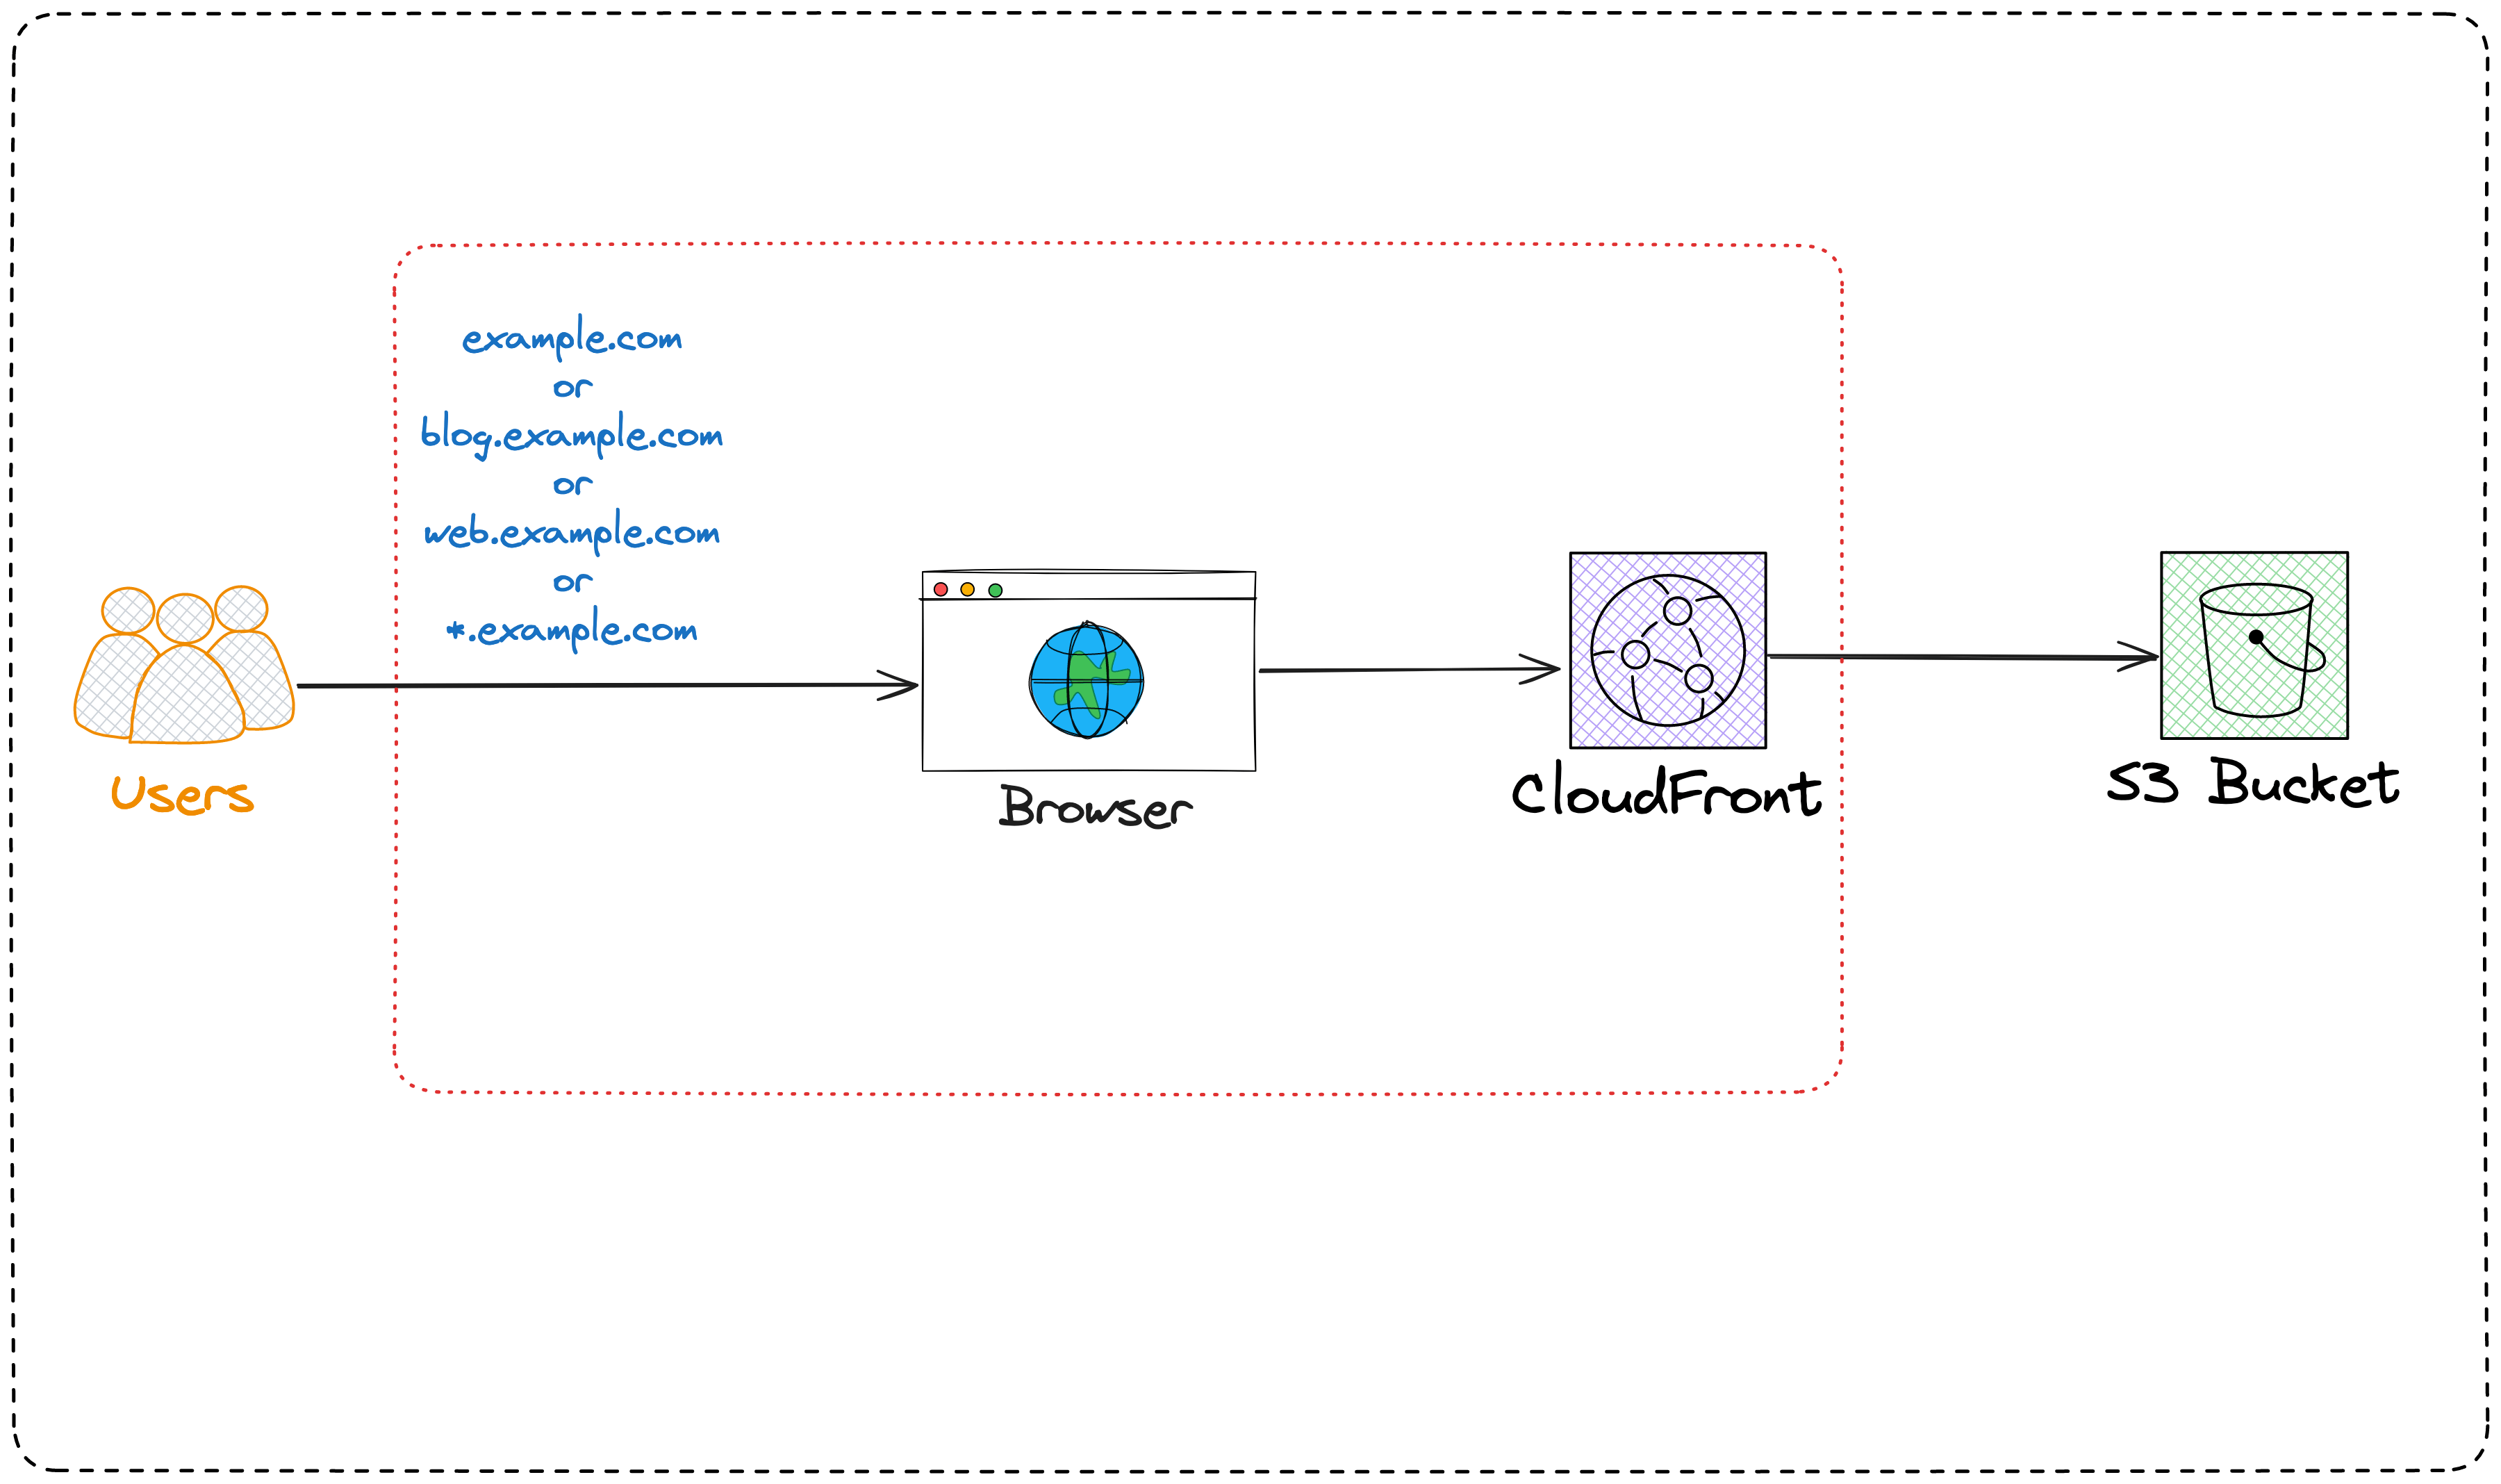
In this post, we will see how to attach a custom domain to a website served by AWS CloudFront and protect the former with an SSL certificate.
Prerequisites
To follow this tutorial, you must meet the following requirements:
- An AWS account, being on a free tier, is enough.
- A website served the internet through AWS CloudFront. I wrote a complete post about hosting a static website with AWS S3 and CloudFront.
- A domain name you own and want to put it in front of CloudFront. The one I will use is tericcabrel.com, and it is registered in OVH.
Create the Hosted Zone
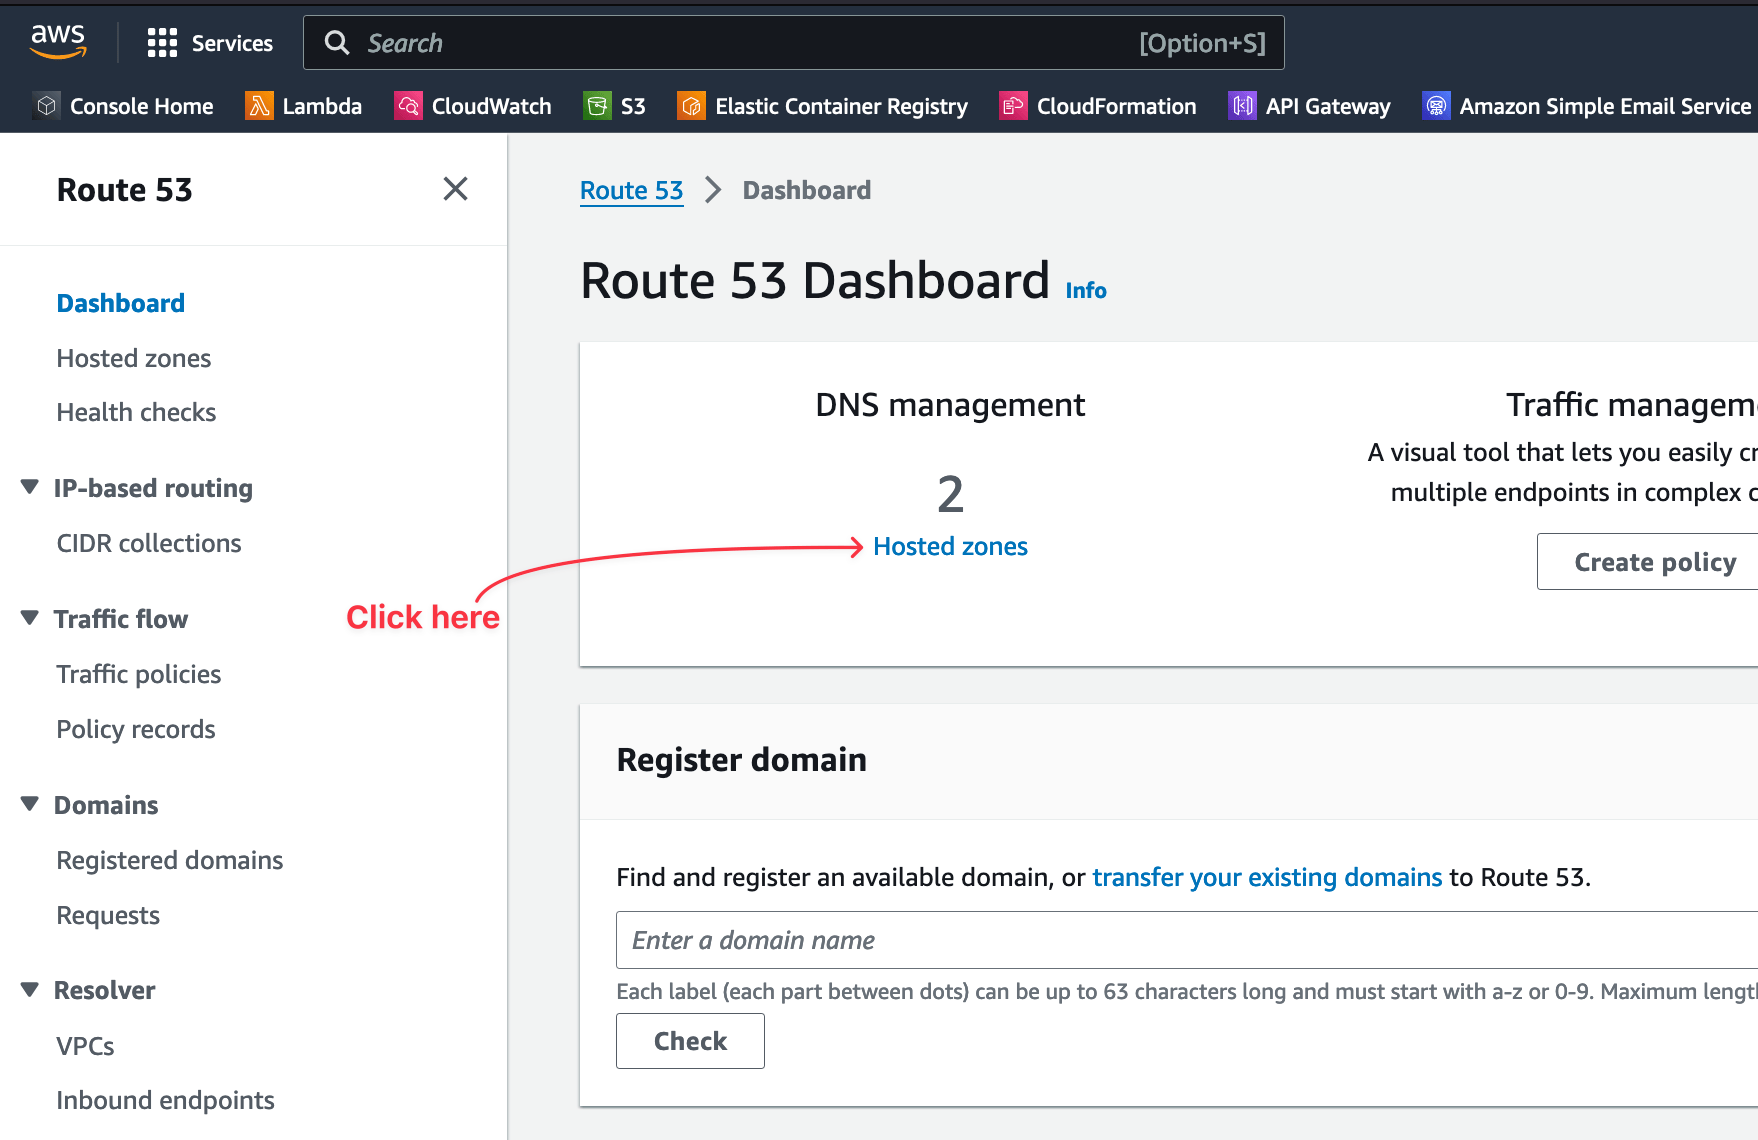
Log into the AWS console, search for the service "Route 53", click on it, and you will be redirected to the dashboard. Click on the link to view the list of hosted zones.
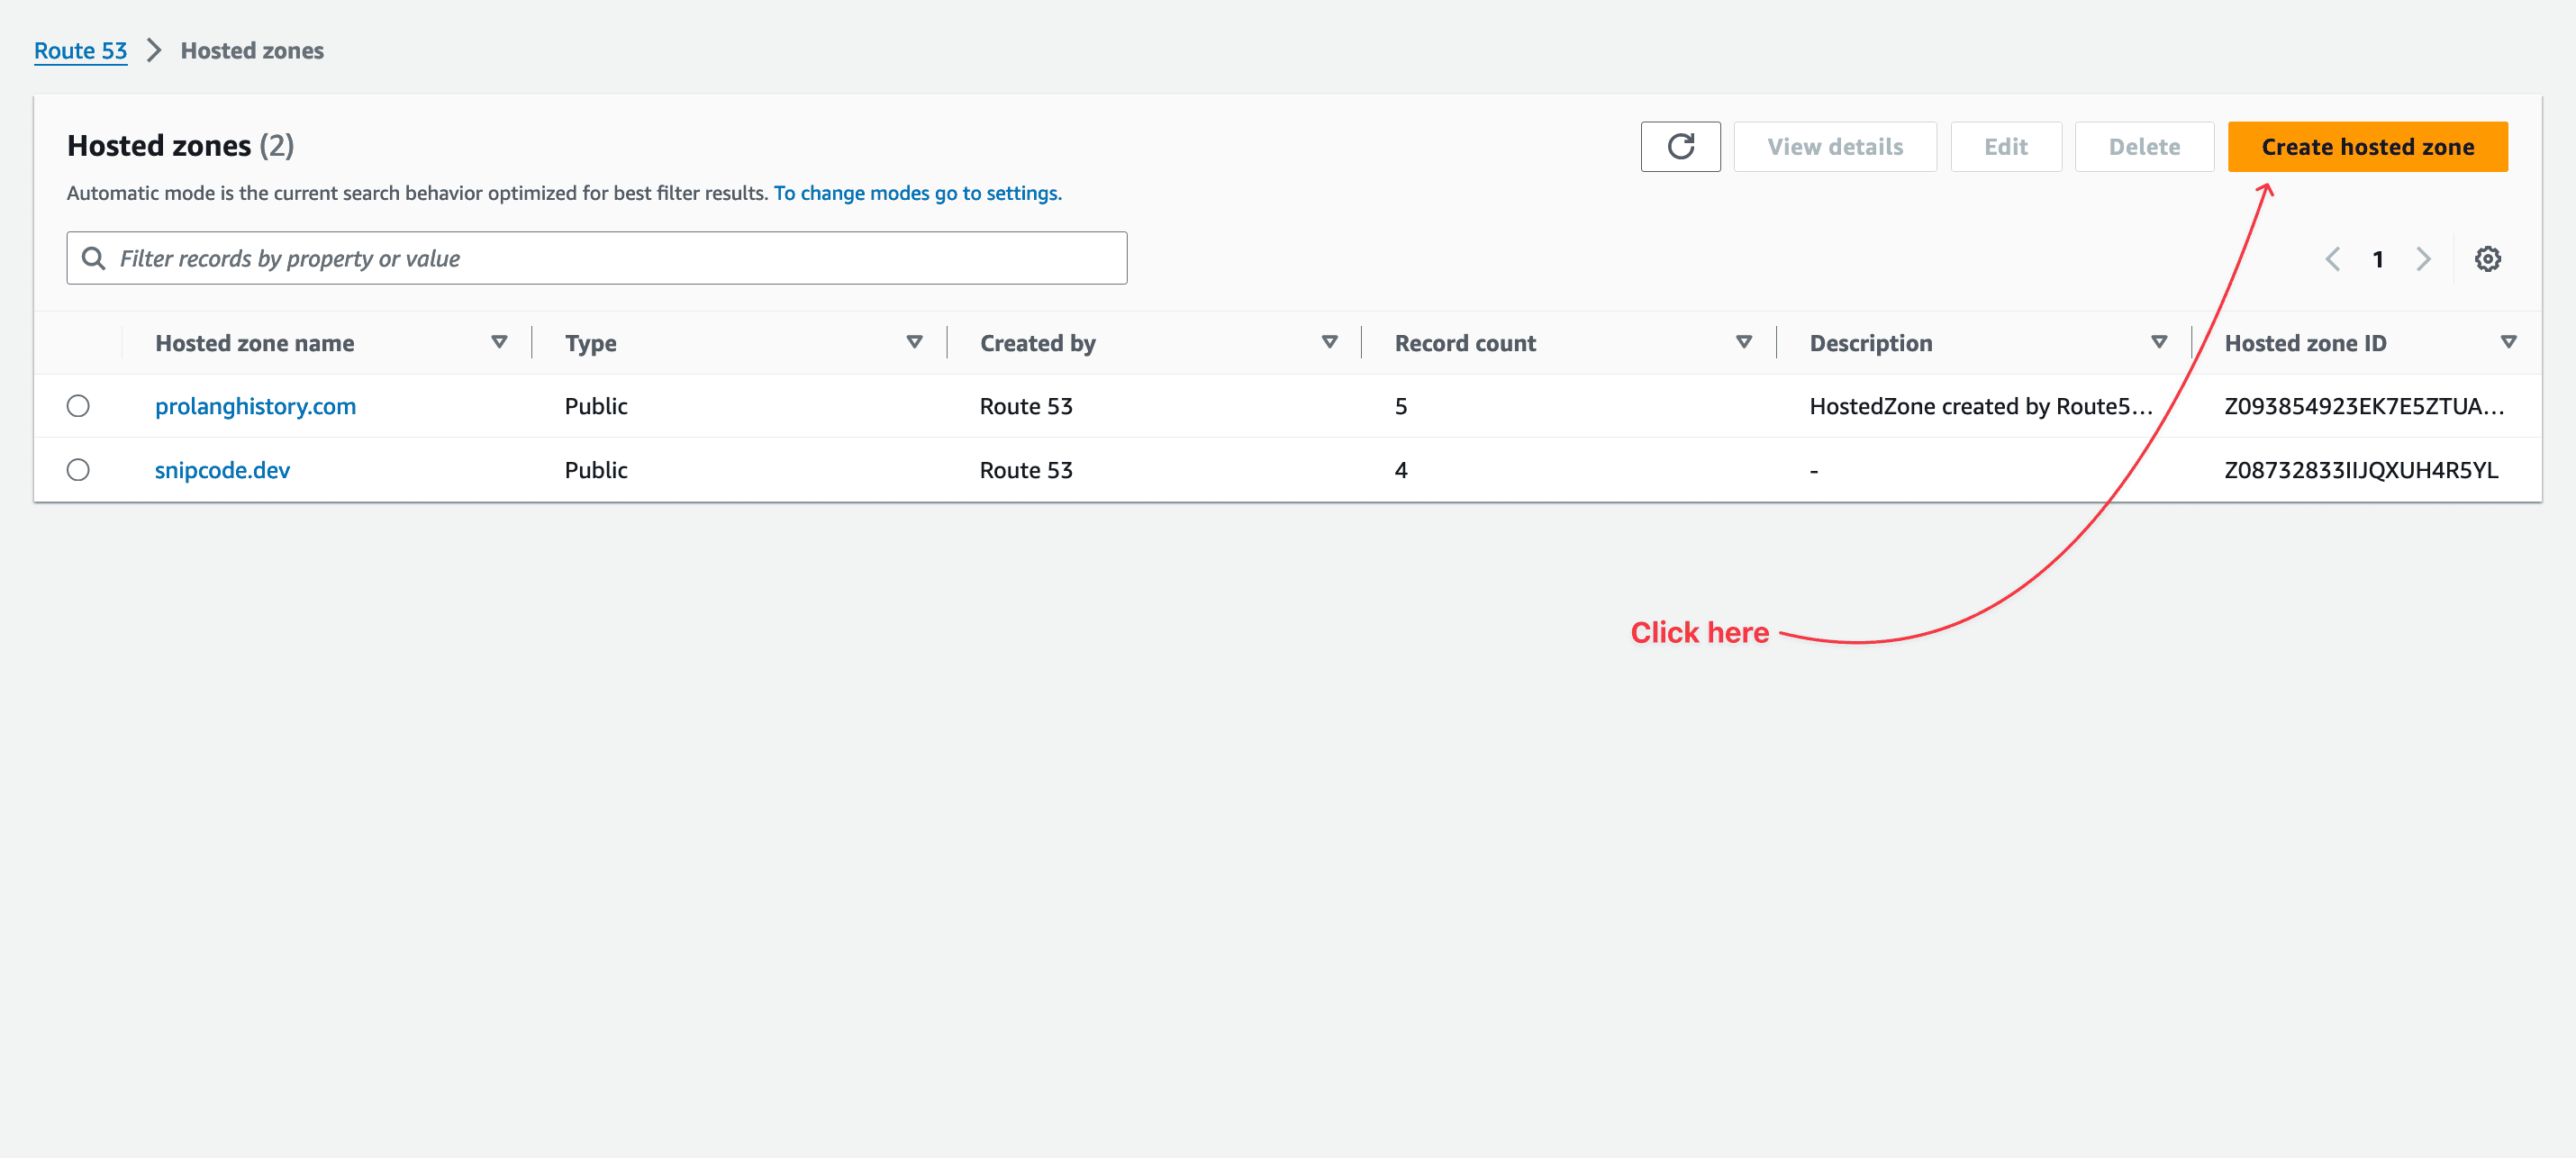
You will see the list of your hosted zones. In the picture below, we can see I have two hosted zones. At the top right, click on the button "Create hosted zone"
You are redirected to the form page for a hosted zone creation. Two pieces of information are required:
- The Domain name: the value is the domain name you want to attach to the CloudFront distribution URL.
- The hosted zone type: whether public or private, chooses the public option as the private one is suitable for Amazon VPC.
The hosted zone description and tags are optional, so provide values if you want.
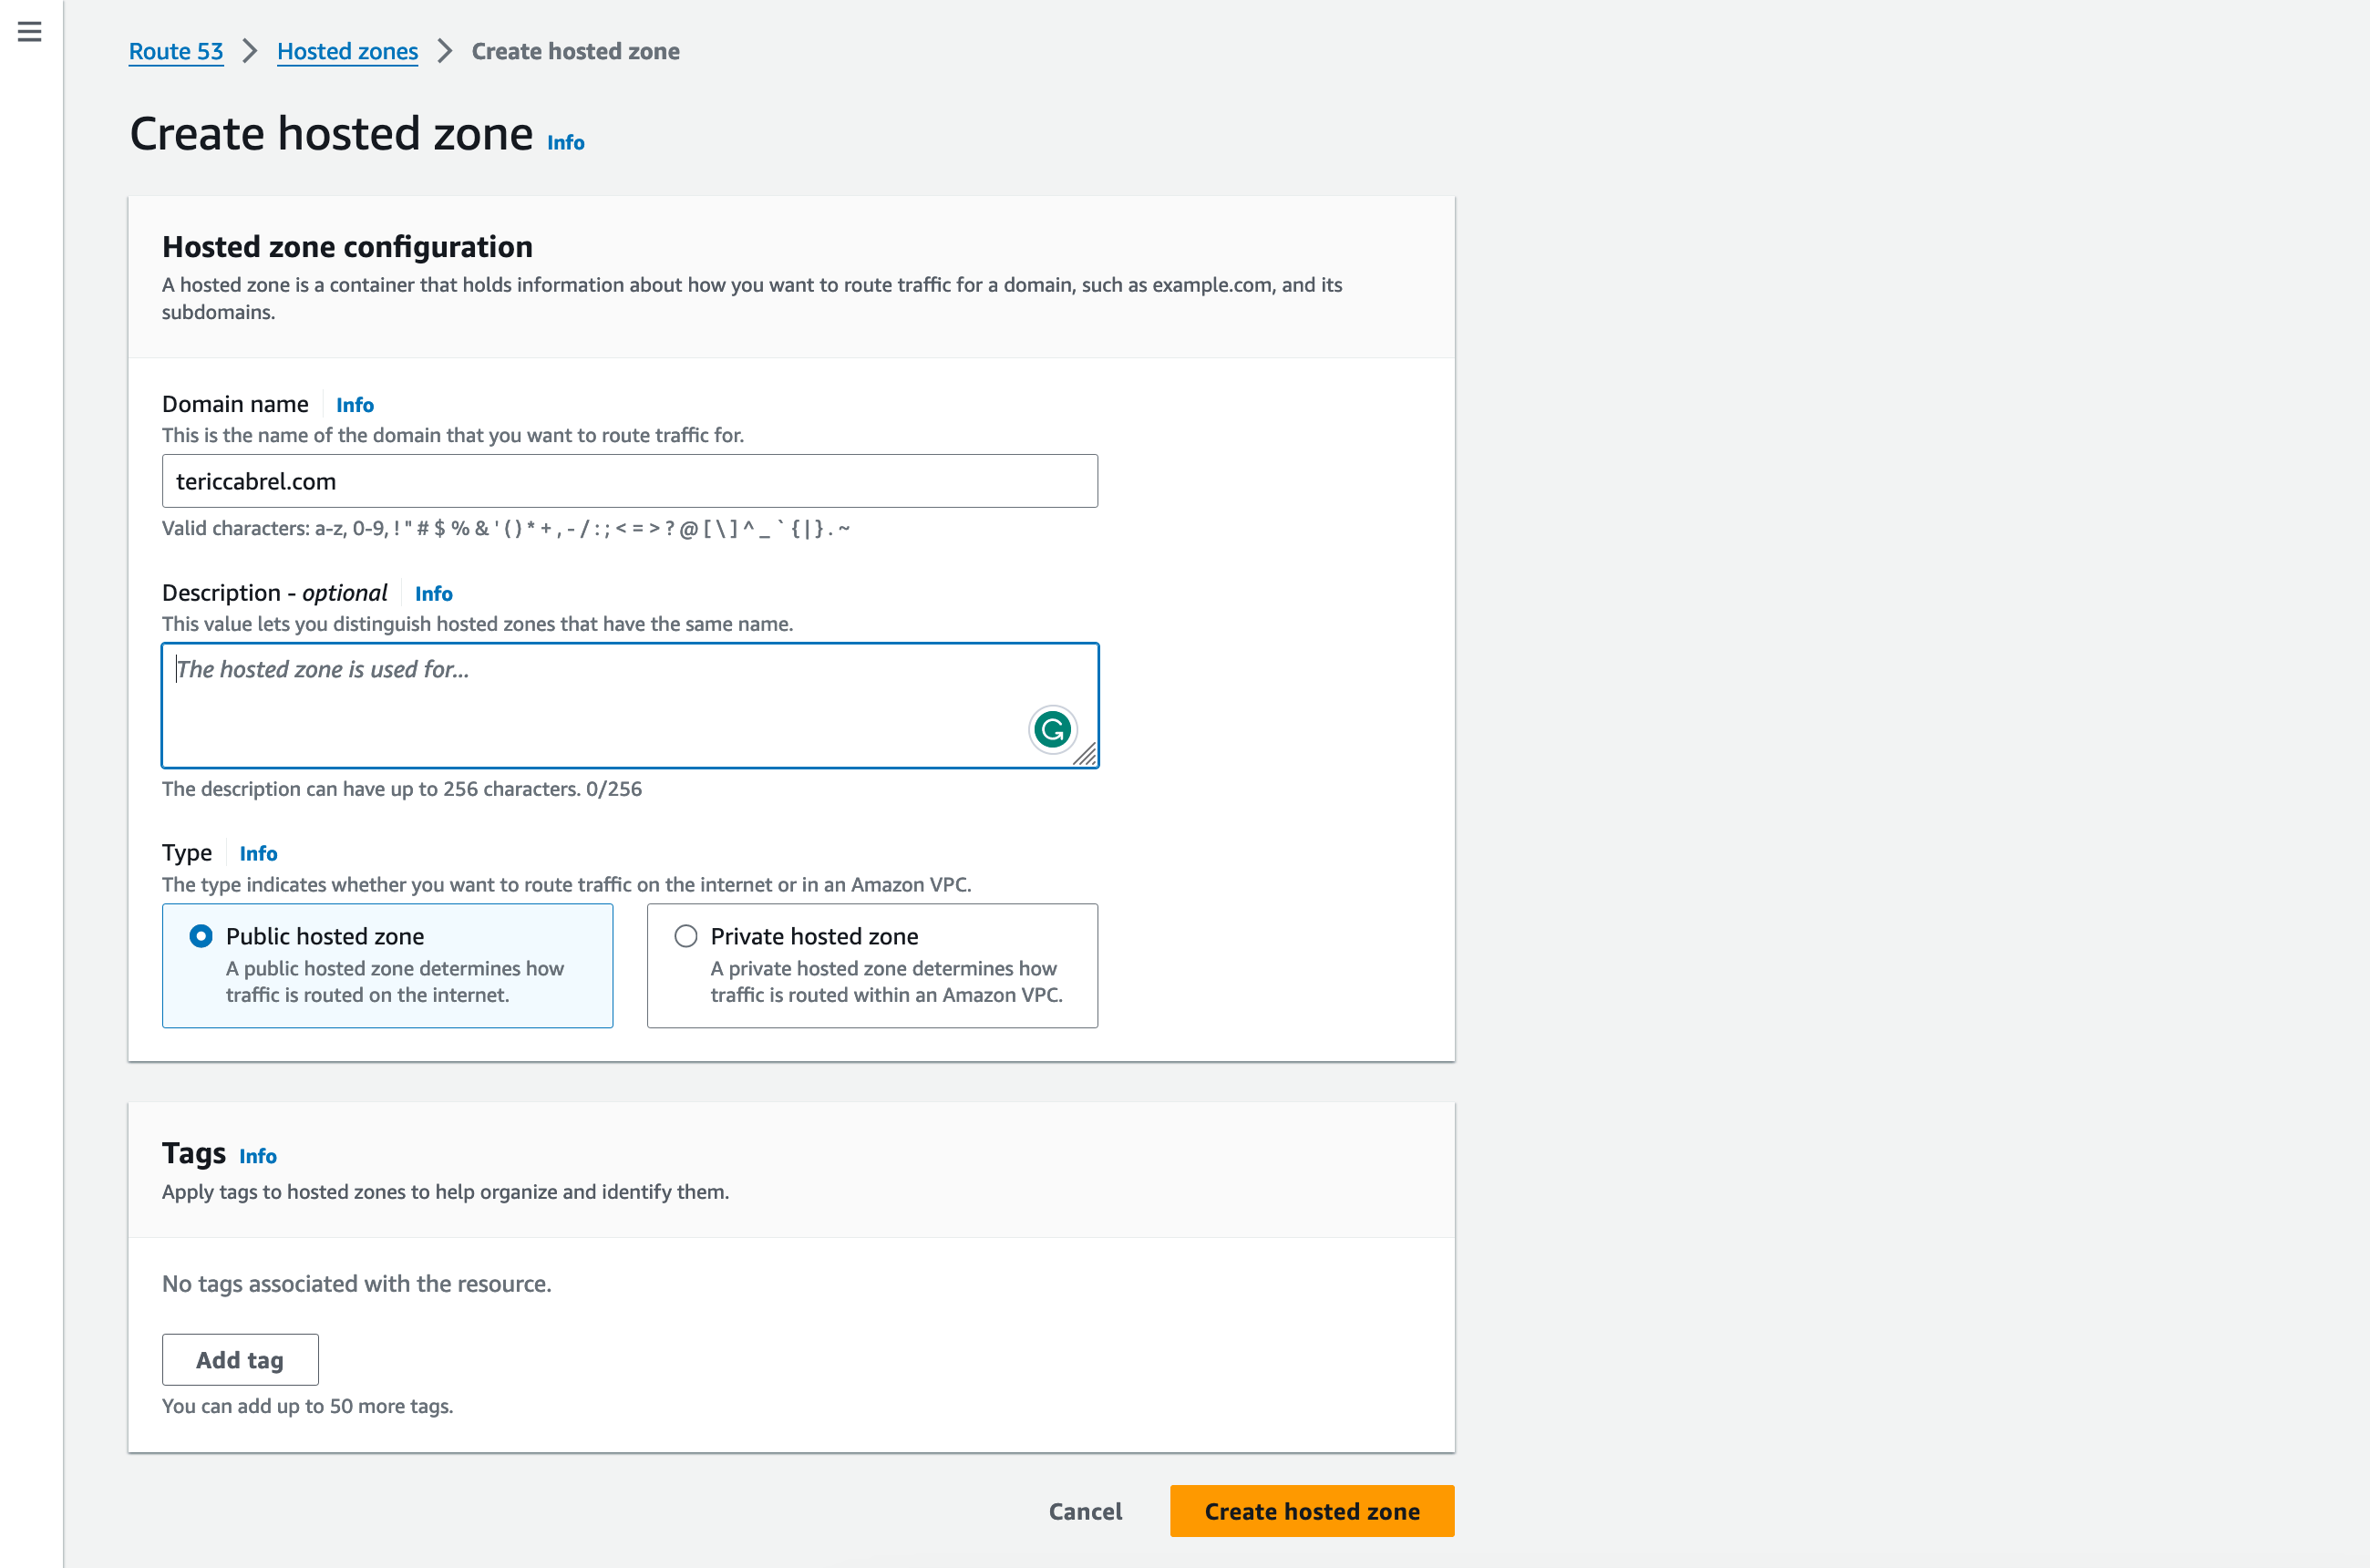
Click the submit button to create the hosted zone; you will be redirected to the hosted zone detail page you just created.
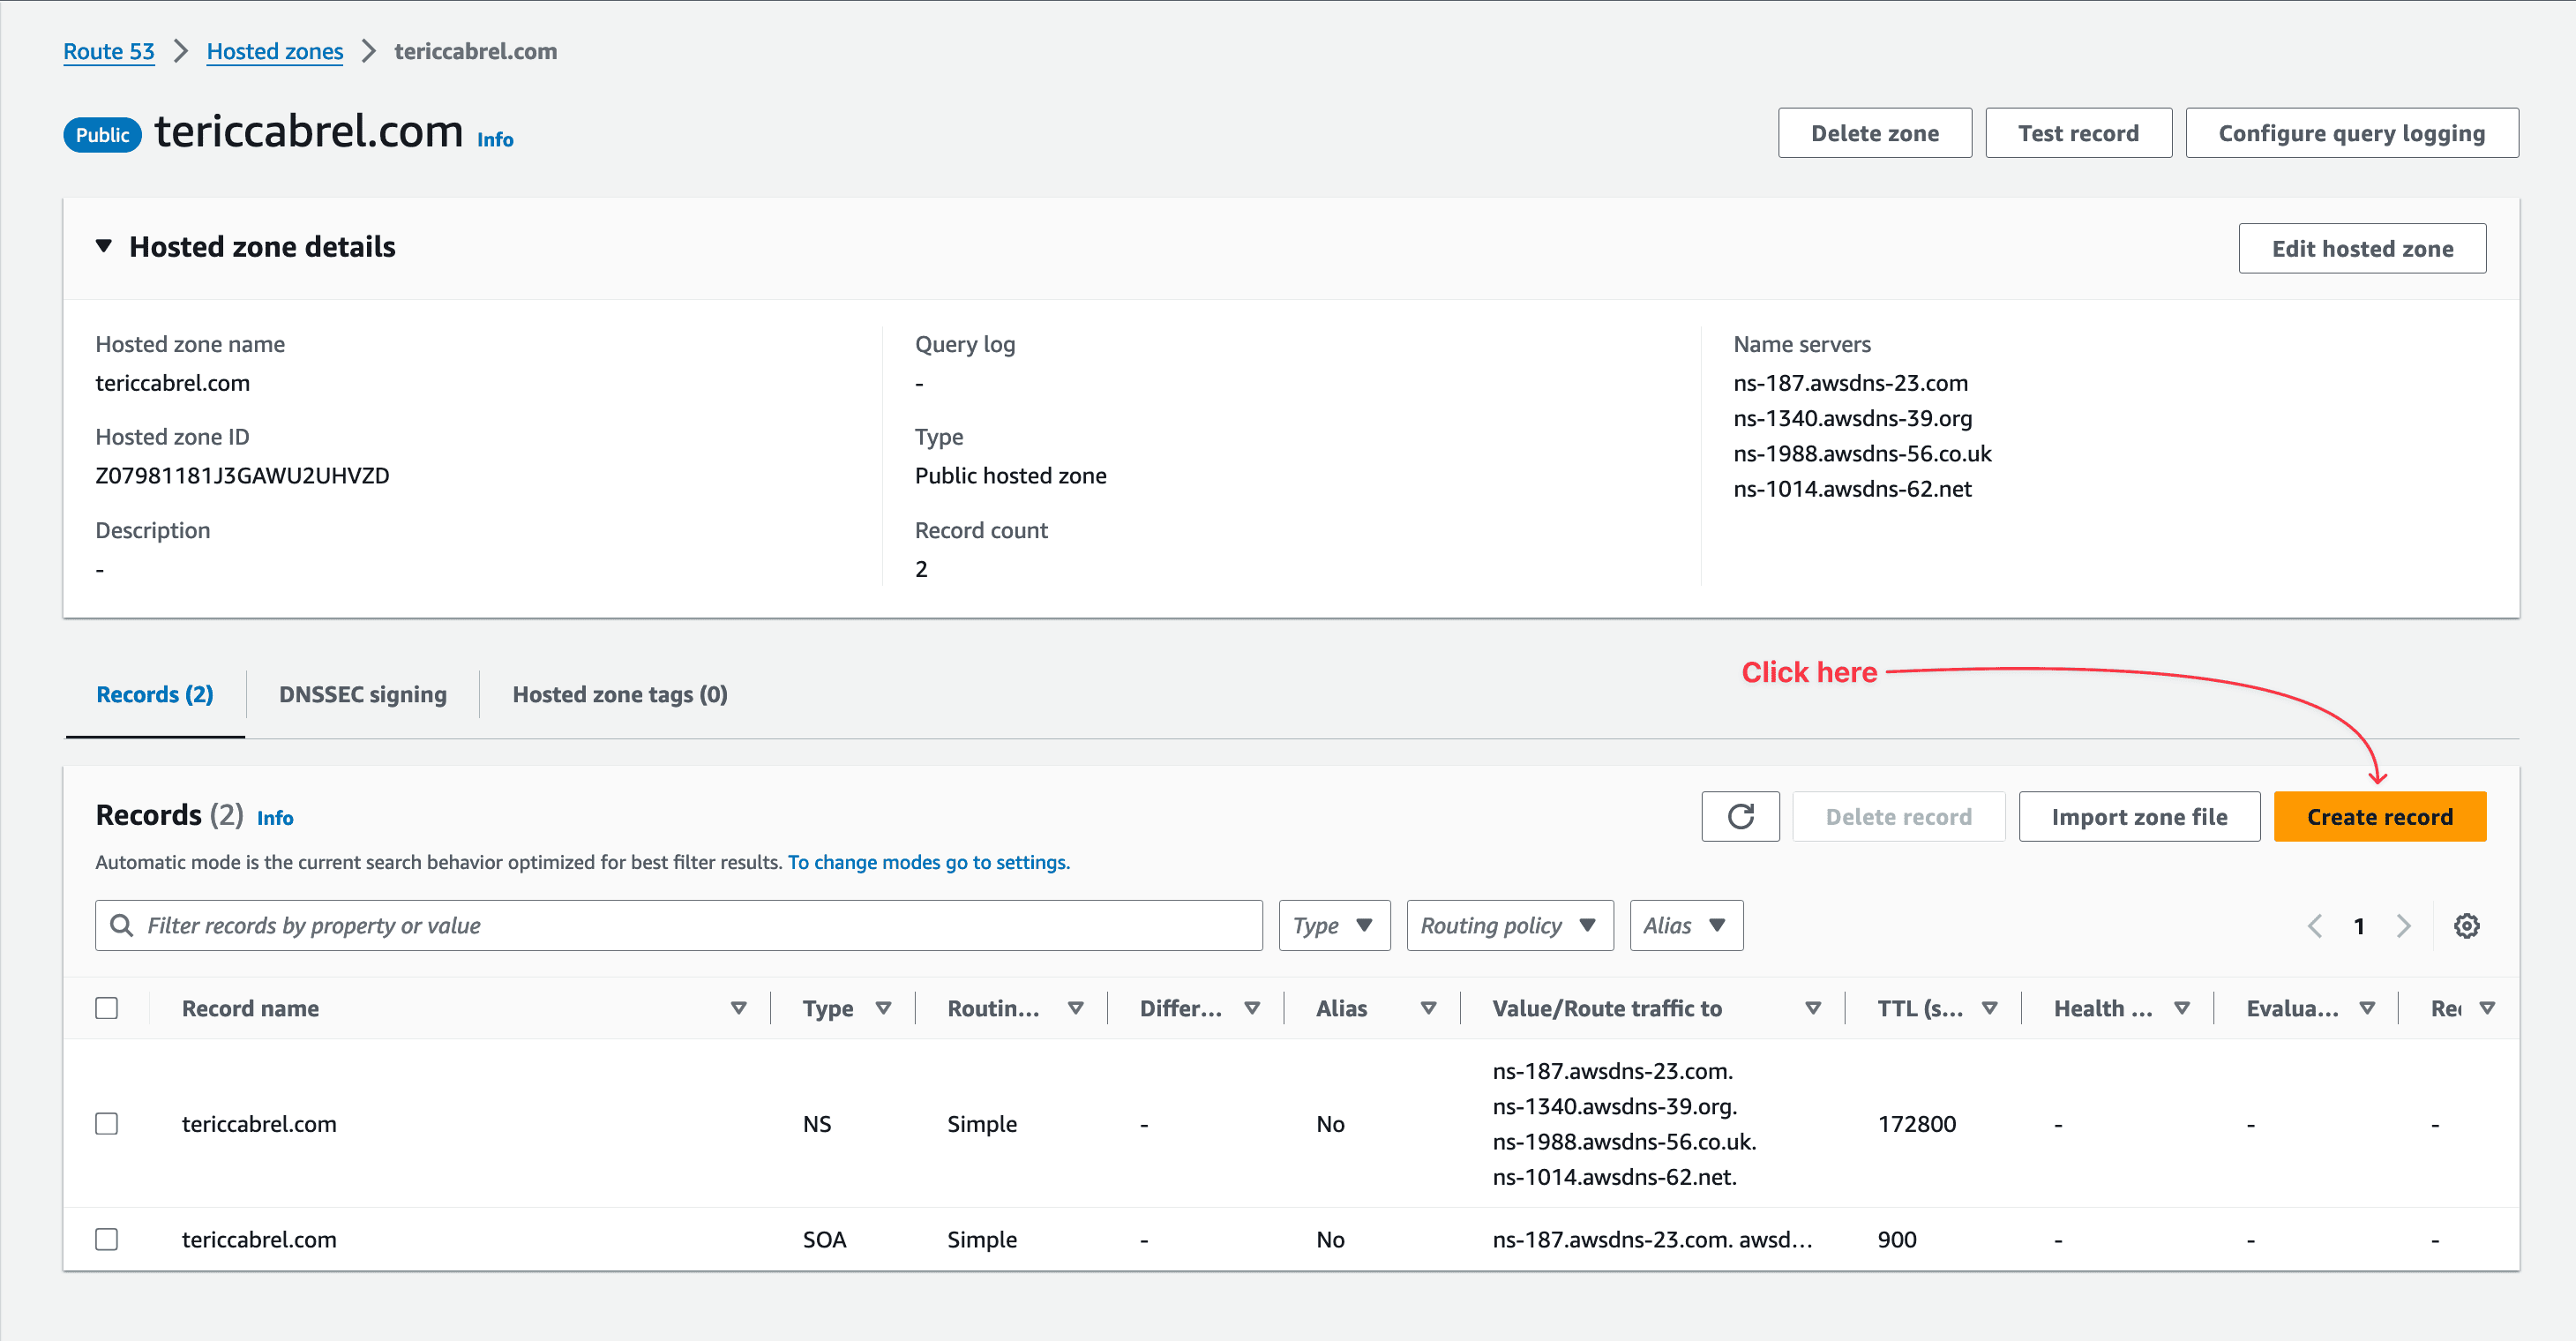
Create a DNS record in the hosted zone
To link the CloudFront distribution URL with the domain name, we must create a DNS record in the hosted zone to configure that.
At the top right in the record section, click on the button "Create record"
You will be redirected to a page showing a multistep form. The first step concerns the routing policy selection.
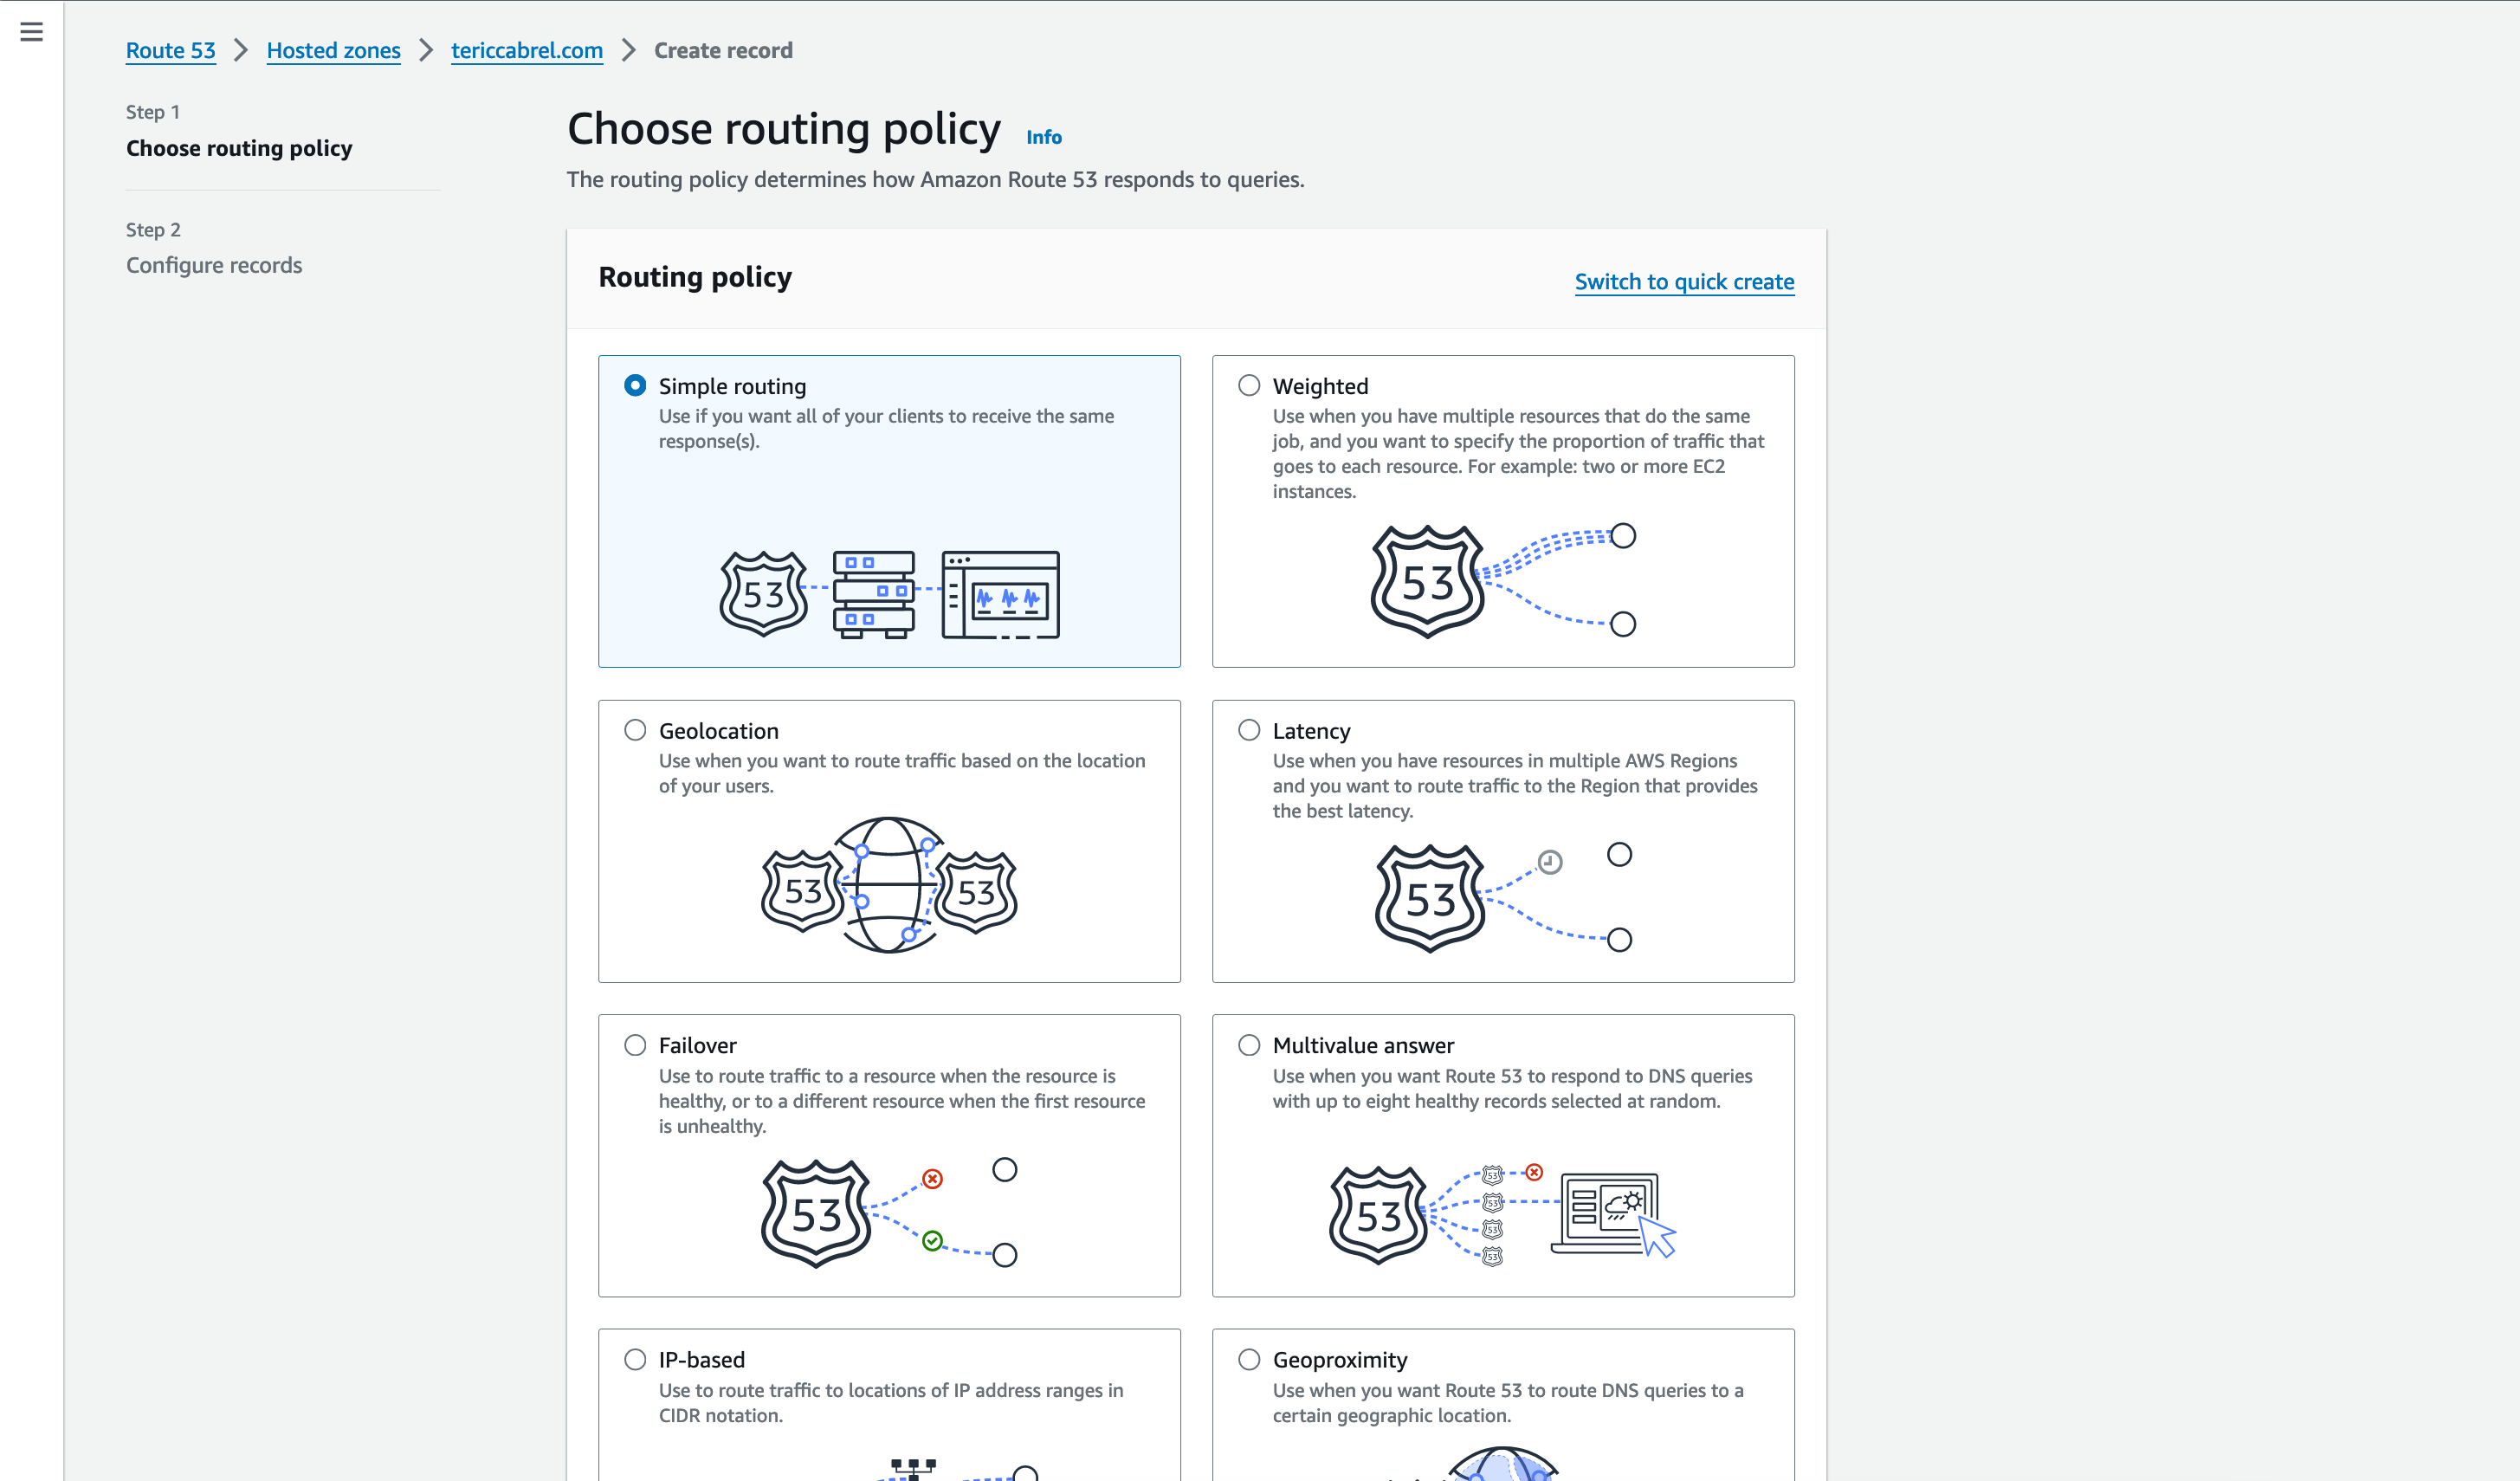
Choose the simple routing option and submit to go to the next step.
The second and last step is about creating the DNS records. We only need one record; click on the button to create it.
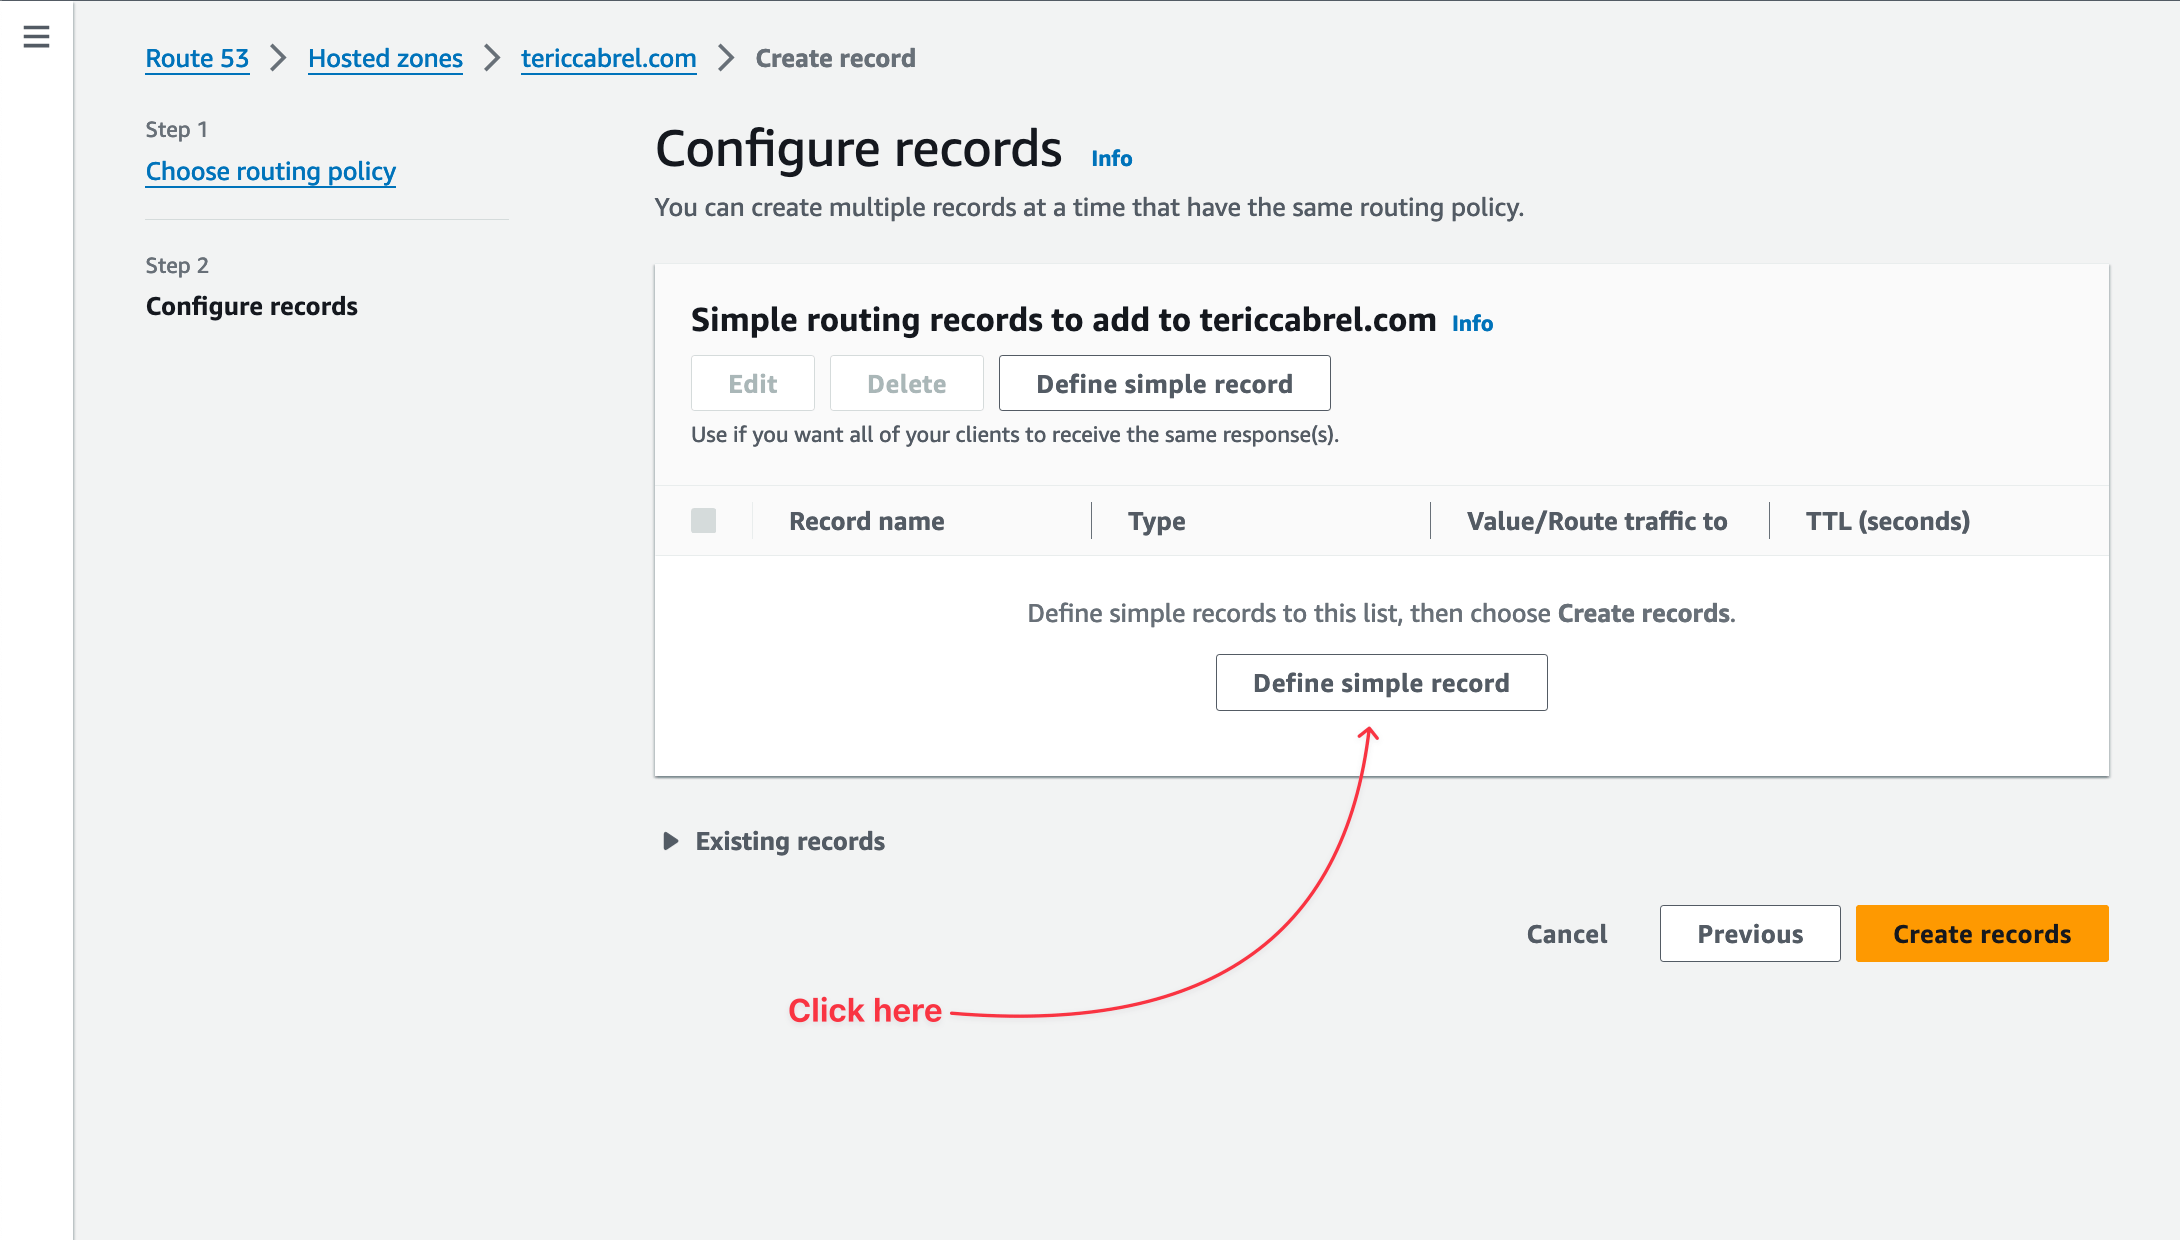
A modal form will appear to fill in the information about the DNS record.
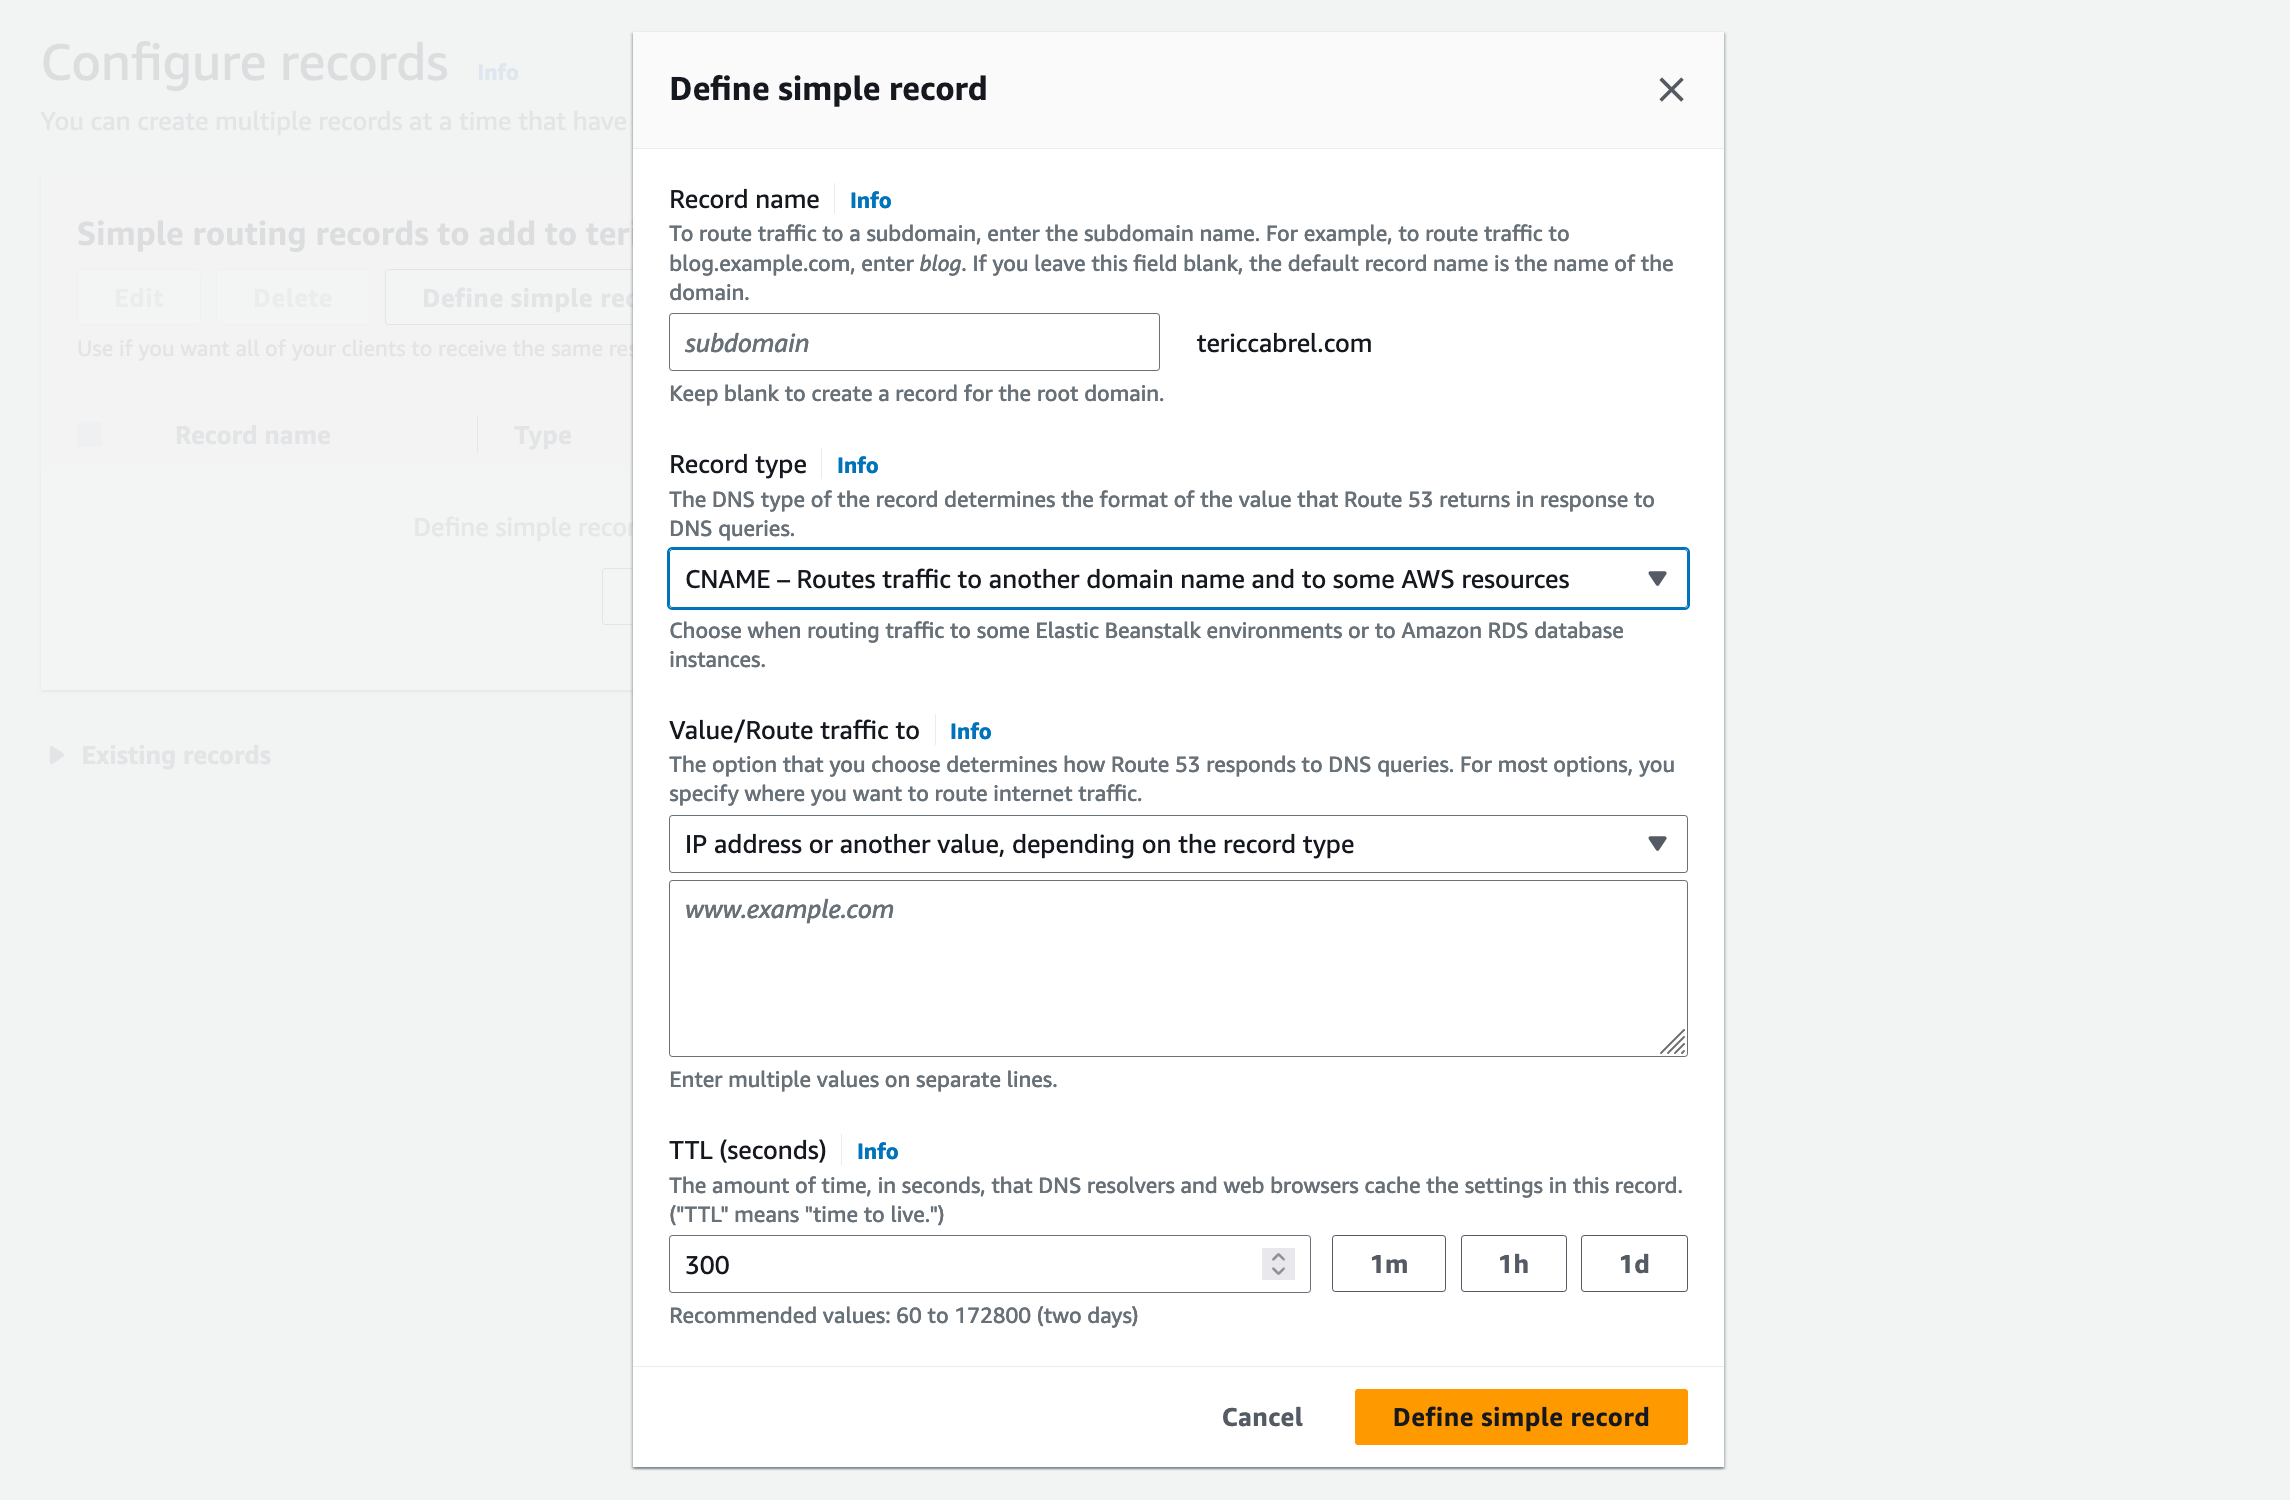
Let's go through each form input and provide a value:
- Record name: the subdomain to route the traffic; if you want to use the main domain, leave the input empty; otherwise, enter the value of the subdomain. In my case, I will enter "webapp".
- Record type: Select the CNAME option in the list to map the subdomain (webapp.tericcabrel.com) to another URL (CloudFront distribution URL).
- Value/Route traffic to
- Choose the option "IP address or another value, depending on the record type"
- In the text area input, type the CloudFront distribution URL.
- TTL (seconds): I usually set it to 60 seconds, but you can set a value you are okay with.
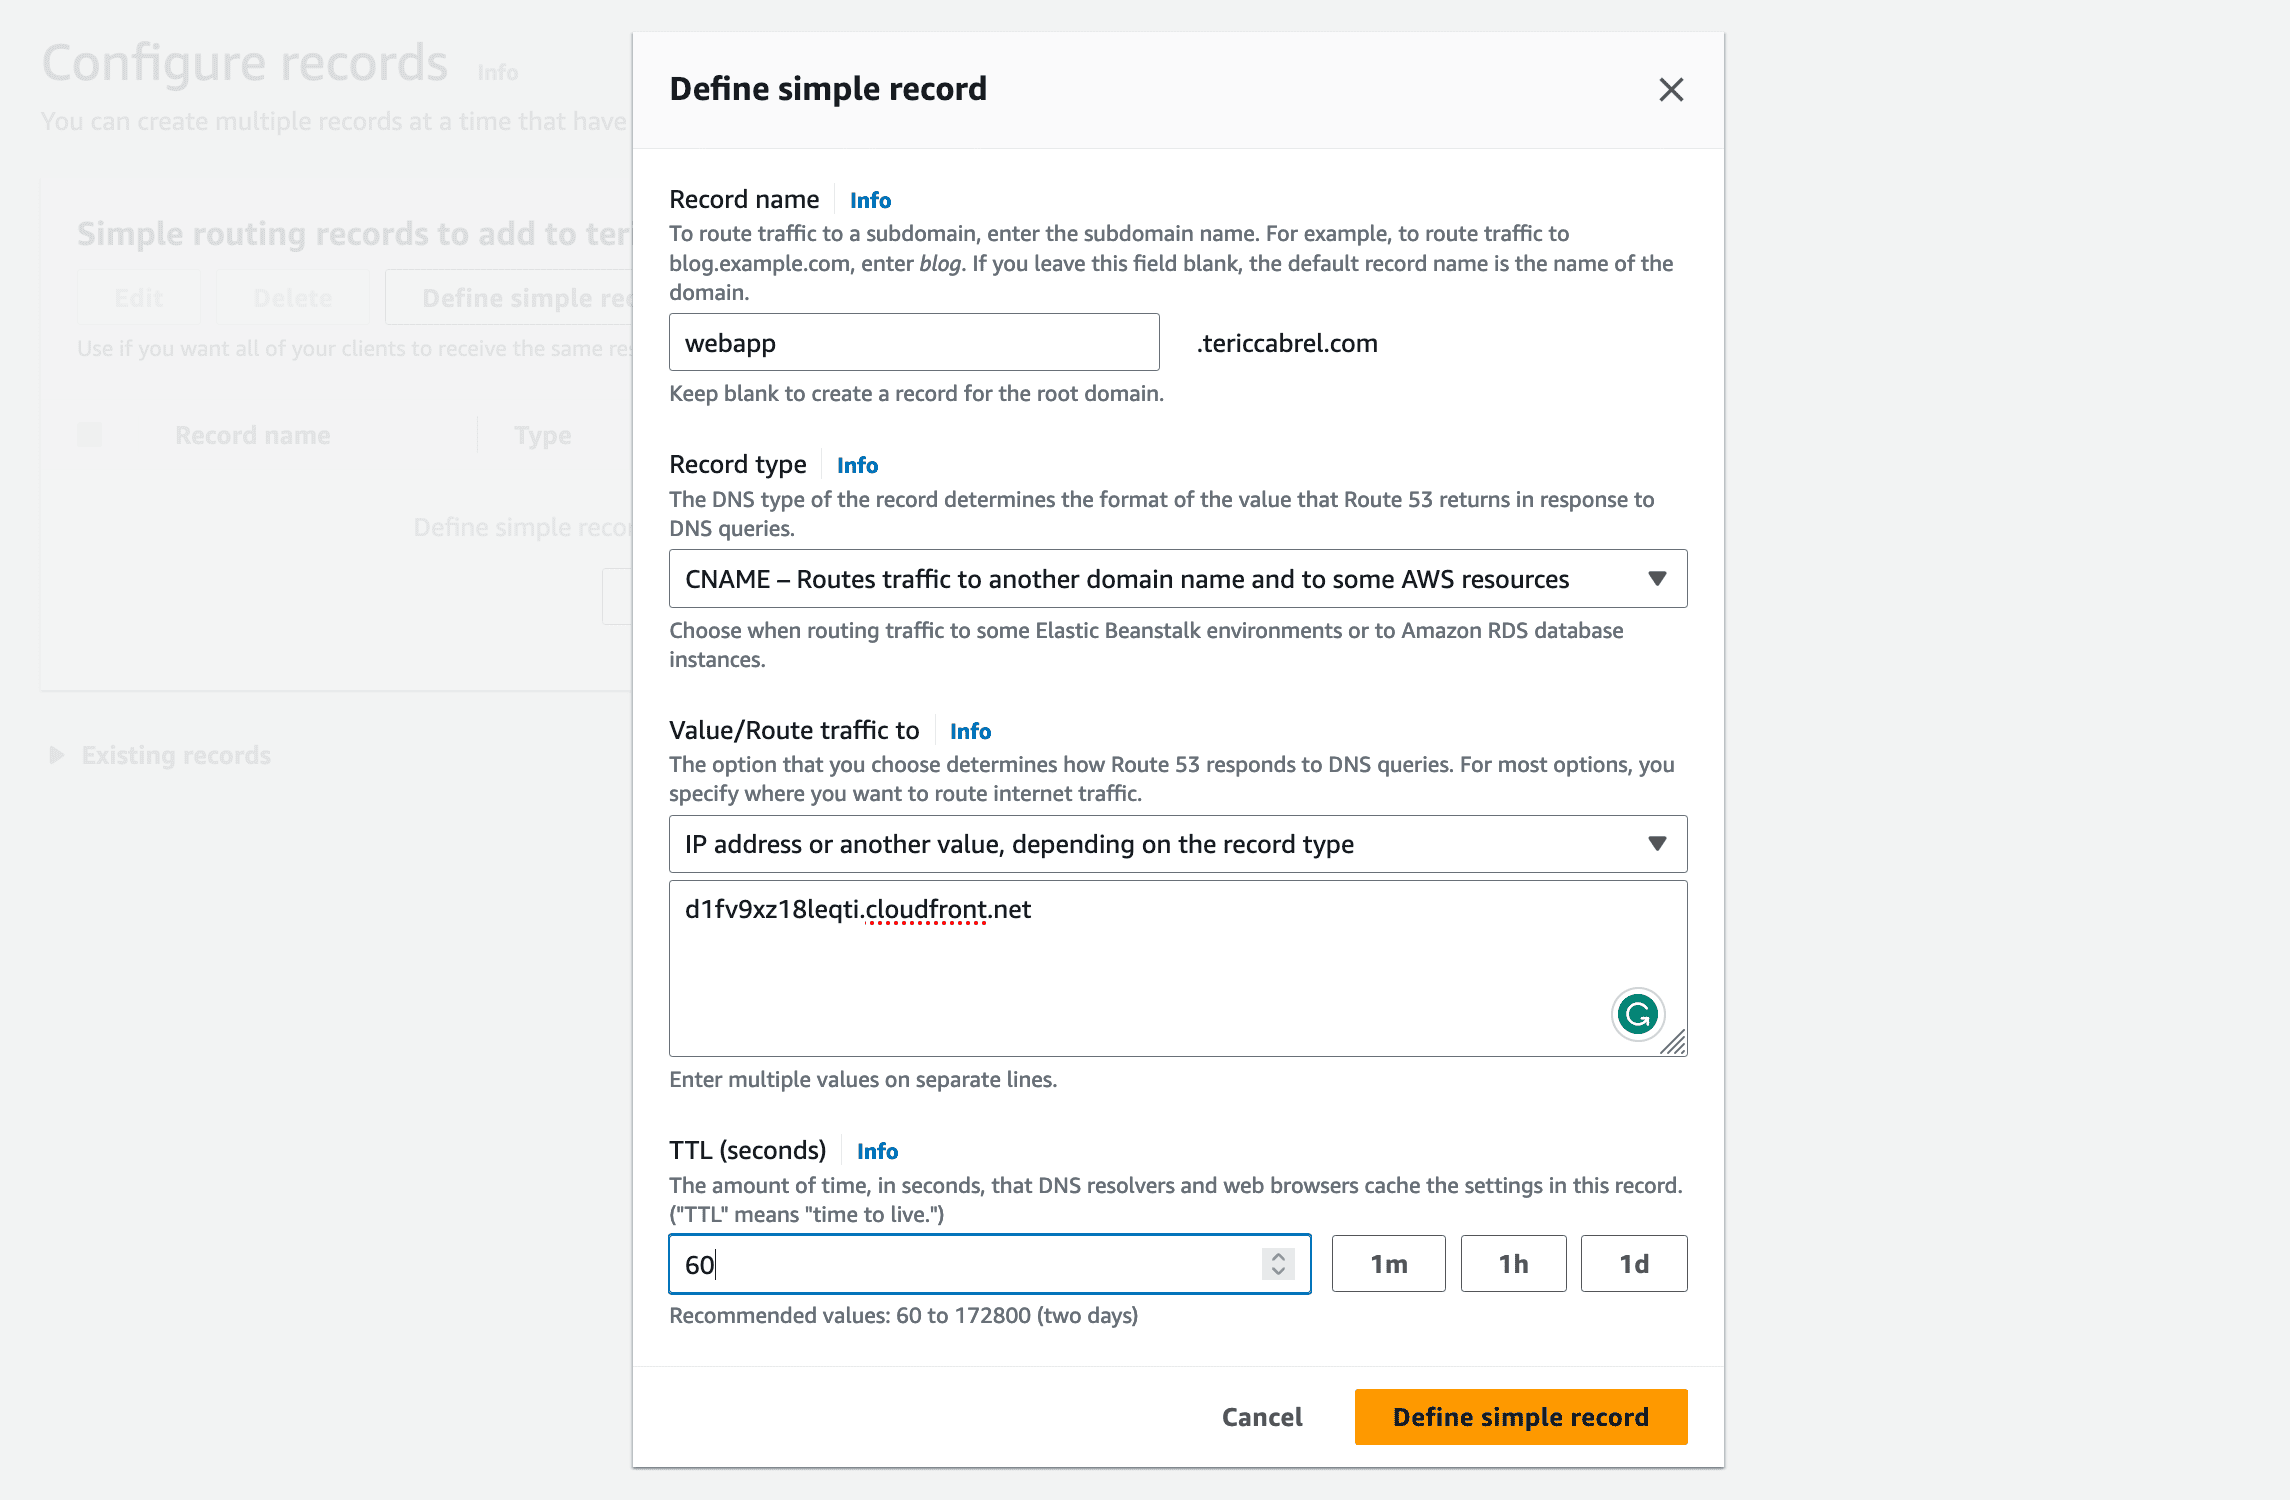
Click on the submit button to create the DNS record; the modal form will close, and you will see the record created in the DNS records table.
Since we don't have other DNS records to create, click on the button "Create records" to submit the creation.

You will redirected to the hosted zone detail page; in the records list, you can now see the DNS record we created.

The hosted zone configuration is done.
Generate the SSL certificate
To issue an SSL certificate to protect our subdomain, search for the service "Certificate Manager" and click on it; you will be redirected to the service home page; find and click on the button to request a certificate.
You will be redirected to a page to select the type of certificate you want to create. Choose the option "Request a public certificate"
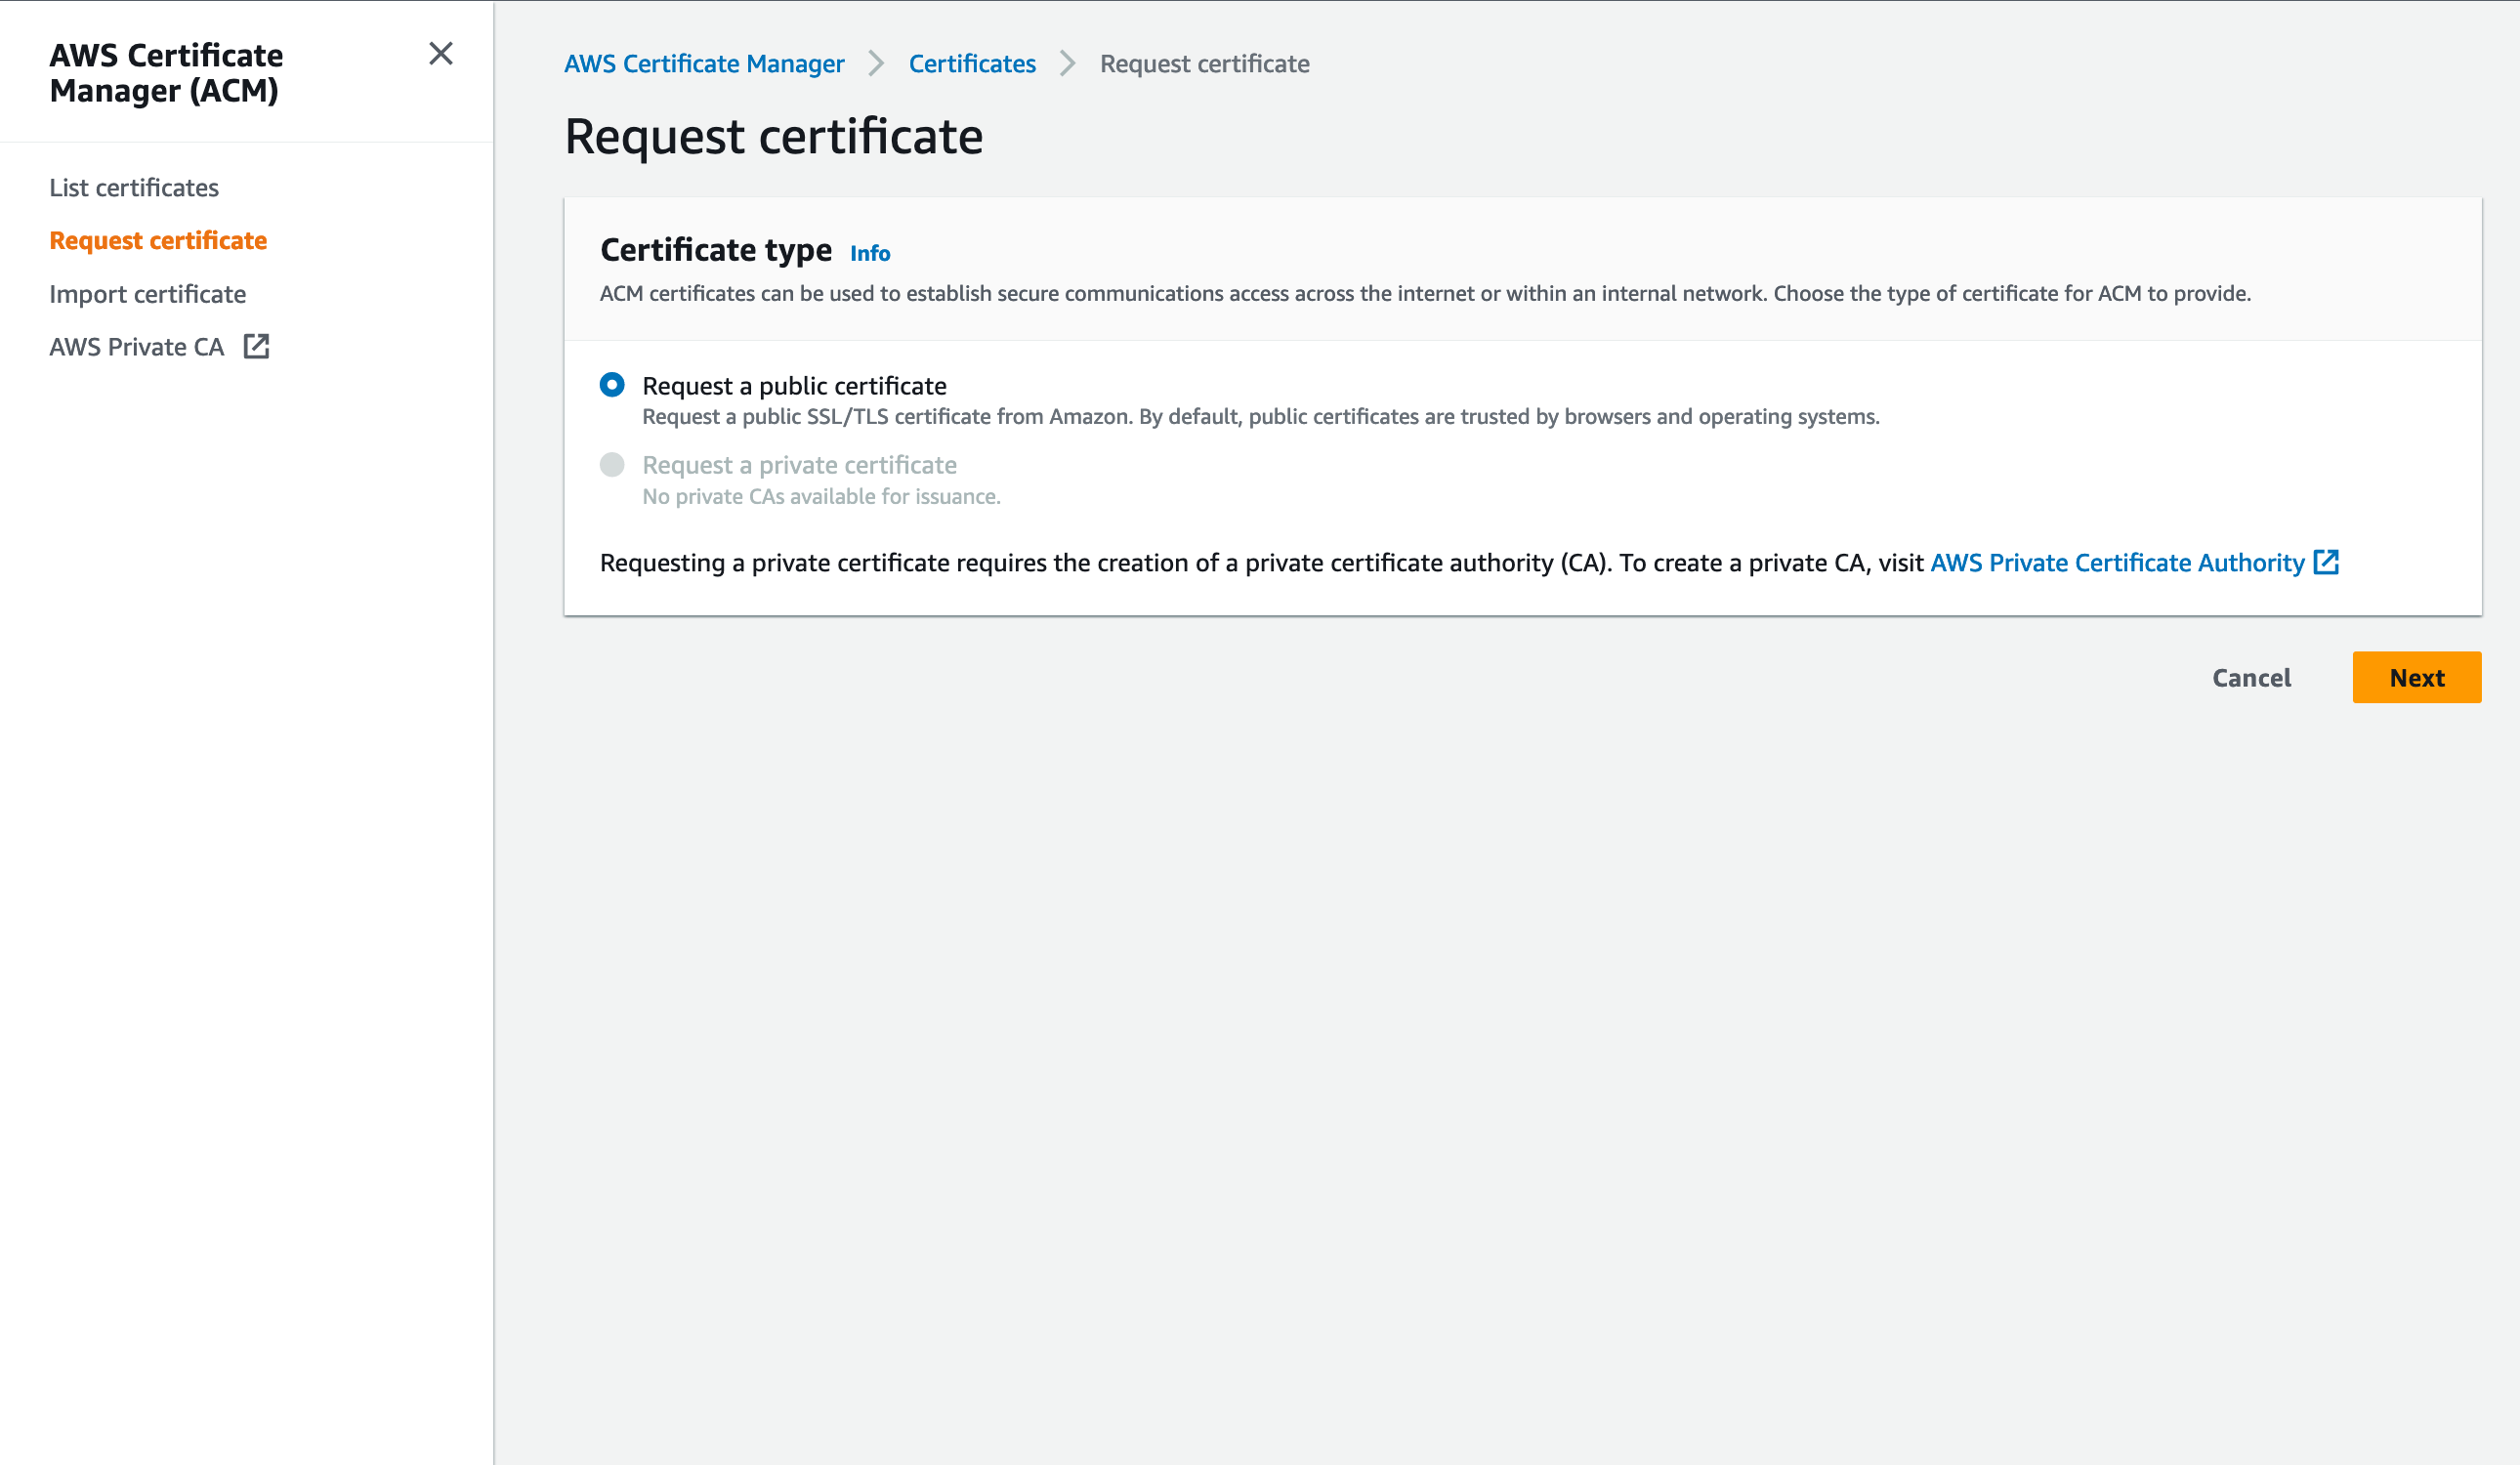
Click the "Next" button to be redirected to a page displaying the form to configure the Certificate.
There are three pieces of information are required:
- Fully qualified domain name: it is the subdomain name to put in front of the CloudFront distribution URL. In my case, it is webapp.tericcabrel.com.
- Validation method: It is helpful to ensure you own the subdomain for which you want to generate the SSL certificate. Choose the DNS validation option, which we will perform further in this post, but you can also choose the email validation option, as it is more straightforward.
- Key algorithm: choose the option "RSA 2048"
You can define some tags if you want.

Click the "Request" button to create the certificate; you will be redirected to the certificate detail page.
We can see that the certification generation and subdomain statuses are "pending validation" because we must perform the DNS validation for the subdomain.

To perform the DNS validation, we will use the "CNAME name" and "CNAME value" values in the table of the domain section.
Copy the CNAME name and the CNAME value, then keep the value somewhere.
Go to your domain registar account (OVH in my case), find your domain name (tericcabrel.com in my case), go to the DNS Zone section, and click the button to create a DNS record.
You must provide three pieces of information to configure the DNS record:
- The record type: choose the CNAME option.
- The subdomain: provide the value of the "CNAME name" which, in my case, is
_c2e86b17843c1301220cc0aca911b3d2.webapp.tericcabrel.com.. For some domain registars, you must remove the domain's name in the value because they append it automatically at the creation, so the value will be_c2e86b17843c1301220cc0aca911b3d2.webappinstead. - The target: provide the value of the "CNAME value"
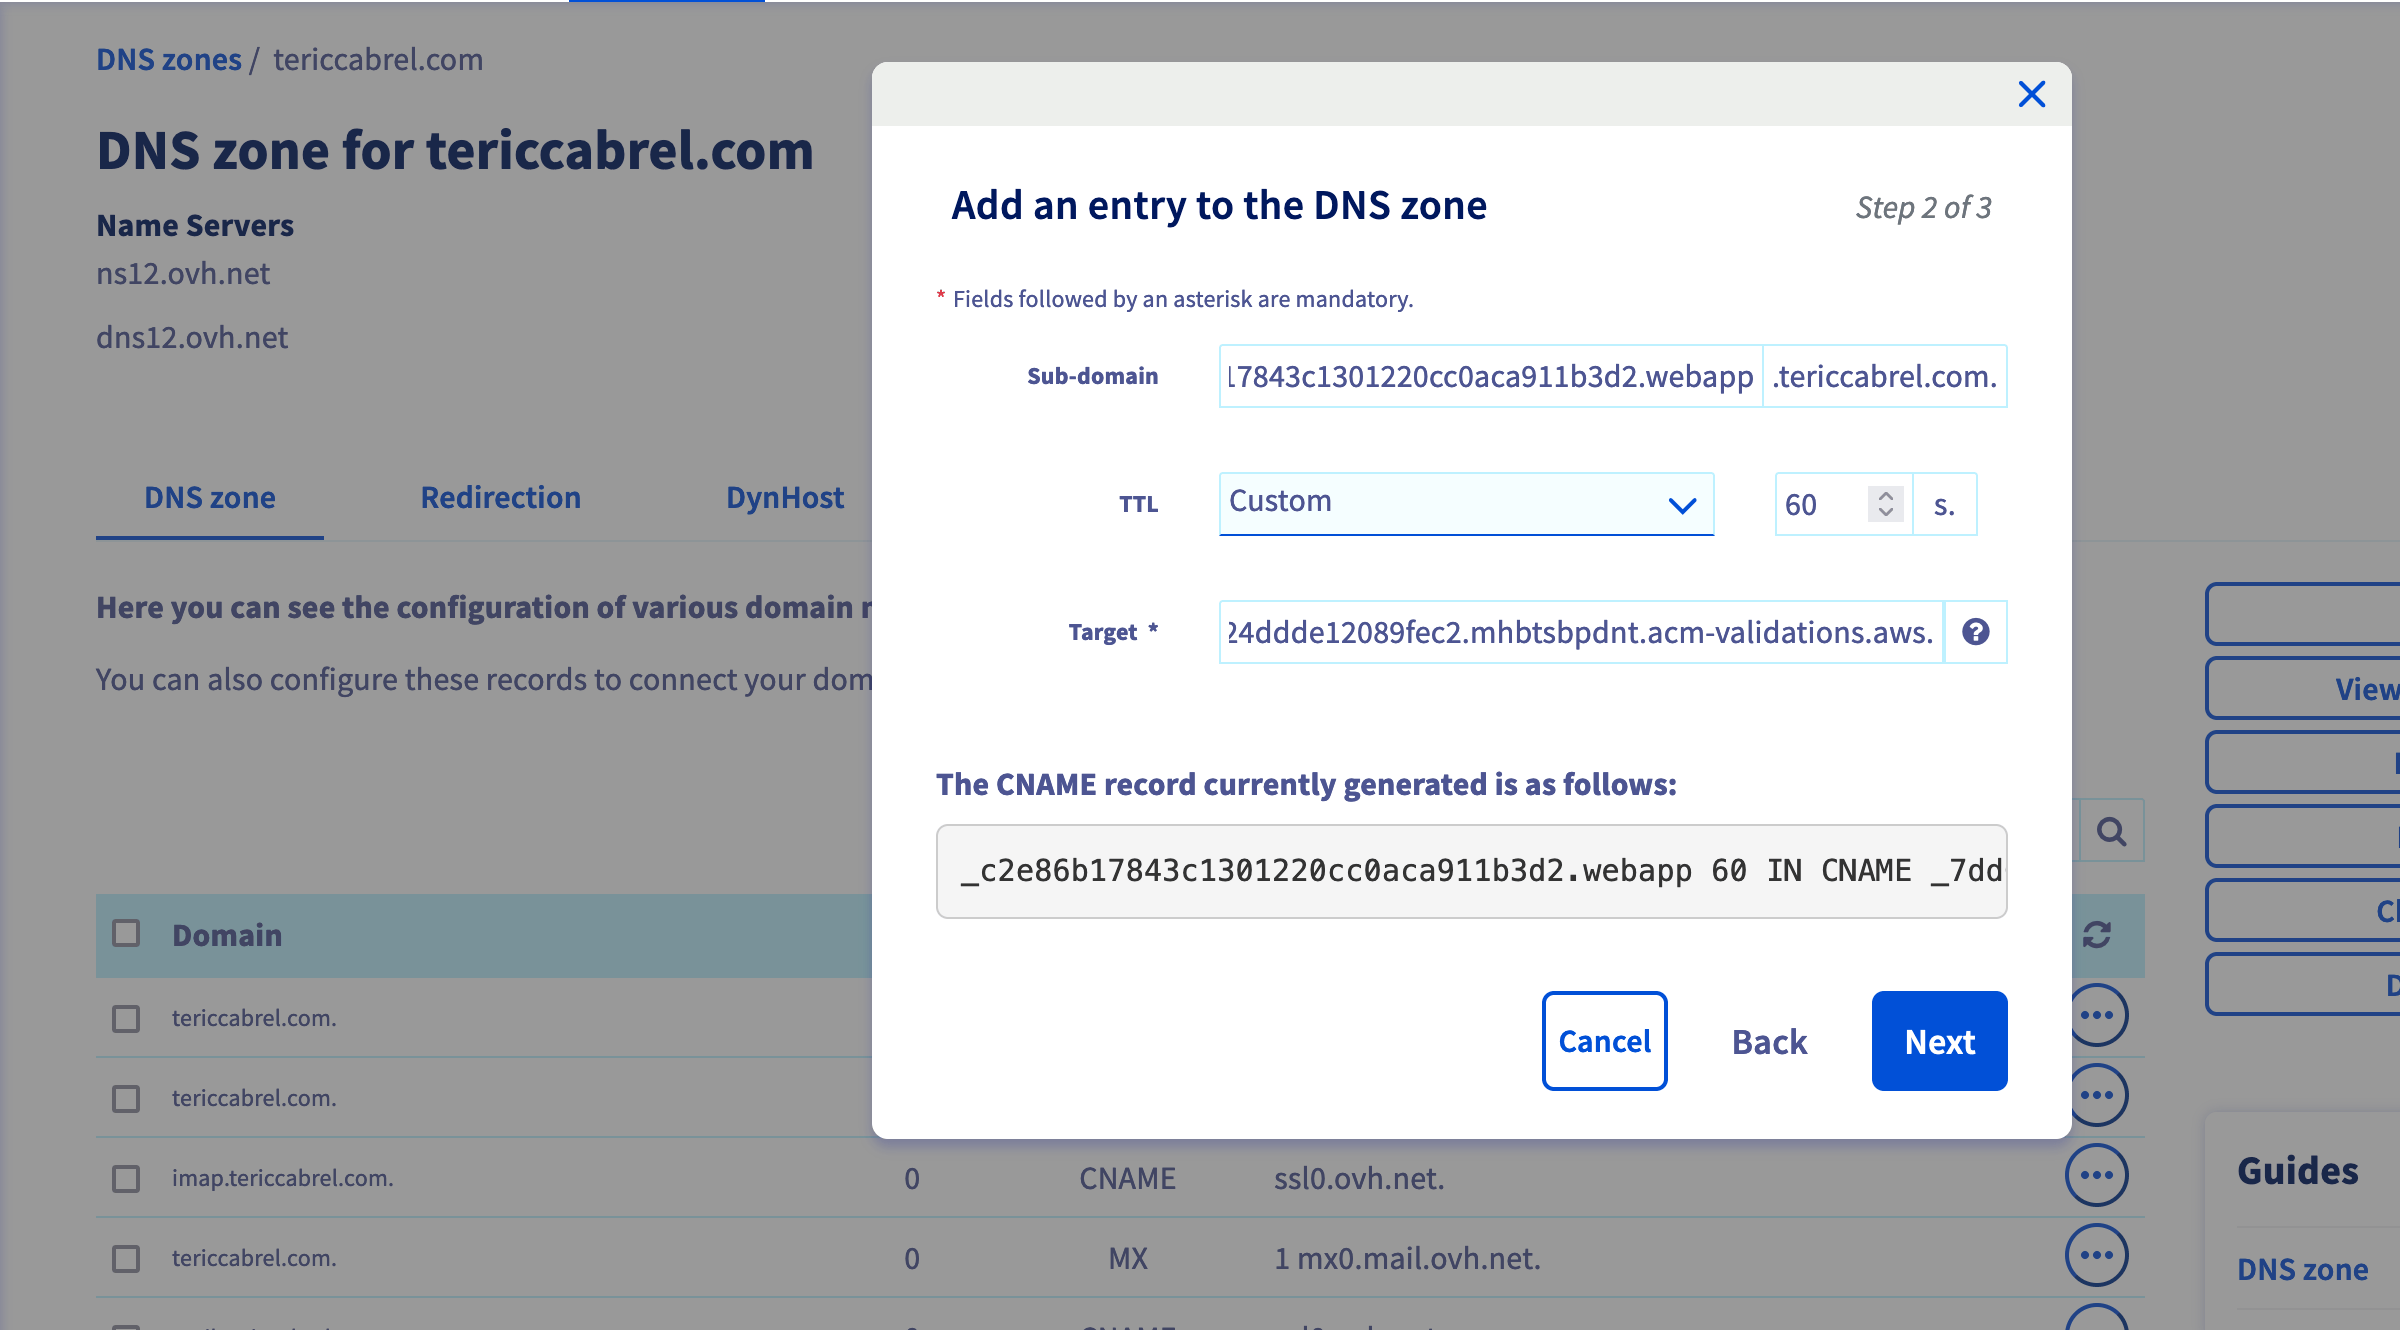
Click on the submit button to create the DNS record. Return to AWS Certificate Manager, browse the certificate detail page, and wait a few seconds for the status to change after the successful DNS validation verification.
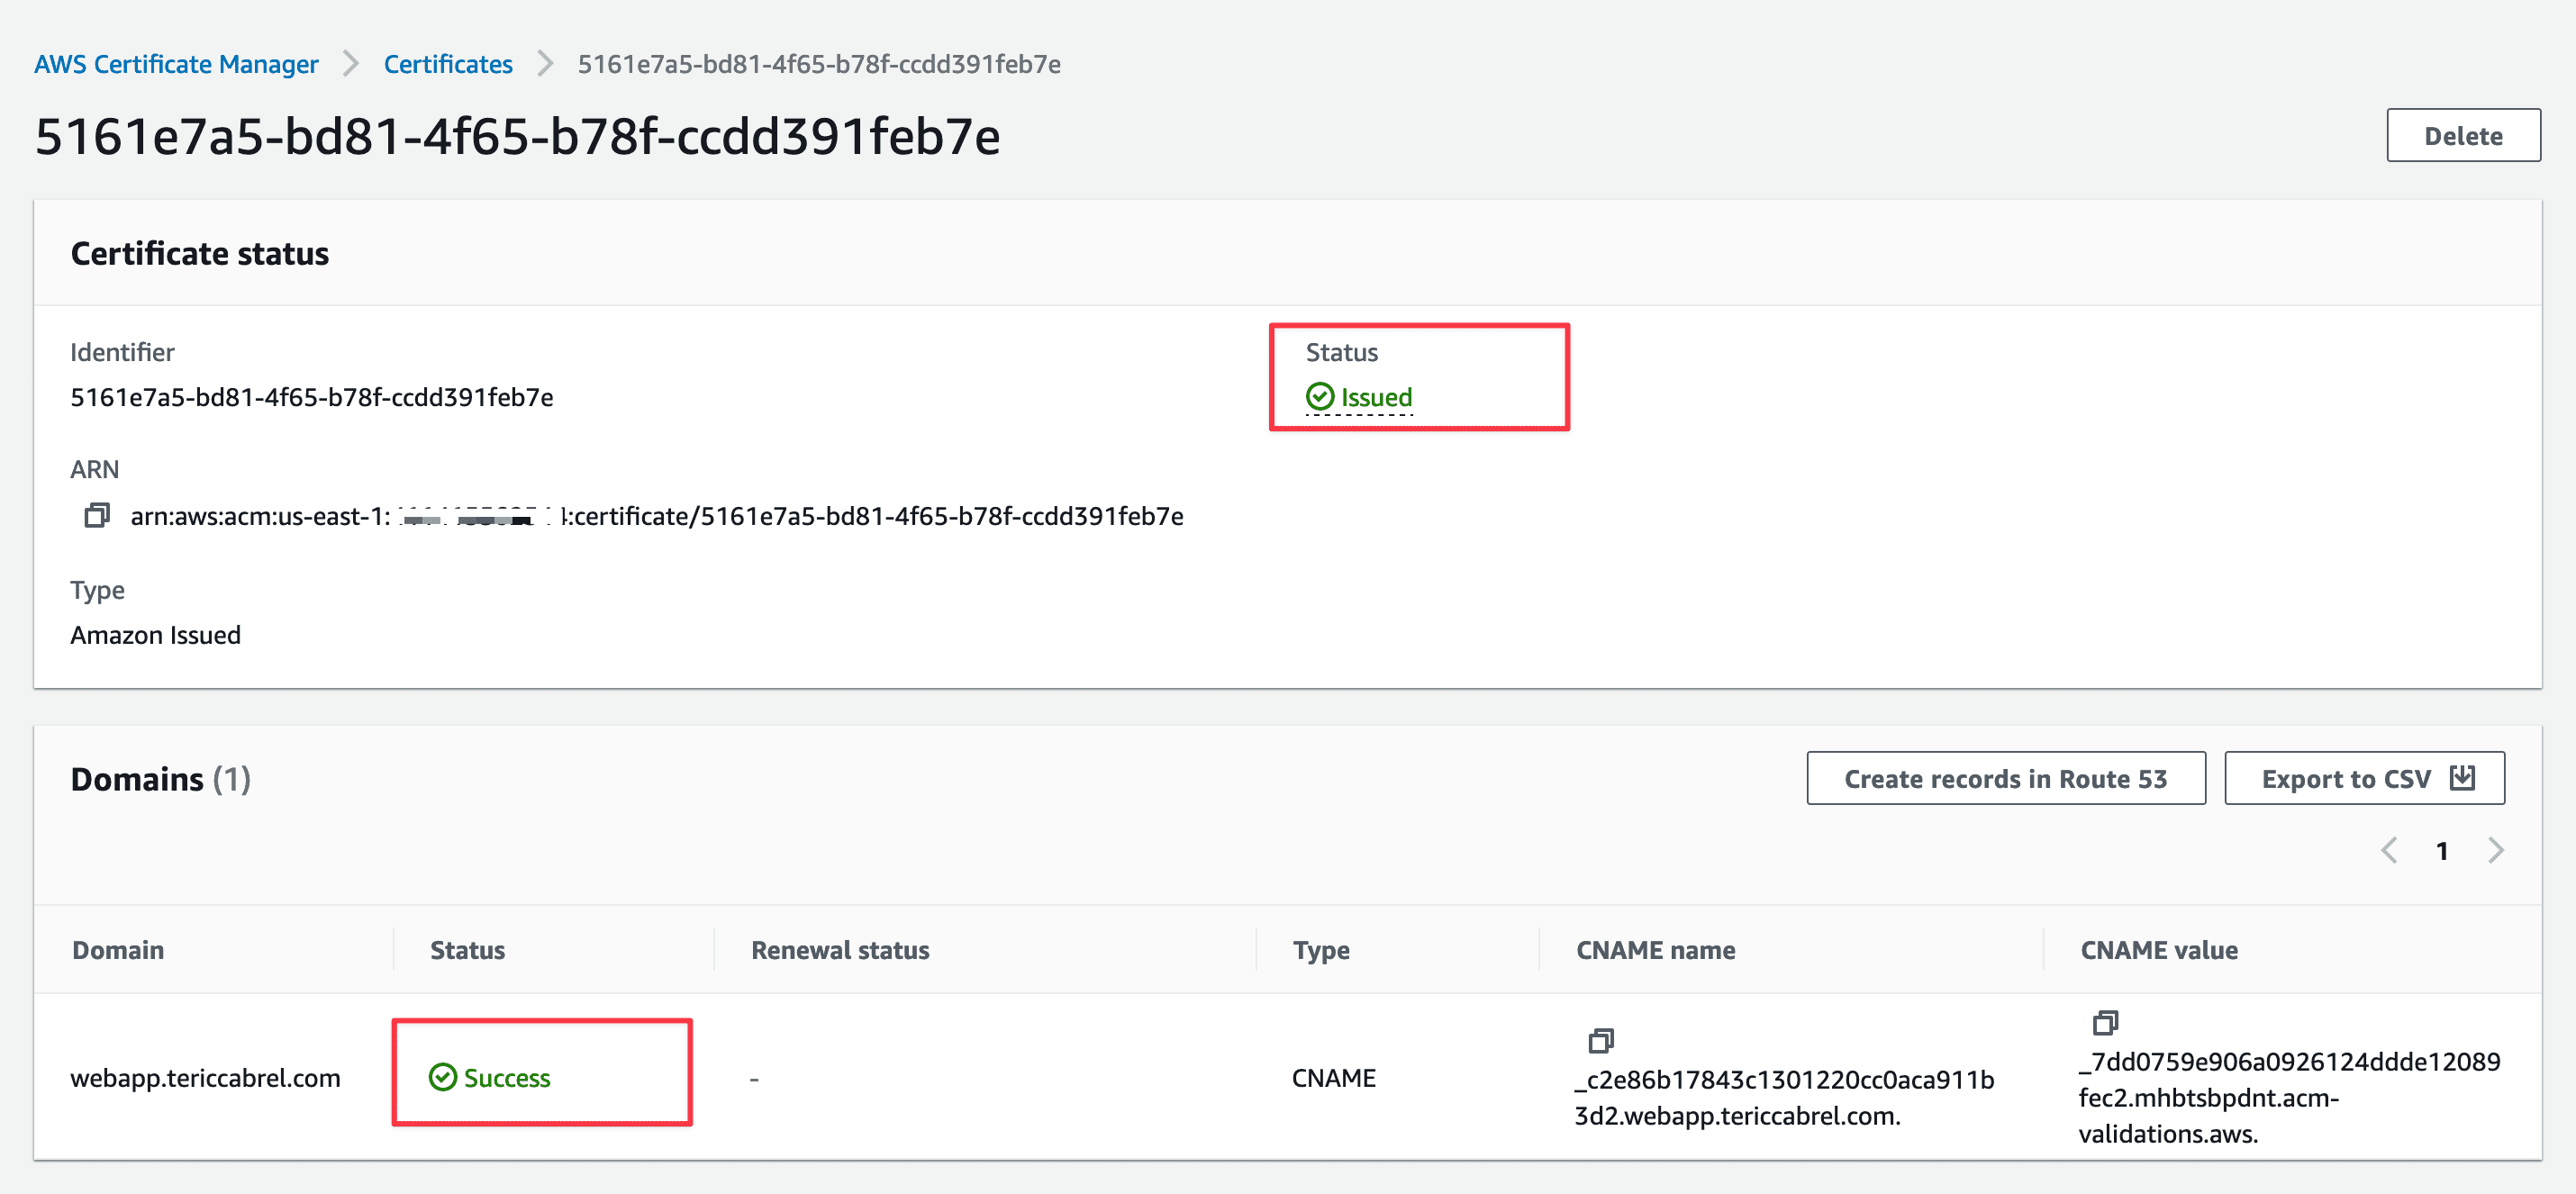
The SSL certificate is generated and ready to use.
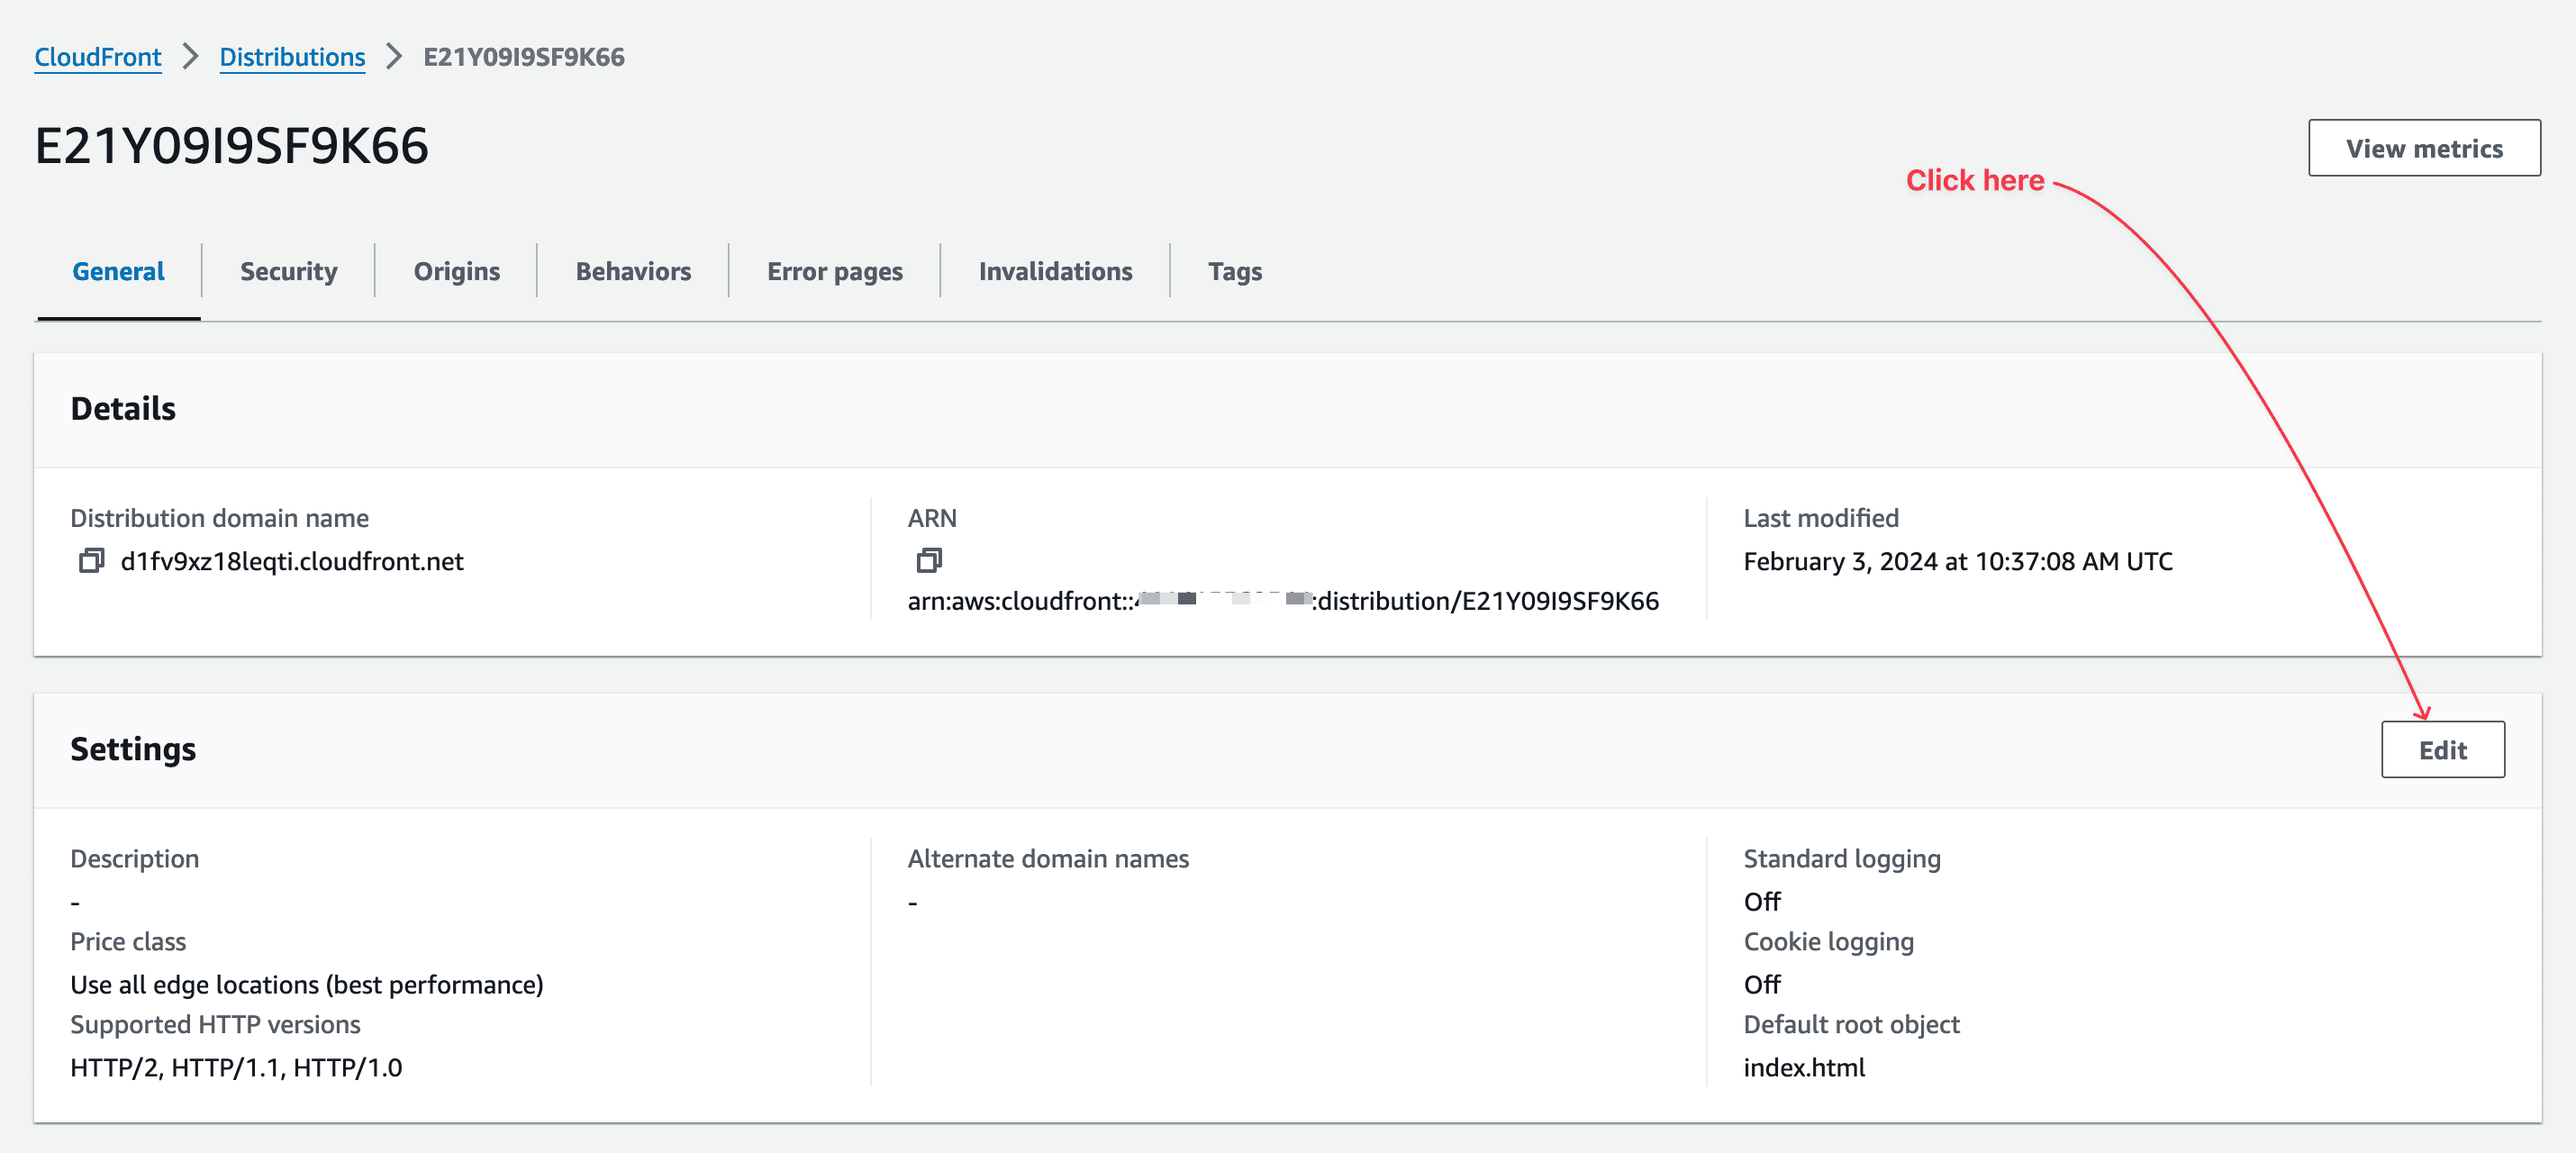
Attach the domain name to the CloudFront distribution
Go to the CloudFront distribution; click the "Edit" button in the Settings section.
We will update two fields on the page displayed: the alternate domain name and the Custom SSL certificate.
- For the alternate domain name (CNAME), click on the "Add item" button and set the value to the subdomain URL (webapp.tericabrel.com, in my case).
- For the custom SSL certificate, click on the select menu, find the option related to the SSL certificate we generated earlier (named with the subdomain URL), and click on it to select.

Click the "Save changes" button to be redirected to the CloudFront distribution detail page.
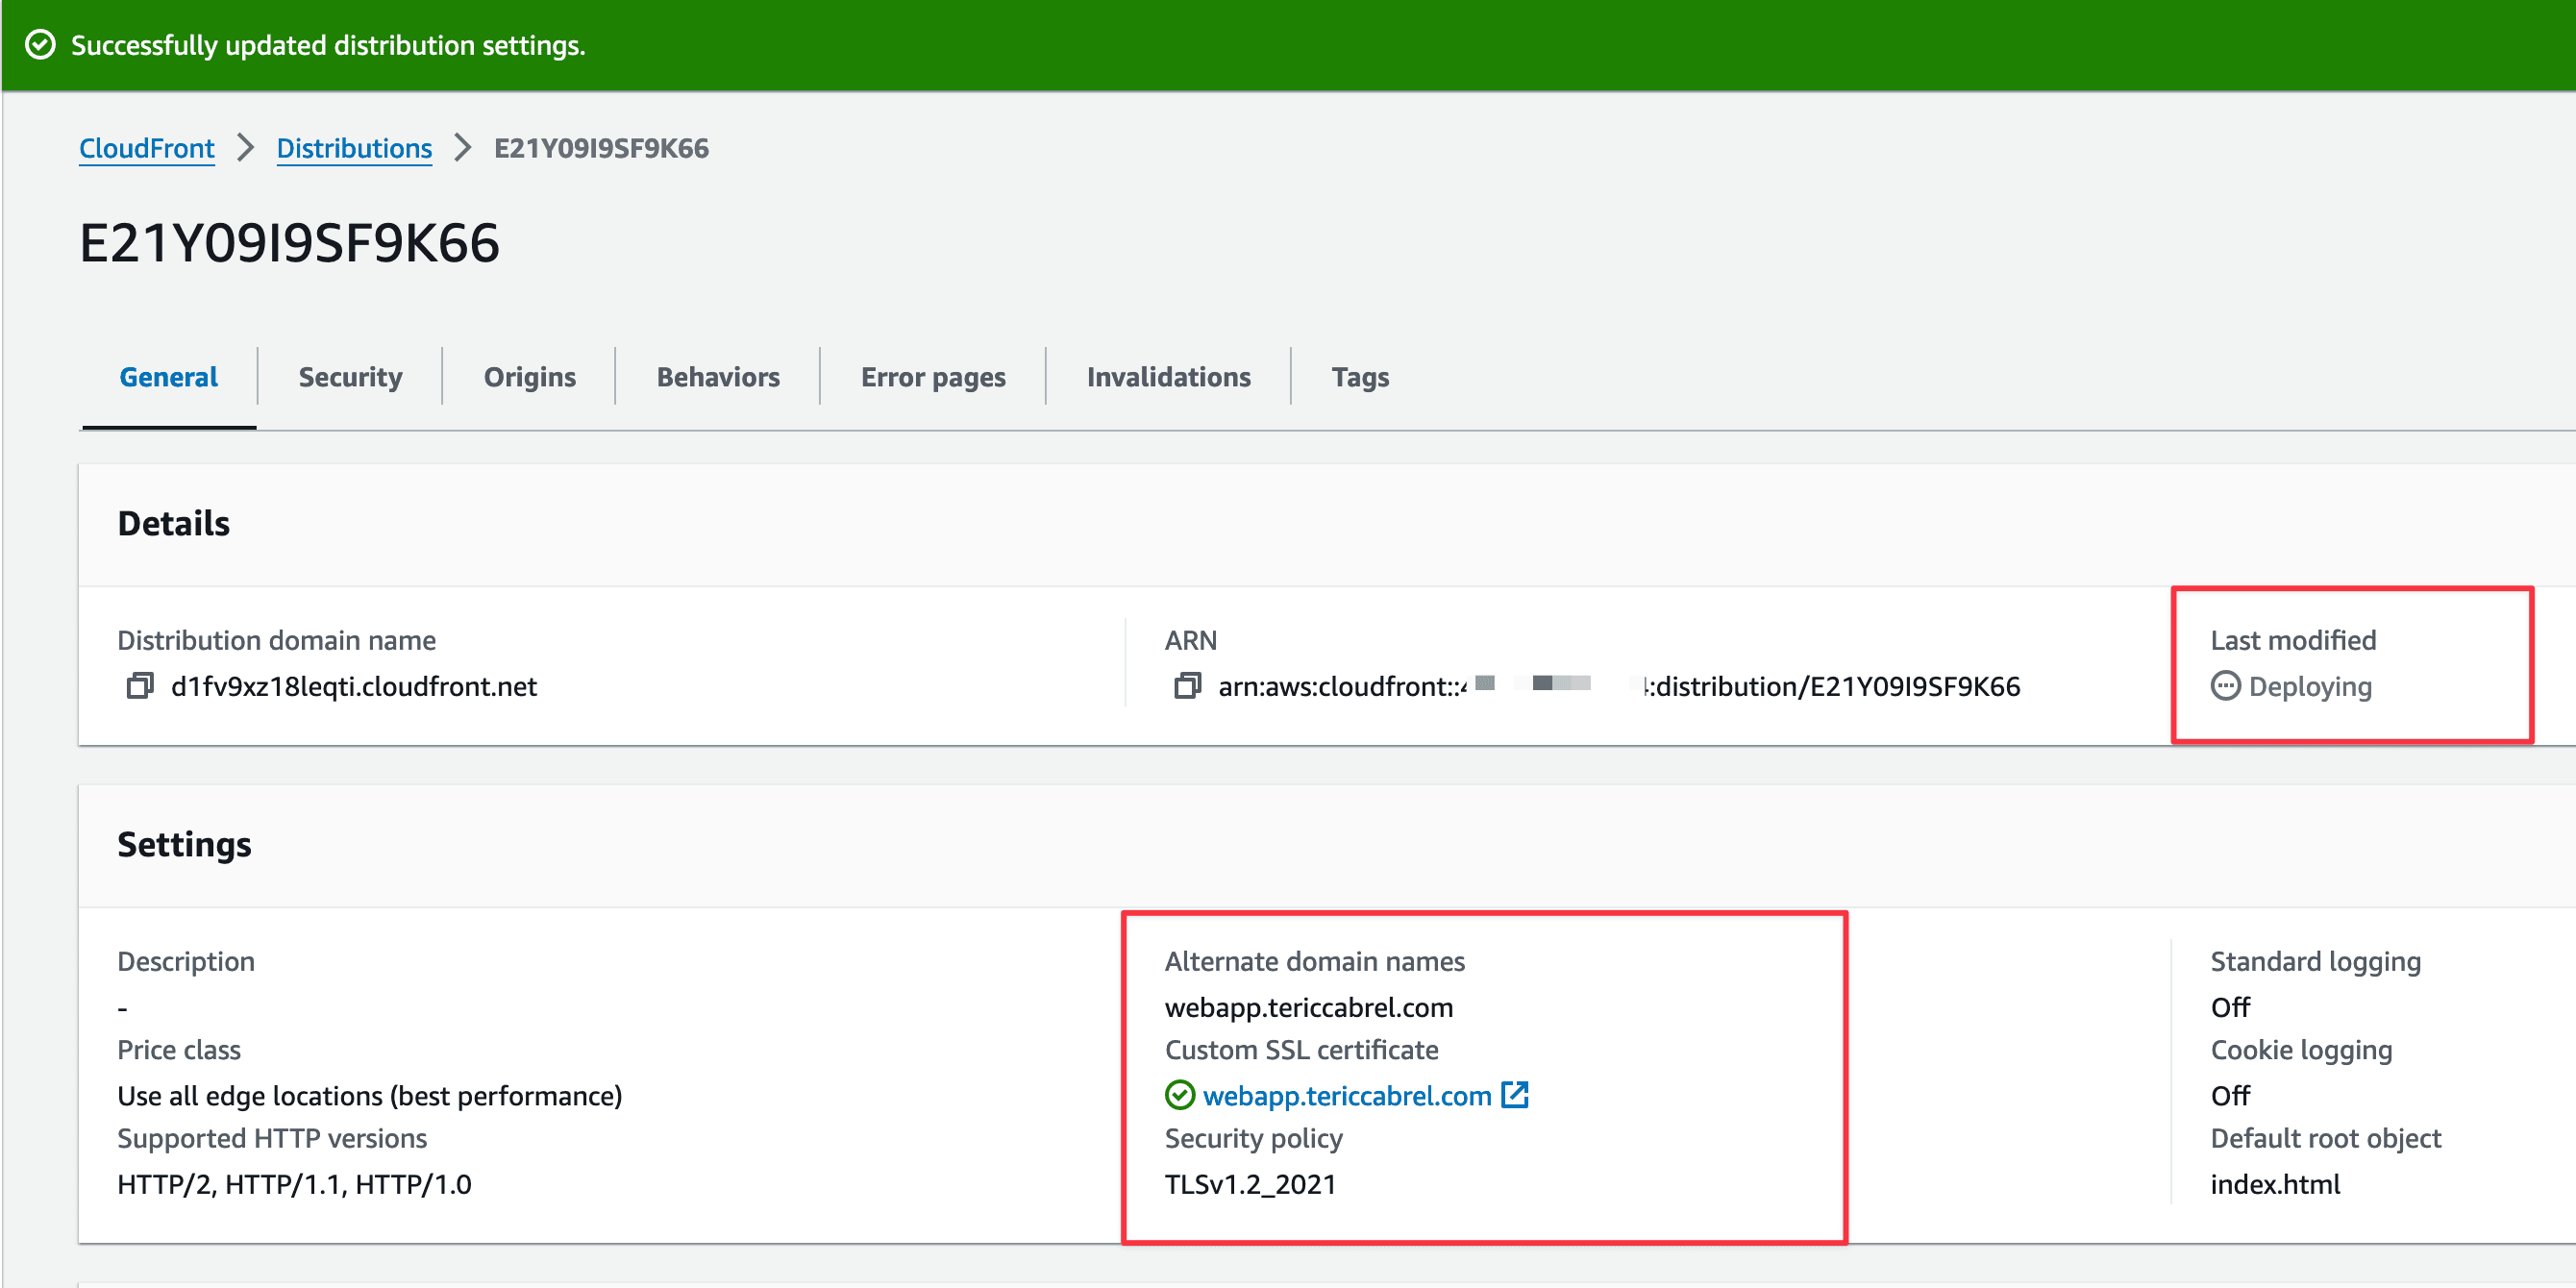
We can see the information on the subdomain, the SSL certificate, and the CloudFront distribution update status. Updating the CloudFront distribution can take more than five minutes, so be patient.
Create a DNS record in the domain name
The final step is to tell the DNS servers where to redirect the traffic received on the subdomain URL. We must create a CNAME record from the subdomain URL to the CloudFront distribution URL.
Go to your domain registar account (OVH in my case), find your domain name (tericcabrel.com in my case), go to the DNS Zone section, and click the button to create a DNS record.
- The record type: choose the CNAME option.
- The subdomain: provide the subdomain ("webapp" in my case).
- The target: The CloudFront distribution URL.
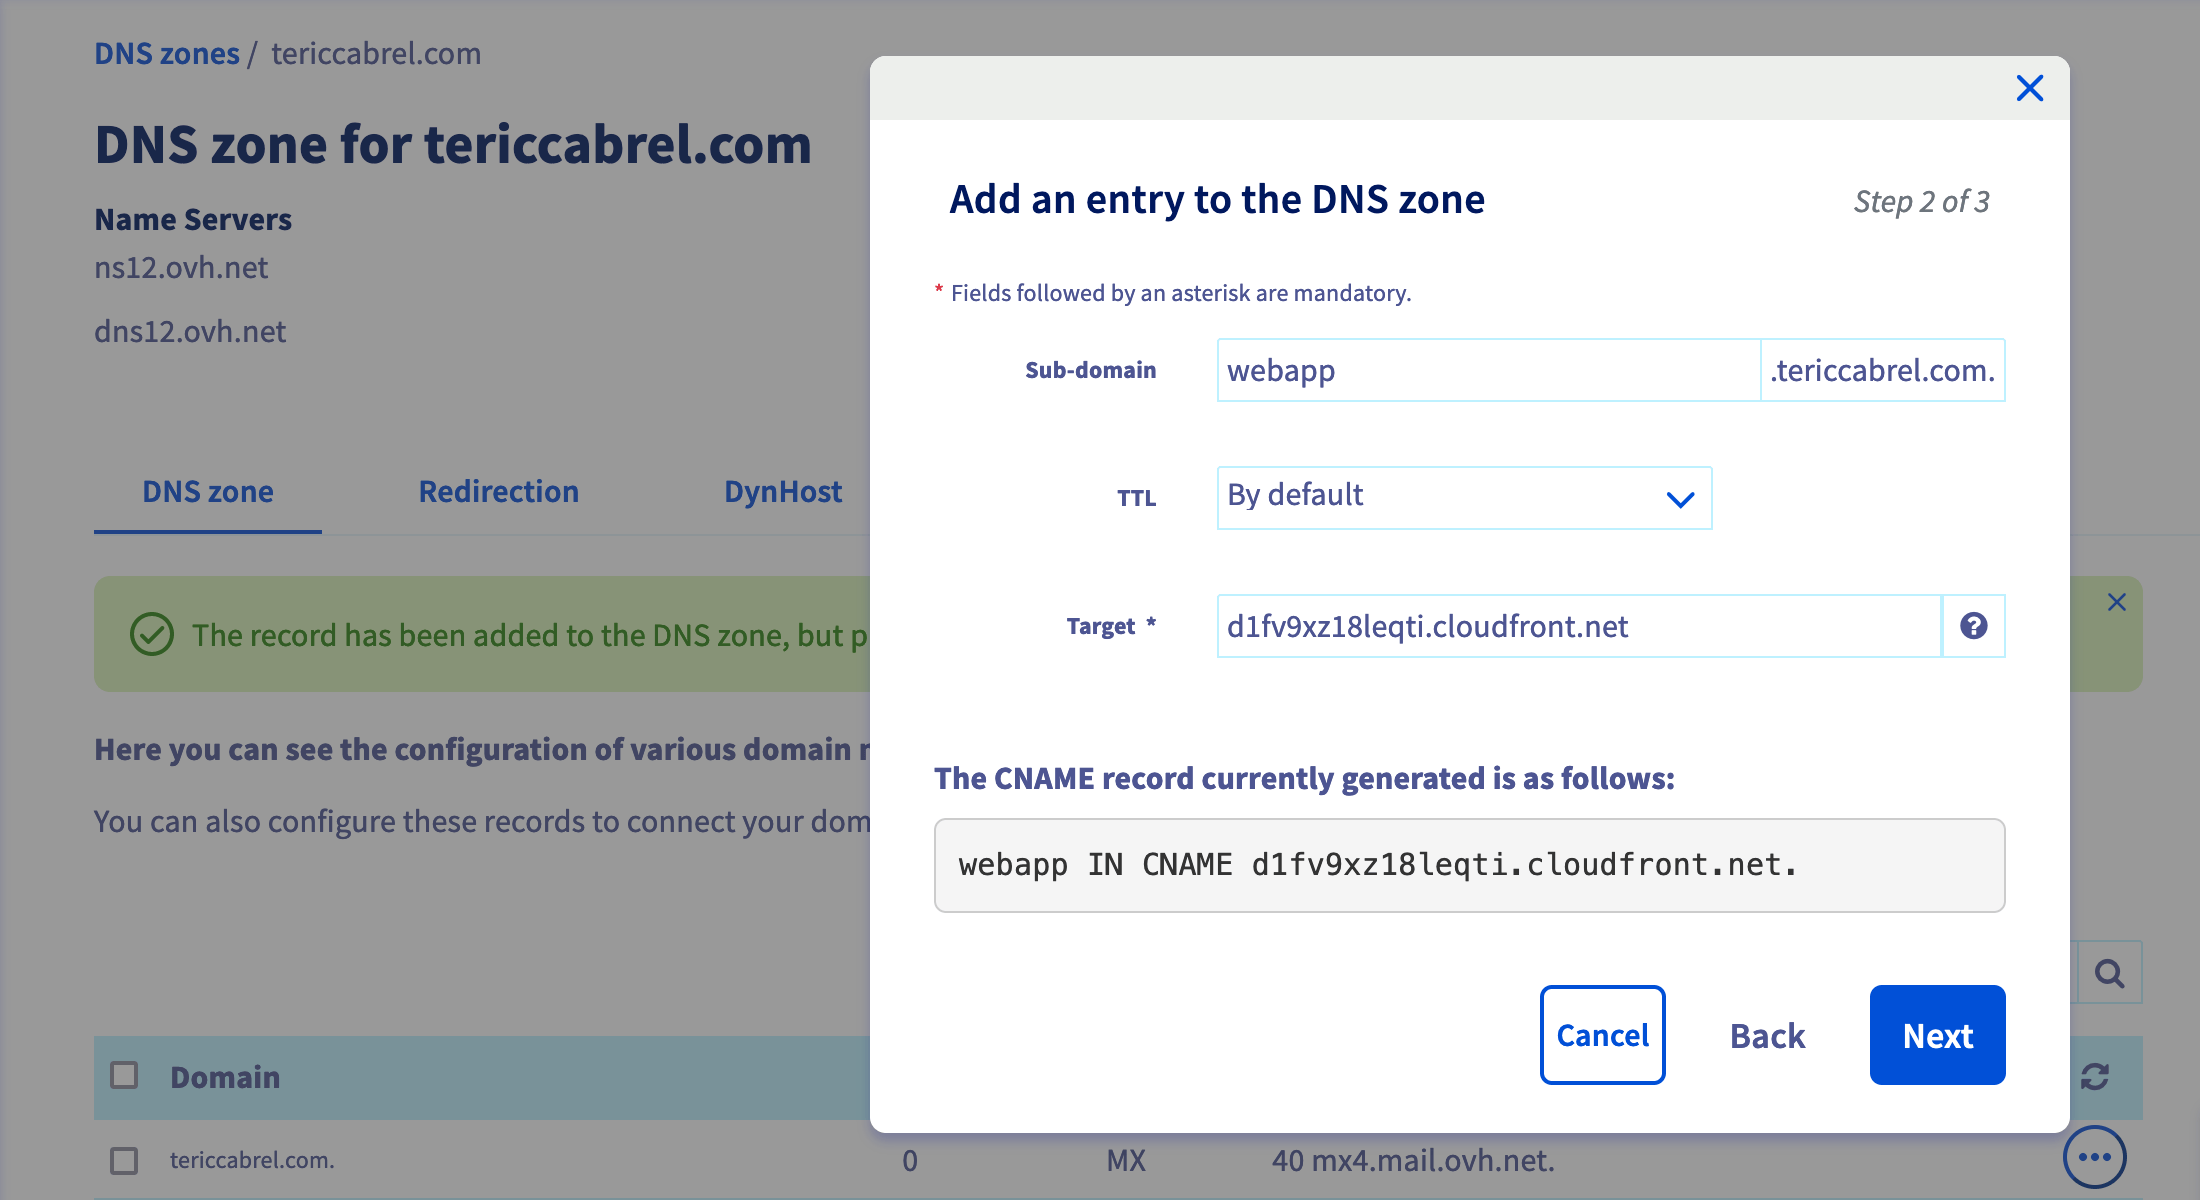
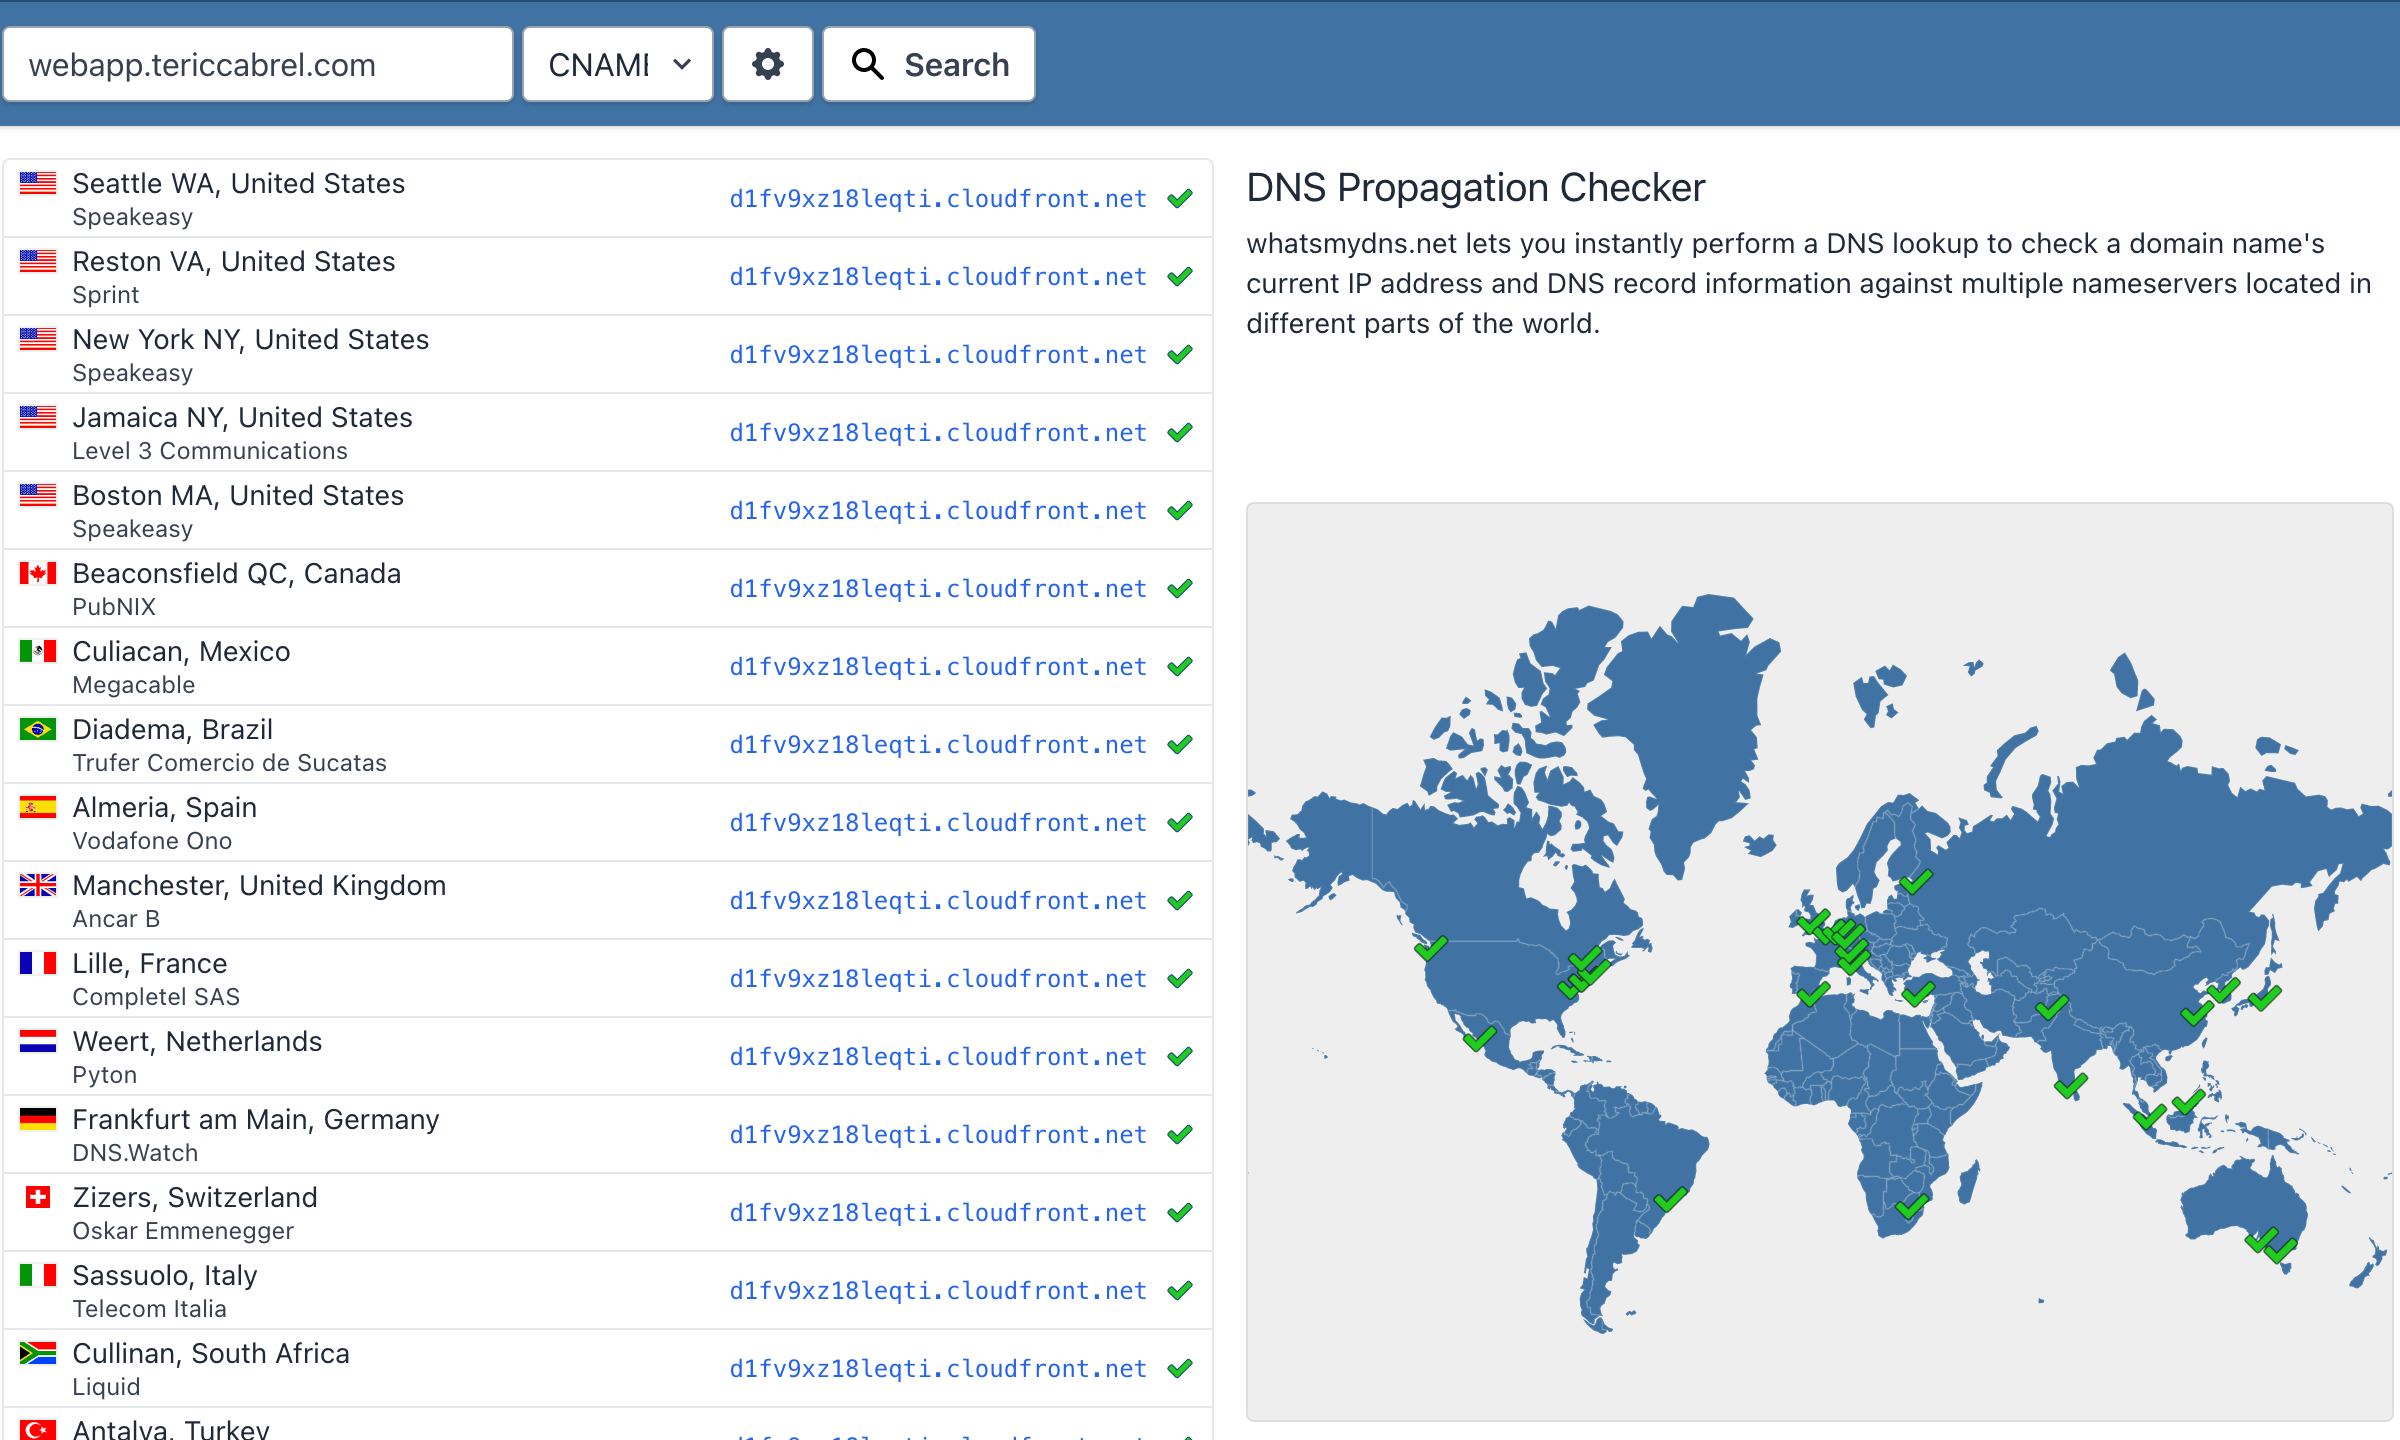
Click the submit button to create the DNS record and wait for DNS propagation. You can use the website What Is My DSN to verify the propagation status.
Now that the propagation is done open a browser tab and type your subdomain URL (webapp.tericcabrel.com, in my case).
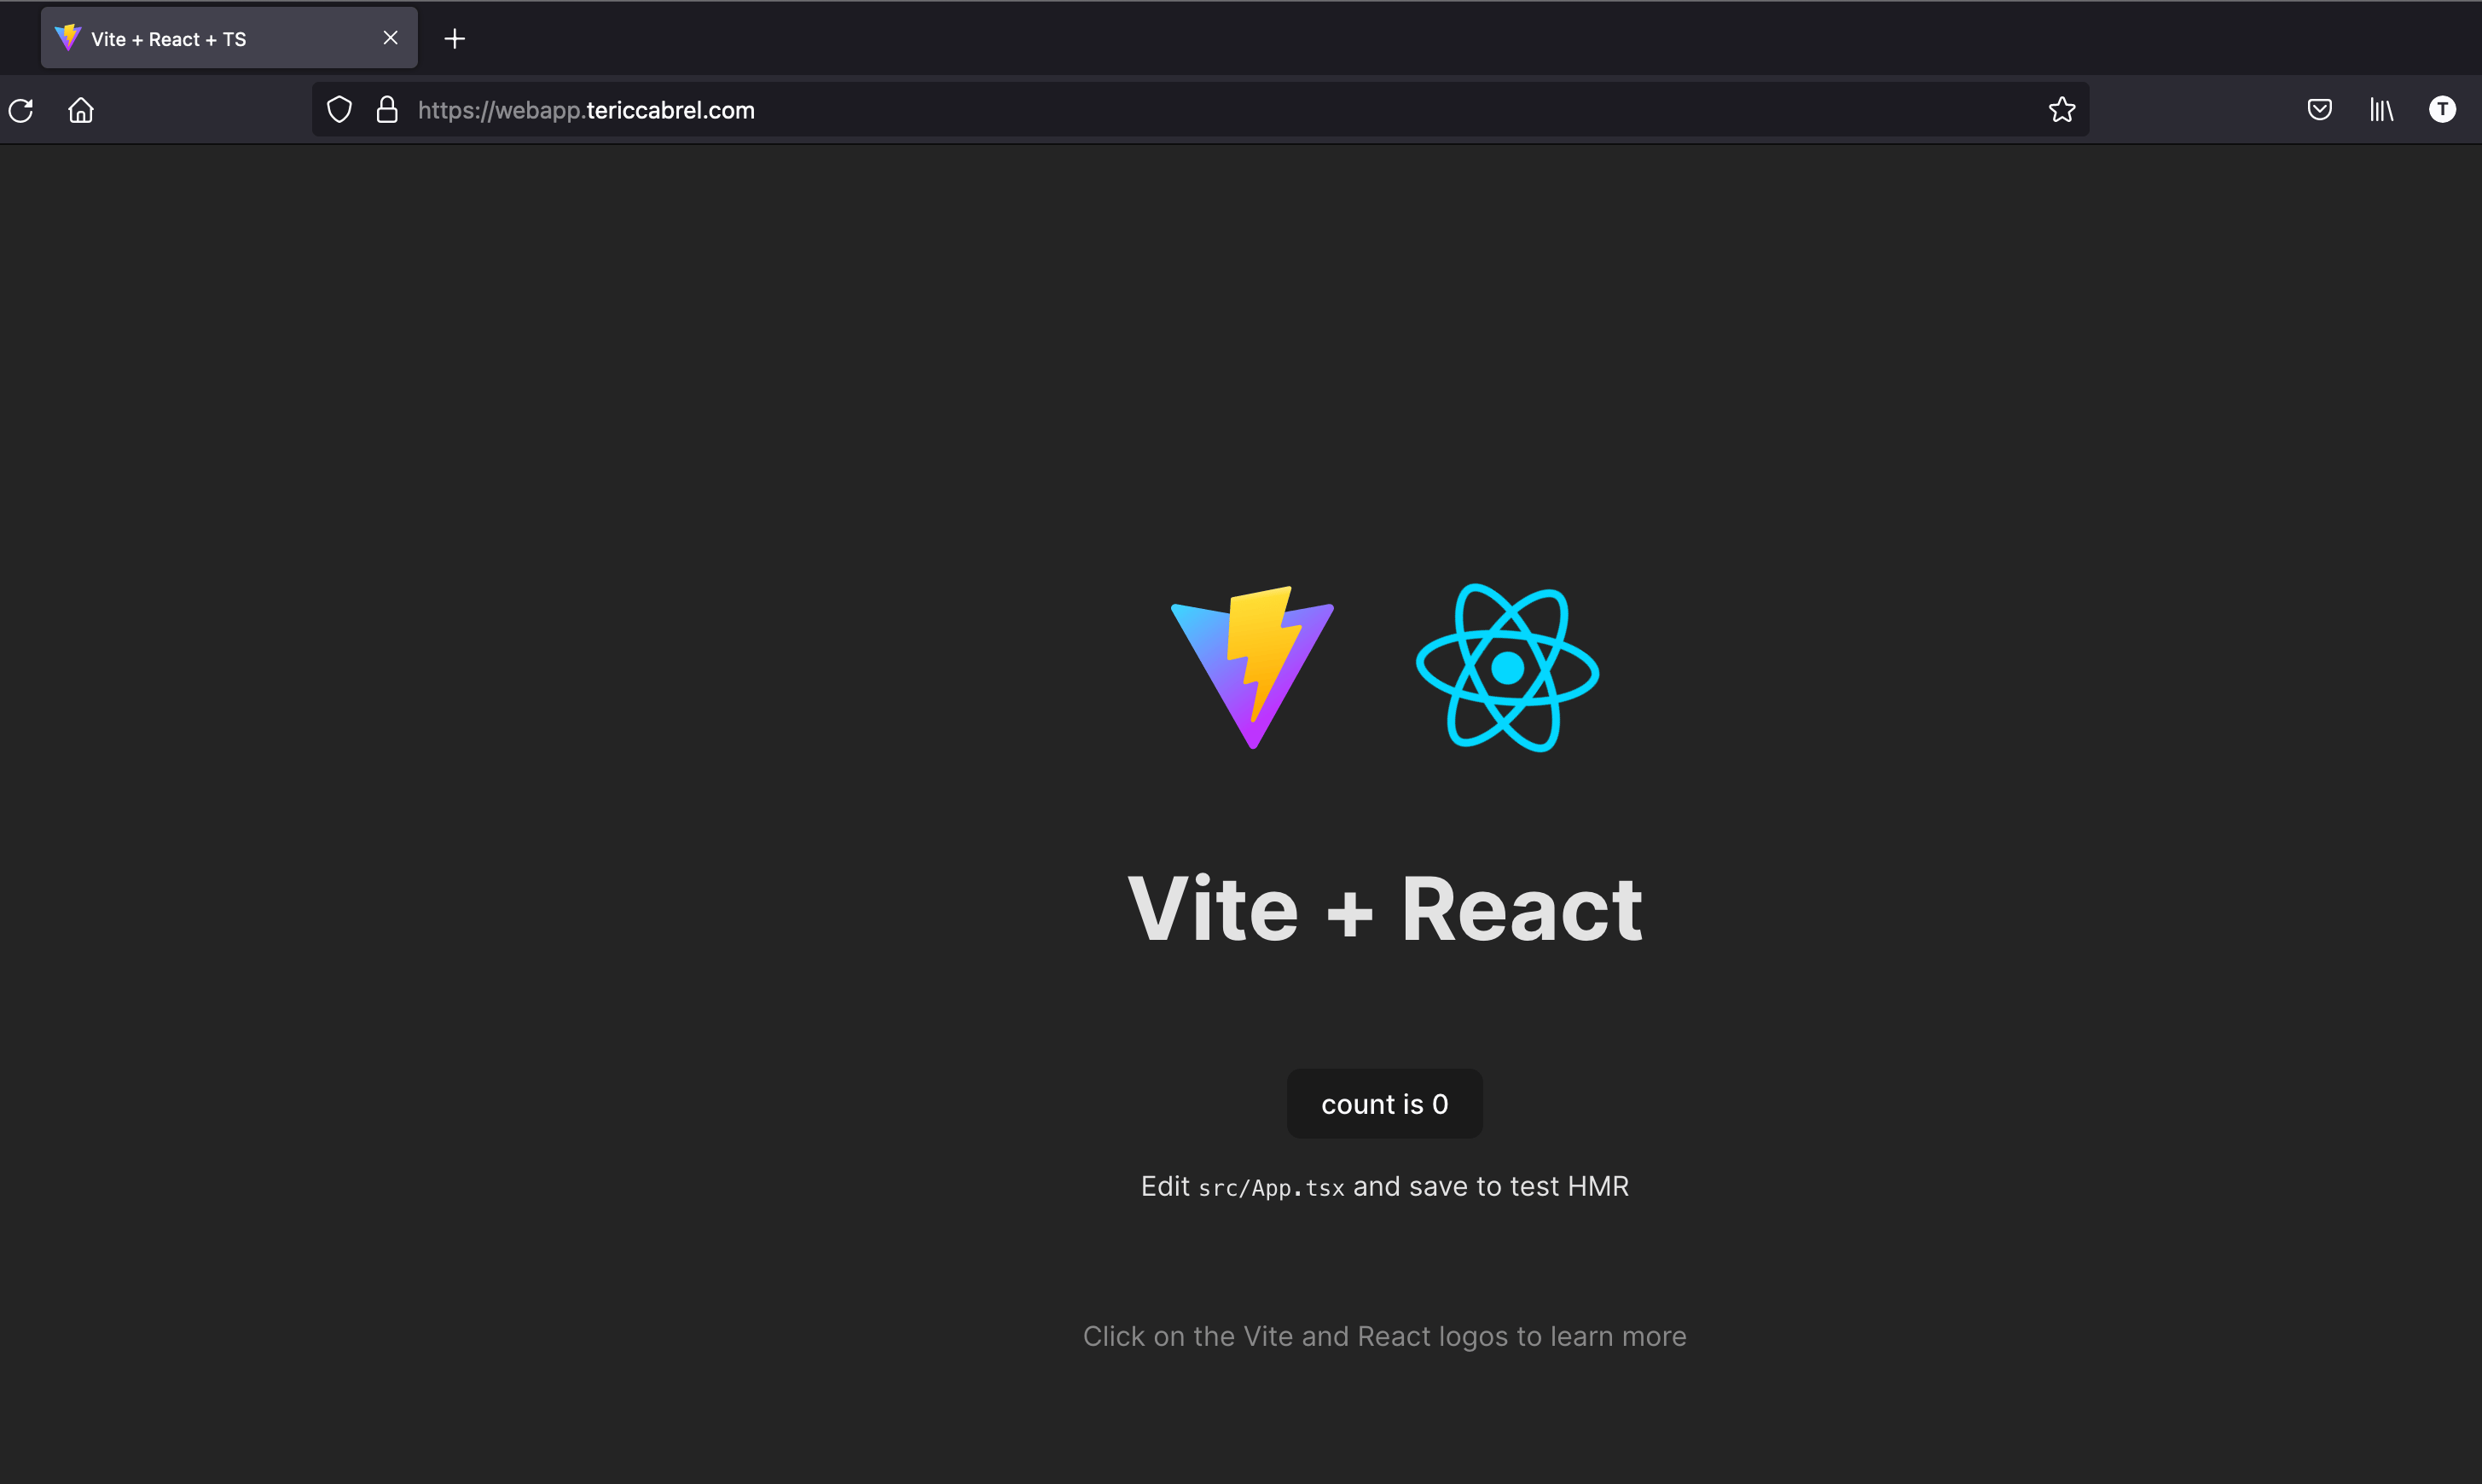
It works; you can now share this URL as it is more human-friendly 🎉.
Wrap up
Setting a custom domain name to a CloudFront distribution that is more human-friendly is helpful to make your website easily accessible and shareable.
Here are the steps to configure a custom domain name in a CloudFront distribution:
- Create the hosted zone in Route53
- Create a DNS record in the hosted zone to map the custom domain name to the CloudFront distribution.
- Generate the SSL certificate with AWS Certificate Manager for the custom domain name.
- Perform the DNS Validation of the domain name.
- Update the CloudFront distribution to attach the custom domain name and the SSL certificate.
- Create a DNS record in the domain registar to allow the DNS servers to reach the CloudFront distribution URL.
Follow me on Twitter or subscribe to my newsletter to avoid missing the upcoming posts and the tips and tricks I occasionally share.