
Create a Spring Boot starter project for a REST API


Photo by Alexandru Tudorache on Unsplash
Spring Boot is a Java utility built on top of Spring Framework to avoid developers spending too much time on tooling and configuration instead of building features that really bring value.
By starting a project with Spring Boot, here is what you have out of the box:
- Embedded webserver (Tomcat by default but you can choose Netty, Jetty, Wildfly, etc.)
- A configuration file where you can configure almost everything just by key-value pair.
- Great utilities for automated testing already configured
- Provide many useful metrics about the application.
- The support of Maven and Gradle to manage dependencies and package the application
- Provide great libraries for advanced features hot reload, package application a container
There are so many others awesome feature provided by Spring Boot check here to learn more about.
Prerequisites
To be able to follow this tutorial you need to have:
- JDK 8 or later (I use version 11)
- Maven 3.2+
- MySQL 5.7+
- Your favorite Java IDE (I use IntelliJ ?)
Create Spring Boot project
It is possible to create a Spring Boot project from your IDE or from the web at this link. We will see how to do it from the web since it will no be specific to my IDE.
- Go to start.spring.io. You will have a simple and awesome web page.
- Select Maven project and choose Java as the programming language.
- Select the version of Spring Boot (2.4.4 at the moment I write this)
- Provide information about the group, artifact, name, description,
- Select
Jaras the package and the Java version you want. - Click on add dependencies and select these: Spring Web, Lombok, Spring Configuration Processor, Spring Data JPA, MySQL Driver, Spring Boot Actuator.
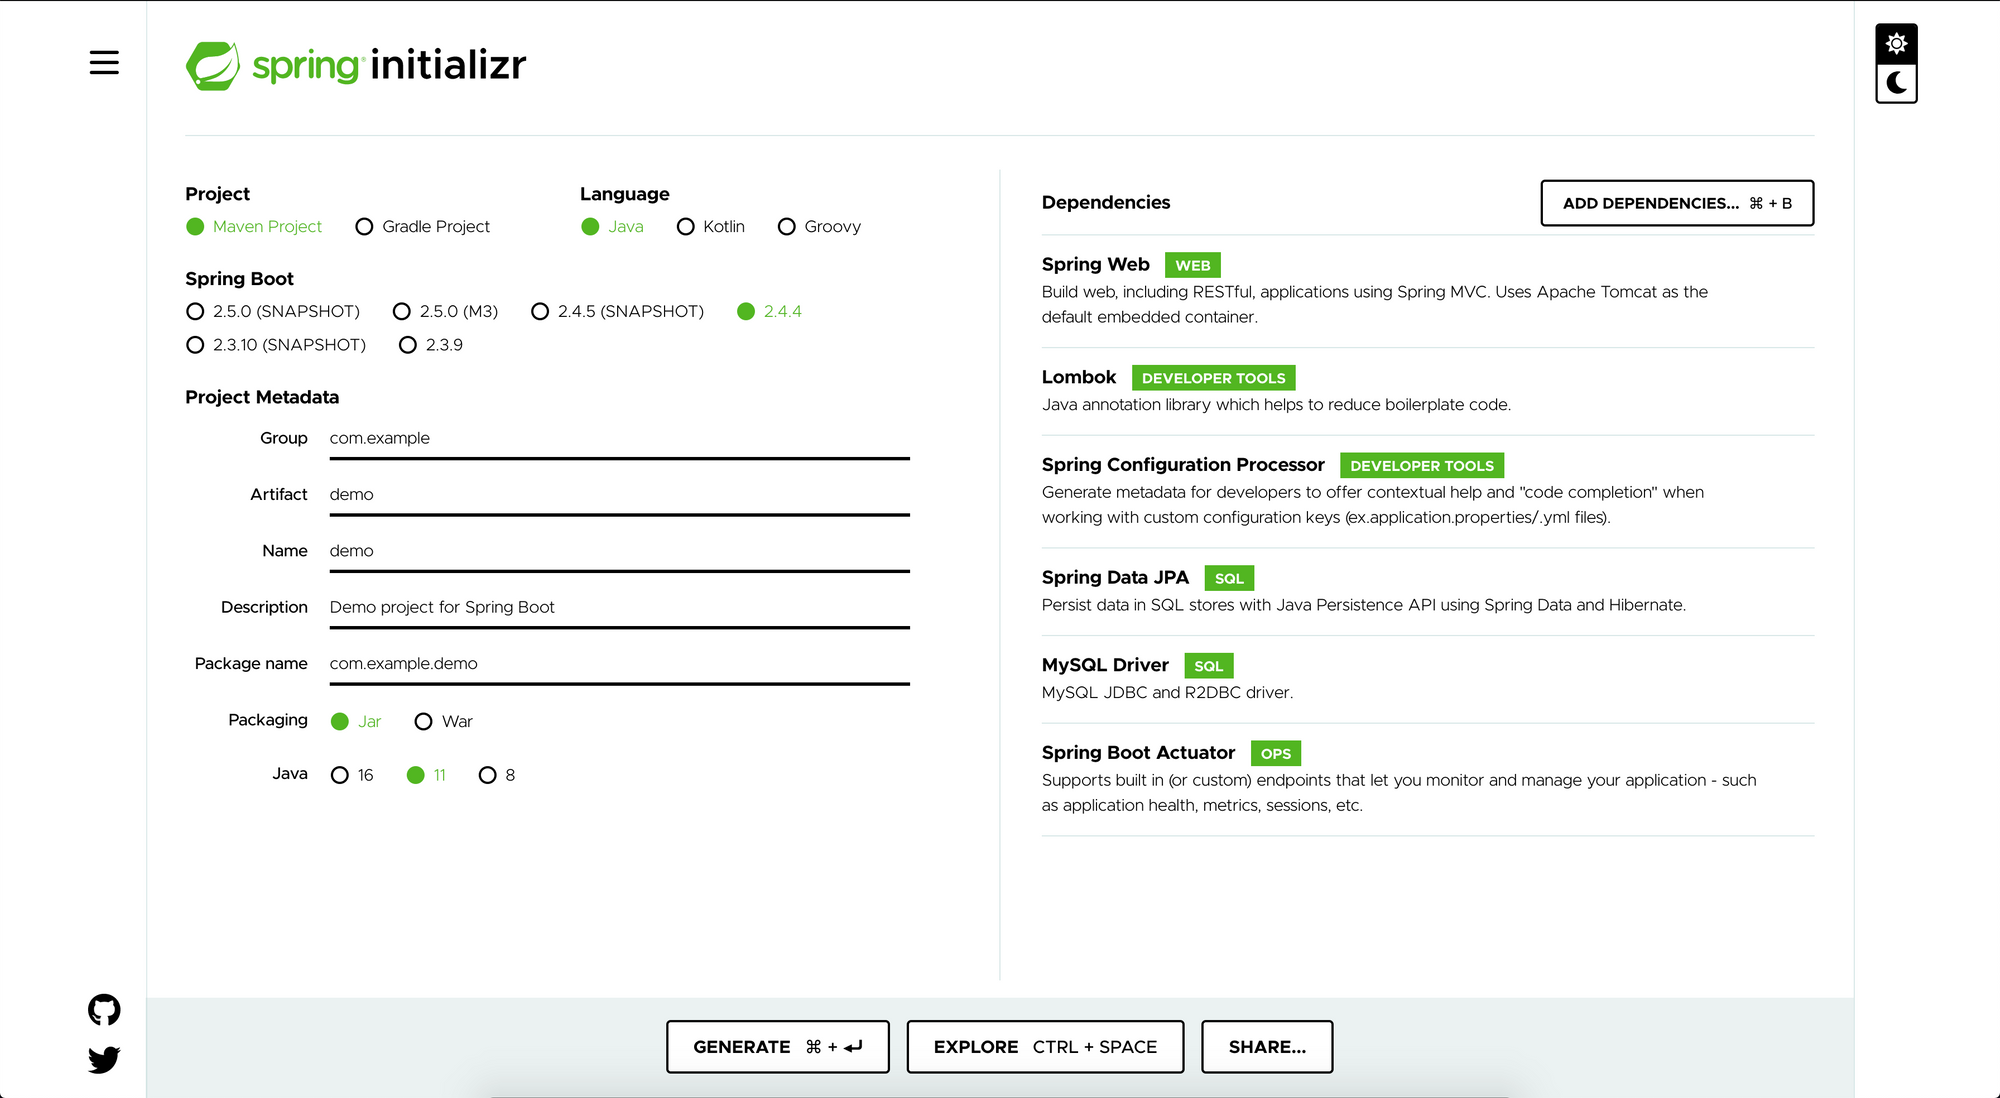
7. Click on the button "Generate" to download the project and import it into your IDE.
8. Install dependencies with Maven by running mvn install. Normally, your IDE will be able to do it for you automatically.
MySQL configuration
To connect our application to MySQL, we need to set up credentials to connect to the database and this is done inside the configuration file application.properties.
server.port=7450

spring.datasource.url=jdbc:mysql://localhost:3306/mysql_database?serverTimezone=UTC&useSSL=false
spring.datasource.username=mysql_user
spring.datasource.password=mysql_passwordWe define the port where the application will start on. If this property is not defined, port 8080 will be used. Provide the URL of the MySQL server. Note that the parameters serverTimezone and useSSL are required otherwise you will get an error when running the application.
Replace mysql_database by your own database name, mysql_user and mysql_password by the MySQL username and password.
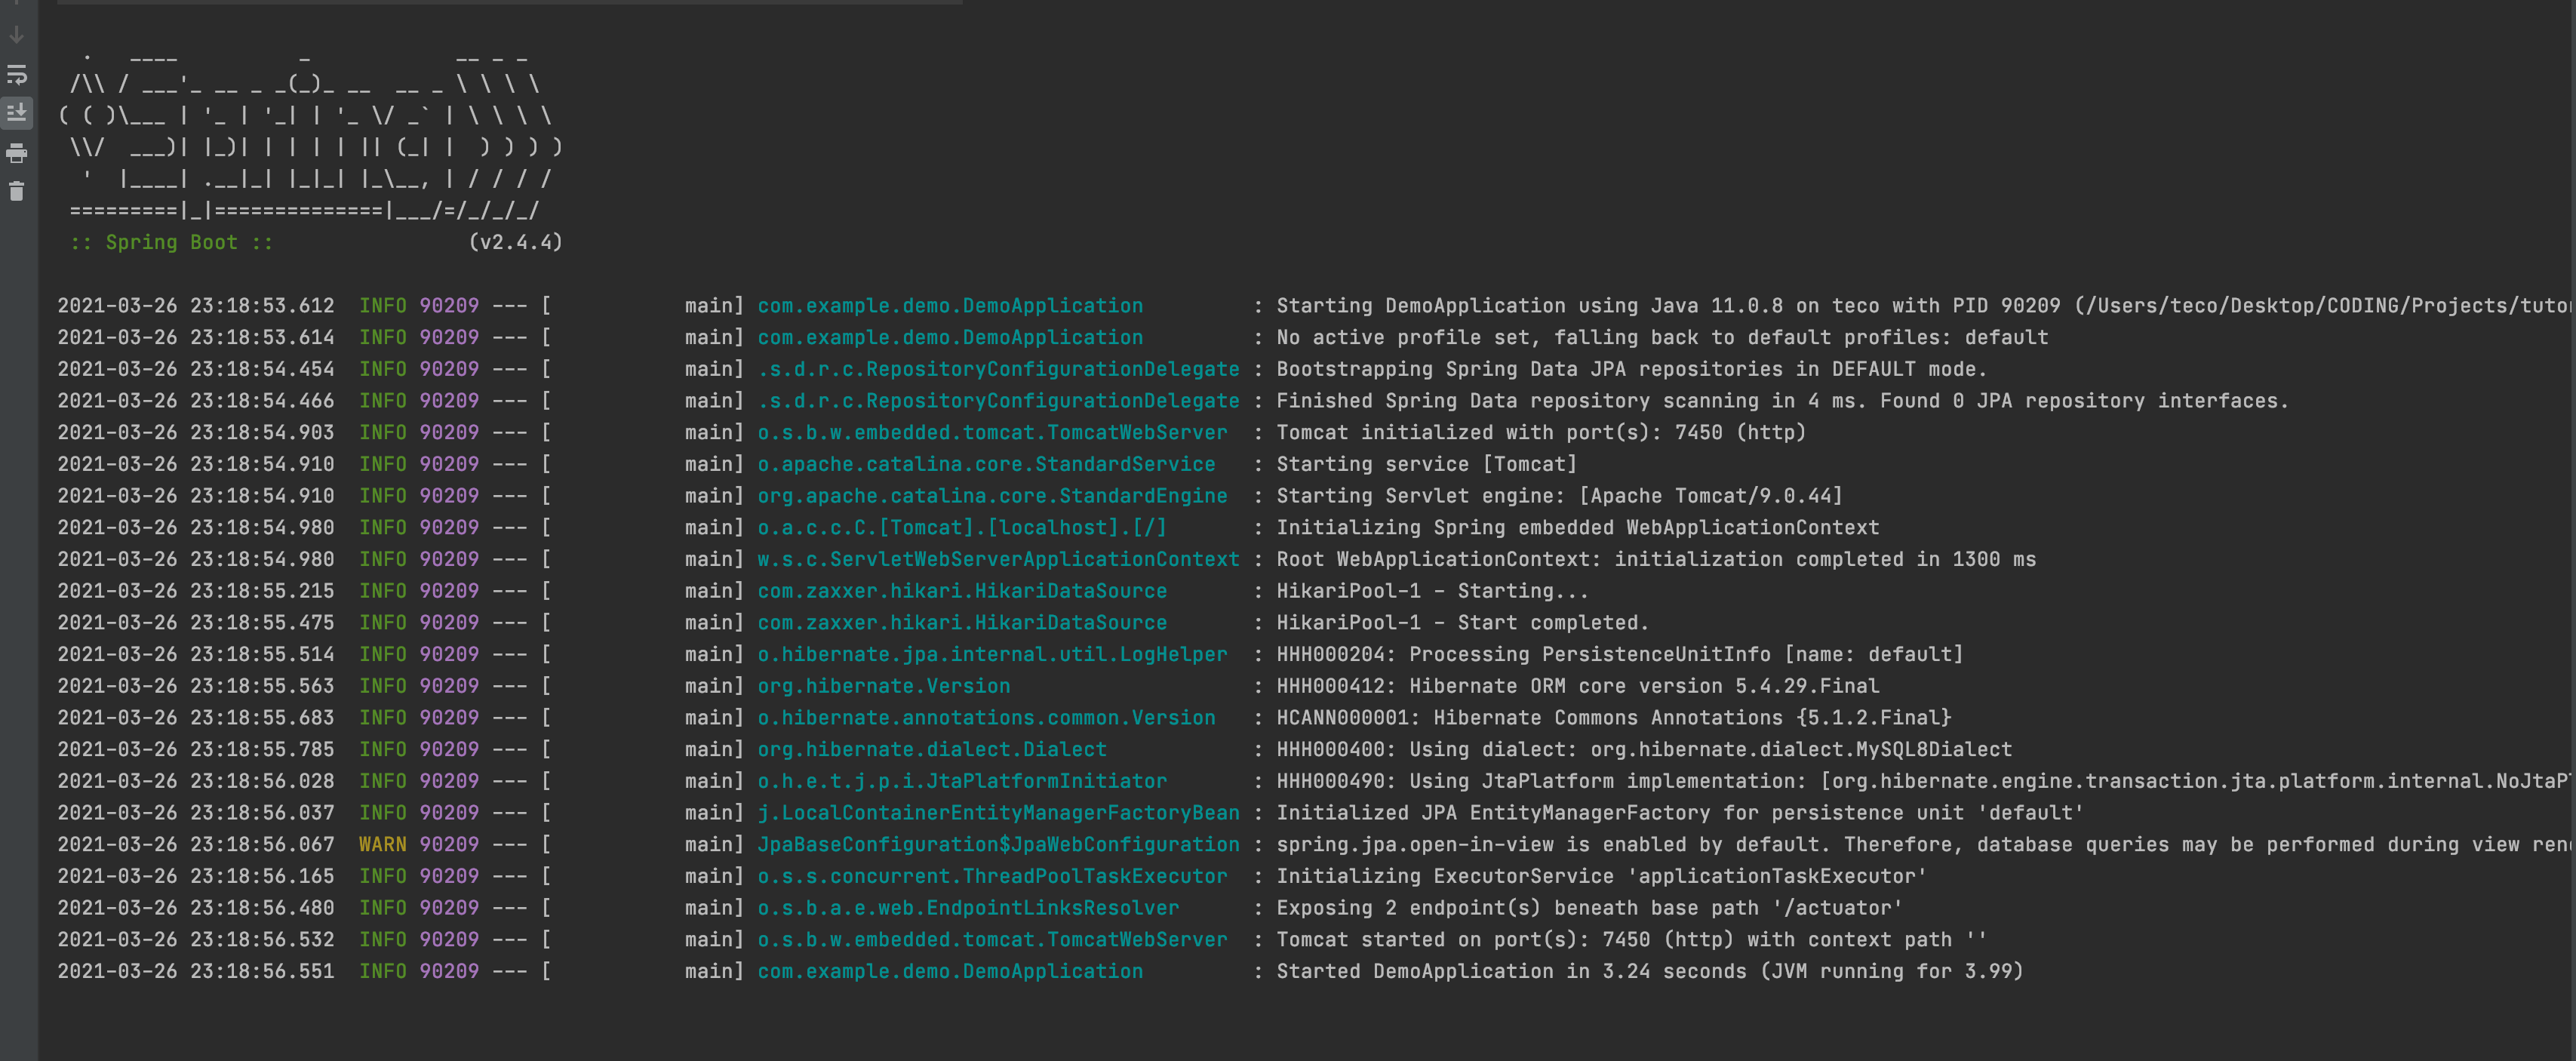
Save the file and start run the application from the IDE or open the terminal and type: mvn spring-boot:run
Configuration file and profiles
In the software development lifecycle, it is a common practice to have multiple environments to test our application.
- development: It is the developer computer where the feature is coded/fixed
- test/staging: It is the environment where the feature coded by the developer is by the developer itself or a tester.
- production: It is the environment where is run the application served to end-users.
The idea is to create a configuration file for each environment so that we will run the application with the configuration file related to the environment. Maven has a feature that allows us to create a Spring profile and set one profile as default.
How it works?
If inside your pom.xml you add a profile called dev, when starting your application, spring will look for the configuration file application-dev.properties. If you add a profile prod, it will look for application-prod.properties. You guessed the analogy, right?
We are going to create 3 profiles dev, test and prod and to achieve that, open your pom.xl and after the tag <build></build>, add the code below:
<profiles>
	<profile>
		<id>dev</id>
		<activation>
			<activeByDefault>true</activeByDefault>
		</activation>
		<properties>
			<build.profile.id>dev</build.profile.id>
			<currentProfile>dev</currentProfile>
		</properties>
	</profile>
	<profile>
		<id>prod</id>
		<properties>
			<build.profile.id>prod</build.profile.id>
			<currentProfile>prod</currentProfile>
		</properties>
	</profile>
    <profile>
		<id>test</id>
		<properties>
			<build.profile.id>test</build.profile.id>
			<currentProfile>test</currentProfile>
		</properties>
	</profile>
</profiles>
We created three profiles and set the profile dev as the default. We need to create the properties file for each profile.
- Duplicate the file application.properties three times
- Rename each duplicated file with a profile related to and update the configuration file (change the port and database configuration)
- Open application.properties and replace all the content by
spring.profiles.active=@currentProfile@ - Launch the project by running
mvn spring-boot:run. You will have the same result as before if everything configured well.
Note: If you use IntelliJ to launch the project, it will fail because when you make a change in the pom.xml, you need to reload the Maven project inside the IDE. Here is the link to show you how to do it: Reload Maven Project.
Configuration file security
We created three configurations for each environment but if many developers are working on the project, there will be a conflict between the config file for dev since each developer has its own local configuration so we need to exclude this file from the version control.
The test and prod config's file is the same for everything so we can keep it right? Noooo! It is not recommended to version a file that contains credentials for the remote environments. These two files also need to be excluded which left us with only application.properties who doesn't contain the properties necessary for the application to run.
Duplicate application-dev.properties and rename the duplicated file to application-example.properties then replace properties value with dummies value. This file will be versioned and when a developer clone the project, he will create the three others configuration file from this one. Looks good right?
To summary add the following file in the .gitignore: application-dev.properties, application-test.properties and application-prod.properties.
Project structure
Define a structure for the project is important to make sure we apply separation of concerns which to make the code easy to navigate in and understand. Here some package to create:
- configs: Hold the manual or custom configuration for libraries
- models: contains all our entities
- repositories: contains the repositories for each entity. An entity repository contains methods to transform an action on the entity to a database query. you can add your own method if need to perform an action that the repository doesn't support by default (eg: complex queries, aggregated queries, etc.).
- services: contains the business logic and uses repositories to perform this business logic.
- controllers: it is the gateway between the end-user and the services. The user requests action by hitting an endpoint defined inside the controller and this endpoint calls a specific method in the service.

Add some logic
We are going to create a model representing a task, create the repository for the model, create the service with a method to create a task, and finally create the endpoint in the controller.
Model
Create the package models then inside, create a class called TaskStatusEnum and Task.
package com.example.demo.models;

public enum TaskStatusEnum {
  PENDING,
  IN_PROGRESS,
  COMPLETED
}
package com.example.demo.models;

import java.util.Date;
import javax.persistence.Column;
import javax.persistence.Entity;
import javax.persistence.EnumType;
import javax.persistence.Enumerated;
import javax.persistence.GeneratedValue;
import javax.persistence.GenerationType;
import javax.persistence.Id;
import javax.persistence.Index;
import javax.persistence.Lob;
import javax.persistence.Table;
import lombok.Data;
import lombok.NoArgsConstructor;
import lombok.experimental.Accessors;
import org.hibernate.annotations.CreationTimestamp;
import org.hibernate.annotations.UpdateTimestamp;

@Table(name = "tasks", indexes = {
    @Index(name = "idx_title", columnList = "title")
})
@Entity()
@NoArgsConstructor()
@Accessors(chain = true)
@Data()
public class Task {
  @Id()
  @GeneratedValue(strategy = GenerationType.AUTO)
  @Column(insertable = false, updatable = false)
  private int id;

  @Column(length = 100, unique = true)
  private String title;

  @Lob()
  private String description;

  @Enumerated(EnumType.STRING) // Store enum as string instead of number
  @Column(length = 20)
  private TaskStatusEnum status = TaskStatusEnum.PENDING;

  @Column(name = "max_duration")
  private int maxDuration;

  @Column(name = "is_public", columnDefinition = "boolean default false")
  private boolean isPublic;

  @CreationTimestamp
  @Column(nullable = false, updatable = false)
  private Date createdAt;

  @UpdateTimestamp
  @Column(nullable = false)
  private Date updatedAt;
}We use the ORM Hibernate to generate our table from the class definition.
Lombok
As you have probably guessed, all our properties has the visibility private yet I didn't created accessors to get or set the value of a property.
We are going to use a tool that avoid us to generated those methods that add too much boilerplate code we don't always use them all. This tool is called Lombok.
Lombok provides annotation for the getter, setter, toString, constructor, equals, etc. These annotations are resolved in the runtime to generate the corresponding code using the Java Reflection API. In the end, we have the same result with a better readable class.
To use Lombok annotation on Task, a these for annotations on above the class:
- @Data(): It will generate for all the non-final properties a getter and a setter. Also generate toSring(), equals() and hashCode() for the class.
- @NoArgsConstructor: It will generate a constructor with no argument
- @Accessors(chain = true): It make the setter chainable: setTitle().setStatus().setDescription().....
Repository
Create the package repositories then inside, create a class called TaskRepository.
package com.example.demo.repositories;

import com.example.demo.models.Task;
import java.util.List;
import org.springframework.data.repository.CrudRepository;
import org.springframework.stereotype.Repository;

@Repository
public interface TaskRepository extends CrudRepository<Task, Integer> {
  List<Task> findAllByIdGreaterThanOrderByIdDesc(long id);
}Services
Create the package services then inside, create an interface called TaskService.
package com.example.demo.services;

import com.example.demo.models.Task;
import java.util.List;

public interface TaskService {
  Task create(Task task);

  List<Task> findAll();
}Always inside services package, create a class called TaskServiceImpl who implements the interface TaskService.
package com.example.demo.services;

import java.util.List;
import org.springframework.stereotype.Service;
import com.example.demo.models.Task;
import com.example.demo.repositories.TaskRepository;

@Service
public class TaskServiceImpl implements TaskService {
  private final TaskRepository taskRepository;

  public TaskServiceImpl(TaskRepository taskRepository) {
    this.taskRepository = taskRepository;
  }

  @Override
  public Task create(Task task) {
    return taskRepository.save(task);
  }

  @Override
  public List<Task> findAll() {
    return taskRepository.findAllByIdGreaterThanOrderByIdDesc(0);
  }
}
Controller
Before creating the controller we need to create a class called CreateTaskDto inside the package models. We will use it to map the body of the HTTP request to a java class. The suffix Dto is an acronym for Data Transfer Object (DTO). I will write an article to show when, where and how to use it.
package com.example.demo.models;

import com.fasterxml.jackson.annotation.JsonProperty;
import lombok.Data;
import lombok.NoArgsConstructor;

@Data
@NoArgsConstructor
public class CreateTaskDto {
  private String title;
  private String description;
  private TaskStatusEnum status = TaskStatusEnum.PENDING;
  private int maxDuration;

  @JsonProperty("isPublic") // Required to handle boolean type properly
  private boolean isPublic;

  public Task toTask() {
    return new Task()
        .setTitle(title)
        .setDescription(description)
        .setStatus(status)
        .setMaxDuration(maxDuration)
        .setPublic(isPublic);
  }
}Create the package controllers then inside, create a called TaskController.
package com.example.demo.controllers;

import com.example.demo.models.CreateTaskDto;
import com.example.demo.models.Task;
import com.example.demo.services.TaskService;
import java.util.List;
import org.springframework.http.ResponseEntity;
import org.springframework.web.bind.annotation.GetMapping;
import org.springframework.web.bind.annotation.PostMapping;
import org.springframework.web.bind.annotation.RequestBody;
import org.springframework.web.bind.annotation.RequestMapping;
import org.springframework.web.bind.annotation.RestController;

@RestController()
@RequestMapping(path = "/tasks")
public class TaskController {
  private final TaskService taskService;

  public TaskController(TaskService taskService) {
    this.taskService = taskService;
  }

  @PostMapping(path = "")
  public ResponseEntity<Task> createTask(@RequestBody CreateTaskDto taskParam) {
    Task createdTask = taskService.create(taskParam.toTask());

    return ResponseEntity.ok(createdTask);
  }

  @GetMapping(path = "")
  public ResponseEntity<List<Task>> findAllTasks() {
    List<Task> allTasks = taskService.findAll();

    return ResponseEntity.ok(allTasks);
  }
}
Configure Hibernate ORM
We used Hibernate to have the possibility to generate our database table from the class but to make it works, some configuration is required. open application-dev.properties and append the code below:
## Hibernate Properties
spring.jpa.open-in-view=false

# Prevent hibernate from creating a hibernate_sequence table
spring.jpa.hibernate.use-new-id-generator-mappings=false

# Hibernate ddl auto (create, create-drop, validate, update, none)
spring.jpa.hibernate.ddl-auto=create

# Whether to enable logging of SQL statements
spring.jpa.show-sql=true

# Default value is embedded which mean it only applies if you're running an embedded database.
spring.datasource.initialization-mode=neverAt the first run of the application, the tasks table will be created and if you restart, it will be dropped then recreated. To avoid losing your data after the first run, change the value of spring.jpa.hibernate.ddl-auto to validate or none.
There is a better way to manage entity changes by using migrations. We will see how to use it in another tutorial.
Test the API
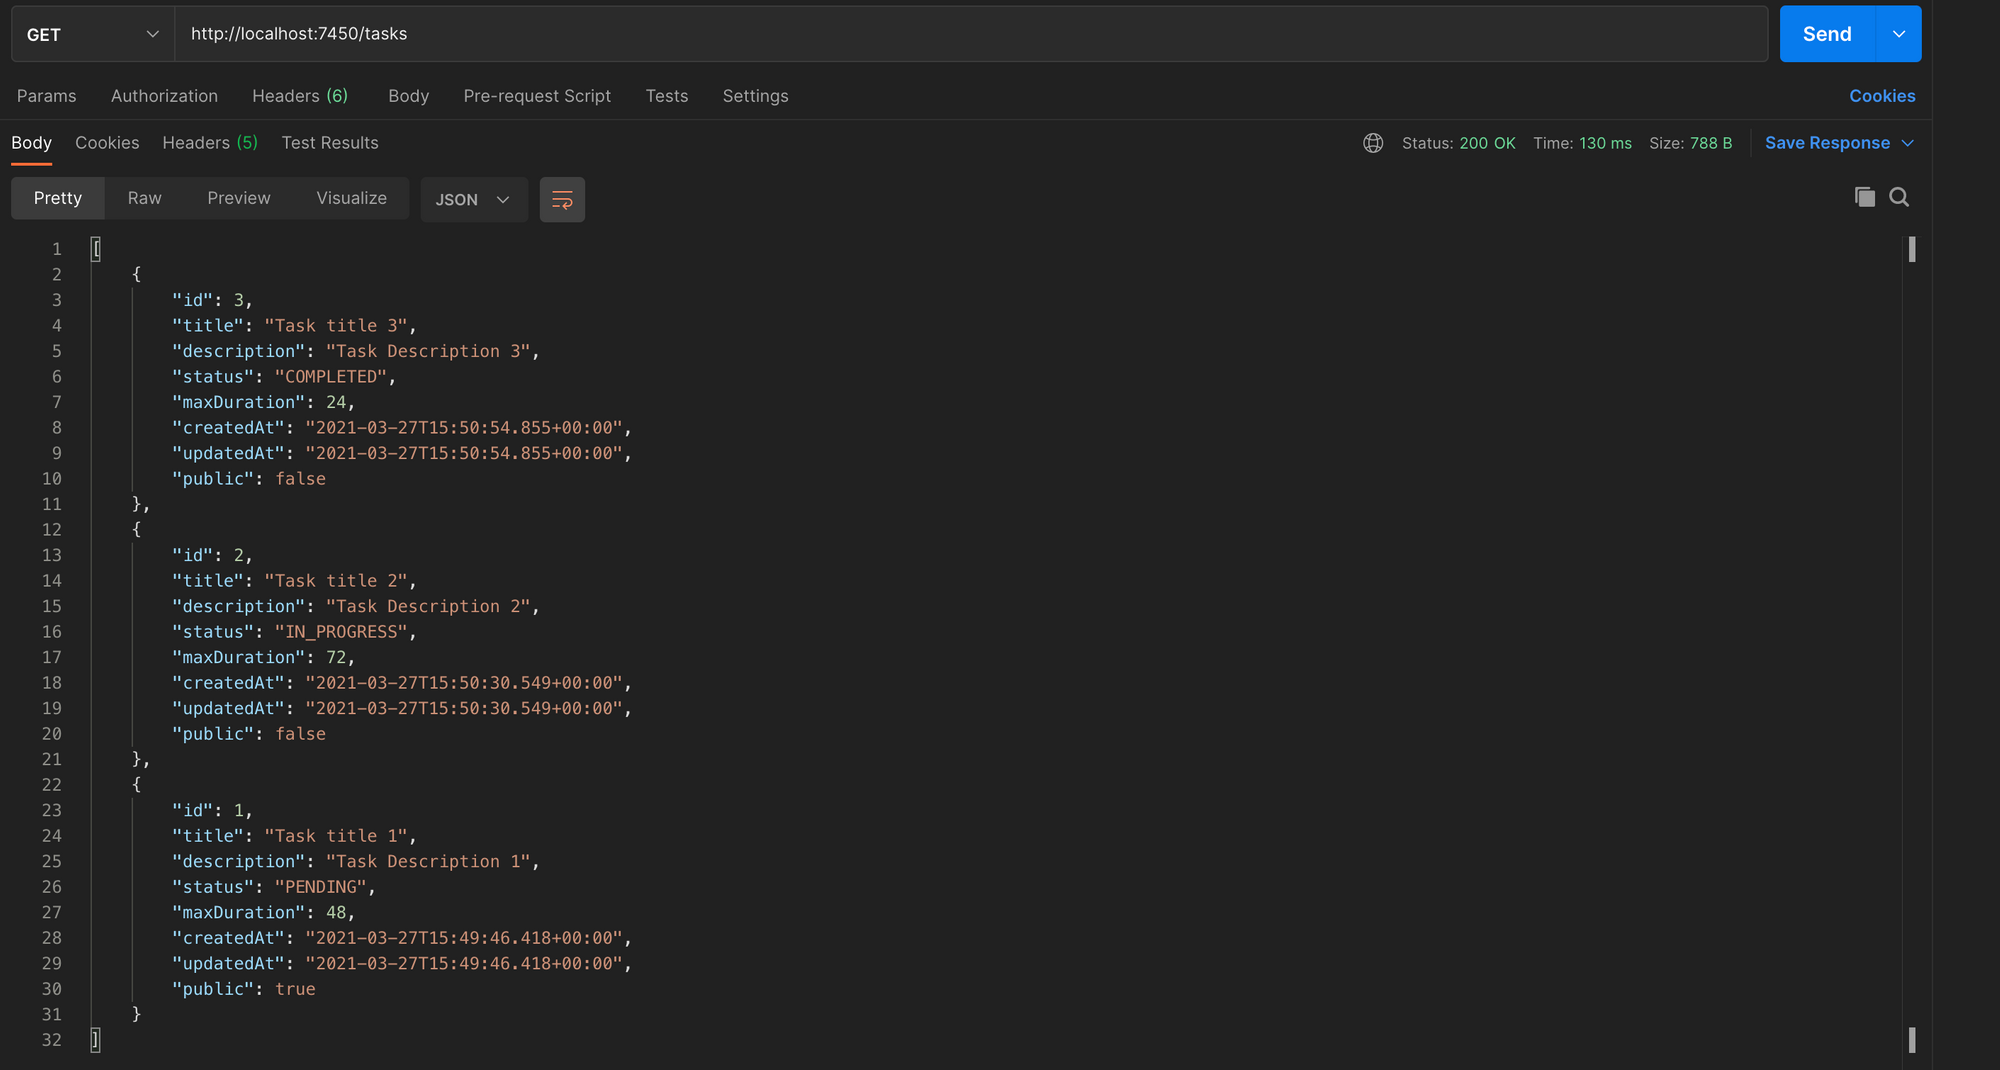
Run the application and test with Postman

Logging
When the app is running it produces a log when an error occurs or when we want to log some information in the console. In production, it's important to catch these logs in a file for further analysis. Spring Boot already includes a library to customize the behavior of the logging.
Create a file logback-spring.xml in the folder resources and add the code below:
<?xml version="1.0" encoding="UTF-8"?>
<configuration>
  <property name="FILE_LOG_PATTERN" value="%d{yyyy-MM-dd HH:mm:ss} %-5level %logger{35} - %msg%n"/>

  <appender name="server-console" class="ch.qos.logback.core.ConsoleAppender">
    <encoder>
      <pattern>%d - %-5level %logger{35} - %msg %n</pattern>
    </encoder>
  </appender>

  <!-- Plain Text Rolling Appender for application info -->
  <appender name="server-info" class="ch.qos.logback.core.rolling.RollingFileAppender">
    <file>${LOG_PATH}/demo.log</file>
    <filter class="ch.qos.logback.classic.filter.LevelFilter">
      <level>INFO</level>
      <onMatch>ACCEPT</onMatch>
      <onMismatch>DENY</onMismatch>
    </filter>
    <encoder class="ch.qos.logback.classic.encoder.PatternLayoutEncoder">
      <pattern>${FILE_LOG_PATTERN}</pattern>
    </encoder>
    <rollingPolicy class="ch.qos.logback.core.rolling.SizeAndTimeBasedRollingPolicy">
      <fileNamePattern>${LOG_PATH}/archived/demo.%d{yyyy-MM-dd}.%i.log</fileNamePattern>
      <maxFileSize>20MB</maxFileSize>
    </rollingPolicy>
  </appender>

  <!-- Plain Text Rolling Appender for application error -->
  <appender name="server-error"
    class="ch.qos.logback.core.rolling.RollingFileAppender">
    <append>true</append>
    <file>${LOG_PATH}/demo-error.log</file>
    <filter class="ch.qos.logback.classic.filter.LevelFilter">
      <level>ERROR</level>
      <onMatch>ACCEPT</onMatch>
      <onMismatch>DENY</onMismatch>
    </filter>
    <encoder>
      <pattern>${FILE_LOG_PATTERN}</pattern>
    </encoder>
    <rollingPolicy class="ch.qos.logback.core.rolling.SizeAndTimeBasedRollingPolicy">
      <fileNamePattern>${LOG_PATH}/demo.log.%d{yyyy-MM-dd}.%i</fileNamePattern>
      <maxFileSize>20MB</maxFileSize>
      <maxHistory>15</maxHistory>
    </rollingPolicy>
  </appender>

  <logger name="com.example" level="info">
    <appender-ref ref="server-info" />
    <appender-ref ref="server-error" />
  </logger>

  <root level="info">
    <appender-ref ref="server-console" />
  </root>
</configuration>
For summary:
- We define the format of the log's line for the console and the file following this: date - logLevel - file - message
- We define the logging policy for the levels INFO and ERROR. The max file size is set to 20MB exceed this size it will be archived or after 15 days.
- We attach logging file configuration at the package level
- We attach logging console configuration at the root level
Append in the configuration file the code below:
# Logging properties
logging.level.web=INFO
logging.file.path=logsDon't forget to update application-example.properties and exclude the folder logs from version control.
It is the end of this tutorial and you have a starter for your next backend project with Spring Boot. Find the final code for this tutorial here.
I hope you found it helpful. Feel free to join me on Twitter for any questions.