
Handle database migrations in a Spring Boot application with Flyway


Photo by Julia Craice / Unsplash
Databases are crucial for applications and during the evolution of the project; as the needs of users change/evolve, these changes imply the modification in the database structure. These changes are versioned nowhere, meaning if we want to roll back, there is no way to know which changes have been made to the database structure.
Migration is a change applied to the database structure stored in a file. The filename follows a specific naming that allows keeping the order of changes. Some tools help us handle the versioning of the database. Flyway is one of these, and we will see how to use it from the standalone application and a Java application using Spring Boot.
The use case
To demonstrate the use of Flyway, we will take the case of a simple blog system where the author can make a post. You can find this schema here.
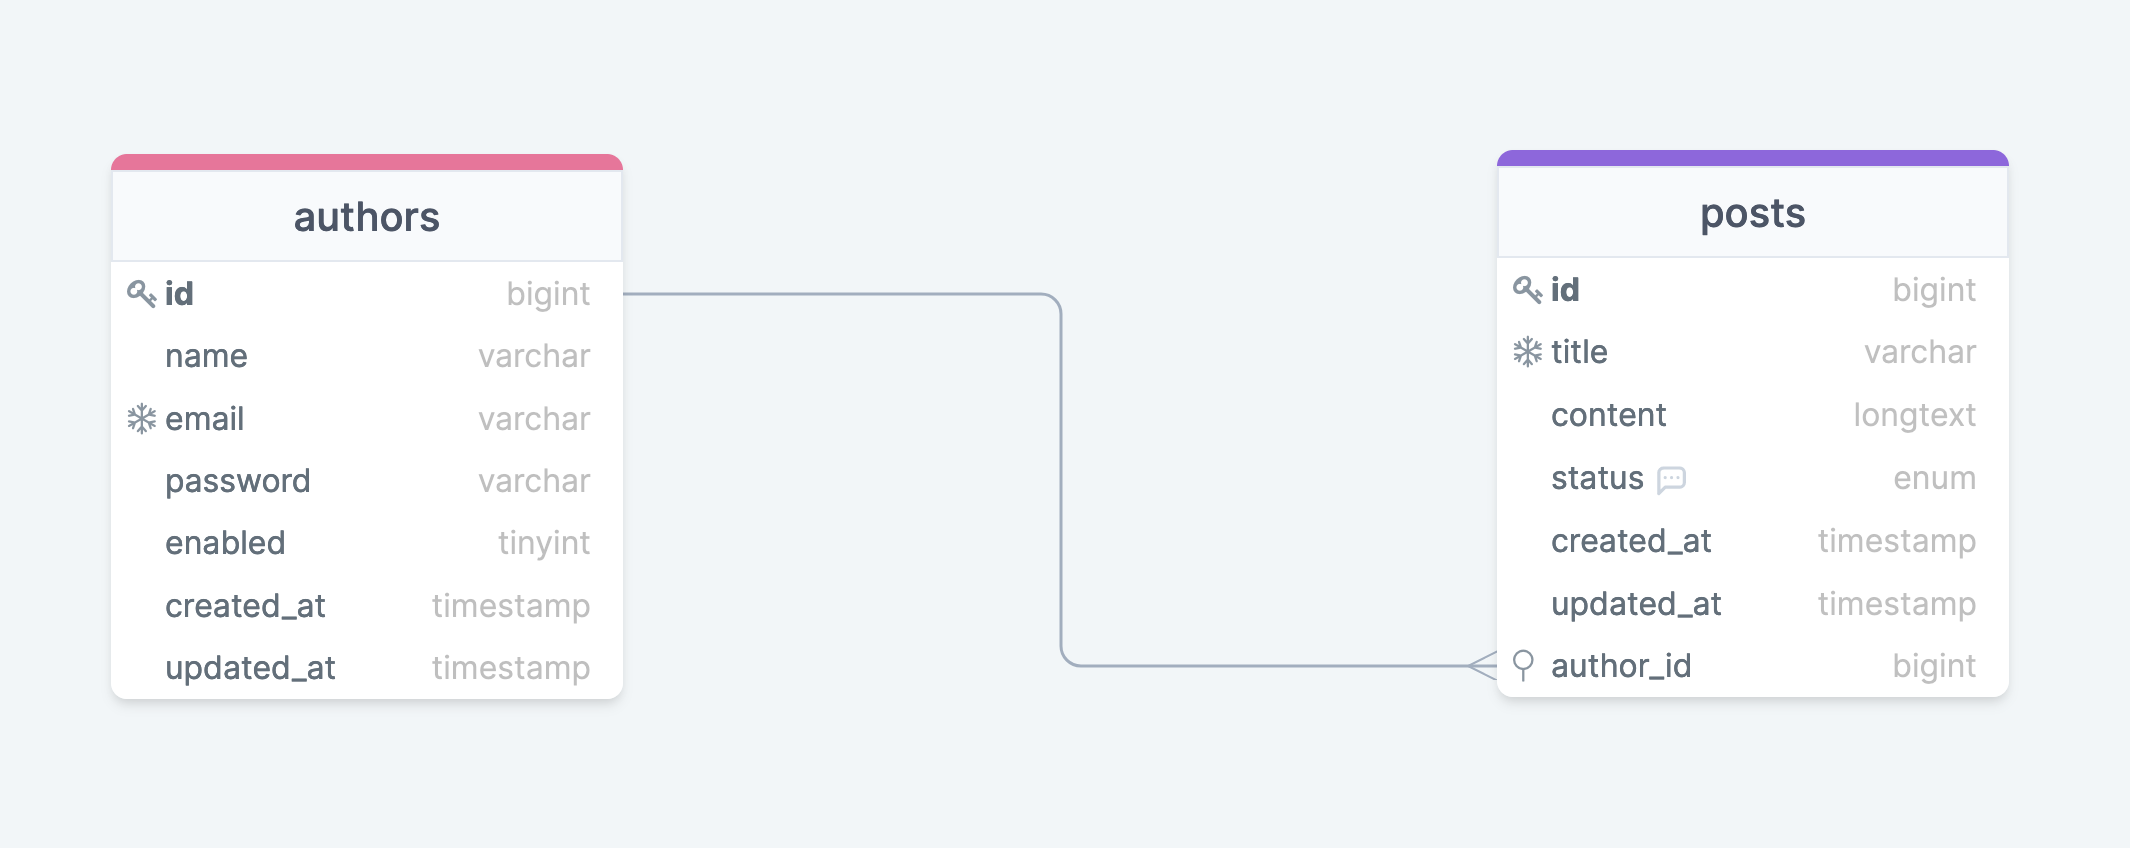
We will create the entities in Java with Hibernate and then make the migration that creates the tables related to these entities.
For this tutorial, you need Java 8+ and MySQL installed on your computer or Docker if you don't want to install MySQL on your computer. Indeed, you can start a Docker container from the MySQL Docker image. It will be enough to achieve the goal.
docker run -it -e MYSQL_ROOT_PASSWORD=secretpswd -e MYSQL_DATABASE=blog --name blog-mysql -p 3307:3306 mysql:8.0Install Flyway
Flyway has been released in two editions: The community edition and the team's edition. As you may guess, we will focus on the community version. It is available on every platform, and there are many ways to install them, so, depending on your platform, download the compressed file. The next step is to add it to your environment path so that your operating system can recognize the command "flyway" in the terminal.
At the moment I write this post, Flyway is at version 8.0.2.
This is the installation process for MacOS users:
- Download Flyway for MacOS on this page
- Once downloaded, we will uncompress it.
# Move the file from the download folder to the Home folder
mv flyway-commandline-8.0.2-macosx-x64.tar.gz $HOME

tar xf flyway-commandline-8.0.2-macosx-x64.tar.gz
A folder named "flyway-8.0.2" will appear in the Home directory.
3. Add the folder's path to the environment variable.
The file where to add may vary. It can be .profile, .bash_profile, .zsh, etc... Locate your own, open it, then at the line at the end of the file:
export PATH=$PATH:$HOME/flyway-8.0.2Save and exit. Reload your profile with the command: source <my_profile_file_path>.
Verify that the flyway command is recognized in the terminal by running flyway -v
Set up the project
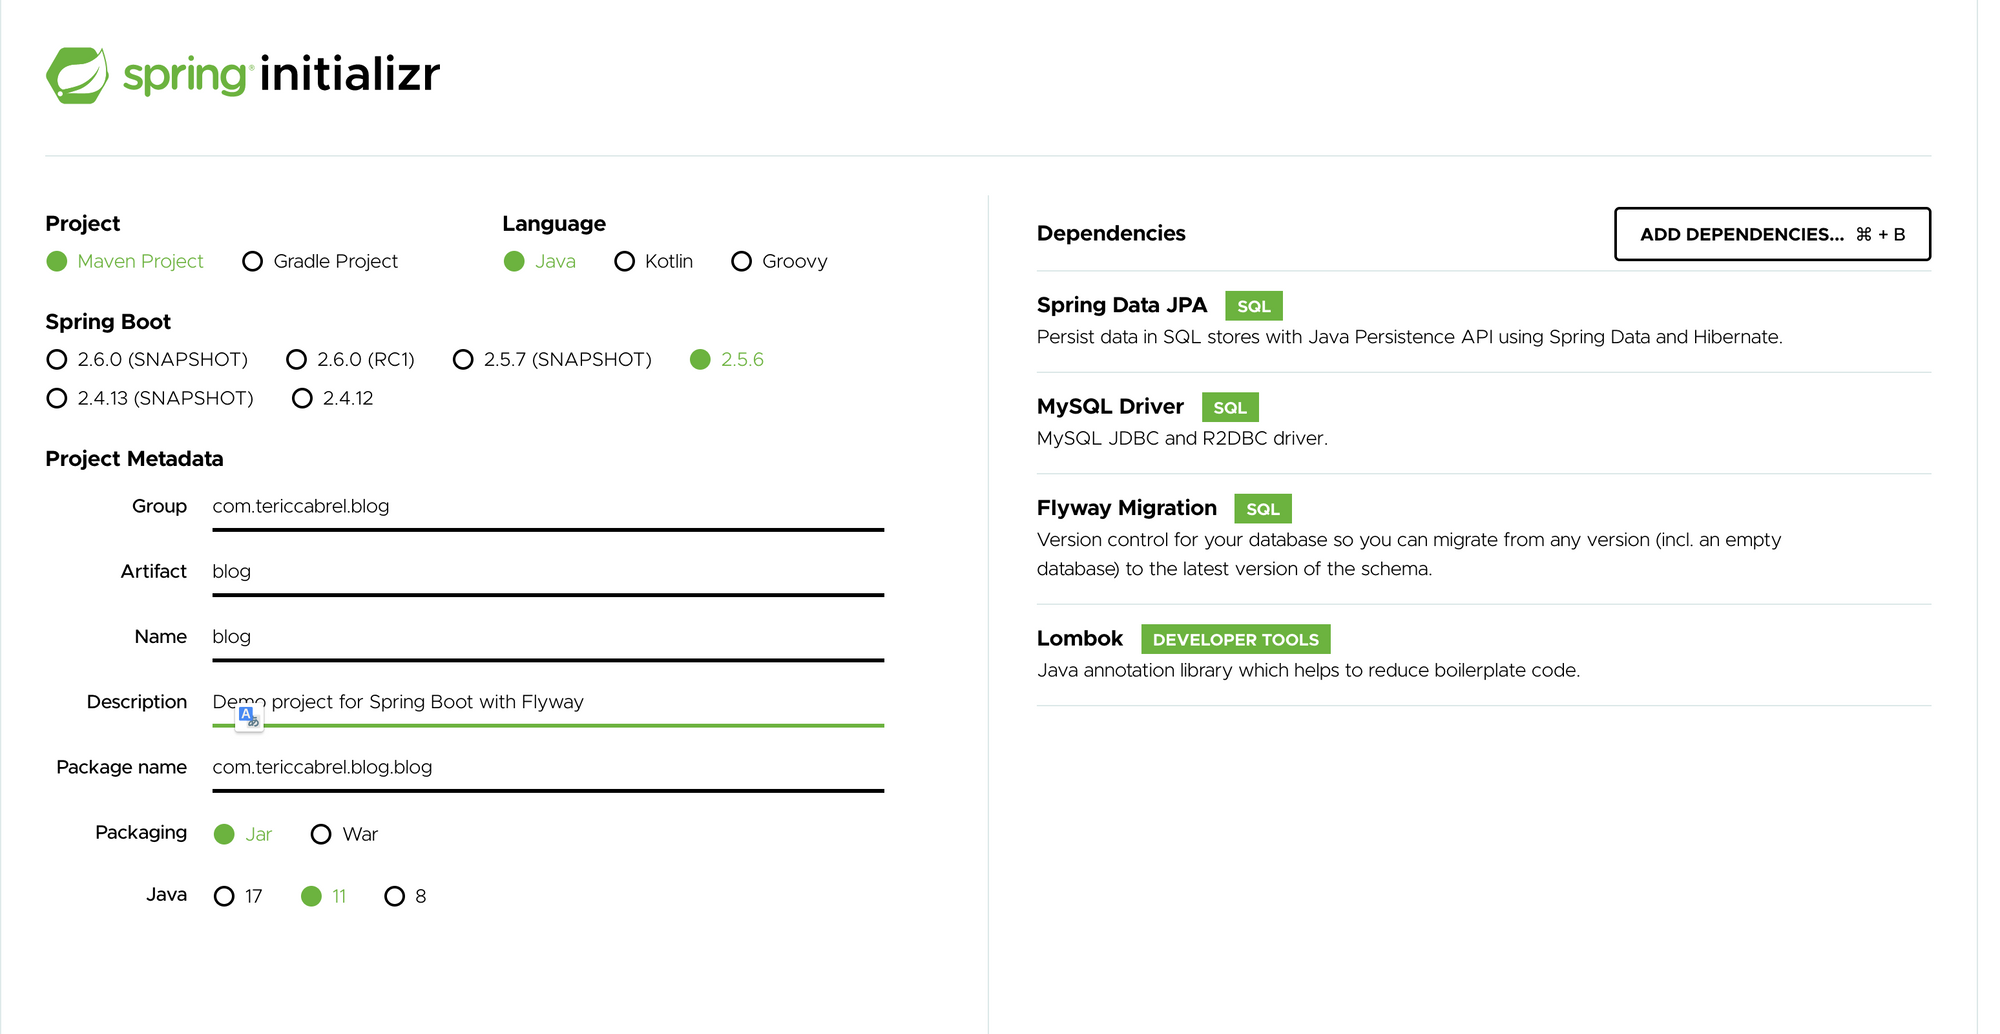
Let's set up the SpringBoot project with the necessary dependencies on start.spring.io
Update the configuration file resources/application.properties with the code below:
server.port=4767

spring.datasource.url=jdbc:mysql://localhost:3307/blog?serverTimezone=UTC&useSSL=false
spring.datasource.username=root
spring.datasource.password=secretpswd

## Hibernate properties
spring.jpa.hibernate.use-new-id-generator-mappings=false
spring.jpa.hibernate.ddl-auto=update
spring.jpa.show-sql=false
spring.jpa.open-in-view=false
Run the project with the command mvn spring-boot:run
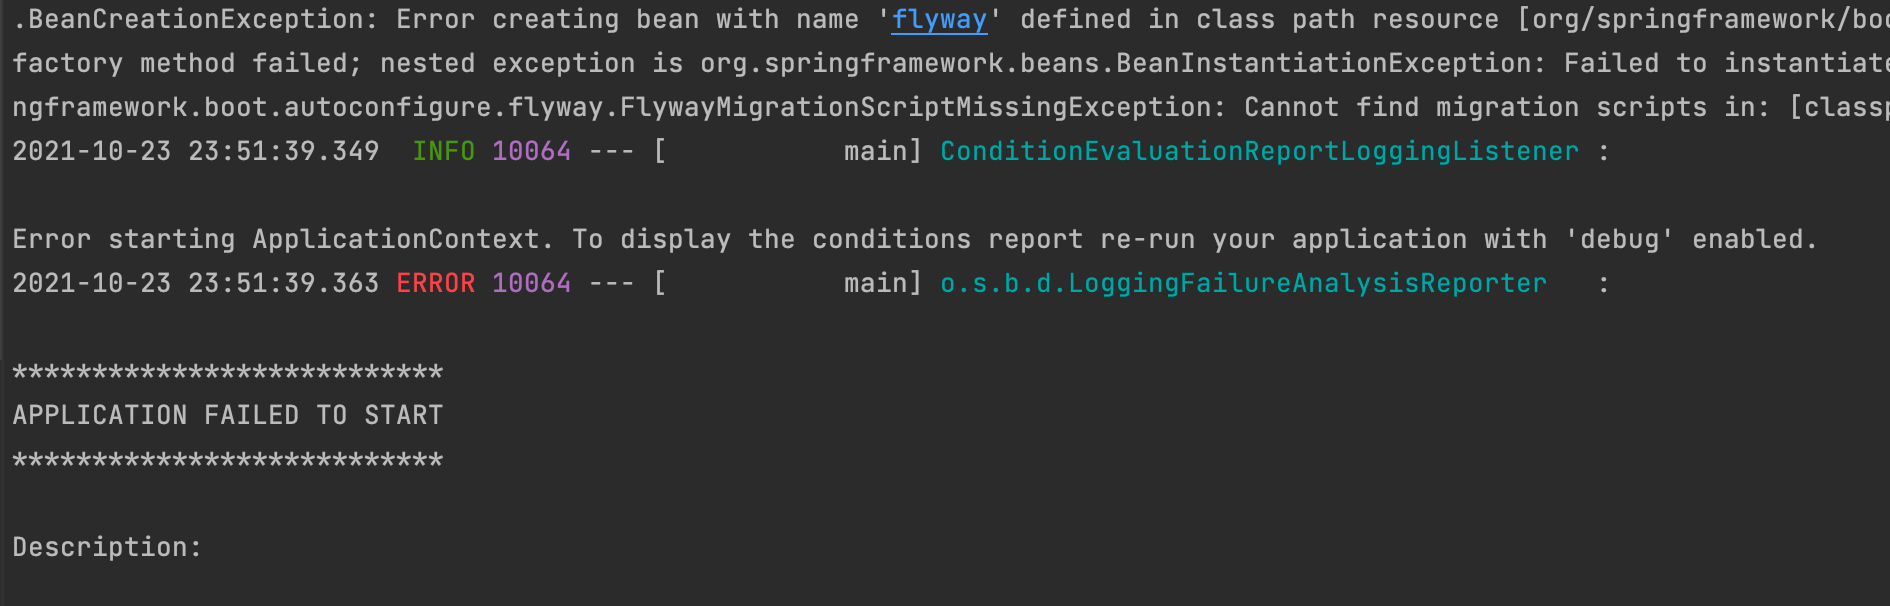
The application failed to start because Flyway is enabled by default but not configured yet in the project. There are two possible solutions.
- Disable Flyway for the project and use the CLI to manage the database migrations (we will see how to do that further)
To disable Flyway addspring.flyway.enabled=falsein the configuration file. - Configure Flyway in the project. The flyway package will detect the migrations in the defined folder and run them when launching the application. But for Flyway to run the migrations, he needs the credentials to connect to the database.
For now, we will go for the second option so update the configuration file with the code below:
spring.flyway.enabled=true
spring.flyway.url=jdbc:mysql://localhost:3307/blog?serverTimezone=UTC&useSSL=false
spring.flyway.user=root
spring.flyway.password=secretpswd
spring.flyway.group=true
The property spring.flyway.group set to true indicates we want to run the pending migrations in a single transaction instead of one transaction per pending migrations. So if one migration fails, all the executed migrations before will be rollbacked.
Run the project with the command mvn spring-boot:run
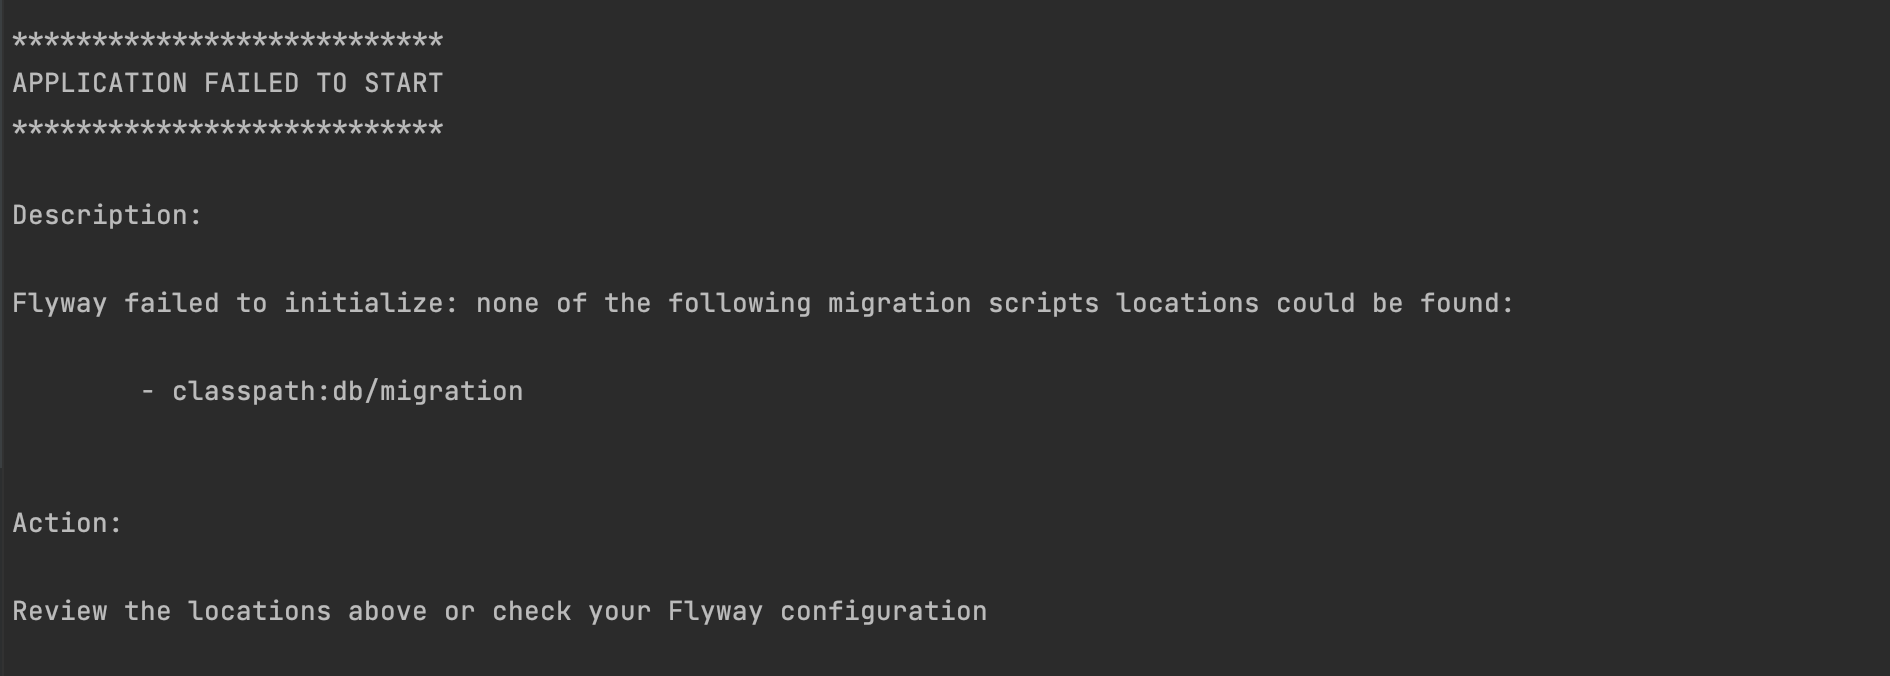
The application still fails to start because there is no migration to run. Let's create one.
Note: If you get an error "Public Key Retrieval is not allowed", append allowPublicKeyRetrieval=true to the value of the property spring.flyway.url.
Create the author's model
Create a package called entities then create a file Author.java and add the code below:
package com.tericcabrel.blog.entities;

import java.util.Date;
import javax.persistence.Column;
import javax.persistence.Entity;
import javax.persistence.GeneratedValue;
import javax.persistence.GenerationType;
import javax.persistence.Id;
import javax.persistence.Table;
import lombok.Data;
import org.hibernate.annotations.CreationTimestamp;
import org.hibernate.annotations.UpdateTimestamp;

@Data
@Table(name = "authors")
@Entity
public class Author {
  @Id
  @GeneratedValue(strategy = GenerationType.AUTO)
  @Column(name = "id", nullable = false)
  private Long id;

  @Column(unique = true, length = 100, nullable = false)
  private String name;

  @Column(length = 100, nullable = false)
  private String password;

  @Column(nullable = false, columnDefinition = "tinyint not null default 0")
  private boolean enabled;

  @CreationTimestamp
  @Column(updatable = false)
  protected Date createdAt;

  @UpdateTimestamp
  protected Date updatedAt;
}
Flyway migration filename pattern
There is already a folder created where to put the migration file; it is located at resources/db/migration. However, the name of the file must follow a specific pattern:
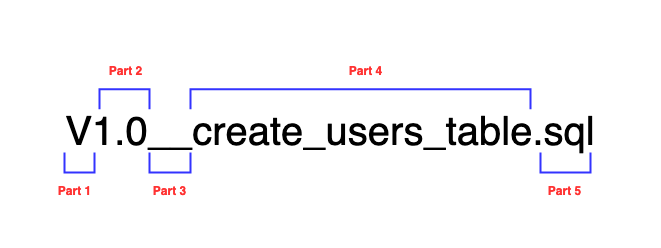
- Part 1: It is the letter "v" in uppercase. The name always starts with this letter.
- Part 2: It is the migration version; it can be 1, 001, 1.2.3, 2021.09.24.12.55.32, ... you got it.
- Part 3: It is the two underscores (_)
- Part 4: The description of the migration; you can separate words with an underscore or a space.
- Part 5: It is the extension of the file
.sql
The Part 1, 3 and 5 are configurable using the configuration file with this properties: spring.flyway.sql-migration-prefix, spring.flyway.sql-migration-separator, spring.flyway.sql-migration-suffixes.
spring.flyway.sql-migration-prefix=T
spring.flyway.sql-migration-separator=--
spring.flyway.sql-migration-suffixes=.blog
The migration file will be: T1.0--create_users_table.blog
We will keep the default configuration for the rest of the tutorial.
Create the migration for the author's table
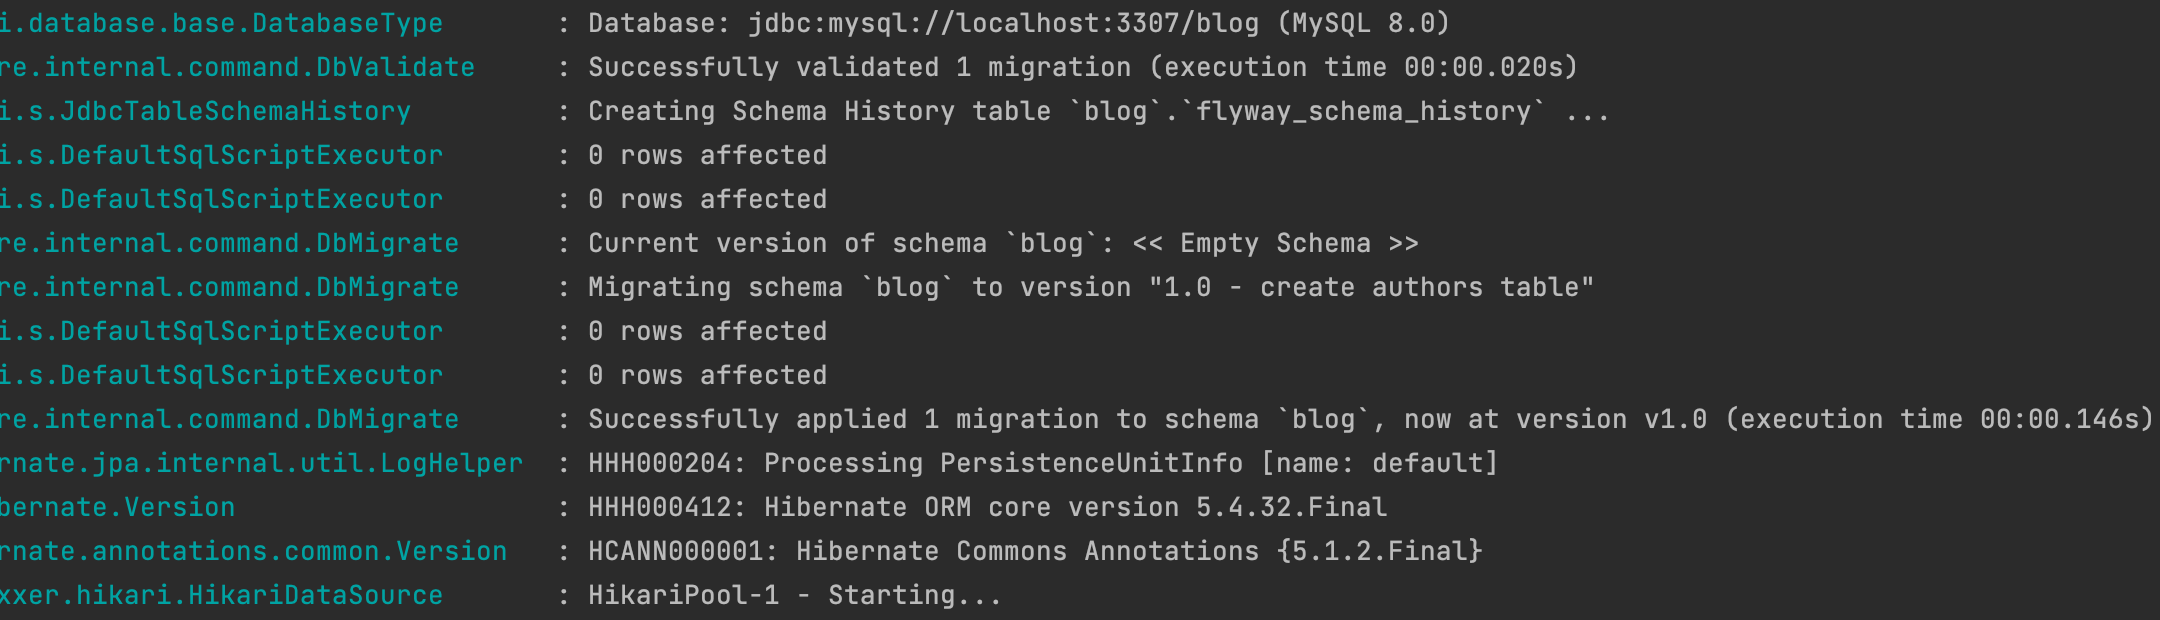
Inside the file resources/db/migration, create a file called V1.0__create_authors_table.sql and add the code below:
CREATE TABLE authors
(
    id         BIGINT            NOT NULL AUTO_INCREMENT,
    name       VARCHAR(100)      NOT NULL,
    password   VARCHAR(100)      NOT NULL,
    enabled    TINYINT DEFAULT 0 NOT NULL,
    created_at datetime          NULL,
    updated_at datetime          NULL,
    CONSTRAINT pk_authors PRIMARY KEY (id)
);

ALTER TABLE authors ADD CONSTRAINT uc_authors_name UNIQUE (name);
Rerun the project, and we got a beautiful message in the console.
Create a migration to add an email column
We forgot the field email in the author's entity if you pay attention. This is the perfect case where Flyway is helpful; we will create another migration for that.
Update the Author.java file by adding this code:
.....

@Column(unique = true, length = 100, nullable = false)
private String email;

.....
Create a migration file called: V1.1__add_email_in_authors_table.sql and add the code below:
ALTER TABLE authors ADD COLUMN email varchar(100) NOT NULL;
ALTER TABLE authors ADD CONSTRAINT uc_authors_email UNIQUE (email);
Create the migration for posts table
As for the user entity, we first create the entity Post with Hibernate; fin the code source of the file [here].
Inside the file resources/db/migration, create a file called V2.0__create_posts_table.sql and add the code below:
CREATE TABLE posts
(
    id            BIGINT                        NOT NULL AUTO_INCREMENT,
    title         VARCHAR(200)                  NOT NULL,
    `description` LONGTEXT                      NULL,
    status        VARCHAR(10) DEFAULT 'PENDING' NOT NULL,
    author_id     BIGINT                        NOT NULL,
    created_at    datetime                      NULL,
    updated_at    datetime                      NULL,
    CONSTRAINT pk_posts PRIMARY KEY (id)
);

ALTER TABLE posts ADD CONSTRAINT uc_posts_title UNIQUE (title);

ALTER TABLE posts
    ADD CONSTRAINT FK_POSTS_ON_AUTHOR FOREIGN KEY (author_id) REFERENCES authors (id);
Rerun the project to apply the migration.
Run migration from Flyway
As stated previously, Flyway is used behind the scene by SpringBoot. What if we want to use the CLI?
- Disable the flyway in the configuration file:
spring.flyway.enabled=true. - Create a file called flyway.properties at the project root, copy the flyway properties inside the configuration file and paste it into this file, and finally, remove the prefix "spring".
- Add a new line to indicate the location of the migration:
flyway.locations=filesystem:src/main/resources/db/migration
We got something like this:
flyway.url=jdbc:postgresql://localhost:5432/giva?serverTimezone=UTC&useSSL=false
flyway.user=teco
flyway.password=suprageek95
flyway.group=true
flyway.locations=filesystem:src/main/resources/db/migration
Now run the command below to execute the migrations.
flyway migrate -configFiles=flyway.propertiesNote: You must be in the project directory to run the command.
Rollback a migration
It may happen you want to roll back a migration; run the command below:
flyway undo -configFiles=flyway.propertiesConclusion
It is the end of this post, and now you have the basis to start using Flyway in your enterprise project, and there is still so much to learn about using the capabilities of Flyway. I recommend checking out the documentation for more.
You can find the code source on the GitHub repository.
Follow me on Twitter or subscribe to my newsletter to avoid missing the upcoming posts and the tips and tricks I occasionally share.