
Publish a message to many Node.js applications using RabbitMQ


Photo by Maria Teneva / Unsplash
In the previous post, we saw how to make two applications communicate asynchronously using RabbitMQ. The producer sends a message in the queue, and the consumer retrieves it from the queue and processes it.
We also saw that as soon as the message is consumed by one application, it is not visible to other applications listening to that queue unless the former re-queues the message. The consequence is that if two applications are listening to the same queue, one will not get the message.
The use case
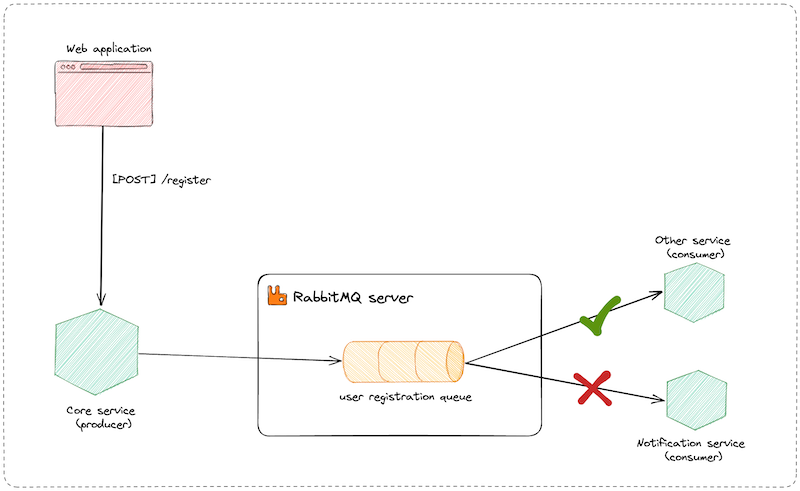
In the previous post, the core backend application (producer) sends a message in the queue when a user registers. The notification service consumed the message to send a confirmation email to the user.
Now we have an analytic service that computes system data, and some of them are re-computed when there is new user registration (if you thought about Salesforce or Chartmogul, you are on a good track).
With the current system, when the core service sends a message in the queue, either the notification service or the analytic service will receive the message and never both, which is what we want.
This is bad for our business, and we will see how to fix it by exploring another capability of RabbitMQ called exchanges.
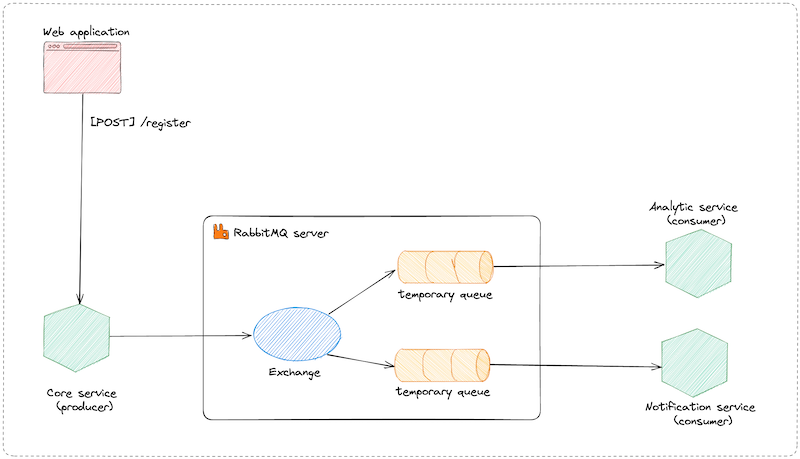
The picture below shows the system architecture.
What is an Exchange?
An exchange is a message-routing agent that routes messages to queues based on the message properties, such as the routing key, headers, or other application-specific information.
There are four types of exchanges.
| Type | Description |
|---|---|
| Direct | Routes messages to queues based on the message routing key. |
| Fanout | Routes messages to all queues bound to it. |
| Topic | Routes messages to one or many queues based on matching between a message routing key and the pattern that was used to bind a queue to the exchange. |
| Headers | Routes messages based on the message headers. |
The Direct exchange is the default one; when you send a message directly to a queue, under the hood, this exchange is used with the routing key set to the queue's name.
The Fanout exchange
This exchange receives a message and forwards it to all the queues bound to him.
In our use case, if the notification service listens to the queue user-registration-notification and the analytics to user-registration-analytic and these two queues are attached to a Fanout exchange; when we publish a message into the exchange, the message will be broadcast to both queues, and thus both services will process the message.
This might look like the solution, but if you think further about what will happen when there is a new event or a new service. For the former, we must create a new queue for each service; for the latter, we must create queues for each event. It will become a night to manage. Fortunately, RabbitMQ provides a solution to this called temporary queue.
A temporary is created when a service connects to RabbitMQ; it is used throughout the time the service remains connected, and when it disconnects, the queue is deleted.
This is the summary of the steps to implement for each consumer:
- Connect to the RabbitMQ server
- Create a temporary queue
- Bind the temporary queue name to the Fanout exchange created earlier from the Web administration interface
- When a producer sends a message to the Fanout exchange, it will forward to the temporary.
- At the Disconnection, the temporary queue is deleted.
Prerequisites
To follow this post, you will need to install this tool on your computer:
- Node.js 16 or higher - download link
- A Node.js package manager such as NPM or Yarn.
Set up the project
We will start from the project of the previous tutorial, where we already had a producer and a consumer (notification service). The project is in the blog repository GitHub.
git clone --no-checkout https://github.com/tericcabrel/blog-tutorials.git

cd blog-tutorials

git sparse-checkout init --cone

git sparse-checkout set node-rabbitmq

git checkout @

cd node-rabbitmq
To learn more about Git sparse checkout, read my post.

Create the exchange
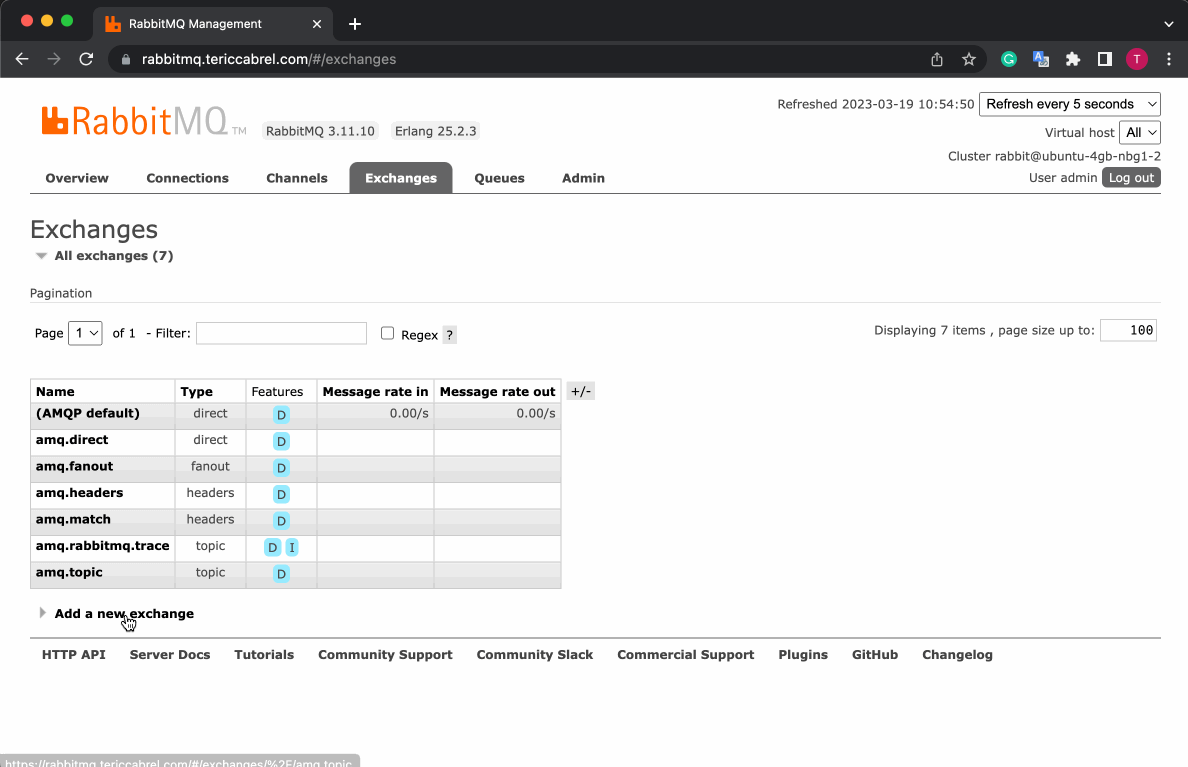
Log into the RabbitMQ Web administration interface and go to the tab to create an exchange named `users`.
Publish a message in the exchange
We will update the producer to send the message in the exchange instead of the queue.
Inside the folder app-producer, we will update the file src/index.ts to change the way we publish the message by the code below:
app.post('/register', async (req, res) => {
  const { email, name } = req.body;

  // TODO save register in the database

  const EXCHANGE_NAME = 'users';
  const messageData = {
    fullName: name,
    emailAddress: email,
    confirmationCode: Math.floor(Math.random() * 900000) + 100000,
  };
  const messageDataAsString = JSON.stringify(messageData);

  const channel = await rabbitConnection.createChannel();

  await channel.assertExchange(EXCHANGE_NAME, 'fanout', {
    durable: false,
  });

  channel.publish(EXCHANGE_NAME, '', Buffer.from(messageDataAsString));

  return res.json({ message: 'User registered successfully' });
});
We define variables for the exchange's name and the payload of the message to send, then we assert the exchange exists and is a fanout and finally publish the message in the exchange.
Receive a message sent in an exchange
Inside the folder app-consumer, replace the content of the file src/index.ts with the code below:
import { connectToRabbitMQ } from './rabbitmq-connection';

(async () => {
  const EXCHANGE_NAME = 'users';

  const rabbitConnection = await connectToRabbitMQ();

  console.log('Successfully connected to RabbitMQ server!');

  const channel = await rabbitConnection.createChannel();

  const assertQueueResult = await channel.assertQueue('', { exclusive: true });

  await channel.bindQueue(assertQueueResult.queue, EXCHANGE_NAME, '');

  await channel.consume(assertQueueResult.queue, async (message) => {
    if (!message) {
      console.error('Consumer cancelled by server!');
      return;
    }

    const data = JSON.parse(message.content.toString());

    console.table(data);

    // TODO send an email using the data

    console.log('Email sent successfully!');
  }, { noAck: true });
})();
The line below creates the temporary queue and makes it exclusive to this client.
const assertQueueResult = await channel.assertQueue('', { exclusive: true });
When we consume the message, we don't need to send an acknowledgment because the current client can only read messages from it.
Read a message from a second consumer
Let's create the analytic service that will be bound to the exchange users. It is almost the same code as the app-consumer. Let's duplicate it and change what is needed.
cp -r app-consumer app-consumer-analytic

cd app-consumer-analytic

rm -rf node_modules

yarn start

nano src/index.ts
Replace the TODO comment and the console.log() message to distinguish it from the notification service, and it's done. The rest will just work.
// TODO compute new analytics using the data

console.log('Compute done successfully!');
See the system in action
Let's test it by running our three services by running the command yarn start in each folder.
Send a request from Postman to the app-producer, and you will see the output in the console of the app-consumer and also the app-consumer-analytic.
What happens when no consumer is available?
In the above demo, our two consumers were up and connected to the RabbitMQ server and received the message published as expected.
What will happen if the producer sends a message and no consumer is available? The short answer is: the message is lost forever.
To understand, the message is published in an exchange, not a queue, yet only a queue can keep a message when no consumer is available. When the consumer is connected, a temporary queue is created and deleted when it disconnects so the exchange can't broadcast; thus, the message is dropped.
This is a significant drawback of the publish/subscribe pattern.
Wrap up
Exchange in RabbitMQ allows a single application to publish a message to many consumers. This gives more flexibility in how we structure our services and makes it easy to have low coupling between services.
Here are some takeaways:
- Understanding the different exchange types and their routing algorithms is essential to properly designing your RabbitMQ messaging architecture.
- An exchange broadcasts a message received to all the queues bound to it.
- Each consumer creates a temporary queue and binds it to the exchange. This queue is deleted when the consumer disconnect.
- When a message is published, and no consumer can receive it, the message is lost forever.
You can find the code source on the GitHub repository.
Follow me on Twitter or subscribe to my newsletter to avoid missing the upcoming posts and the tips and tricks I occasionally share.