
Send email in Node.js using Handlebars and Amazon SES


Photo by Mediamodifier / Unsplash
It is common to send emails from a Web application to notify users about events related to their interaction with the system, such as account confirmation, password reset, order confirmation, etc.
Emails are sent through the SMTP protocol, which requires a server from one side and a client to send the request to the server. SMTP servers are handled by companies such as Yahoo, Google, AWS, etc...
This post shows how to use Amazon SES (Simple Email Service) to send emails from a Node.js application. We will use account creation, which usually requires confirmation through email, as the use case.
Prerequisites
You must need these tools installed on your computer to follow this tutorial:
- Node.js 20+ - Download's link
- NPM or Yarn - I will use Yarn
- An AWS account to use Amazon SES
Set up the project
I created a boilerplate to quickly start a Node.js project with Express Framework; check it out on my GitHub repository. Let's clone it and make it work locally:
git clone https://github.com/tericcabrel/node-ts-starter.git -b express node-email-ses

cd node-email-ses

cp .env.example .env

yarn install

yarn start
Navigate to the URL http://localhost:4500 to verify it works as expected.
This project uses the package dotenv to load environment variables from a file named .env . The repository contains a template file named .env.example.
Check out the blog post below to learn how to achieve that.

Build the email template with Handlebars
The email body is where the content lies. The content can be plain text or HTML. HTML allows you to build good-looking email content, so the first part is to create that email template.
We will use a template engine to take advantage of the possibility of injecting variables into our template. The most popular template engine in Node.js is Handlebars. Let's install it:
yarn add handlebars
Create a folder named src/mail-template then, create a file confirm-account.html and add the code below:
<!DOCTYPE html>
<html lang="en">
<head>
    <title>Registration confirmation</title>
    <meta http-equiv="Content-Type" content="text/html; charset=UTF-8" />
    <style>
        body {
            font-family: calibri, 'DejaVu Sans', Arial, Helvetica, sans-serif;
            background-color: #cbd5e1;
        }
        .container {
            margin: 0 auto;
            width: 600px;
            padding: 10px 30px 30px 30px;
            box-shadow: 0 0 4px #ddd;
            background-color: #f3f4f6;
            border-radius: 5px;
        }
        a.link {
            border: solid 1px #0ea5e9;
            background-color: #0ea5e9;
            text-decoration: none;
            color: #fff;
            font-weight: bold;
            display: block;
            width: 400px;
            text-align: center;
            padding: 10px 0;
            margin-top: 50px;
            border-radius: 5px;
        }
        .text-blue {
            color: #0ea5e9;
        }
    </style>
</head>
<body>
<div class="container">
    <h1 class="text-blue">Confirm your account</h1>
    <div>Welcome <b class="text-blue">{{name}}</b> !</div>
    <p>
        Your account has been created on our platform
        <br/><br/>
        Find your login information below:
        <br/><br/>
        <span style="font-size: 14px; font-weight: bold">
            Email address : <span class="text-blue">{{email}}</span>
        </span>
        <br/><br/>
        To confirm the validity of your email address, please click on the link below
    </p>
    <p>
        <a class="link" href="{{url}}" target="_blank">Confirm my account</a>
    </p>
    <br>
    <p>
        Regards, <br />
        <em>The AwesomeApp Team</em>
    </p>
</div>
</body>
</html>
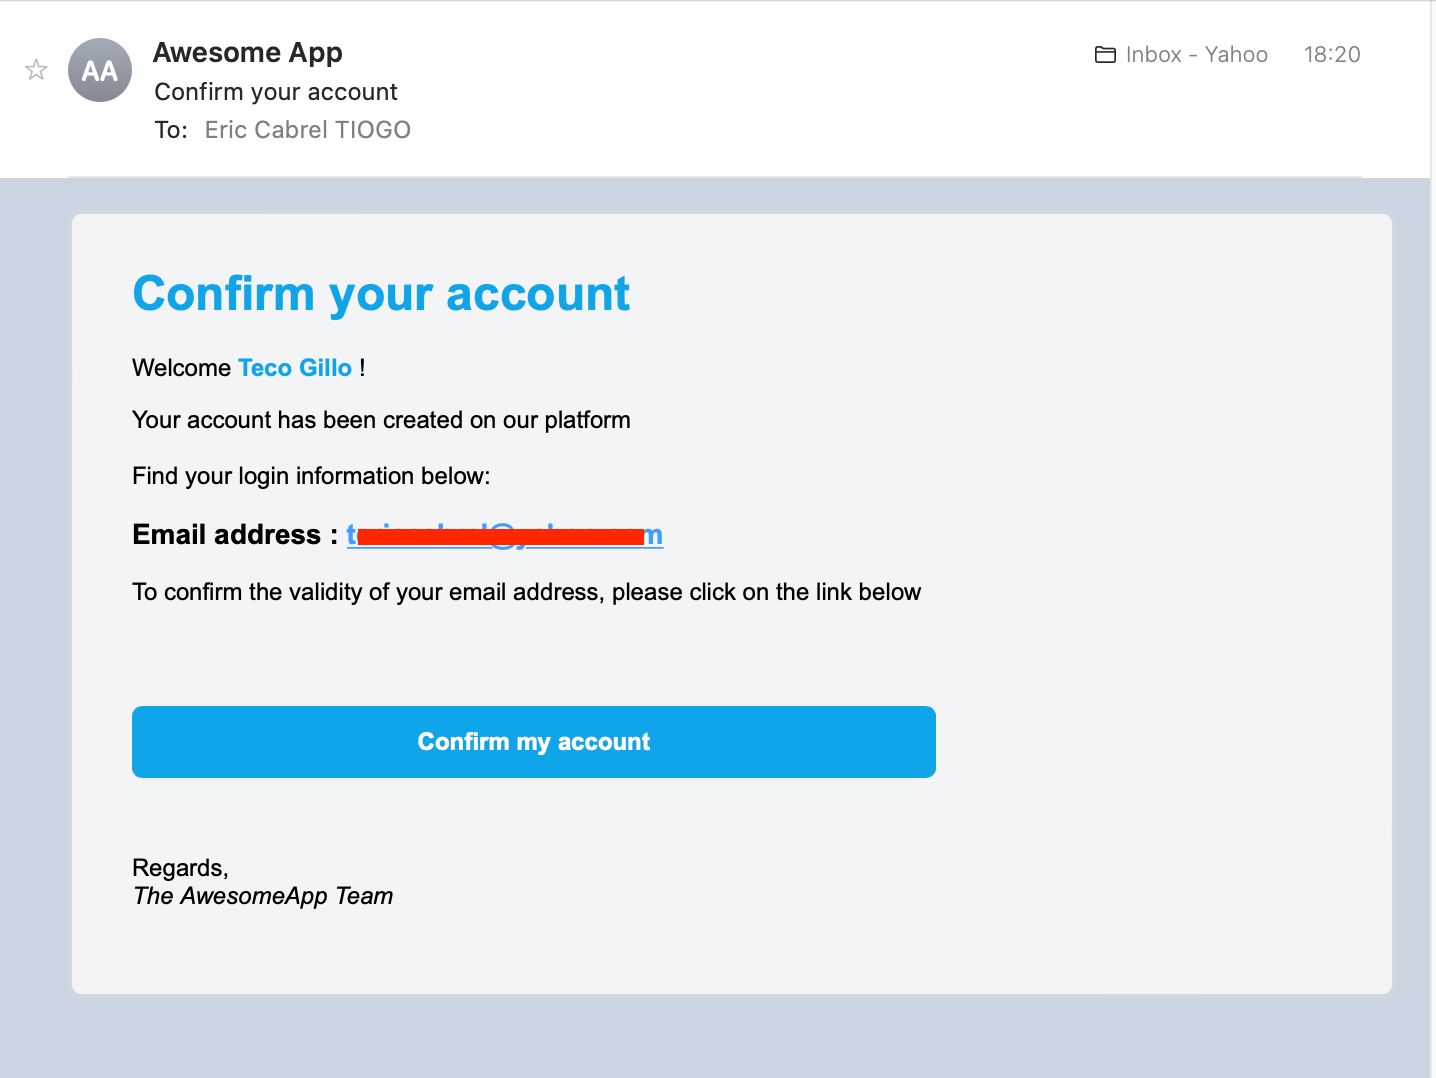
This HTML code provides the preview below:
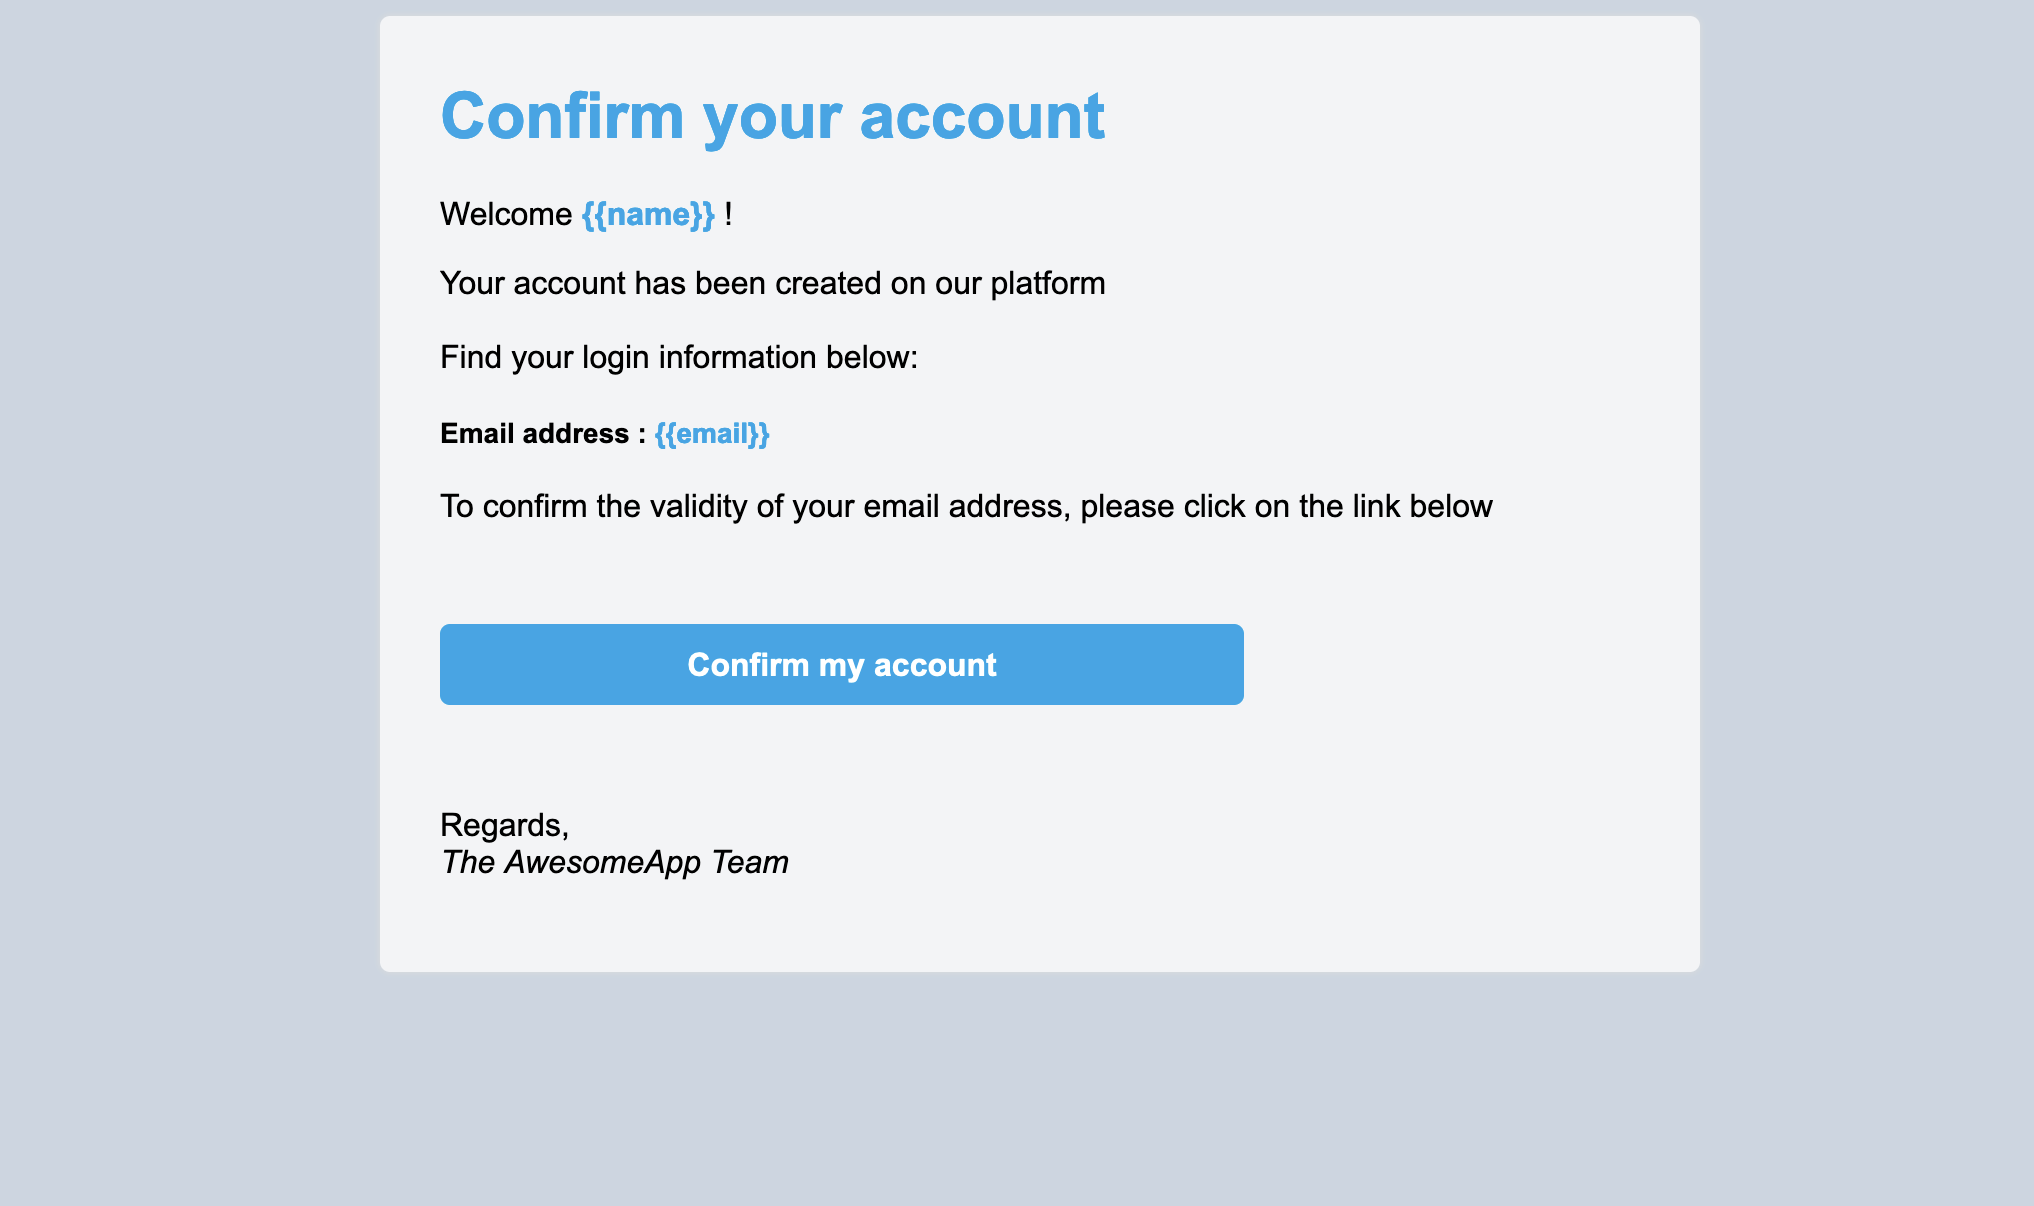
The keyword {{name}} and {{email}} will be replaced with respectively the user name and email. Handlebars provide a method handlebars.compile() to generate the HTML content from this template.
Configure AWS SES
To send emails with Amazon SES, we must first set up SES from the AWS console and validate the sender's email address.
Before going further, check out the Amazon SES pricing.
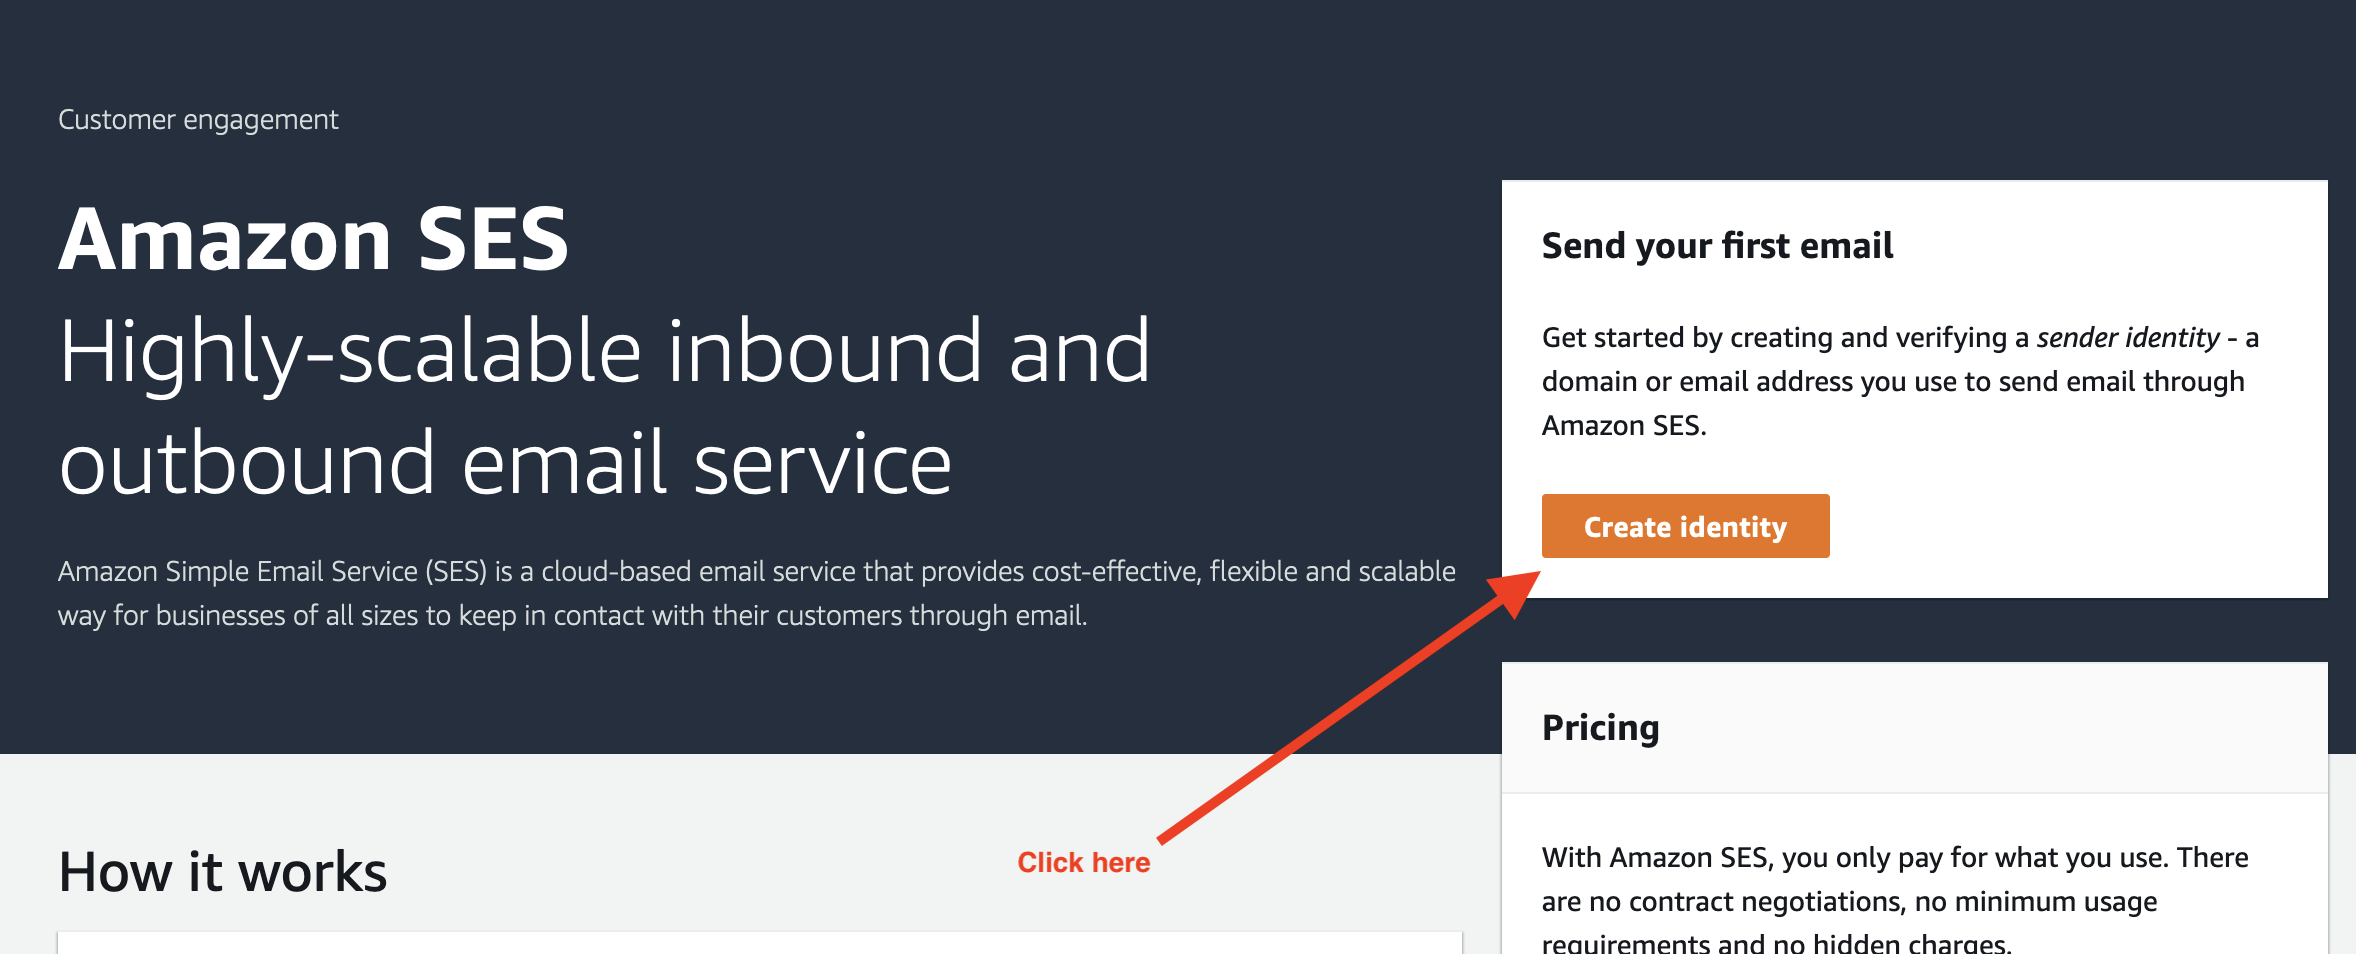
Go to AWS Console, authenticate, then find the service SES. You will have the page below; click on the button "Create identity"
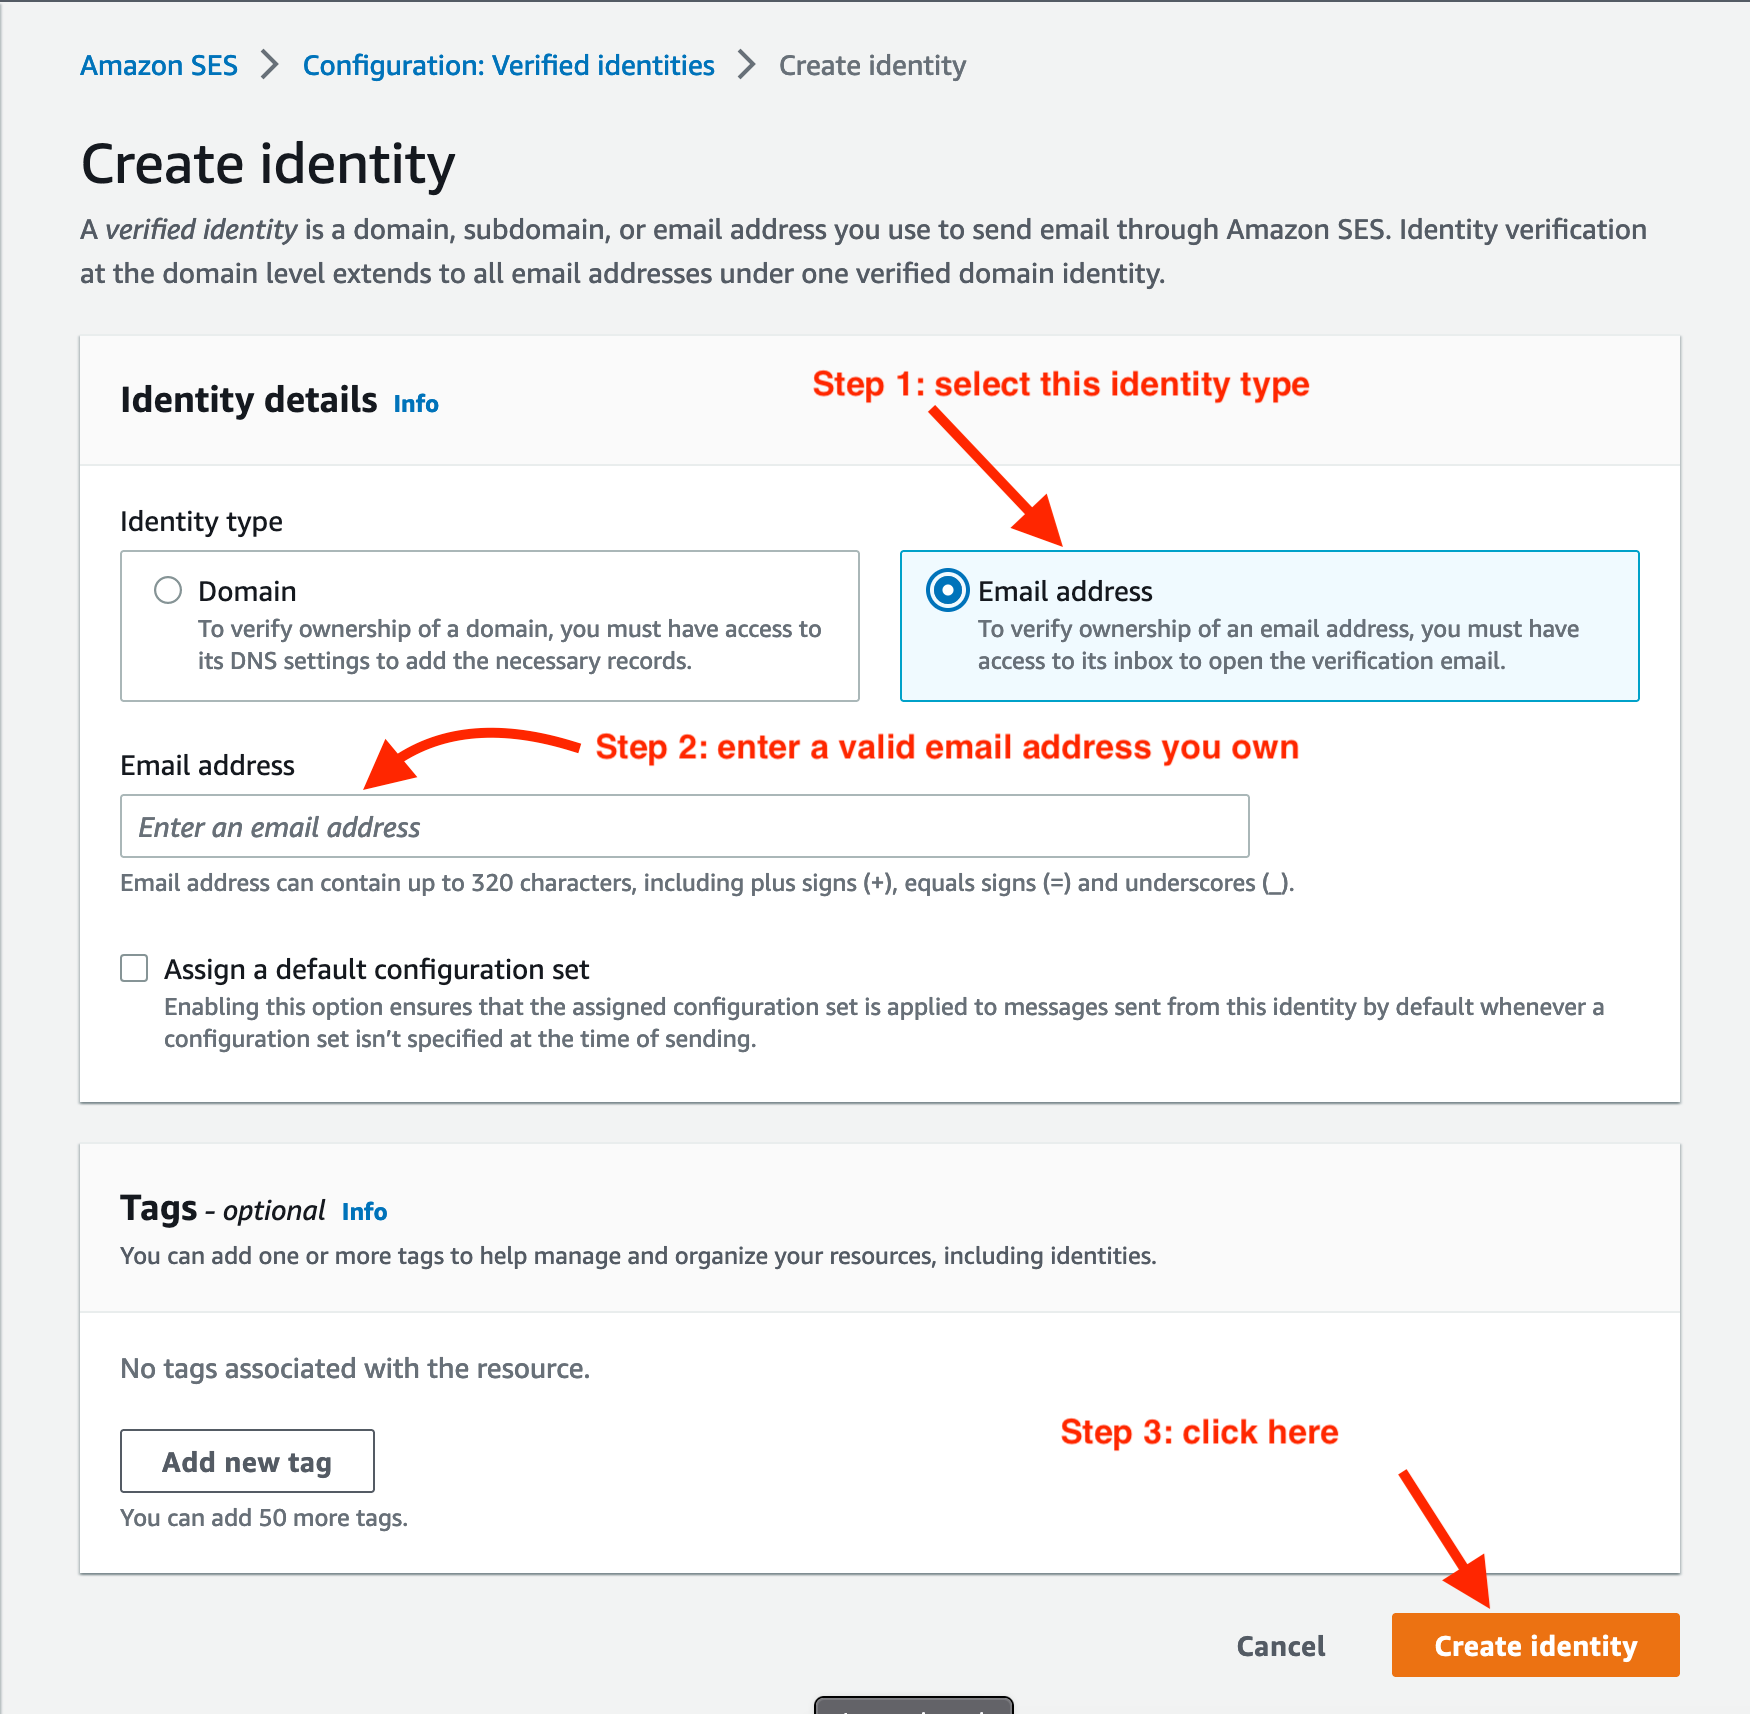
There are two identity types: Domain and Email address; the former requires a domain name while the latter requires an address email. We will take the second identity type for simplicity.
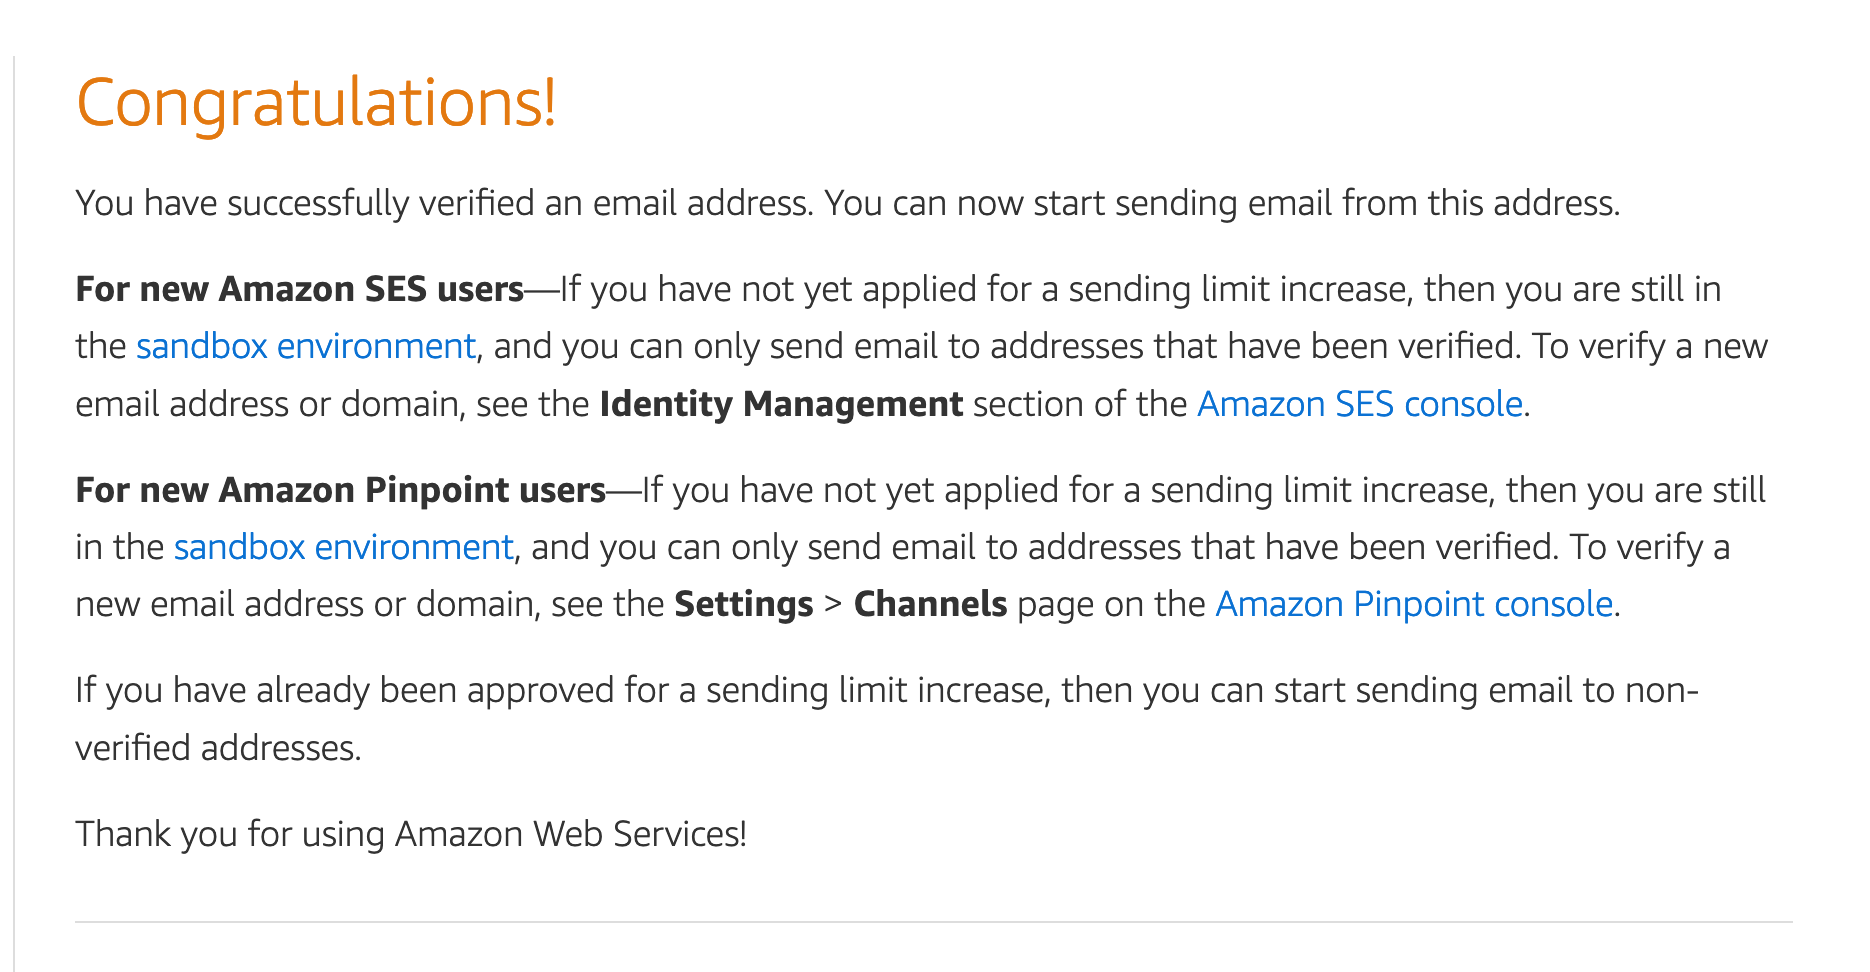
You will be redirected to a page showing a banner like in the picture below:

Go to your email address inbox and click the link provided. You will be redirected to a successful validation page:
Now, we can send emails using this identity.
Configure STMP settings
The identity is verified, but to send an email, we need SMTP credentials that consist of four pieces of information:
- The SMTP host:
email-smtp.<region>.amazonaws.com - The SMTP port:
587 - The username: to create
- The password: to create
Let's get the two remaining pieces of information:
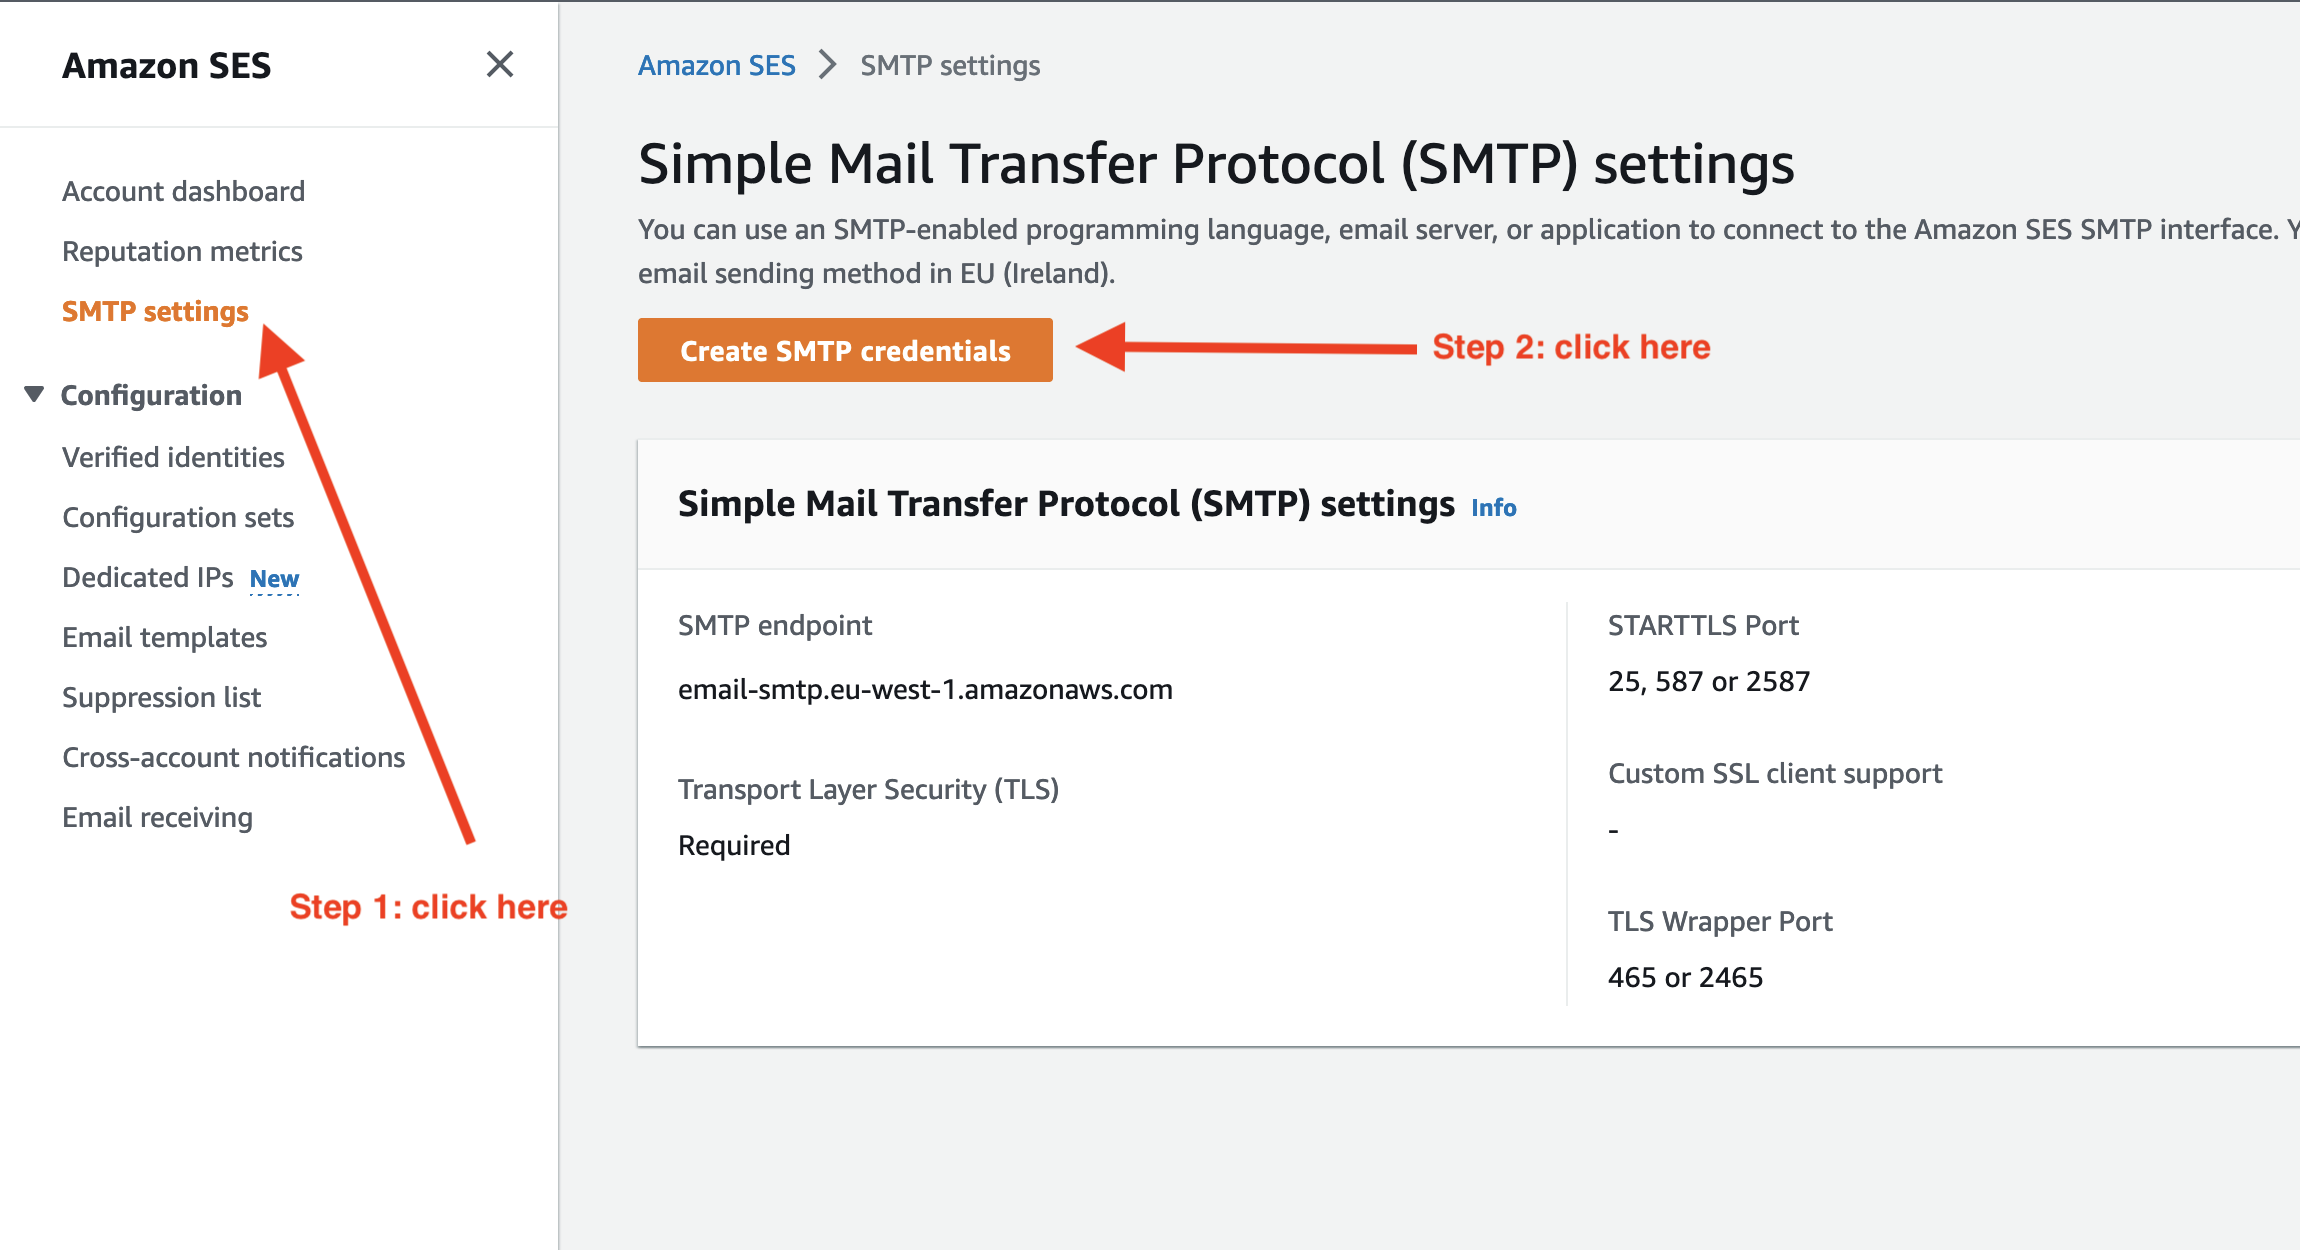
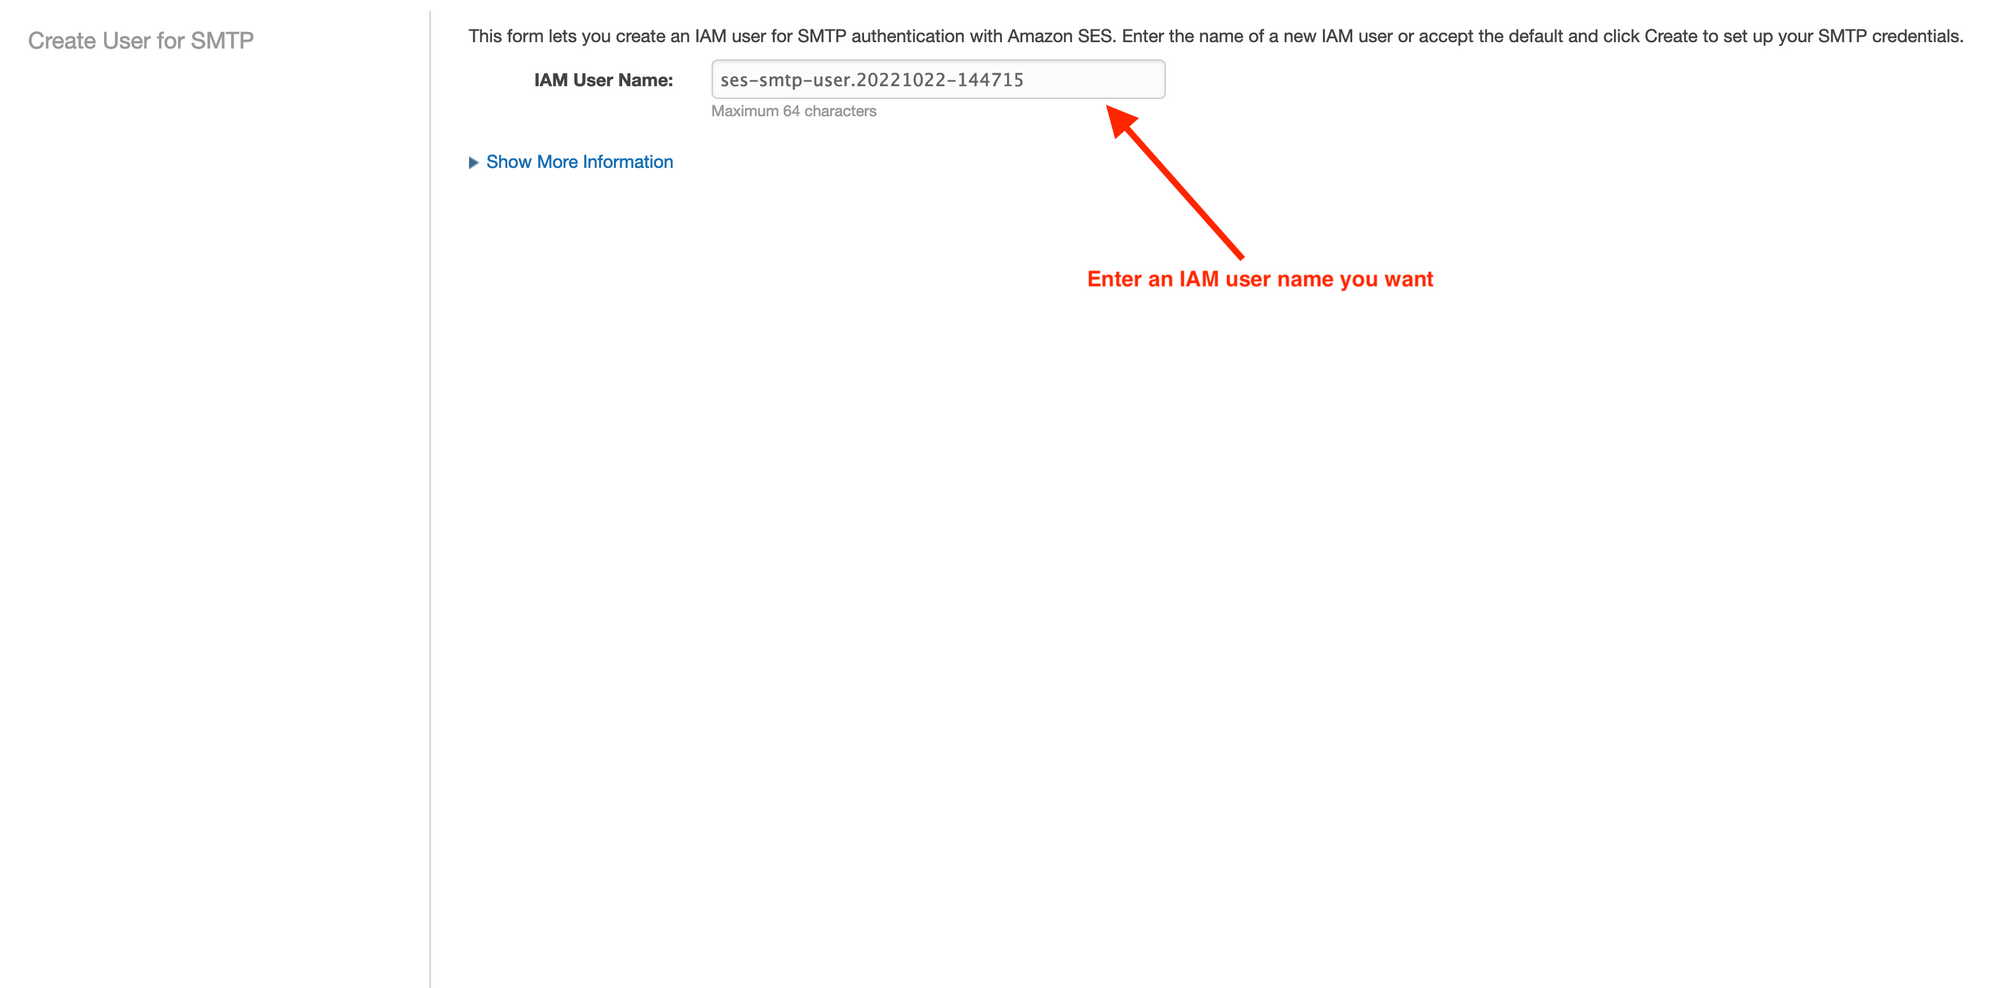
You will be redirected to the page below; enter an IAM user name you want and click on the button "Create credentials" at the bottom right.
On the next page, you will see the generated credentials; you can copy or download the file containing them.
The file downloaded is a CSV file containing the IAM User name, the STMP username, and the STMP password.
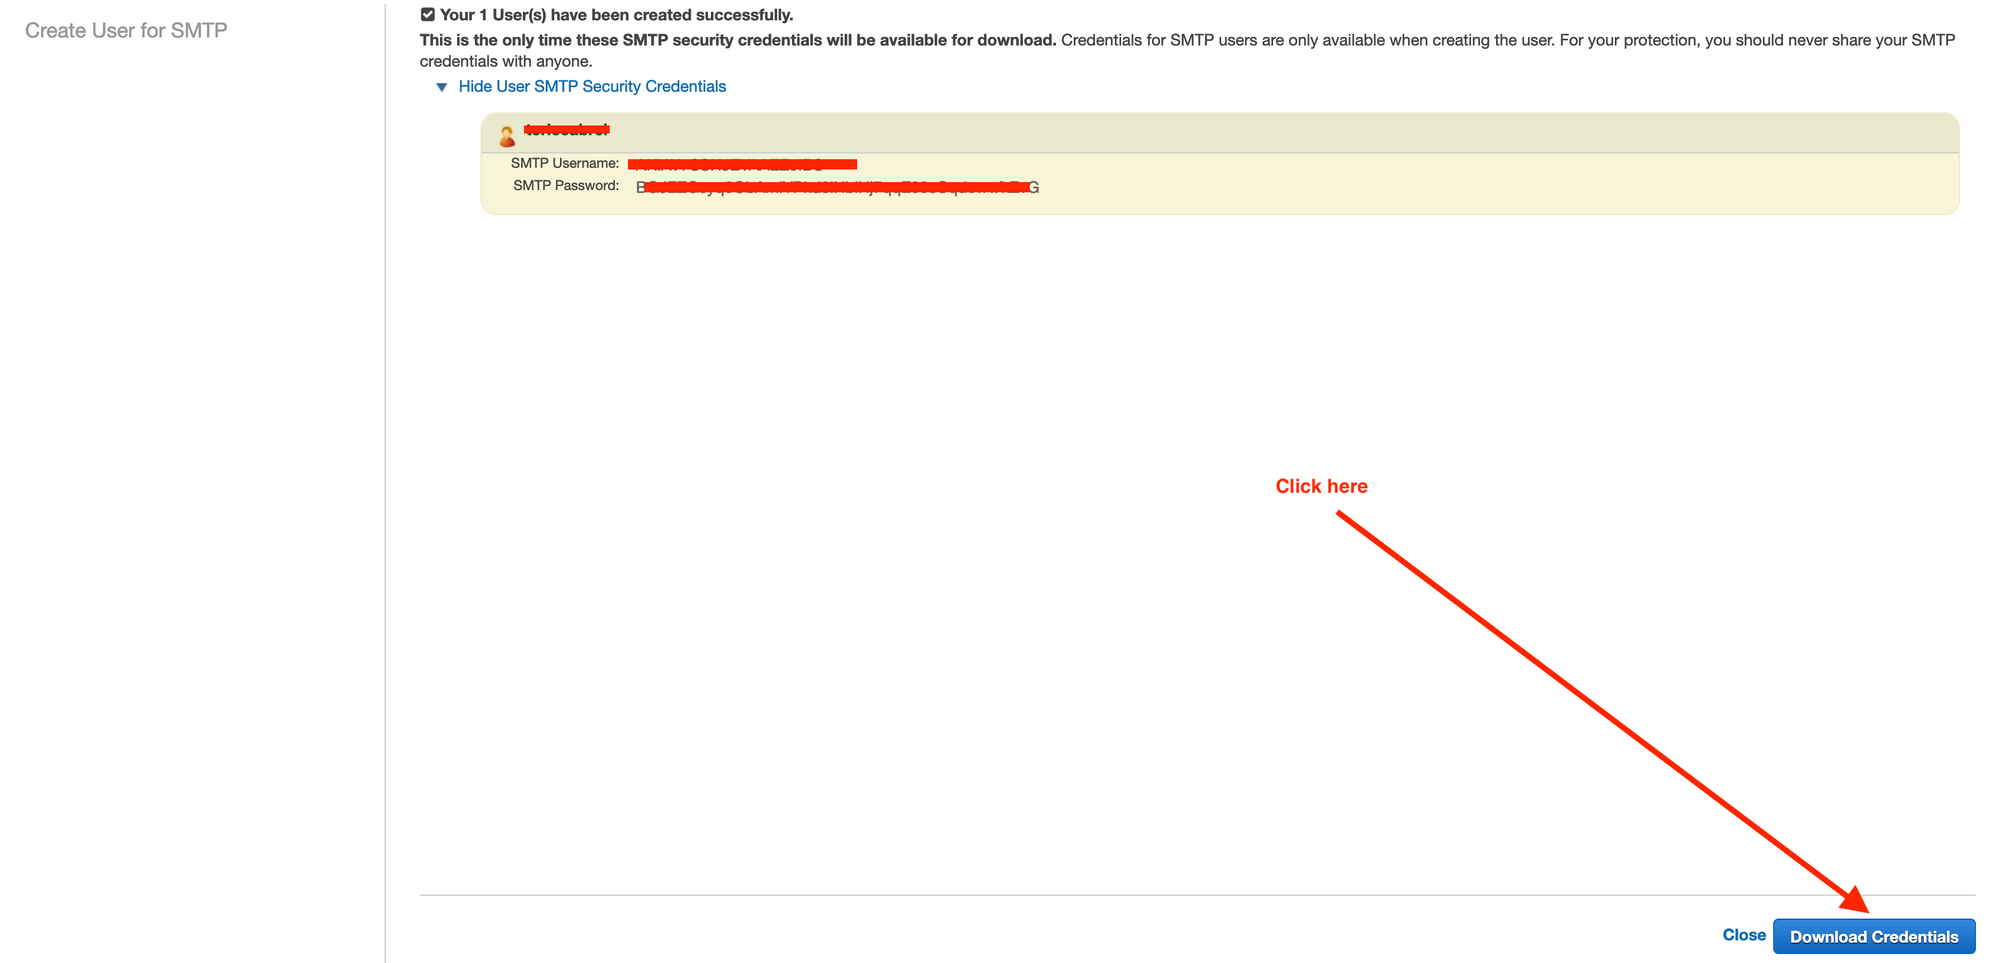
We can move to the next step.
Install the STMP client
To send an email from a Node.js application, we need an STMP client, which we will use the Node.js package nodemailer.
Run the command below to install the package:
yarn add nodemailer
yarn add -D @types/nodemailer
Create an endpoint to trigger the sending
We will create a route /register in the POST method, the request body must have the email address and name of the user. We will not handle the registration in the database.
Update the file src/index.ts to add the code below:
type ConfirmEmailPayload = {
  email: string;
  name: string;
  url: string;
};

app.post('/register', async (req, res) => {
  const { email, name } = req.body;

  // TODO Save user into the database

  const fromEmailAddress = process.env.FROM_EMAIL;
  const smtpHost = process.env.STMP_HOST ?? '';
  const smtpPort = parseInt(process.env.STMP_PORT ?? '587', 10);
  const smtpUser = process.env.STMP_USER ?? '';
  const smtpPassword = process.env.STMP_PASSWORD ?? '';

  const smtpTransport: Mail = nodemailer.createTransport({
    host: smtpHost,
    port: smtpPort,
    auth: {
      user: smtpUser,
      pass: smtpPassword,
    },
  });

  const confirmationUrl = 'generated_confirmation_url';
  const templateData: ConfirmEmailPayload = {
    email,
    name,
    url: confirmationUrl,
  };

  const templatePath = path.join(__dirname, './email-template/confirm-account.html');
  const source = fs.readFileSync(templatePath, { encoding: 'utf-8' });
  const template: HandlebarsTemplateDelegate<ConfirmEmailPayload> = handlebars.compile(source);
  const html: string = template(templateData);

  try {
    const updatedData: Mail.Options = {
      to: email,
      html,
      from: `Awesome App <${fromEmailAddress}>`,
      subject: 'Confirm your account',
    };

    smtpTransport.sendMail(updatedData).then((result: nodemailer.SentMessageInfo): void => {
      console.info(result);
    });
  } catch (e) {
    console.error(e);
  }

  return res.send({ message: 'User created successfully.' });
});
We can break the code above into four parts:
- Part one: read the STMP settings from the environment variables.
- Part two: create the SMTP transporter from the STMP settings using Nodemailer.
- Part three: generate the HTML body of the email from the email template using Handlebars.
- Part four: prepare the email client options and send the email.
Update the environment variable file
According to the code above, we must add five variables to the file .env
STMP_HOST=<your_ses_smtp_host>
STMP_PORT=<your_ses_smtp_port>
STMP_USER=<your_smtp_username>
STMP_PASSWORD=<your_smtp_password>
FROM_EMAIL=<sender_email_address>
The property FROM_EMAIL must be the email we verified earlier in Amazon SES.
Test the application
Start the application, open Postman or any HTTP client you have, and send a POST request to the path /register.
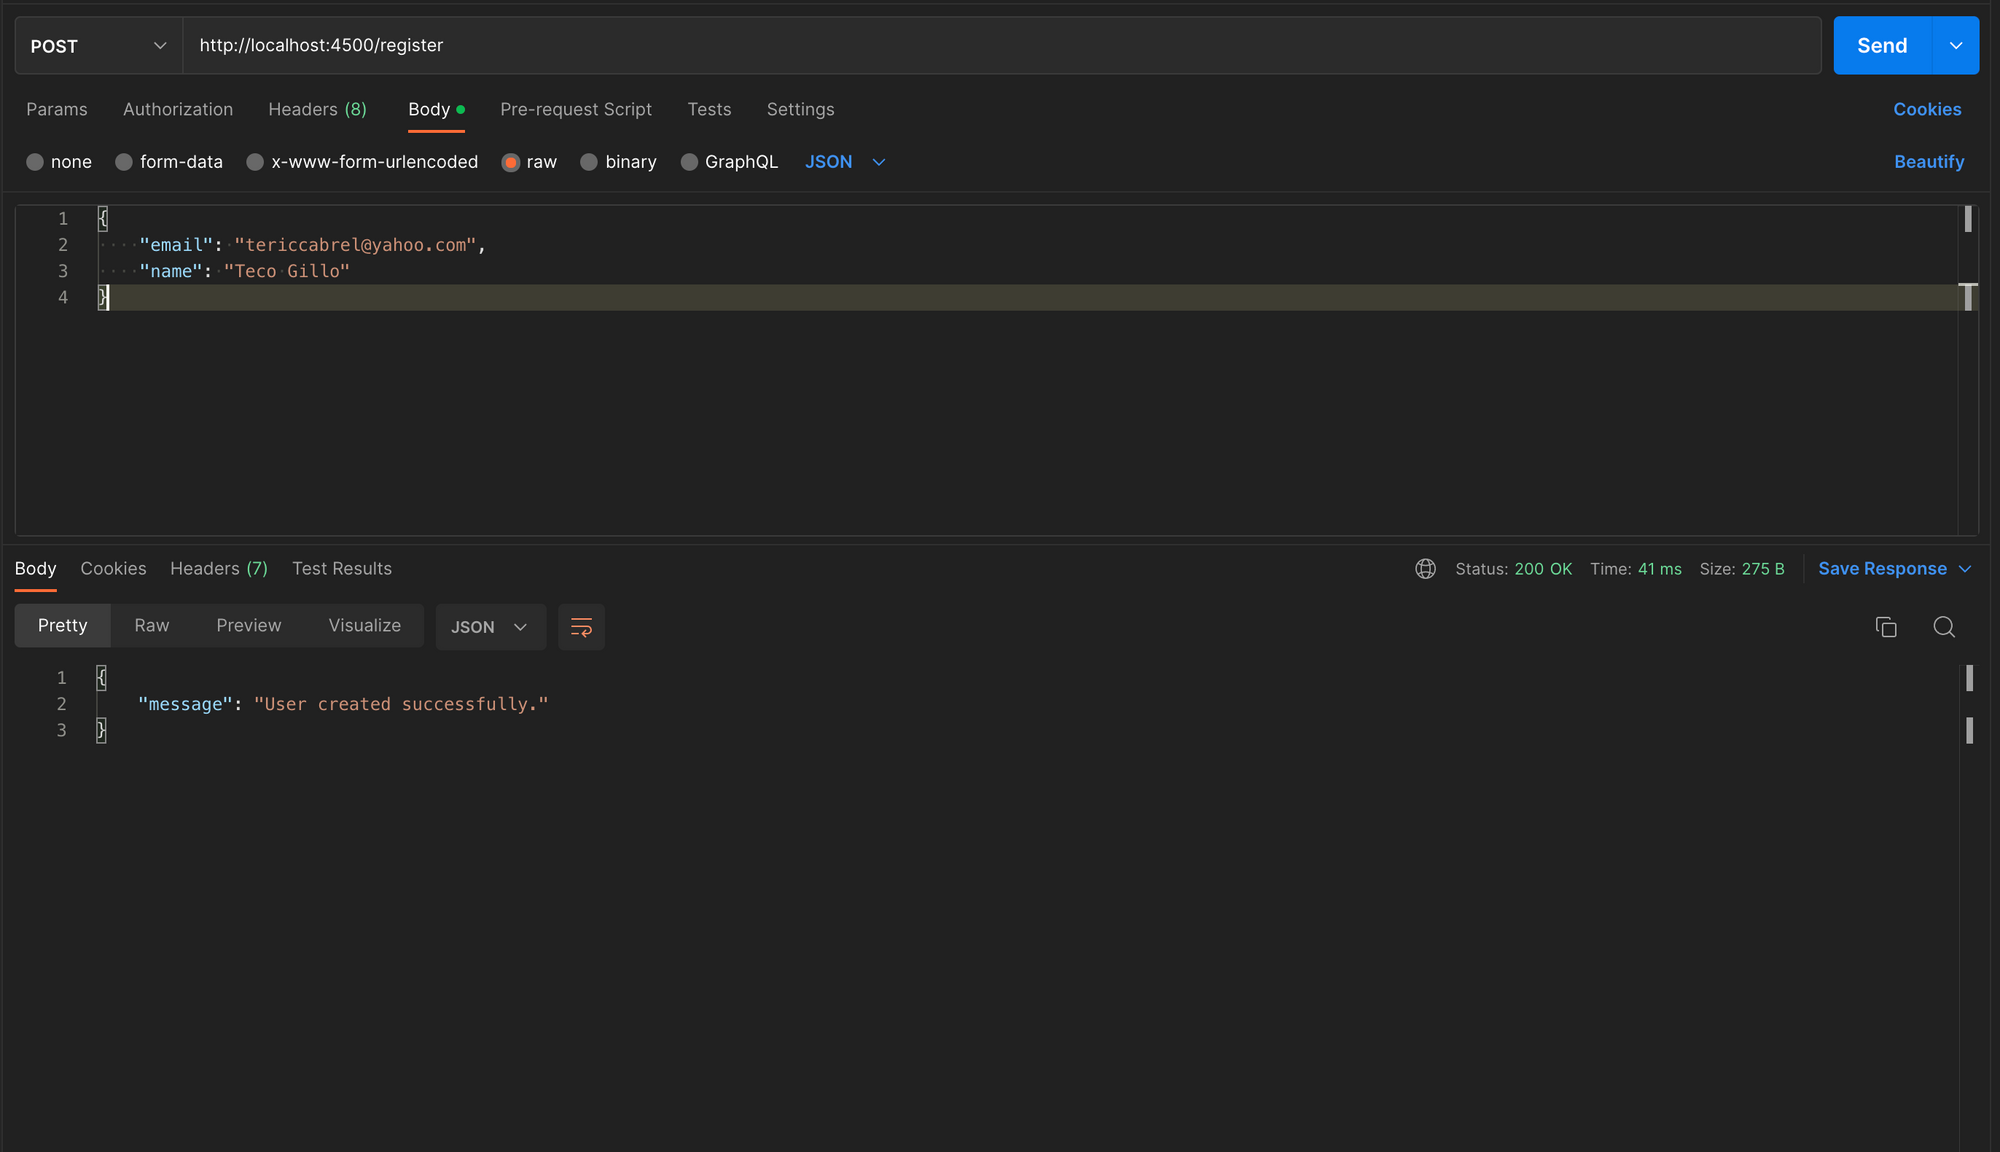
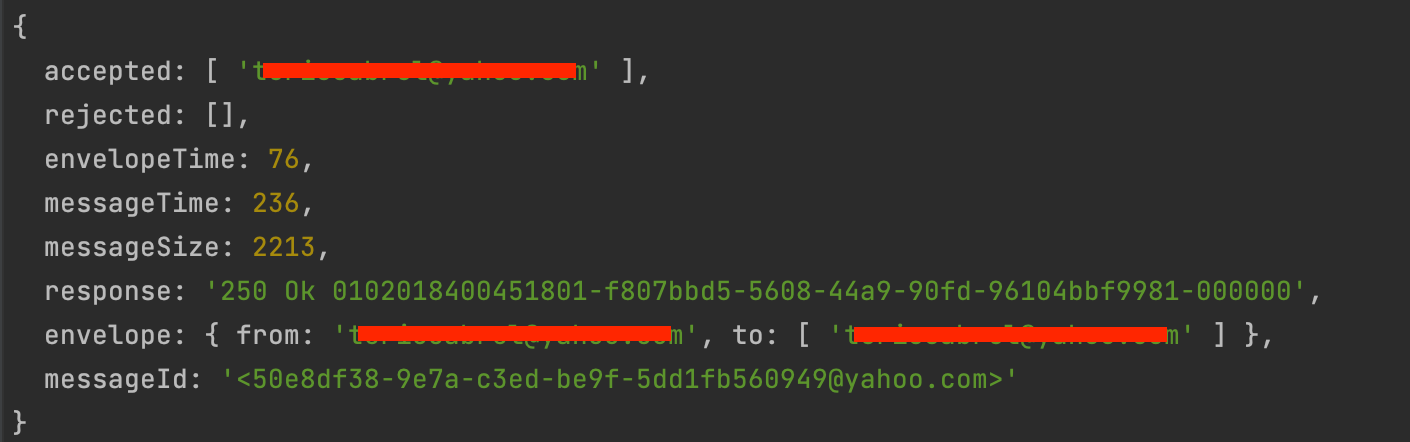
Check your email inbox or junk email; you will see an email like this one below:
The SMTP client provides some details about the email's result. You can see if the email has been accepted or rejected, the email size, message ID, etc.
Sandbox mode error
In Sandbox mode, you can only send emails to a verified email address. In our case, we can only send emails to the one we verified earlier or add a new one.
In other words, the FROM_EMAIL and the TO_EMAIL must be verified. Otherwise, you will get an error when sending the email.
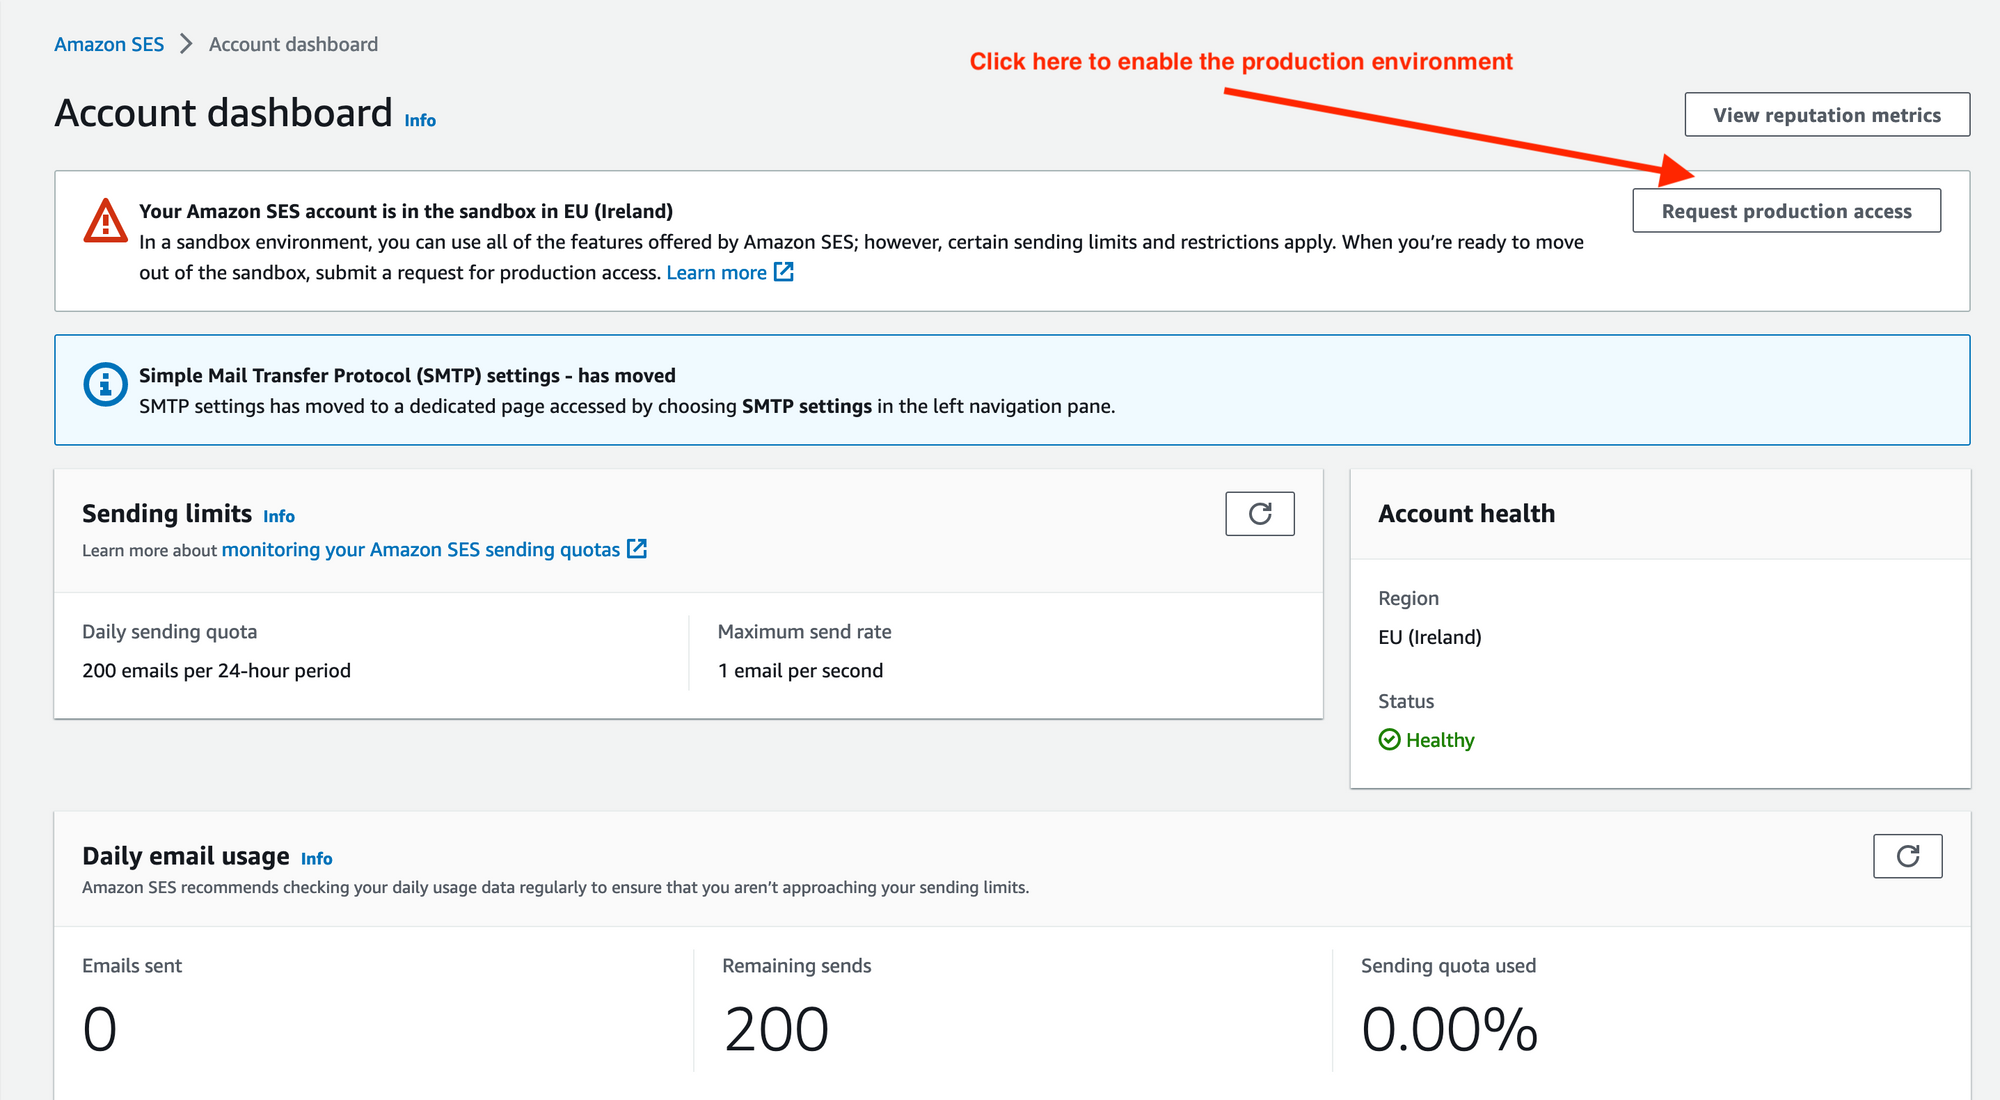
Enable AWS SES for production
You tested your application in Sandbox mode and are ready to use it in production. To do so, switch to production mode, submit a request, and wait for approval.
Go to the SES page and click the left sidebar menu named Account Dashboard; you will have the page below:
Provide information about the business that will use the SES identity and submit.
Build a generic STMP client to send email
The code to send the email takes 60+ lines of code, and if you need to send an email in many places of your codebase, duplicate this code to only change some details (the template data, the template path, the subject, and the email recipients) is not good.
We can abstract the logic related to the HTML generation, the SMTP transport setup, and the email sending.
Create a file src/email-client.ts and add the code below:
import * as nodemailer from 'nodemailer';
import * as fs from 'fs';
import handlebars from 'handlebars';
import Mail from 'nodemailer/lib/mailer';

type EmailClientArgs<TemplateData> = {
  to: string;
  subject: string;
  templatePath: string;
  templateData: TemplateData;
};

const sendMail = async <TemplateData>(data: EmailClientArgs<TemplateData>) => {
  const fromEmailAddress = process.env.FROM_EMAIL;
  const smtpHost = process.env.STMP_HOST ?? '';
  const smtpPort = parseInt(process.env.STMP_PORT ?? '587', 10);
  const smtpUser = process.env.STMP_USER ?? '';
  const smtpPassword = process.env.STMP_PASSWORD ?? '';

  try {
    const smtpTransport: Mail = nodemailer.createTransport({
      host: smtpHost,
      port: smtpPort,
      auth: {
        user: smtpUser,
        pass: smtpPassword,
      },
    });

    const source = fs.readFileSync(data.templatePath, { encoding: 'utf-8' });
    const template: HandlebarsTemplateDelegate<TemplateData> = handlebars.compile(source);
    const html: string = template(data.templateData);

    const updatedData: Mail.Options = {
      to: data.to,
      html,
      from: `Awesome App <${fromEmailAddress}>`,
      subject: data.subject,
    };

    smtpTransport.sendMail(updatedData).then((result: nodemailer.SentMessageInfo): void => {
      console.info(result);
    });
  } catch (e) {
    console.error(e);
  }
};

export { sendMail };
Now, the previous code to send an email in the file src/index.ts looks like this:
type ConfirmEmailPayload = {
  email: string;
  name: string;
  url: string;
};

app.post('/register', async (req, res) => {
  const { email, name } = req.body;

  // TODO Save user into the database

  const templateData: ConfirmEmailPayload = {
    email,
    name,
    url: 'generated_confirmation_url',
  };

  sendMail<ConfirmEmailPayload>({
    subject: 'Confirm your account',
    templateData,
    templatePath: path.join(__dirname, './email-template/confirm-account.html'),
    to: email,
  });

  return res.send({ message: 'User created successfully.' });
});
You can reuse the function sendEmail() in your project.
Wrap up
Amazon SES is an excellent AWS service for sending transactional or marketing emails from your application. We saw how to send emails using the SMTP protocol, but note that we can also use the AWS SDK.
You can go further by connecting your SES identity to SNS topics to perform some actions when an email sending succeeded, bounced, etc...
Check out the official documentation to learn more about AWS SES's capability.
You can find the code source on the GitHub repository.
Follow me on Twitter or subscribe to my newsletter to avoid missing the upcoming posts and the tips and tricks I occasionally share.