
Using TypeScript and Esbuild to deploy a Lambda Function with AWS CDK

In this previous post, we saw how to deploy a Lambda Function using the AWS CDK v2. The source of the Lambda was pointing to an index.js file with the following code:
exports.handler = async function(event) {
  return {
    statusCode: 200,
    headers: { "Content-Type": "text/json" },
    body: JSON.stringify({ message: "Hello from my Lambda node!" })
  };
};
As we can see, the code is a simple "hello world" and far from a real-world application.
Indeed, an actual application is more complex because you add external dependencies to build features, use TypeScript for strong types checking, add images, etc.
Package and deploying a Lambda Function with these can be challenging; hence, we might wonder:
- How to deploy a lambda function that relies on NPM modules?
- How do we deploy when we use NPM modules and TypeScript?
These are the two questions we are going to answer in this tutorial.
The solution
A CDK construct called AWS Lambda Nodejs helps us achieve our goal. When running the command cdk deploy, it will first build our project with all the required dependencies to generate a single JavaScript file and then deploy the Lambda Function in the cloud.
Docker and ESbuild are used under the hood to build the application:
- Docker: As you might guess, it requires having Docker installed on the computer where the build will be done.
- Esbuild: is an extremely fast JavaScript bundler and minifier that supports Typescript files.
If the AWS CDK detects Esbuild on the computer during the deployment, it will build the source files using it.
Prerequisites
Before continuing this tutorial, make sure you have the following tools installed on your computer:
- An AWS account - A free tier is enough.
- The AWS CLI is configured; check out my tutorial to do that.
- Node.js 18+ with NPM or Yarn - Download link.
- Docker to test the Lambda locally using AWS SAM CLI.
- AWS CDK installed locally:
npm install -g cdk
What we will build
We will build a Lambda Function that receives a country and then returns the current time for this latter.
The function code will be in TypeScript, and we will import a dependency to detect the timezone.
It will be enough to show how to apply it to a real-world application.
Create the AWS CDK project
Create a folder, then initialize an AWS CDK Typescript project:
mkdir node-lambda-timeviewer

cd node-lambda-timeviewer

cdk init --language typescript
Once done, let's install Esbuild as a dev dependency because we will use it only for bundling the application:
yarn add -D esbuild

# or

npm install --save-dev esbuild
Update the content of the lib/node-lambda-timeviewer-stack.ts with the code below:
import * as path from "path";
import * as cdk from 'aws-cdk-lib/core';
import { Runtime } from 'aws-cdk-lib/aws-lambda';
import { NodejsFunction } from 'aws-cdk-lib/aws-lambda-nodejs';

export class NodeLambdaTimeviewerStack extends cdk.Stack {
  constructor(scope: cdk.App, id: string, props?: cdk.StackProps) {
    super(scope, id, props);

    new NodejsFunction(this, 'TimeViewerLambda', {
      entry: path.resolve(__dirname, '../src/time-viewer.ts'), // accepts .js, .jsx, .ts and .tsx files
      functionName: 'time-viewer',
      handler: 'handler',
      memorySize: 512,
      runtime: Runtime.NODEJS_18_X,
      timeout: cdk.Duration.seconds(10)
    });
  }
}
The code above creates a Lambda Function with some configuration options. The most interesting here is the "entry" properties for which the value is the file's path containing the Lambda function handler.
Let's explain what we did here:
- We create a Lambda Function called
time-viewerrunning on Node.js 18 with 512MB of memory allocated. - The time-out is set to 10 seconds, which is enough for the execution.
- The property "entry" indicates the folder's path to find the code to run when the Lambda is triggered. It is located in the "src" folder at the project root. It doesn't exist yet.
- The property "handler" indicates the function name executed in the entry file
time-viewer.ts.
Write the logic of the Lambda Function
We will install two Node.js packages for handling dates:
Additionally, we will install the type definition for AWS Lambda, which is useful for viewing the properties of the Lambda Function event received.
Run the command below to install them:
yarn add dayjs @vvo/tzdb
yarn add -D @types/aws-lambda
At the root project directory, create a folder named "src" and add the file time-viewer.ts.
mkdir src

touch src/time-viewer.ts
Open the file and add the code below:
import { APIGatewayProxyHandler } from 'aws-lambda';
import { getTimeZones } from "@vvo/tzdb";
import dayjs from 'dayjs'
import utc from 'dayjs/plugin/utc'
import timezone from 'dayjs/plugin/timezone'

dayjs.extend(utc)
dayjs.extend(timezone)

export const handler: APIGatewayProxyHandler = async (event) => {
  const country = 'France'

  const timeZone = getTimeZones().find((timeZone) => timeZone.countryName === country);

  if (!timeZone) {
    return {
      statusCode: 400,
      headers: { "Content-Type": "text/json" },
      body: JSON.stringify({ message: "Timezone not found for this country!" })
    };
  }

  const dayjsUtc = dayjs(new Date());
  const zonedDate = dayjsUtc.tz(timeZone.name)
  const pattern = 'DD-MM-YYYY HH:mm:ss.SSS Z';
  const output = zonedDate.format(pattern);

  return {
    statusCode: 200,
    headers: { "Content-Type": "text/json" },
    body: JSON.stringify({ time: output })
  };
};
This code finds the timezone in which the country France belongs to and returns which it is there.
For Dayjs to work properly, we must update the TypeScript configuration file (tsconfig.json) to add the property esModuleInterop and set the value true.
{
  "compilerOptions": {
    "esModuleInterop": true
  }
}
Test the Lambda Function locally
To test that the Lambda Function works as expected, we must run it locally to have a quick feedback loop.
We will use the AWS SAM CLI to invoke our Lamba Function locally.
The AWS SAM CLI provides a command to invoke the Lambda Function locally. Follow the AWS documentation guide to install it on your computer.
You will need Docker running on your computer because the SAM will pull the Docker image of Node.js 18 for the Lambda Function in the ECR repository.
Pulling an image from the public ECR repository requires an authentication; run the command below to authenticate:
aws ecr-public get-login-password --region us-east-1 | docker login --username AWS --password-stdin public.ecr.aws
The syntax to invoke the Lambda Function defined with the AWS CDK is the following:
sam local invoke -t <CloudFormationTemplate> <FunctionStackName>
- <CloudFormationTemplate>: is the path to the CloudFormation template of the stack, which is generated in the folder "cdk.out" after executing the command
cdk synth. - <FunctionStackName>: is the name of your Lambda Function stack you set in the file
lib/node-lambda-timeviewer-stack.ts.
Run the command below to invoke your Lambda Function with SAM CLI:
cdk synth

sam local invoke -t ./cdk.out/NodeLambdaTimeviewerStack.template.json TimeViewerLambda
We get the output below:
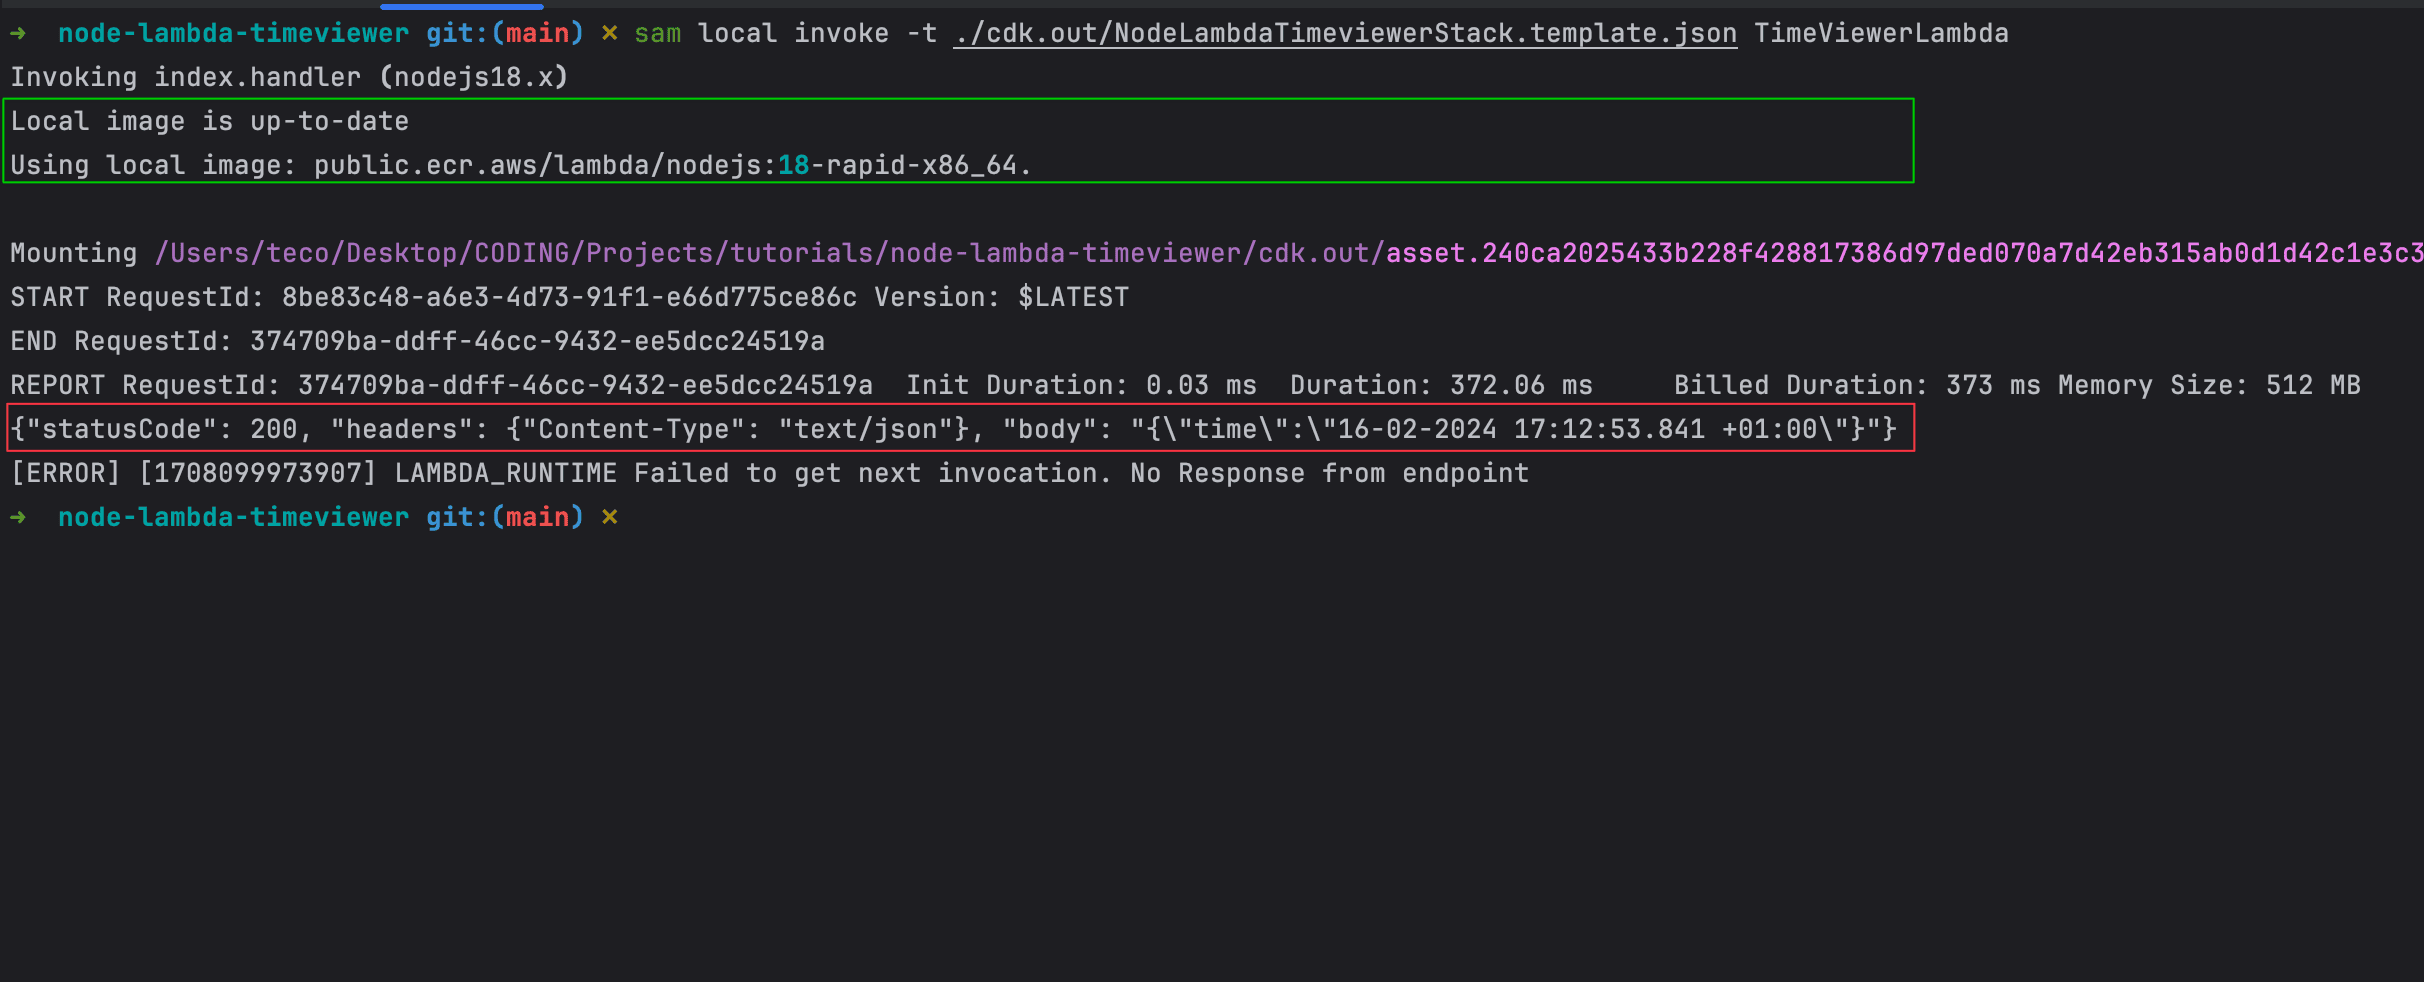
There are two things to highlight here:
- Green rectangle: Docker doesn't pull the image for local SAM CLI emulation from the AWS public ECR repository as it already exists locally.
- Red rectangle: After the execution, we see the output returned by the Lambda Function, which is the current time in France when I write this post.
Configure Esbuild options
When creating your Lambda Function, you can define options to use Esbuild to compile your source code. Let's update it to add some options:
import * as path from "path";
import * as cdk from 'aws-cdk-lib/core';
import { Runtime } from 'aws-cdk-lib/aws-lambda';
import { NodejsFunction, SourceMapMode } from 'aws-cdk-lib/aws-lambda-nodejs';

export class NodeLambdaTimeviewerStack extends cdk.Stack {
  constructor(scope: cdk.App, id: string, props?: cdk.StackProps) {
    super(scope, id, props);

    new NodejsFunction(this, 'TimeViewerLambda', {
      entry: path.resolve(__dirname, '../src/time-viewer.ts'), // accepts .js, .jsx, .ts and .tsx files
      functionName: 'time-viewer',
      handler: 'handler',
      memorySize: 512,
      runtime: Runtime.NODEJS_18_X,
      timeout: cdk.Duration.seconds(10),
      bundling: {
        minify: true, // minify code, defaults to false
        sourceMap: true, // include source map, defaults to false
        sourceMapMode: SourceMapMode.INLINE, // defaults to SourceMapMode.DEFAULT
        sourcesContent: false, // do not include original source into source map, defaults to true
        target: 'esnext', // target environment for the generated JavaScript code
        define: { // Replace strings during build time
          'process.env.COUNTRY': JSON.stringify('France'),
        },
      }
    });
  }
}
Update the file time-viewer.ts to read the country from the environment variable by:
Changing the line: const country = 'France';
To: const country = process.env.COUNTRY;
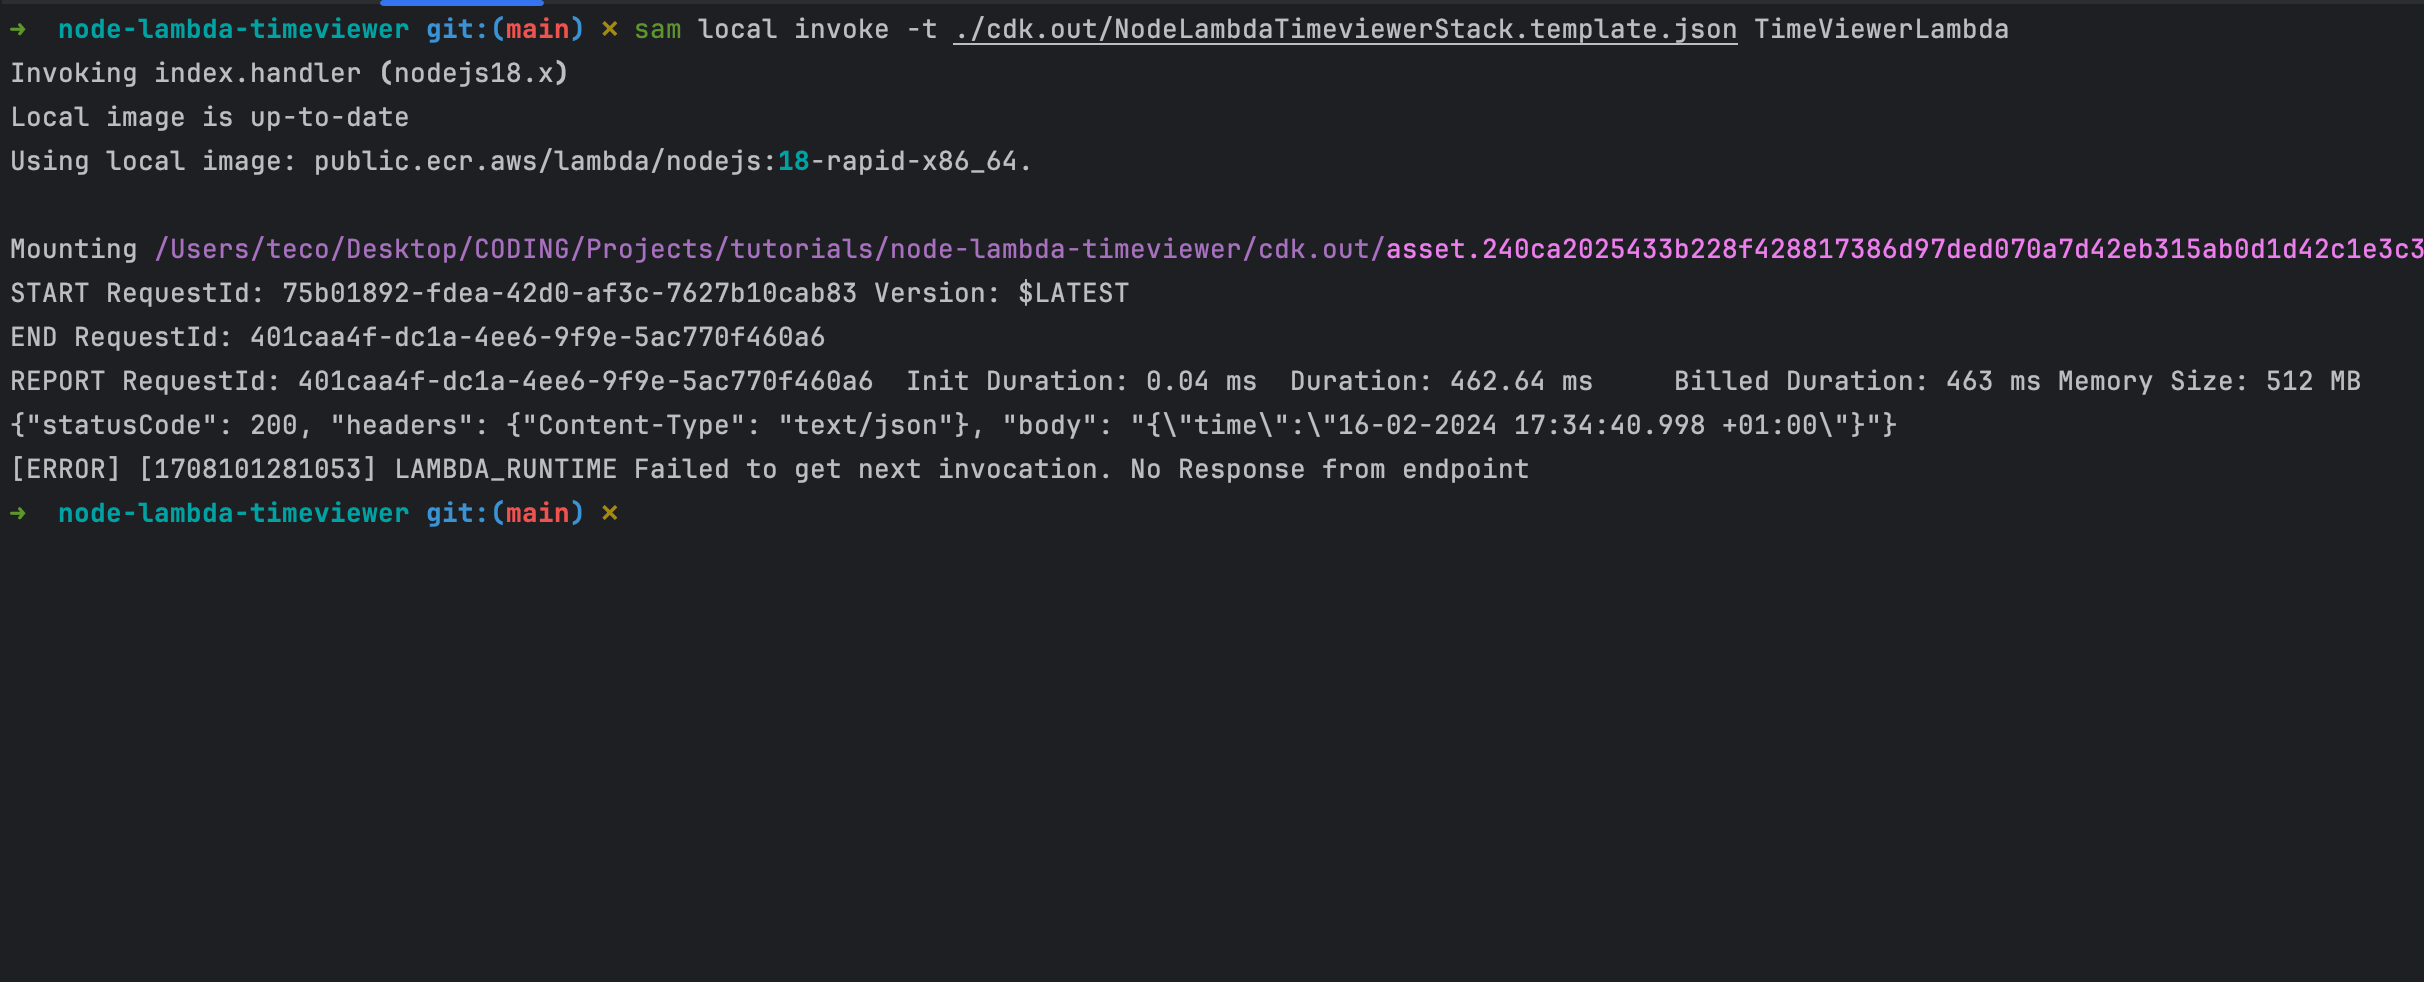
Execute the Lambda Function again to see the result:
Deploy in production
The command to deploy in production is still the same, so run the following command:
cdk synth

cdk deploy
Wait for the deployment to finish and connect to the AWS console, go to the Lambda Function page, and execute our own:

Wrap up
With the possibility to build a source project before deploying it in production, The Lambda CDK construct for Node.js enforces the integration of AWS CDK in the developer experience.
There is no need to have your project apart of the CDK project and write a bash script for the deployment. The command cdk deploy doesn't everything for you.
You can find the code source on the GitHub repository.
Follow me on Twitter or subscribe to my newsletter to avoid missing the upcoming posts and the tips and tricks I occasionally share.