
How to deploy a AWS Lambda container with Docker


At the end of December 2020, AWS released container support for Lambda, which brings unlimited capacities to Lambda Functions.
Before deploying a Lambda Function, you must package your code into a Zip file with a maximum size of 250 MB, upload it to the AWS S3 bucket, and then create a Lambda from a Zipped file; the code is then executed in the Lambda Runtime.
In addition to the size limit, it was impossible to interact with external processes such as shell, git, client SDK, filesystem, etc...
With the Lambda container, you build your Docker image with all the dependencies your application needs, upload it to the AWS Elastic Container Registry, and then create a Lambda linked to that image and run it. The image size can be up to 10 GB.
What we will build
Suppose you have a Web application connected to a Postgres database running in production. The application inserts and retrieves data related to users.
It is paramount to frequently back up the database to avoid data loss or restore it in case it cannot be prevented. Here is a bash script to back up a PostgreSQL database.
#!/bin/bash

# day_month_year_hour_minute
TODAY=`date +"%d_%m_%Y_%H_%M"`

FILENAME="<db_name>-${TODAY}.tar"

echo "${FILENAME}.gz"

# Dump only the data and the schema (data definitions).
pg_dump --dbname=postgresql://<db_user>:<db_password>@<db_host>:$<db_port>/<db_name> -F t > "/tmp/${FILENAME}"

if [ $? -eq 0 ]; then
  exit 0
else
  exit 1
fi

# compress the SQL dump file
gzip "/tmp/${FILENAME}"
Replace <db_user> , <db_password>, <db_host>, <db_password> and <db_name> with valid database information.
We want to trigger a Lambda Function every Saturday at 02:30 am to run this bash script file "backup.sh" and upload the backup somewhere.
Note that we will only focus on database backup. Check out the blog post below to learn how to upload a file to Google Drive.

Implementation steps
We will create a Docker image containing the PostgreSQL client for database backup called pg_dump. We will include the backup script file and the source code written in Node.js to perform the execution.
Once the image is created, we will push it to the AWS Elastic Container Registry (ECR) and create a Lambda Function that uses this Docker image. We will use the Serverless Framework as the Infrastructure as Code tool, but if you want to deploy a Lambda Function with the AWS CDK, I wrote a complete post about it.
Prerequisites
To follow this tutorial, make sure your development environment has the following tools installed and configured:
- An AWS account to deploy the Lambda Function (a free tier is enough)
- AWS CLI installed and configured; read my blog post to generate one.
- Docker CLI installed - Download link
- Node.js 20+ and NPM - Download link
Create Serverless project
Serverless is a framework that makes creating, testing, and deploying a serverless architecture project easier. The first step is to install it on our computer.
npm install -g serverless
To ensure the installation succeeded, check the version by running the command sls -v; you get the following output:
Framework Core: 3.38.0
Plugin: 7.2.3
SDK: 4.5.1
Let's create a Serverless project using the Node.js and Docker template:
sls create --template aws-nodejs-docker --path lambda-container

cd lambda-container
The project generated has the following structure:
├── .gitignore
├── app.js
├── Dockerfile
├── README.md
└── serverless.yml
Create a file backup.sh and add the code related to the PostgreSQL database backup we saw earlier.
Build the Docker image
The container image can be created from one of AWS's base images implementing different runtimes. You can also create your own custom image, but it must implement the Lambda Runtime API for this to work.
We will choose the second option to show how to implement the Lambda Runtime API on a custom Docker image.
Open the Dockerfile and replace the content with the following:
ARG FUNCTION_DIR="/function"

FROM node:20-buster

RUN apt-get update && \
    apt install -y \
    g++ \
    make \
    cmake \
    autoconf \
    libtool \
    wget \
    openssh-client \
    gnupg2

RUN wget --quiet -O - https://www.postgresql.org/media/keys/ACCC4CF8.asc | apt-key add - && \
    echo "deb http://apt.postgresql.org/pub/repos/apt/ buster-pgdg main" | tee /etc/apt/sources.list.d/pgdg.list && \
    apt-get update && apt-get -y install postgresql-client-14

ARG FUNCTION_DIR

RUN mkdir -p ${FUNCTION_DIR} && chmod -R 755 ${FUNCTION_DIR}

WORKDIR ${FUNCTION_DIR}

COPY package.json .
RUN npm install

COPY backup.sh .
RUN chmod +x backup.sh
COPY app.js .

ENTRYPOINT ["/usr/local/bin/npx", "aws-lambda-ric"]
CMD ["app.handler"]
Let’s explain what happens above:
- We store the project's path inside the container as a variable since we will use it in many places.
- We use the Docker node-buster for Node.js 20 as the base image.
- We install the APT dependencies required to install the
postgres-client - We install the
postgres-clientwhich contains pg_dump, required to perform the database backup. - We create the project directory, add the
package.json, and install the dependencies. - Copy the
backup.shfile, make it executable, and copy theapp.jsfile. - Finally, we define the command to execute when the container is launched.
Implement the Lambda API Runtime
On the ENTRYPOINT command in the Dockerfile, the first argument calls an executable aws-lambda-ric located in the node_modules folder. The Lambda Runtime Interface Client is a lightweight interface that allows your runtime to receive requests and forward them to the Lambda Function.
Since we built our Docker image without an AWS Lambda base image, we must add this package through NPM to make our image Lambda compatible.
npm init -y

npm install aws-lambda-ric
Build the docker image. Note that you must be in the project root directory:
docker build -t lambda-container:v1 .
Test the Lambda Function locally
The Docker image is ready, but I want to test it locally before deploying the Lambda in production to ensure it works as expected. With Serverless, we usually use sls invoke local -f <function_name>, but it will not work for this case because we don’t have the Lambda execution context.
AWS provides a Runtime Interface Emulator (RIE) that emulates the Lambda execution context. Let’s install it in our computer home directory:
mkdir -p ~/aws

# Download the RIE
curl -Lo ~/aws/aws-lambda-rie https://github.com/aws/aws-lambda-runtime-interface-emulator/releases/latest/download/aws-lambda-rie

# Make it executable
sudo chmod +x ~/aws/aws-lambda-rie
- Open the first terminal and run the command below to launch a container with RIE.
docker run -v ~/aws:/aws -it --rm -p 9000:8080 --name lambda-backup --entrypoint /aws/aws-lambda-rie lambda-container:v1 /usr/local/bin/npx aws-lambda-ric app.handler
- Open a second terminal and run the code below to trigger the lambda execution:
curl -XPOST "http://localhost:9000/2015-03-31/functions/function/invocations" -d '{}'
Here is the result we get:
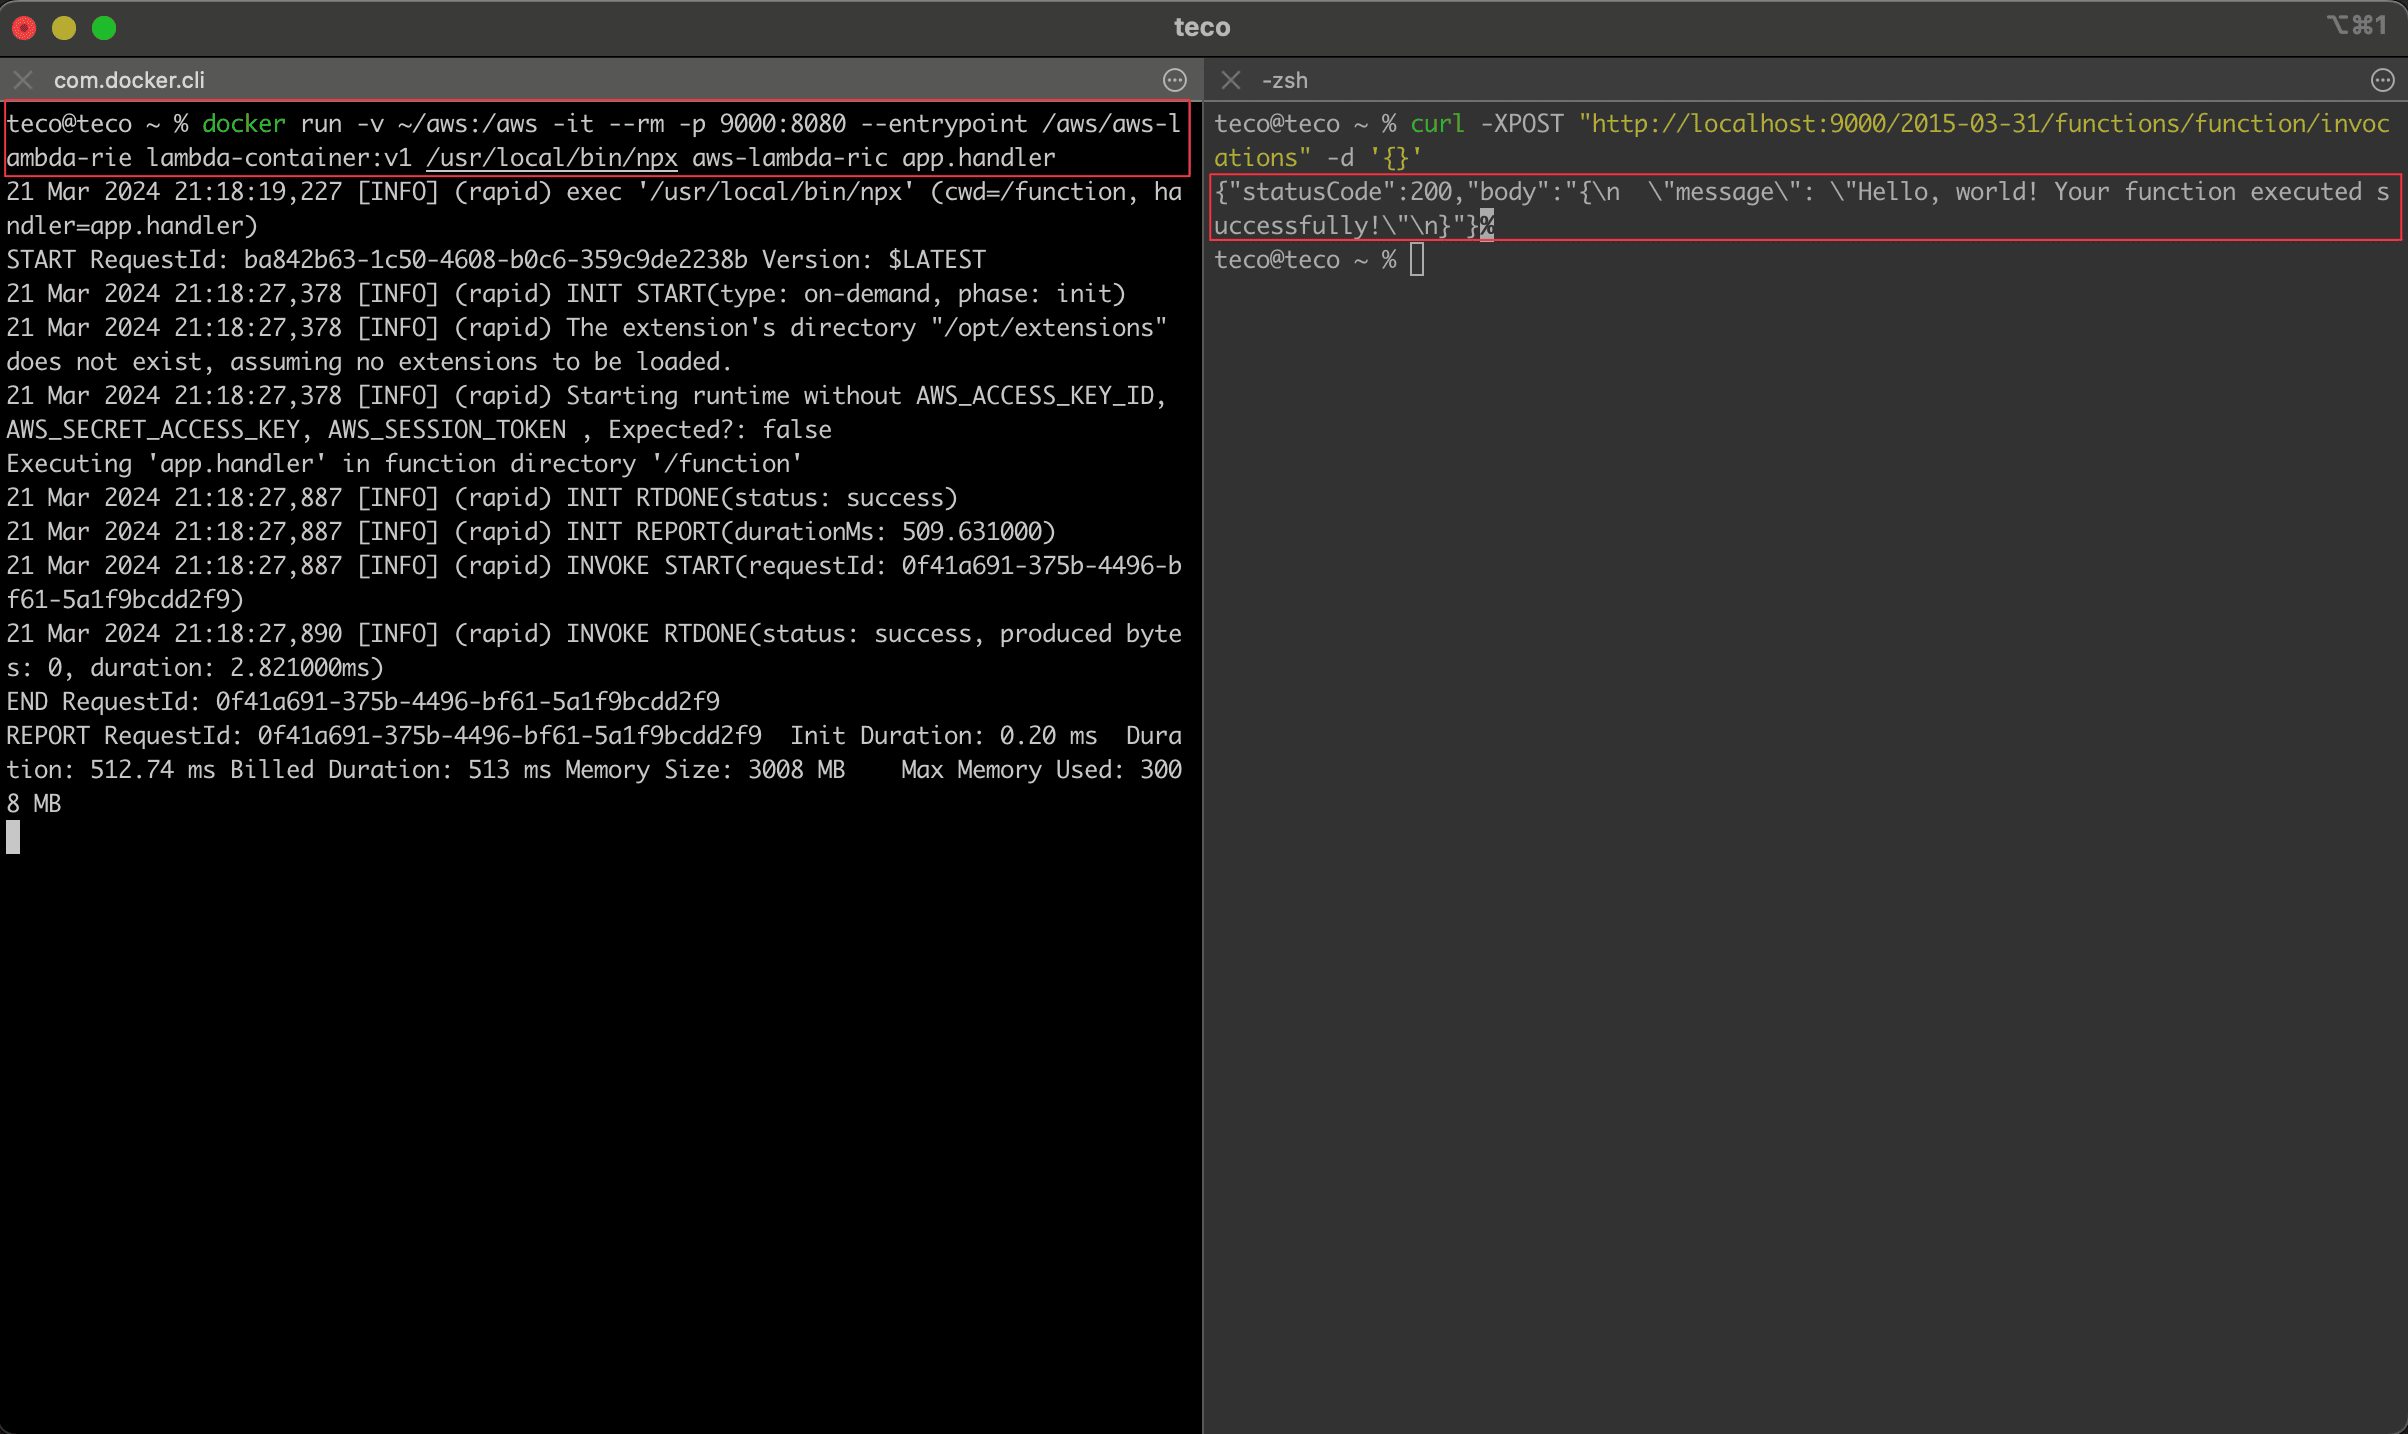
In the second terminal, we got the response returned after the Lambda Function execution, which is the code inside the file app.js.
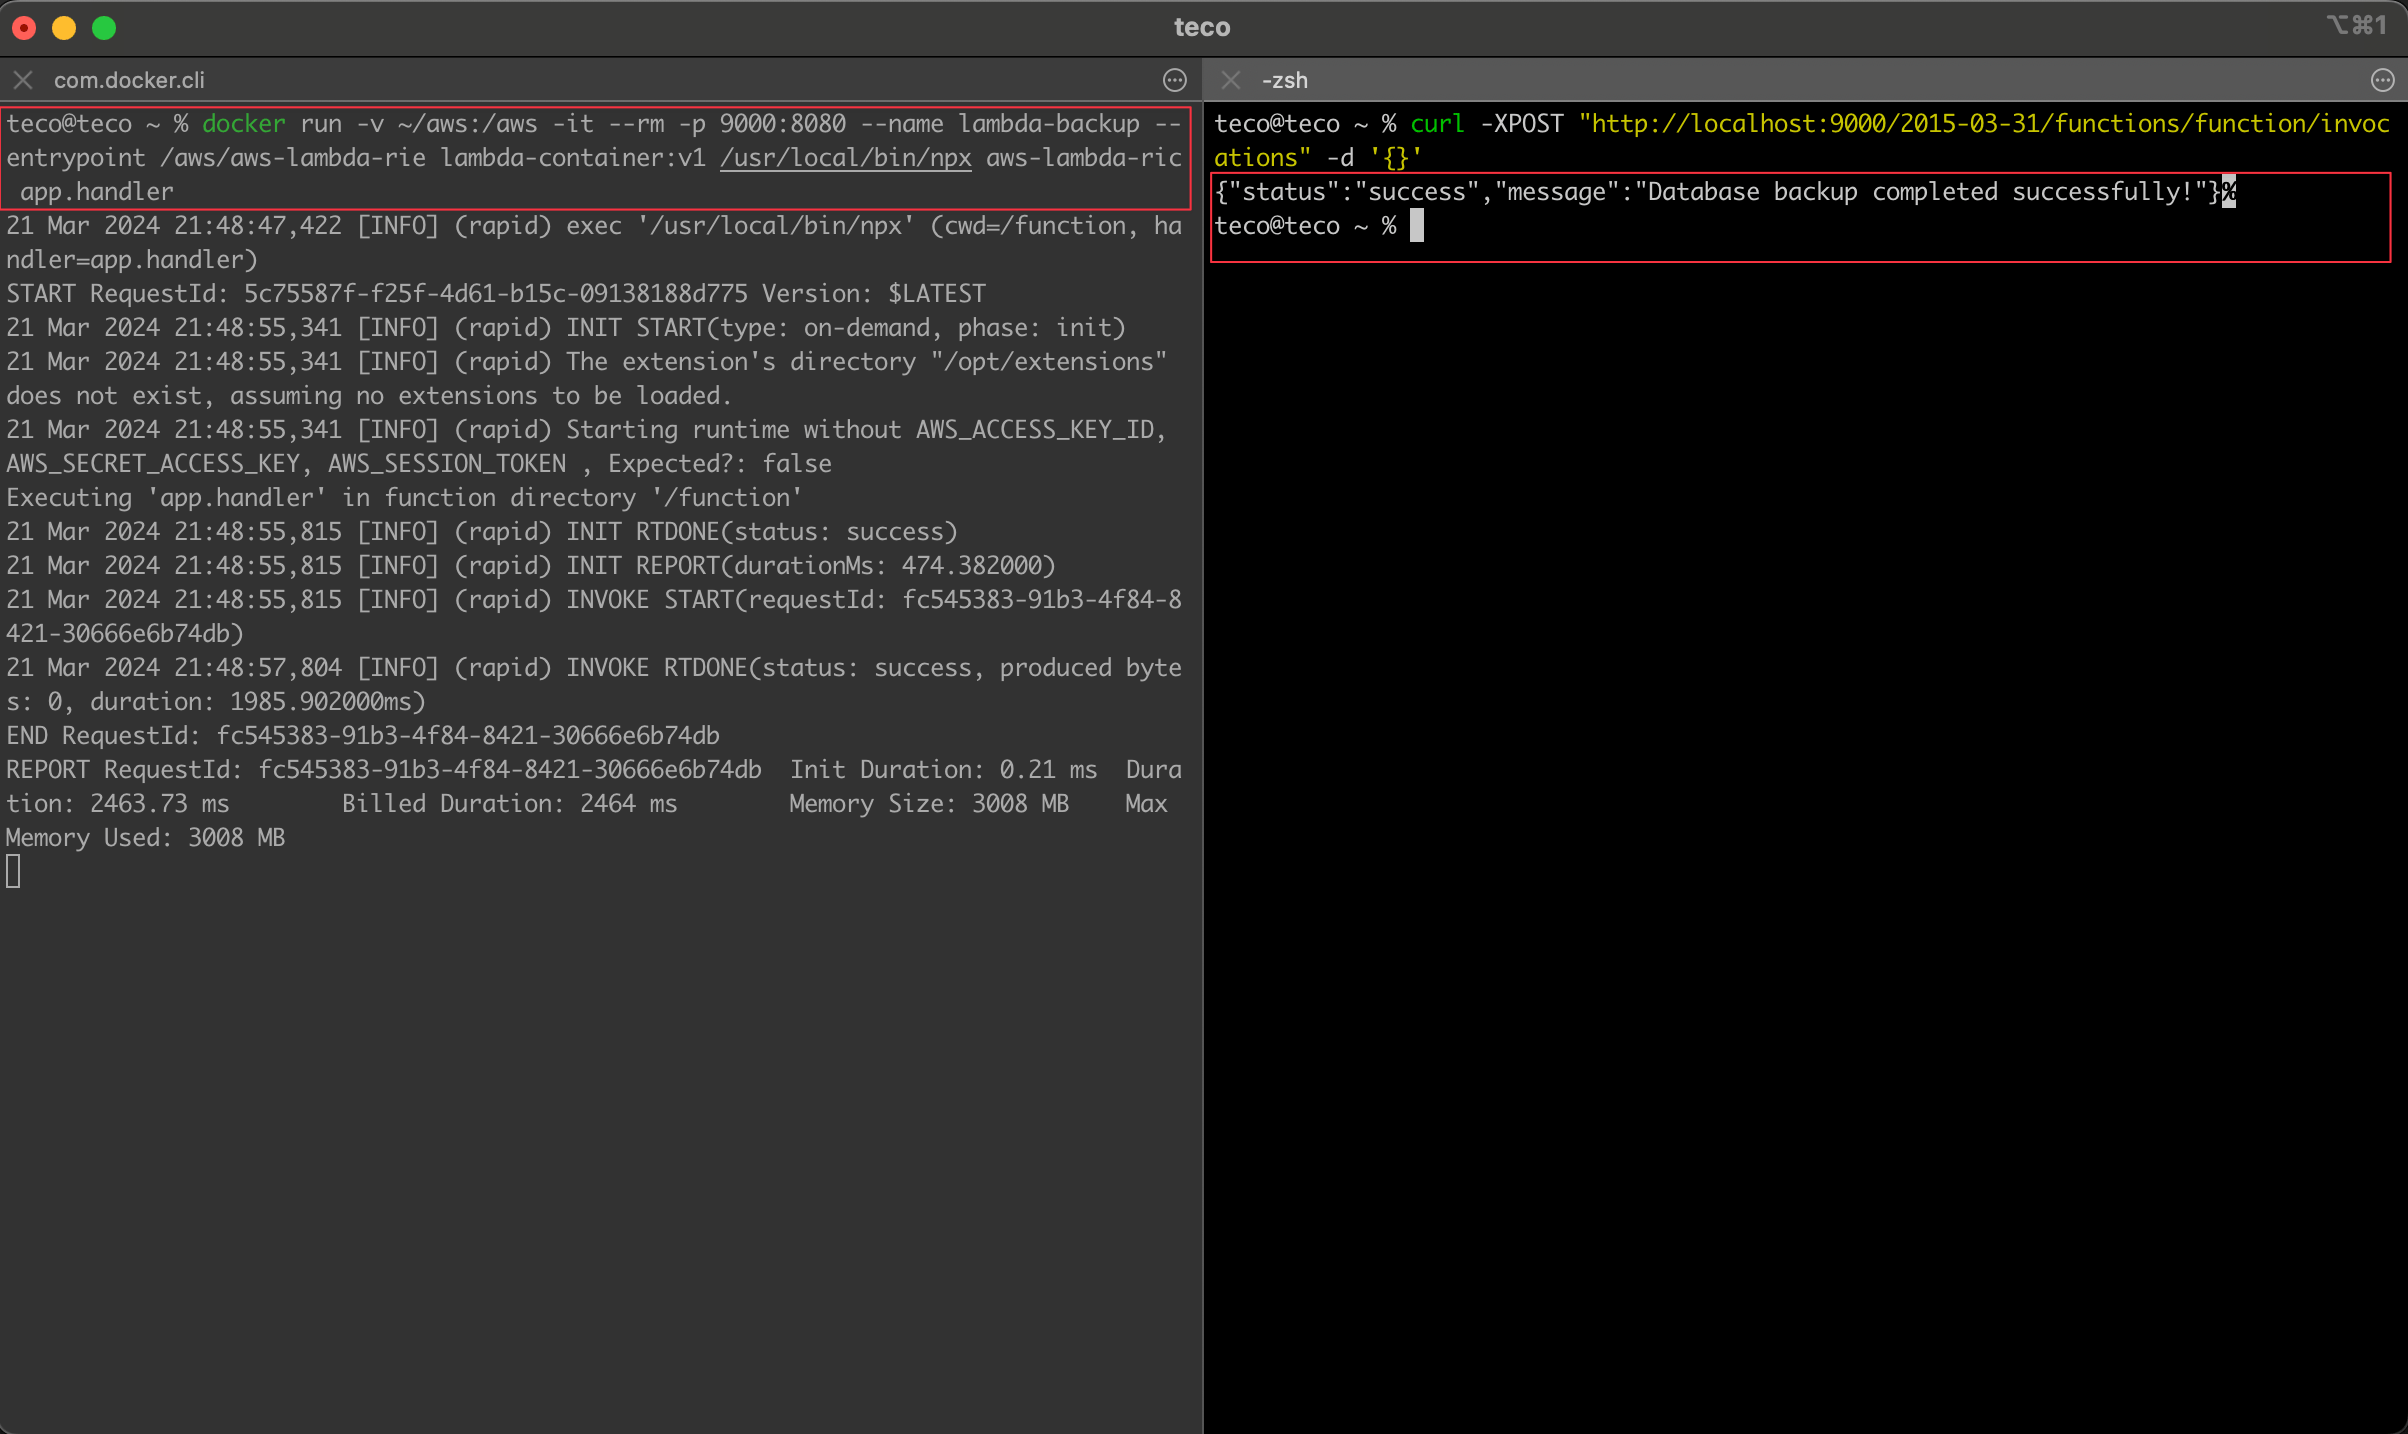
Update the handler to backup the database
We have a bash script we want to run from Node.js code. We will use a built-in Node.js module called child process, which allows creating a sub-process in the current process to run code, retrieve the result, and send it to the parent process.
Replace the content of the file "app.js" with the code below:
'use strict';

const childProcess= require("child_process");
const path= require("path");

const backupDatabase = () => {
  const scriptFilePath =path.resolve(__dirname, "./backup.sh");

  return newPromise((resolve, reject) => {
childProcess.execFile(scriptFilePath, (error) => {
      if (error) {
console.error(error);
        resolve(false);
      }

      resolve(true);
    });
  });
};

module.exports.handler = async (event) => {
  const isBackupSuccessful = await backupDatabase();

  if (isBackupSuccessful) {
    return {
      status: "success",
      message: "Database backup completed successfully!"
    };
  }

  return  {
    status: "failed",
    message: "Failed to backup the database! Check out the logs for more details"
  };
};
Now, test by following the process described previously. We get the output below:
One thing we can do to make sure the backup succeeded is to SSH into the container and check the content of the /tmp folder:
docker ps # To view the container's name

docker exec -it <container_name> /bin/bash

cd /tmp

ls -lh
We got the following output:
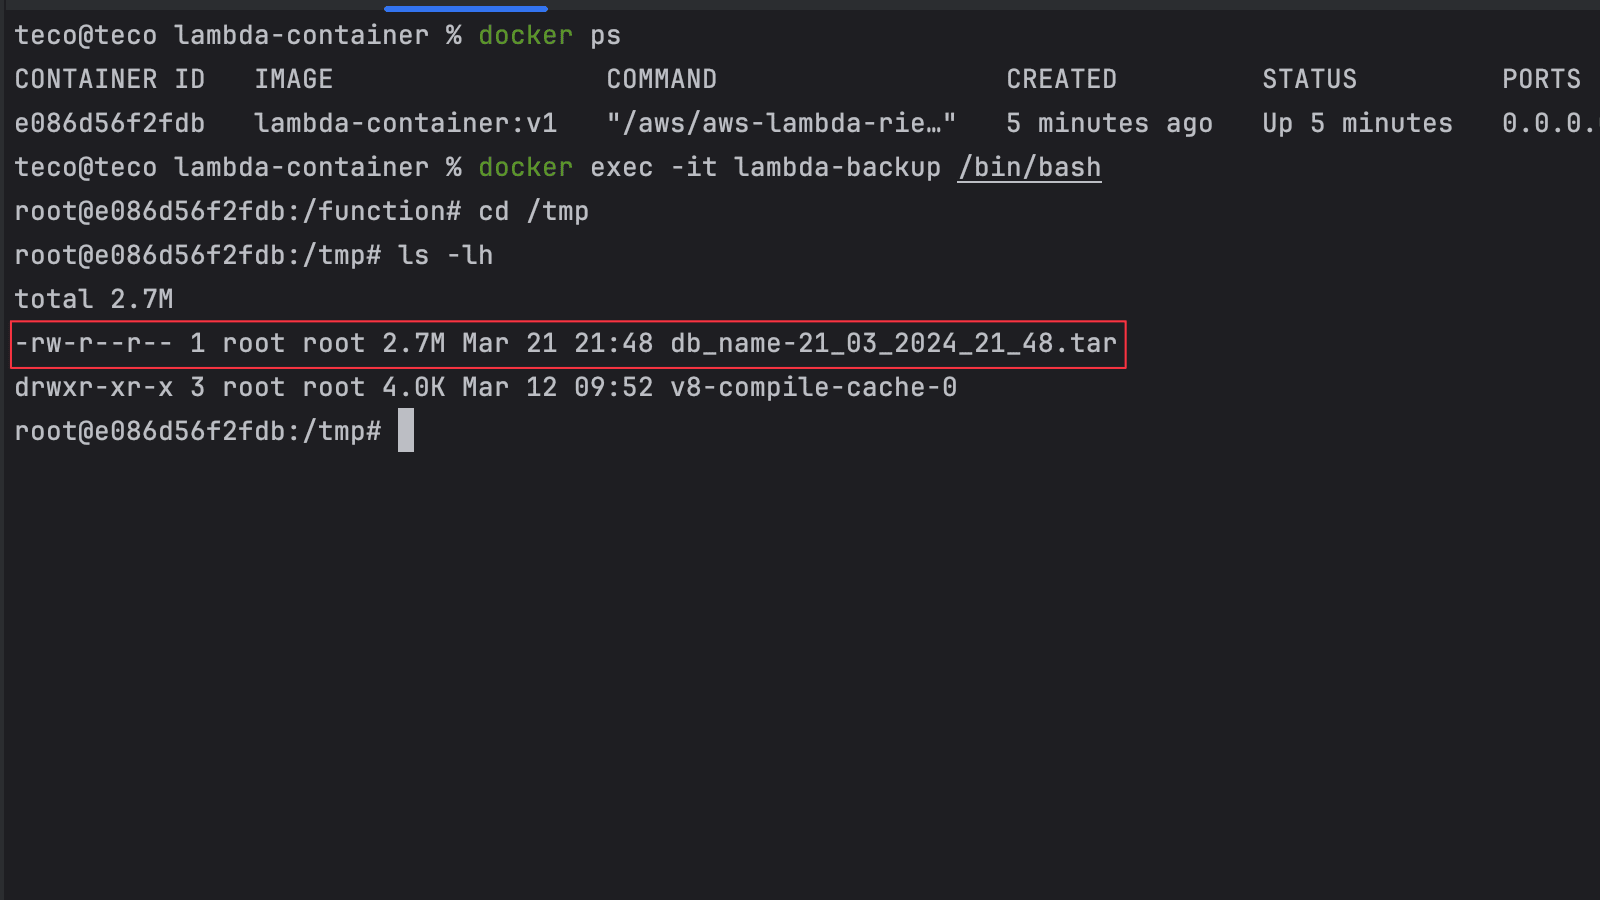
As we can see, the backup file compressed has a size of 2.7 MegaBytes.
Deploy and test the Lambda
Our code works as expected in the local environment, so we will deploy it in production in three steps.
Step 1: Push the Docker image into a container registry. We will use the AWS Elastic Container Registry (ECR).
Log into your AWS account, create an ECR repository backup-db , and then execute the commands below to push the image.
docker build -t lambda-container:v1 .

aws ecr get-login-password --region <region> | docker login --username AWS --password-stdin <ecr_repository_url>

docker tag lambda-container:v1 <ecr_repository_url>/lambda-container:latest

docker push <ecr_repository_url>/lambda-container:latest
Step 2: Update the "serverless.yml" by providing the Docker image URL of the source code. We will also add a cron job that will schedule the trigger of this Lambda Function every Saturday at 2:30 am.
service: backup-db

frameworkVersion: '3'

provider:
  name: aws
  region: eu-west-3
  lambdaHashingVersion: 20201221
  iam:
    role:
      statements:
        - Effect: "Allow"
          Action:
            - "ecr:InitiateLayerUpload"
            - "ecr:SetRepositoryPolicy"
            - "ecr:GetRepositoryPolicy"
          Resource: [ "arn:aws:ecr:eu-west-3:<account_id>:repository/*" ]

functions:
  backup-db:
    image: <account_id>.dkr.ecr.eu-west-3.amazonaws.com/lambda-container@sha256:8e6baf5255e3ab7c5b5cb1de943c2fb67cf4262afde48f7249abcebd8d6a7a01
    timeout: 900
    events:
      - schedule: cron(30 2 ? * SAT *)
3
Step 3: Deploy our Lambda Function using the Serverless Framework.
sls deploy
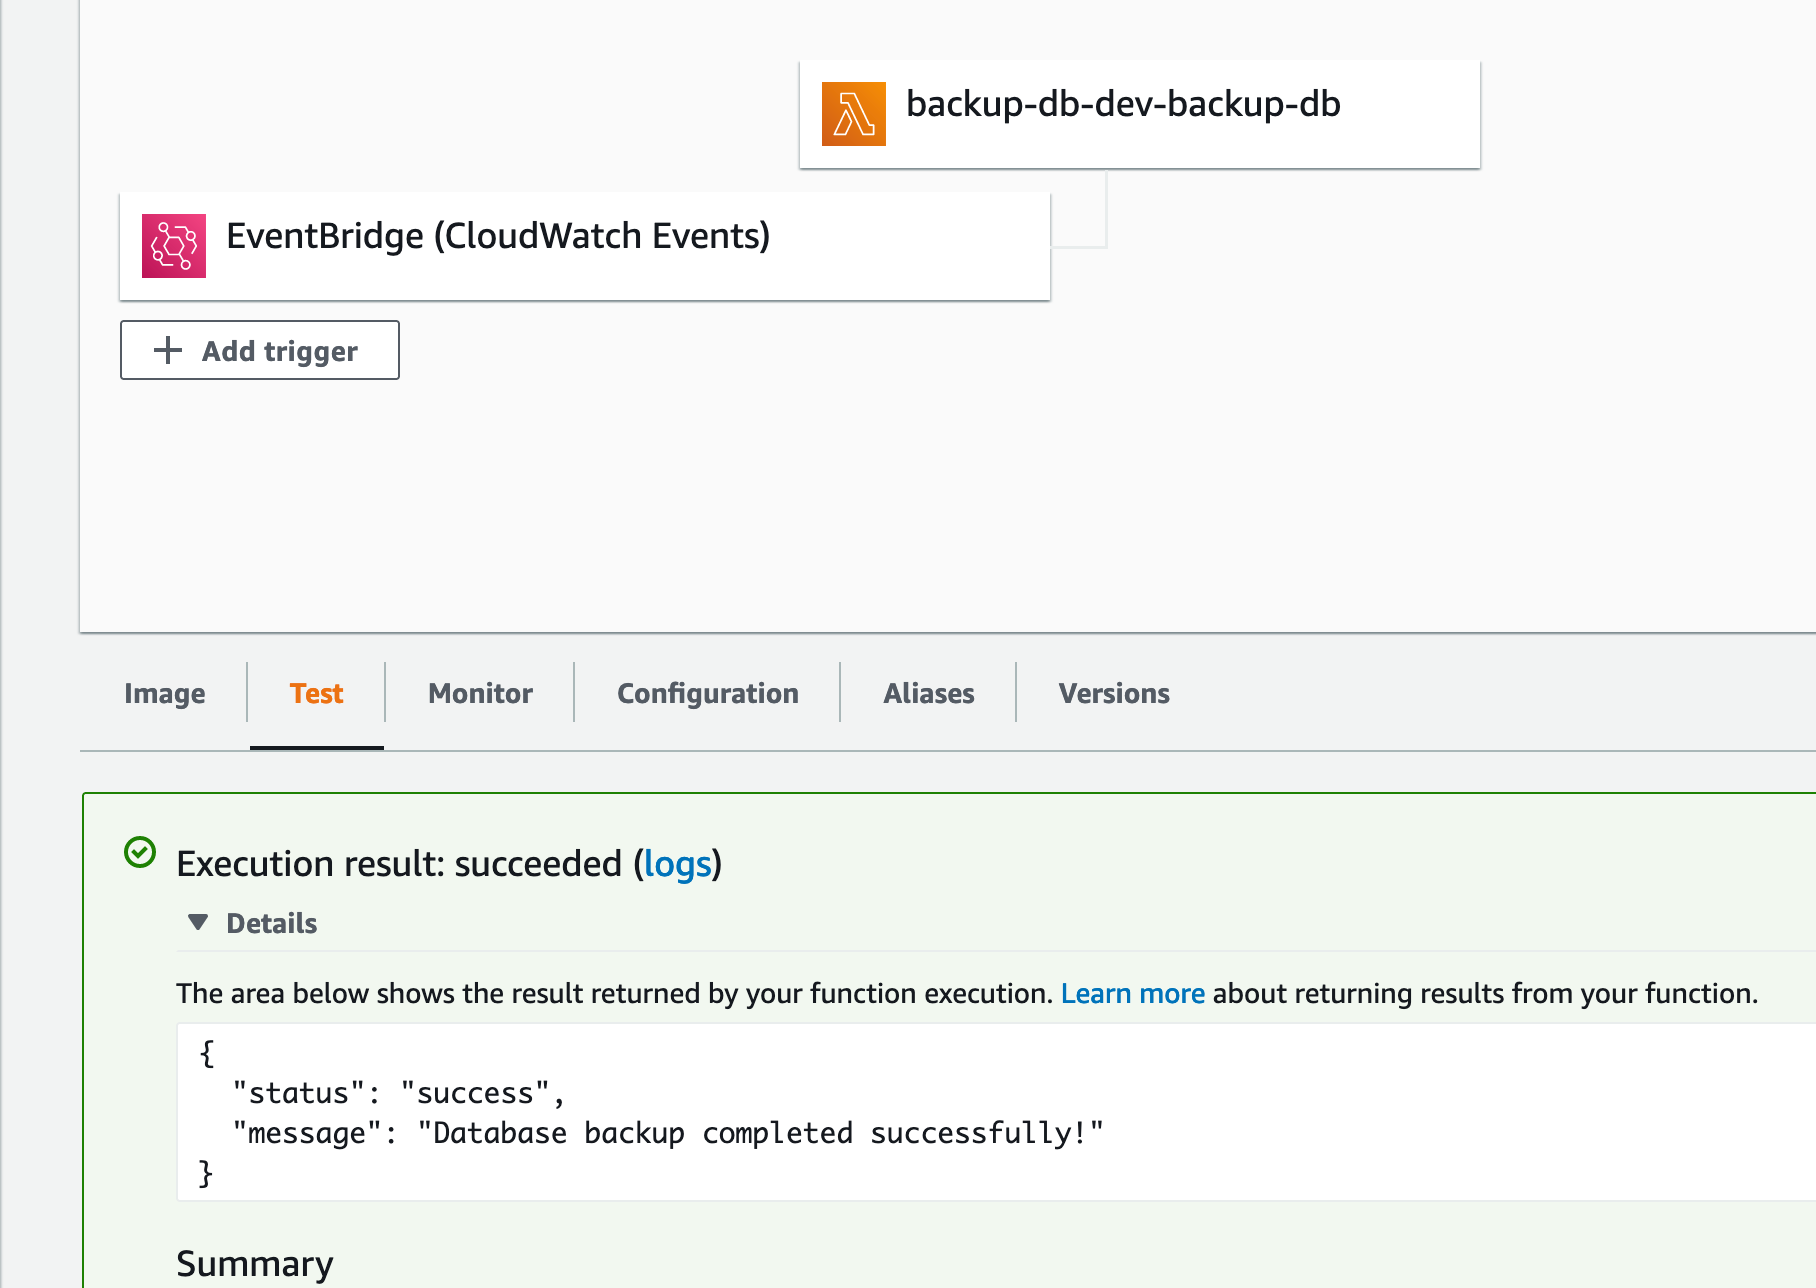
Wait for serverless to complete the deployment, then go to the AWS console to the Lambda. If everything is done correctly, you will have an output similar to the one below:
Conclusion
Throughout this tutorial, we have seen how we can take advantage of Docker image support by AWS Lambda to periodically back up a PostgreSQL database.
To go further, you can upload the code to cloud storage. I showed how to upload a file to Google Drive here.
Find the source code for this project in the GitHub repository.
Follow me on Twitter or subscribe to my newsletter to avoid missing the upcoming posts and the tips and tricks I occasionally share.