
Document a Node.js REST API with Swagger and Open API


Photo by Ian Schneider on Unsplash
Documenting your API is crucial for good integration with other developers. It is also a tedious task, and hopefully, some tools help us, but still, most of the work remains on our side.
In this previous tutorial, we built a REST API with Node.js and express. Today, we will document it by using two tools:
- Open API Specification:
It defines a standard, language-agnostic interface to RESTful APIs which allows both humans and computers to discover and understand the capabilities of the service without access to source code, documentation, or through network traffic inspection. When properly defined, a consumer can understand and interact with the remote service with a minimal amount of implementation logic.
Practically we will create a .ts file where we will write the documentation following the Open API Specification. For example, it will contain the endpoints, the HTTP method, the request's body input, the response returned when successful, the shape of the data returned in the response, etc.
- Swagger: Swagger is used to parse the documentation file and map the data on a nice and user-friendly UI. External developers will access this UI through a URL exposed from our API.

Prerequisites
You must install the following tools on your computer to follow this tutorial.
- Node.js 12+ - Download's link
- NPM or Yarn - I will use Yarn
Set up the project
Let’s clone the project of the previous tutorial and make it works.
git clone https://github.com/tericcabrel/blog-tutorials.git

cd blog-tutorials/node-rest-api

cp .env.example .env

# Update the environment variables with your local configuration
nano .env

yarn install

yarn start
Open your browser and navigate to http://localhost:4500
Here is the list of the endpoint to document:
- [POST] /roles [POST] /users
- [GET] /roles [GET] /users
- [PUT] /roles/:id [PUT] /users/:id
- [DELETE] /roles/:id [DELETE] /users/:id
- [GET] /roles/:id [GET] /users/:id
Once done, create a folder called docs, and inside, create a file called apidoc.ts.
Where do we define API documentation?
We can write our documentation with Swagger in two ways:
Comments
Inside the multiline comment on top of the endpoint definition, we can write our documentation here, and Swagger will parse it. The format to use is YAML.
/**
 * @swagger
 *    components:
 *      schemas:
 *        Book:
 *          type: object
 *          required:
 *            - title
 *            - author
 *            - finished
 *          properties:
 *            id:
 *              type: integer
 *              description: The auto-generated id of the book.
 *            title:
 *              type: string
 *              description: The title of your book.
 */
router.post('/users', createUser);JSON Object
We can write our documentation as JSON objects following the JSON schema standard. When finished, pass our object as an argument when initializing Swagger.
What to use?
Writing documentation in the comments can make our file hard to read, and we can reuse objects when needed, and to finish, YAML can be hard to write without Linter.
With JSON Object, we can create a separate file and write our documentation inside, create a reusable variable, and the JSON schema is relatively easy to use.
As you can guess, we will use the JSON Object in this tutorial so let's start.
Start writing documentation
Inside the file docs/apidoc.ts, add the content below:
const apiDocumentation = {
openapi: '3.0.1',
info: {
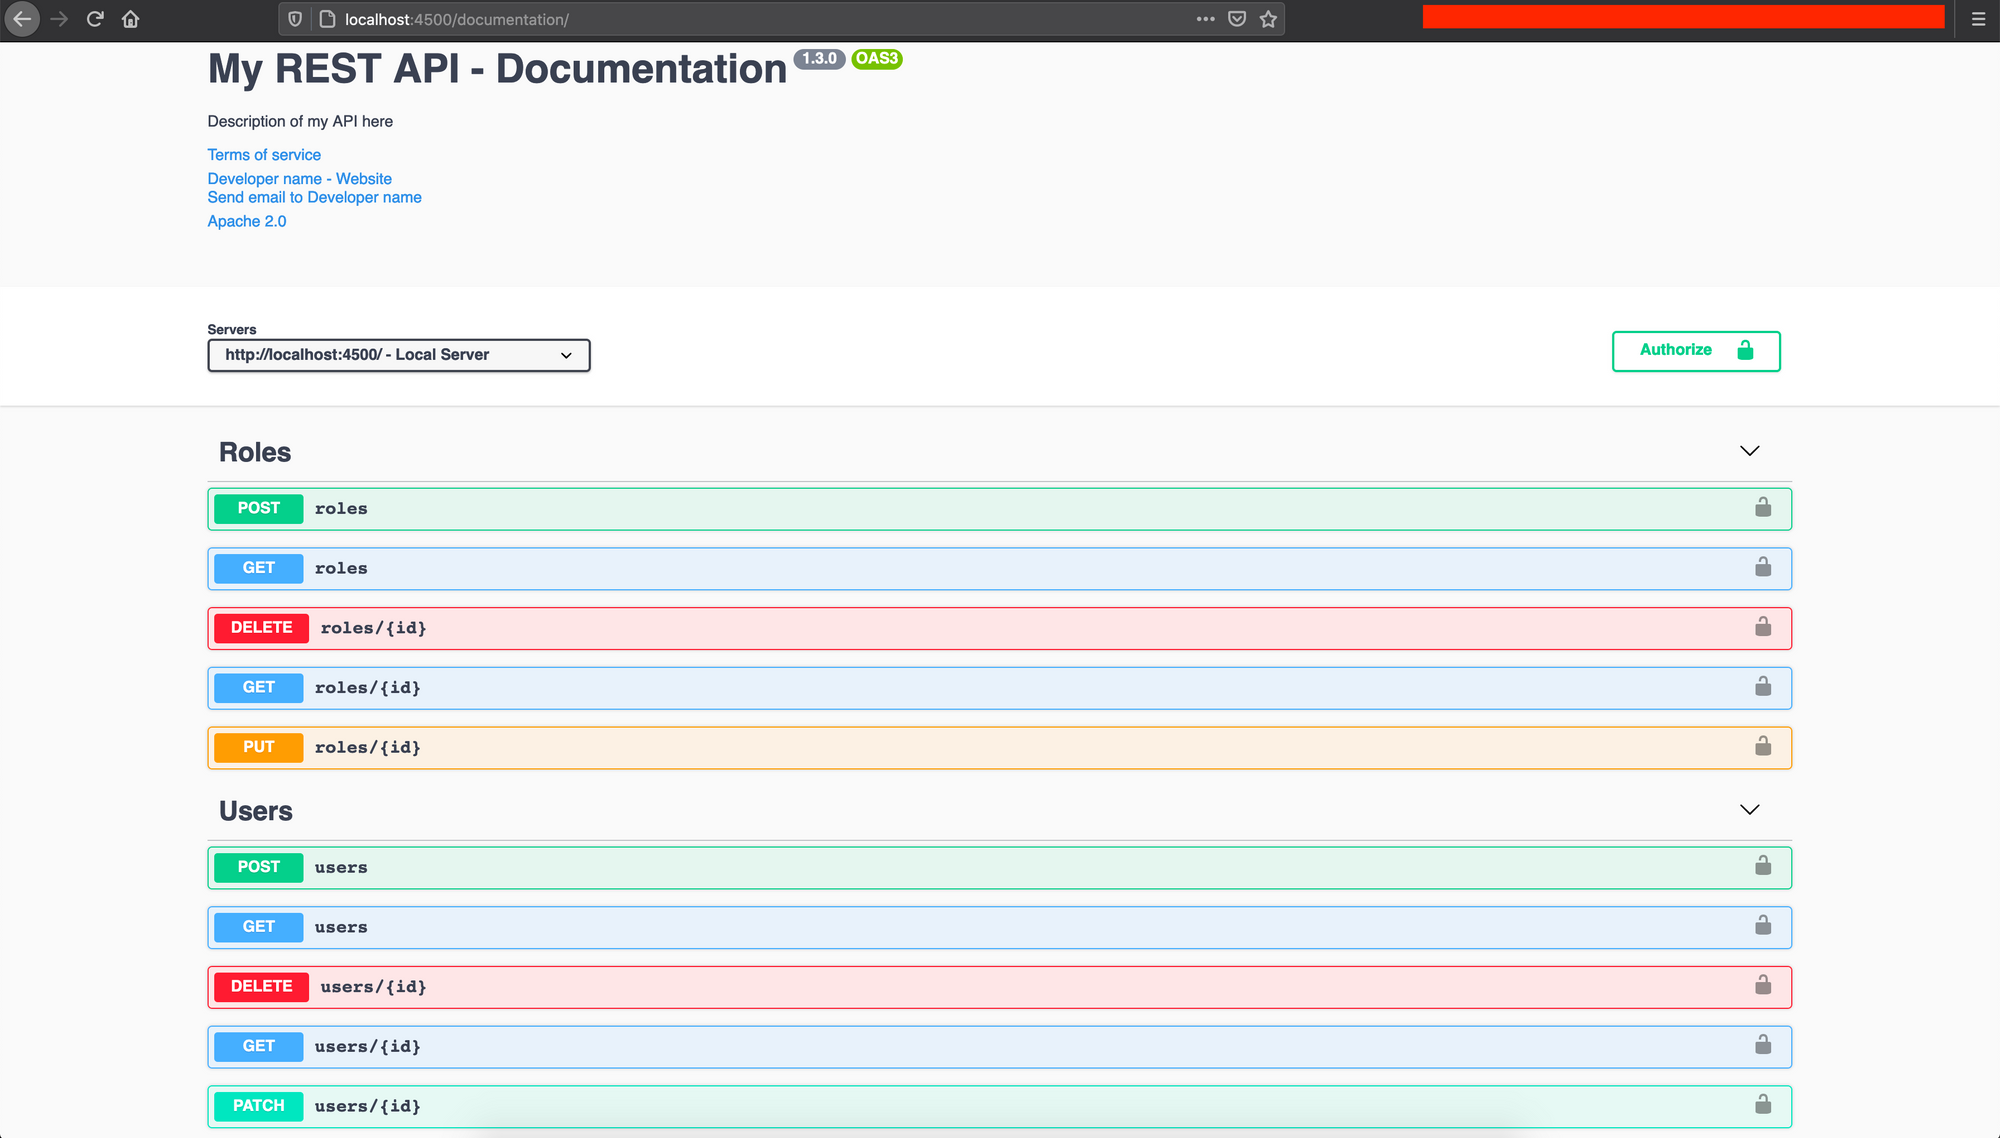
version: '1.3.0',
title: 'My REST API - Documentation',
description: 'Description of my API here',
termsOfService: 'https://mysite.com/terms',
contact: {
name: 'Developer name',
email: 'dev@example.com',
url: 'https://devwebsite.com',
},
license: {
name: 'Apache 2.0',
url: 'https://www.apache.org/licenses/LICENSE-2.0.html',
},
},
servers: [
{
url: 'http://localhost:4500/',
description: 'Local Server',
},
{
url: 'https://api.mysite.com',
description: 'Production Server',
},
],
tags: [
{
name: 'Roles',
},
{
name: 'Users',
},
],
};
export { apiDocumentation };
We defined a title for our API, a description, the developer's contact, and the URL of the project for each environment.
I defined one for the local environment and another for production; you can add as many environments as possible.
The property "tags" represent a set of endpoints grouped together by their domain. The tag "roles" refers to all the endpoints related to role management, and the tag "users" to user management.
Create a user
Create a new file inside the docs folder called users.ts and add the code below:
const createUser = {
  tags: ['Users'],
  description: 'Create a new use in the system',
  operationId: 'createUser',
  security: [
    {
      bearerAuth: [],
    },
  ],
  requestBody: {
    content: {
      'application/json': {
        schema: {
          $ref: '#/components/schemas/createUserBody',
        },
      },
    },
    required: true,
  },
  responses: {
    '201': {
      description: 'User created successfully!',
      content: {
        'application/json': {
          schema: {
            type: 'object',
            properties: {
              _id: {
                type: 'string',
                example: '60564fcb544047cdc3844818',
              },
              fullName: {
                type: 'string',
                example: 'John Snow',
              },
              email: {
                type: 'string',
                example: 'john.snow@email.com',
              },
              password: {
                type: 'string',
                example: '442893aba778ab321dc151d9b1ad98c64ed56c07f8cbaed',
              },
              enabled: {
                type: 'boolean',
                example: true,
              },
              role: {
                type: 'string',
                example: '605636683f6e29c81c8b2db0',
              },
              createdAt: {
                type: 'string',
                example: '2021-03-20T19:40:59.495Z',
              },
              updatedAt: {
                type: 'string',
                example: '2021-03-20T21:23:10.879Z',
              },
            },
          },
        },
      },
    },
    '500': {
      description: 'Internal Server Error',
      content: {
        'application/json': {
          schema: {
            type: 'object',
            properties: {
              message: {
                type: 'string',
                example: 'Internal Server Error',
              },
            },
          },
        },
      },
    },
  },
};

const createUserBody = {
  type: 'object',
  properties: {
    fullName: {
      type: 'string',
      example: 'John Snow',
    },
    email: {
      type: 'string',
      example: 'john.snow@email.com',
    },
    password: {
      type: 'string',
      description: "unencrypted user's password",
      example: '!1234aWe1Ro3$#',
    },
    enabled: {
      type: 'boolean',
      example: true,
    },
    role: {
      type: 'string',
      example: '605636683f6e29c81c8b2db0',
    },
  },
};

export { createUser, createUserBody };
Update the file docs/apidoc.ts by adding the code below at the root of the "apiDocumentation" object:
const apiDocumentation = {
  // previous content here
  paths: {
    users: {
      post: createUser,
    },
  },
  components: {
    securitySchemes: {
      bearerAuth: {
        type: 'http',
        scheme: 'bearer',
        bearerFormat: 'JWT',
      },
    },
    schemas: {
      createUserBody,
    },
  },
};
Let's explain what we did above:
- We create the documentation by setting a tag to "Users," which means the endpoint belongs to the group Users;
- The operationId is used to identify the endpoint. It must be unique across all the documentation.
- The property security defines the authentication mode used for the API. It can be basic, Bearer, API-Key, etc. We set the value to bearerAuth, yet we didn't implement any authentication to show how to define it. The key "bearerAuth" refers to the property components.securitySchemes.bearerAuth, so don't forget to update the former if you change the latter.
- The property requestBody describes the content of the request's body. The JSON schema refers to the property components.schemas.createUserBody inside apiDocumentation object. We end by indicating that the request's body is required.
- The property responses define all possible HTTP status codes that can be returned. We defined status 200 when the user is created successfully and the response body's content; status 500 for an Internal server error.
The process is the same for all the other endpoints with the requestBody and responses properties which will be updated according to the endpoint requirement.
However, we will see the case for an endpoint with a parameter.
Delete a user
Inside the file docs/users.ts, add the code below:
const deleteUser = {
  tags: ['Users'],
  description: 'Delete a user',
  operationId: 'deleteUser',
  security: [
    {
      bearerAuth: [],
    },
  ],
  parameters: [
    {
      name: 'id',
      in: 'path',
      description: 'User ID',
      required: true,
      type: 'string',
    },
  ],
  responses: {
    '200': {
      description: 'User deleted successfully!',
      content: {
        'application/json': {
          schema: {
            type: 'object',
            properties: {
              message: {
                type: 'string',
                example: 'User deleted successfully!',
              },
            },
          },
        },
      },
    },
    '500': {
      description: 'Internal Server Error',
      content: {
        'application/json': {
          schema: {
            type: 'object',
            properties: {
              message: {
                type: 'string',
                example: 'Internal Server Error',
              },
            },
          },
        },
      },
    },
  },
};Don't forget to export the variable deleteUser.
Update the property paths of the object in docs/apidoc.ts to make it look like this:
{
  paths: {
    users: {
      post: createUser,
    },
    'users/{id}': {
      delete: deleteUser,
    },
  },
}Tips: Since the status 500 will be present on all the endpoints, we can move this part to a variable to avoid duplication and include it everywhere.
Display the documentation
We finished writing the documentation for our endpoints; to display the documentation in a way that is more user-friendly. We will install the package swagger-ui-express to achieve that.
yarn add swagger-ui-express

yarn add -D @types/swagger-ui-express
Open the file index.ts and add the code below at the top of the file:
import swaggerUi from 'swagger-ui-express';
import { apiDocumentation } from './docs/apidoc';
Add the code below after the instruction app.use('/', userRoute())
app.use('/documentation', swaggerUi.serve, swaggerUi.setup(apiDocumentation));
We are all set !!!! Run yarn start to start the application, then navigate to the path /documentation in your browser.
With the Open API specification and Swagger UI, you can create developer-friendly API documentation that will make it easier to interact with your API.
To learn more about the possibility of the Open API specification, check out this link.
The Swagger UI provides many options to customize the look of the API documentation, so don't hesitate to check it out if you want.
Find the code source with all the endpoints documented on the GitHub repository.
Follow me on Twitter or subscribe to my newsletter to avoid missing the upcoming posts and the tips and tricks I occasionally share.