
Load balancing a Node.js application with Nginx


A load balancer is a software that distributes network or application traffic between many servers, aiming to improve the application's performance and reliability.
A load balancing can happen at two levels:
- Network level (L4): it happens at the Transport layer of the OSI model, which is the 4th level; the load balancer uses protocols such as TCP, UDP, RSVP, and QUIC to manage transaction traffic based on a load-balancing algorithm and some information such as server connections and response times.
- Application level (L7): It happens at the Application layer of the OSI model, which is the 7th, the last level; the load balancer uses protocols such as HTTP, SMTP, FTP, DNS, etc... The routing decisions are based on information such as the characteristics of the HTTP/HTTPS header, message content, URL type, and cookie data.
This post will focus on load balancing at the application level of using Nginx.
The use case
You run an E-commerce where users come, browse/search for products, add to the cart, and make their purchase; they proceed to the payment. In the following workflow, the step that is highly demanding is the one allowing users to browse and search products.
On E-commerce websites, only 2.17% of visits convert to sales. With numbers, it means if 10,000 users visit your site and browse products, only 217 will make a purchase.
This means you should always ensure there are enough resources to handle a load of users browsing products. You can achieve this by horizontally scaling your backend application and then balancing the load received between these instances.
The E-commerce website exposes an endpoint /products/search for searching products, and our goal is to set up a load balancer with Nginx to handle the traffic.
The project to use as an example
I prepared a Node.js application that exposes a single endpoint /products/search
import express from 'express';
import dotenv from 'dotenv';
import { searchProducts } from './utils';

dotenv.config();

const HOST = process.env.HOST || 'http://localhost';
const PORT = parseInt(process.env.PORT || '4500');

const app = express();

app.use(express.urlencoded({ extended: true }));
app.use(express.json());

app.get('/', (req, res) => {
  return res.json({ message: 'Hello World!' });
});

app.get('/products/search', (req, res) => {
  const result = searchProducts();

  return res.json({ result, processId: process.pid });
});

app.listen(PORT, () => {
  console.log(`Application started on URL ${HOST}:${PORT} 🎉`);
});
To simulate the highly demanding task, the searchProducts() function calculates the Fibonacci suit of a number recursively (the iterative way is too fast to be used for this demo).
const fibonacci = (num: number) => {
  if (num === 0) {
    return 0;
  }

  if (num === 1) {
    return 1;
  }

  return fibonacci(num - 1) + fibonacci(num - 2);
};

export const searchProducts = () => {
  const length = parseInt(process.env.MAX_NUMBER ?? '25', 10);

  return fibonacci(length);
};
The endpoint returns the result of the searchProducts() function and the application's process ID; it will be used further in this article.
app.get('/products/search', (req, res) => {
  const result = searchProducts();

  return res.json({ result, processId: process.pid });
});
The application is packaged into a Docker image and pushed into my personal Docker Hub.
Prerequisites
To follow this tutorial, you will need the following tools:
- A Virtual Private Server with at least 2 CPU cores and Docker and Nginx installed. The server configuration will use 2 CPUs and 4GB of RAM.
- A load testing tool will be used to perform a load test on our backend application and evaluate the result. I will use artillery.
You can buy a VPS on Hetzner, which provides affordable server with good performance. The server running this blog and all my side projects are hosted here. Use my referral link to get €20 after you sign up.
If you don't know how to set up a VPS, I have written a whole post to help you.

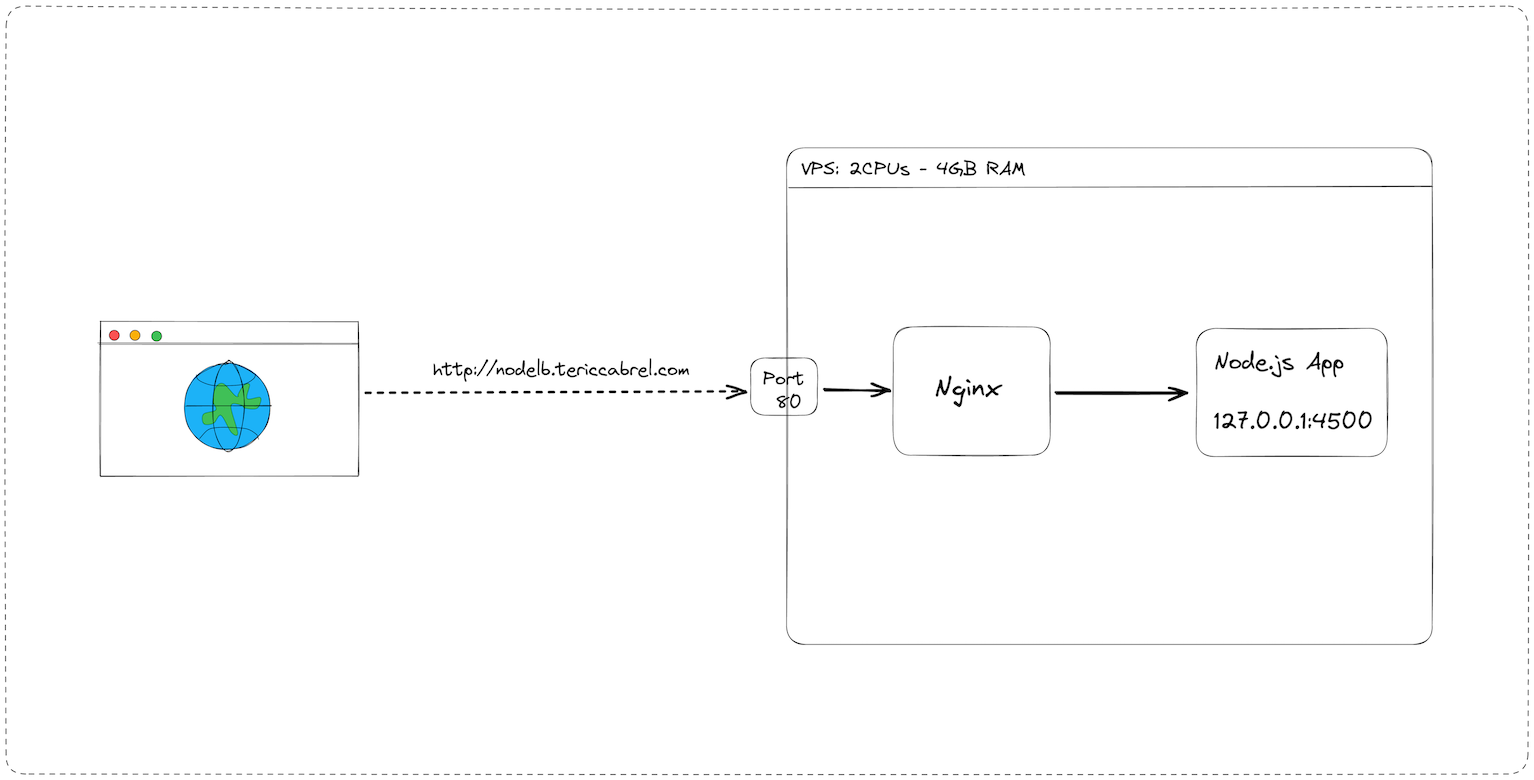
Deploy the project without load balancing
Without a load balancing configured, this is what our architecture looks like:
Start the application
A Docker image of the application is stored on the Docker Hub; we will pull it from there and start a Docker container from that image:
docker pull tericcabrel/nodelb-app:latest

docker run --rm -d -p 4501:4500 --env MAX_NUMBER=35 --name nodelbapp-1 tericcabrel/nodelb-app:latest
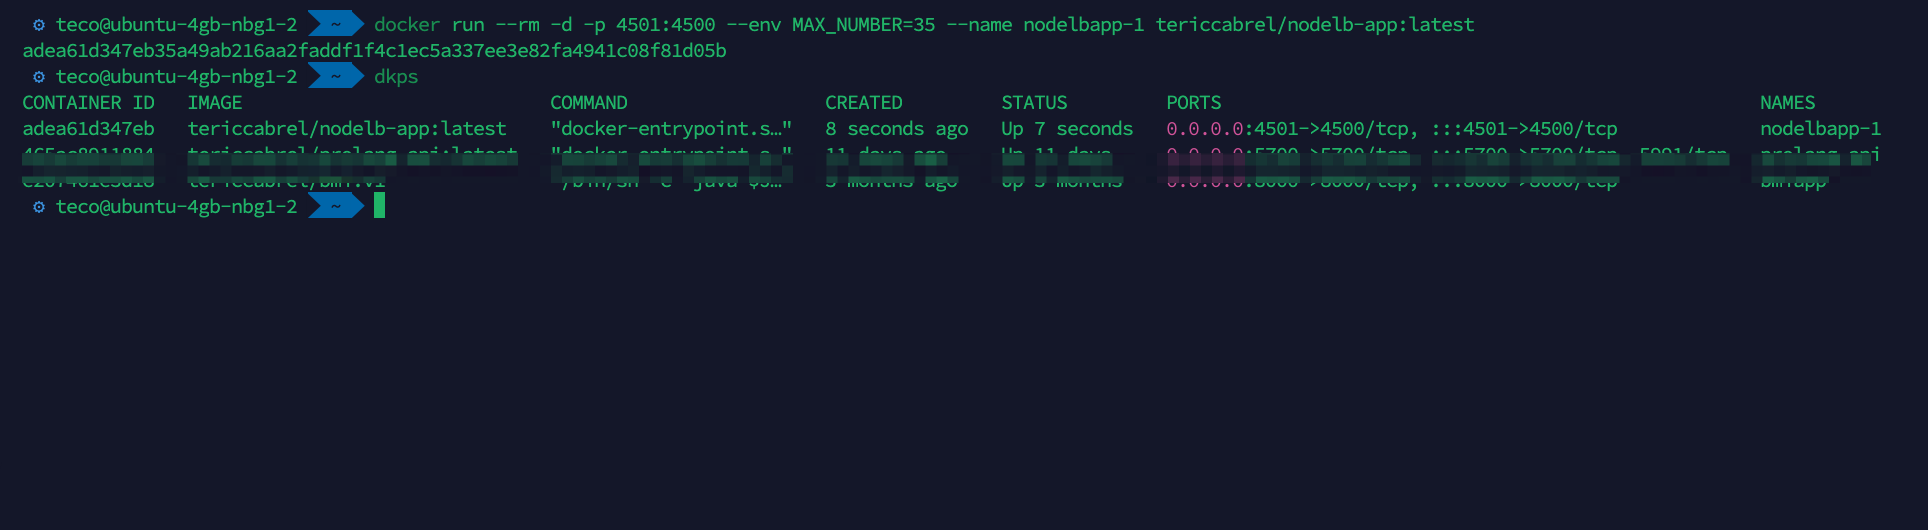
Verify the container is running with docker ps
Configure the reverse proxy with Nginx
This is the Nginx configuration for a reverse proxy to our application using the sub-domain nodelb.tericcabrel.com
server {
    server_name nodelb.tericcabrel.com;
    index index.html index.htm;
    access_log /var/log/nginx/nodelb.log;
    error_log  /var/log/nginx/nodelb-error.log error;

    location / {
        proxy_set_header X-Forwarded-For $proxy_add_x_forwarded_for;
        proxy_set_header X-Forwarded-Proto $scheme;
        proxy_set_header X-Real-IP $remote_addr;
        proxy_set_header Host $http_host;
        proxy_pass http://127.0.0.1:4501;
        proxy_redirect off;
    }
}
I wrote a complete guide to help you configure a reverse proxy and set up an SSL certificate with Letsencrypt.

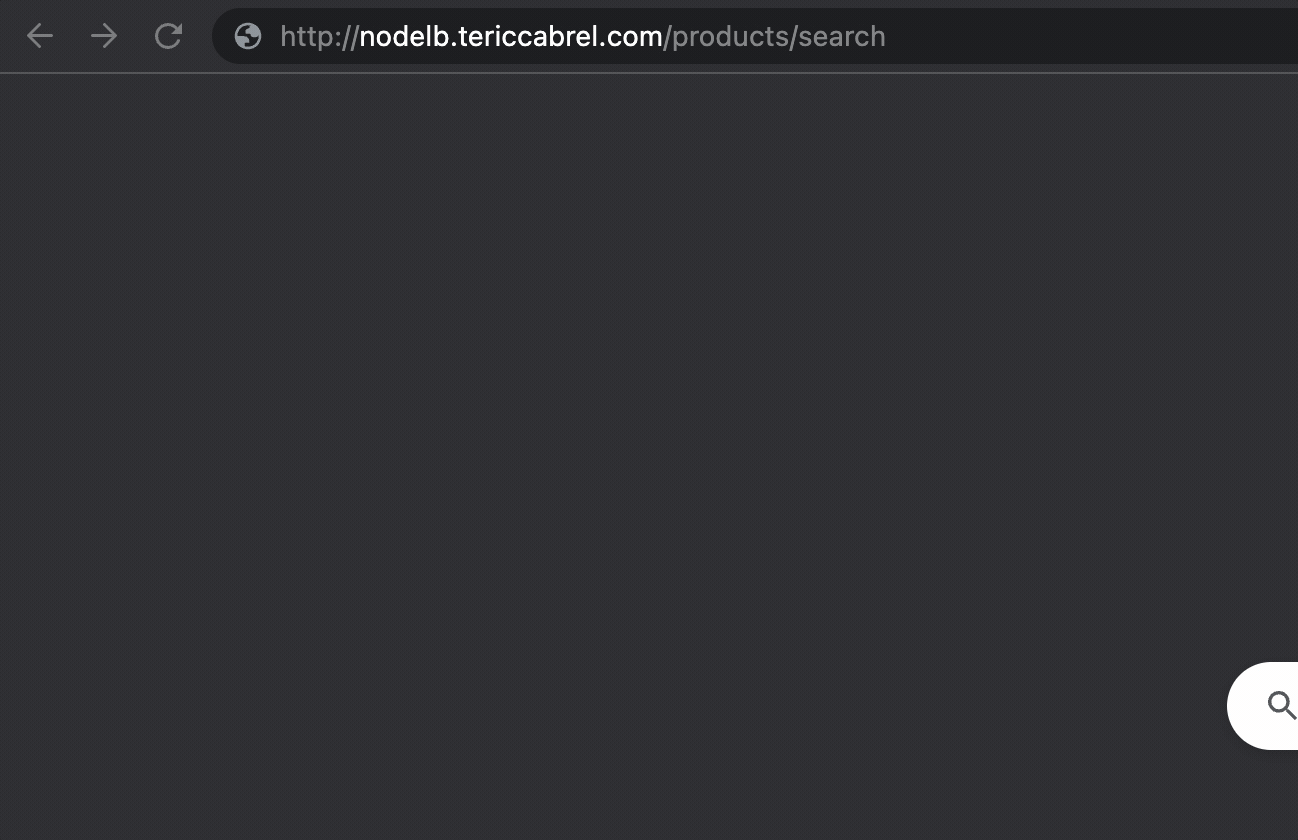
Test in the browser
The application is available on the Internet through nodelb.tericcabrel.com. Let's open the browser and navigate to that URL.
Perform load testing
For one request, the application responds very fast. Let's see what happens when there are 10 users every second within 30 seconds.
We use a load testing tool to simulate this kind of behavior; I use artillery, so you must install it globally on your computer and then run the command below to execute the load test:
npm install -g artillery

artillery run artillery.yaml
The file artillery.yaml can be found in the GitHub repository. After executing the load test, here is the result:
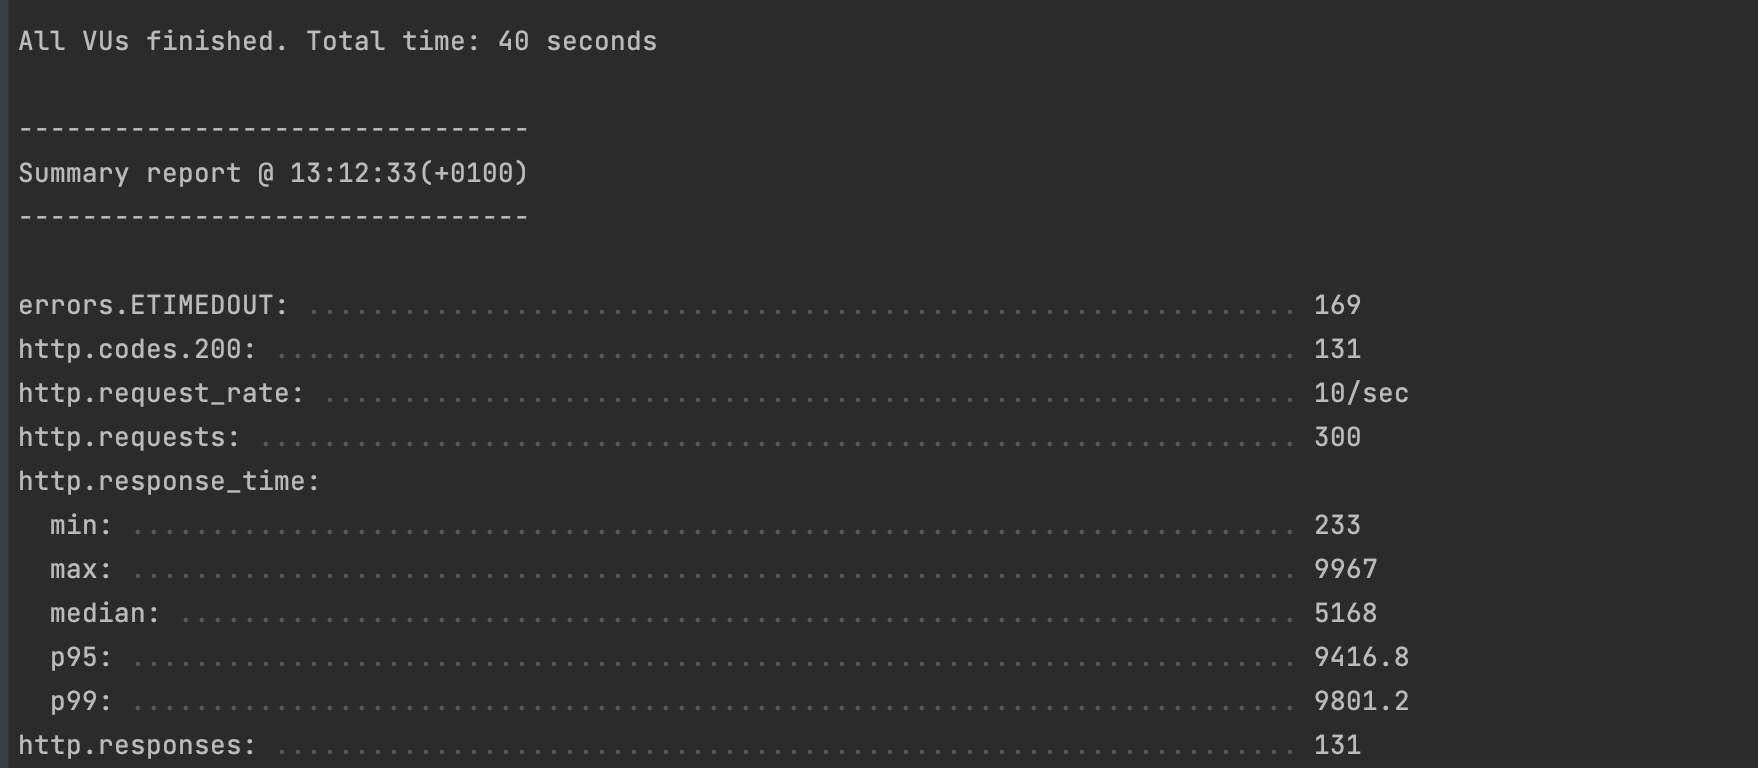
In a range of 30 seconds, the application received 300 requests (10 per second):
- 169 requests timed out, meaning 169 users received an error when trying to search for a product 😱
- 131 requests were completed, and 99% of these requests took less than 9 seconds and 5 seconds on average to respond. Even though 131 users received a response, it was the fastest as possible.
Analyze the CPU usage during the load test
During the load test, I used htop to capture real-time CPU usage, and this is what it looked like throughout the test:

Our application uses one CPU to handle the load and is struggling to serve all the requests, yet the second core is free; it means the server is not used at full capacity.
Let's see how to improve server usage in the next step.
Deploy the project with load balancing
We will start two Docker containers running on different ports to use the two CPU cores. We will now update the Nginx configuration to change how Nginx routes requests to our application.
The architecture of the system will now look like this:
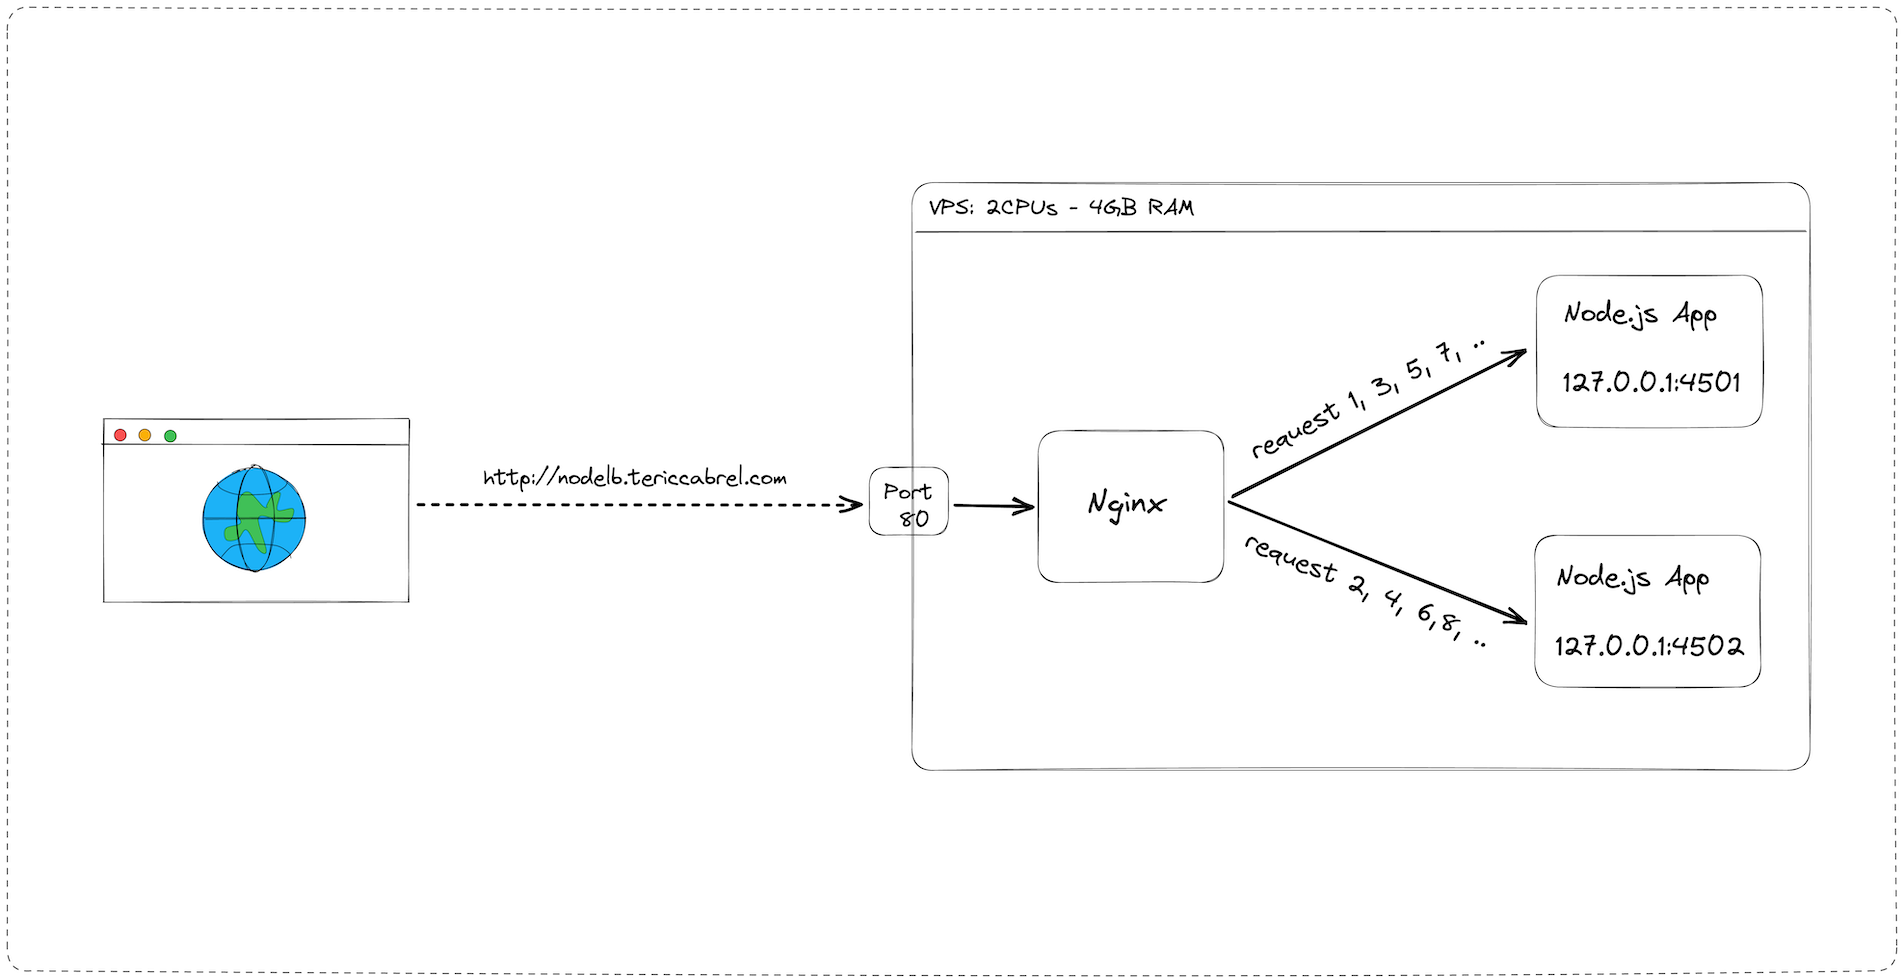
Run two instances of the Node.js application
Run the command below to start two containers from the Docker image of our application:
docker run --rm -d -p 4501:4500 --env MAX_NUMBER=35 --name nodelbapp-1 tericcabrel/nodelb-app:latest

docker run --rm -d -p 4502:4500 --env MAX_NUMBER=35 --name nodelbapp-2 tericcabrel/nodelb-app:latest
The two instances, respectively, run on ports 4501 and 4502.
Update the Nginx configuration to balance the load
Previously, we had only applications running on a port. Now, we have two applications; we must define a fleet of servers and then let Nginx balance the traffic between these servers.
Here is the code to declare a fleet of servers in the Nginx configuration file:
upstream appservers {
  server 127.0.0.1:4501;
  server 127.0.0.1:4502;
}
appservers is the name of my fleet of servers; it can be named as you want. Next, we define the URLs on the server host of each of our applications.
Example: If we add two other servers running on port 7583 and 9461 , our declaration will look like this:
upstream appservers {
  server 127.0.0.1:4501;
  server 127.0.0.1:4502;
  server 127.0.0.1:7583;
  server 127.0.0.1:9461;
}
Now, instead of pointing to a URL on the server host, we changed it to redirect to the fleet of servers, and Nginx will do the rest.
Replace proxy_pass http://127.0.0.1:4501 by proxy_pass http://appservers;
The complete content of the Nginx configuration file for our application looks like this:
upstream appservers {
  server 127.0.0.1:4501;
  server 127.0.0.1:4502;
}

server {
    server_name nodelb.tericcabrel.com;
    index index.html index.htm;
    access_log /var/log/nginx/nodelb.log;
    error_log  /var/log/nginx/nodelb-error.log error;

    location / {
        proxy_set_header X-Forwarded-For $proxy_add_x_forwarded_for;
        proxy_set_header X-Forwarded-Proto $scheme;
        proxy_set_header X-Real-IP $remote_addr;
        proxy_set_header Host $http_host;
        proxy_pass http://appservers;
        proxy_redirect off;
    }
}
Test in the browser
Let's open the browser and navigate again to the URL nodelb.tericcabrel.com:
Now we can see that for each request, the process ID alternates between the values 39 and 40, which are the process IDs of our two application instances.
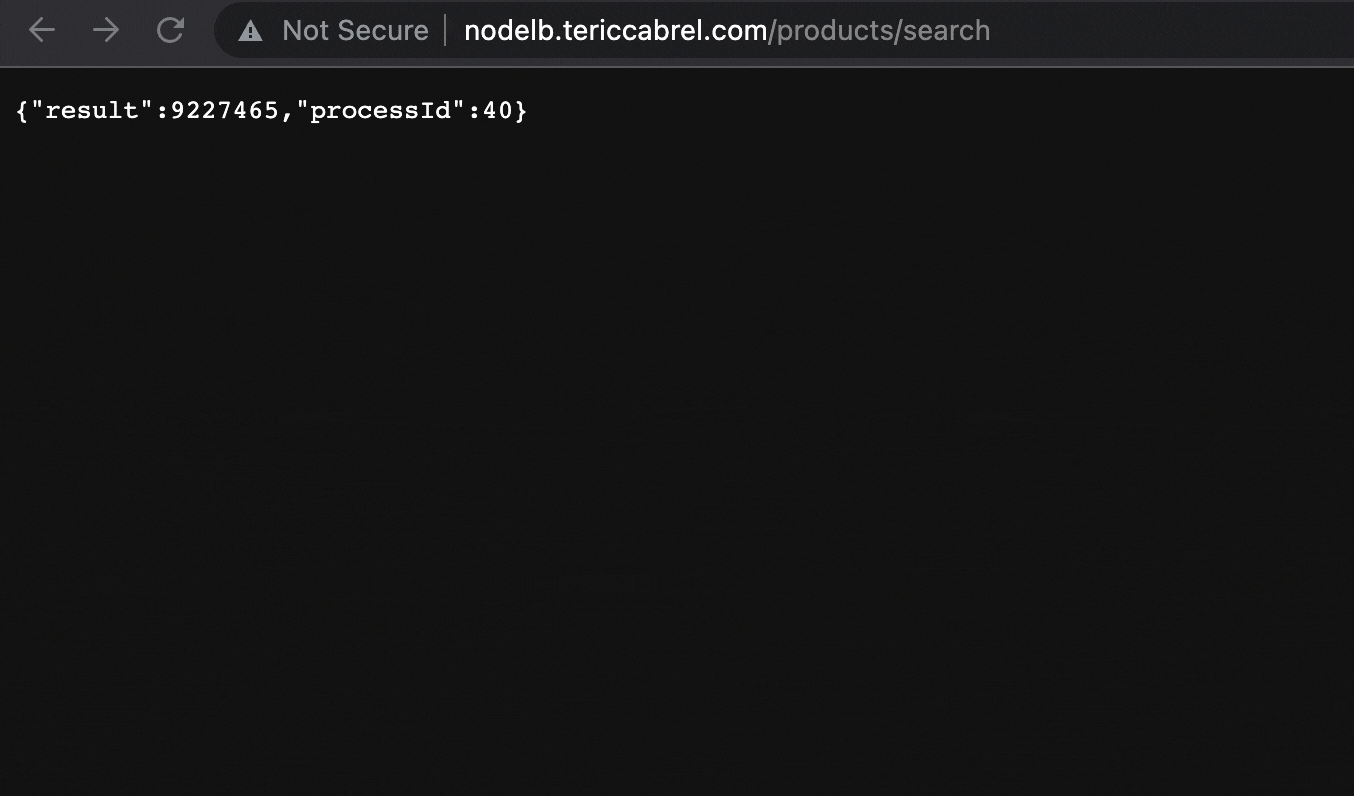
Nginx effectively balances the request between the two applications using a load-balancing algorithm called round-robin; it is the default one when none is specified, as in our case.
Perform load testing
As in the configuration without a load balancer, the response is very fast for one request. Let's see what happens when there are 10 users every second for 30 seconds.
Run the command artillery run artillery.yaml and wait for the execution to complete. This is what we get:
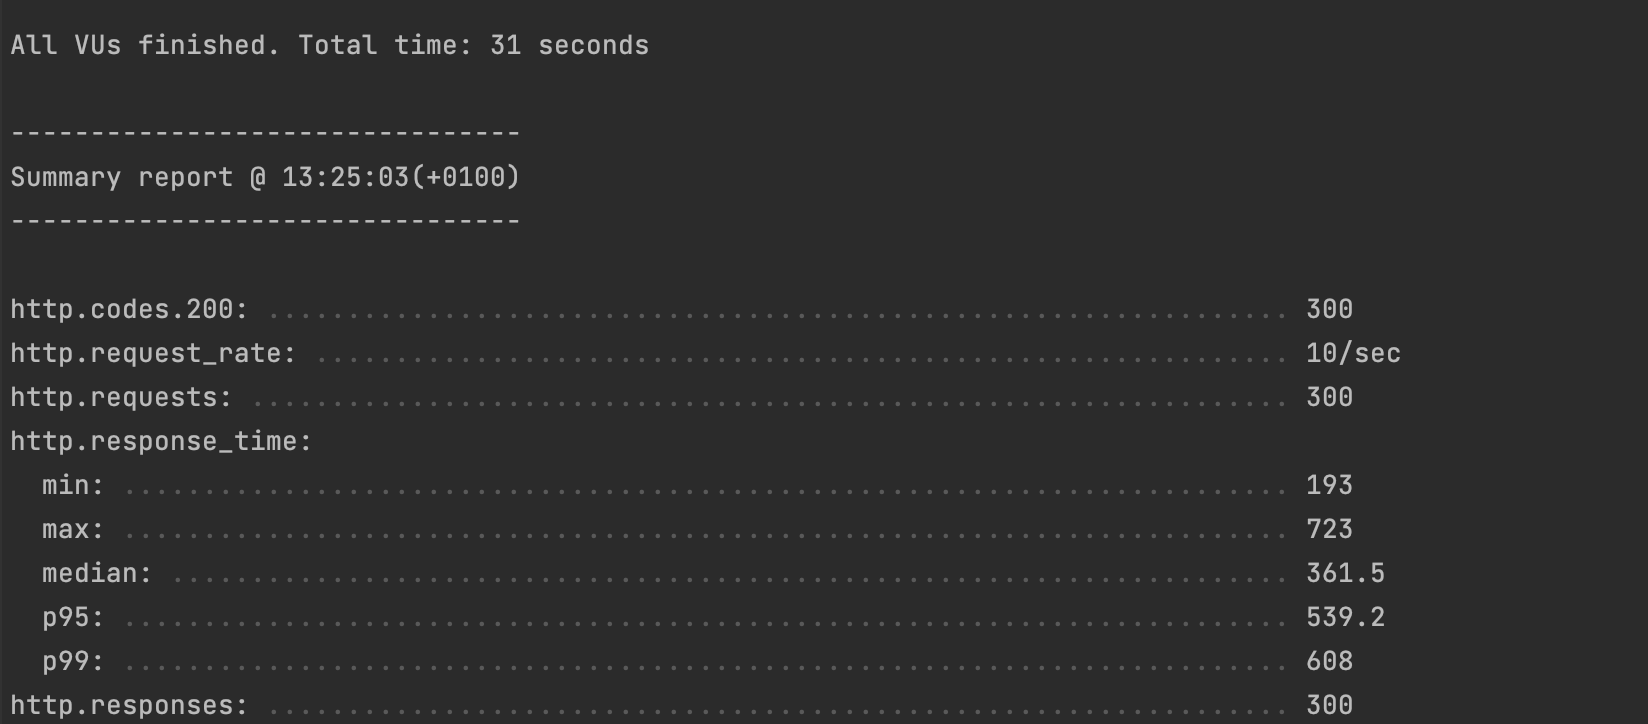
In a range of 30 seconds, the application received 300 requests (10 per second):
- No request timed out 🎉
- All 300 requests were completed, and 99% of these requests took less than 600 milliseconds to respond ⚡
Analyze the CPU usage during the load test
This is how the CPU usage looked like during the load test execution:

We can now see that the two cores are respectively used at 96% and 95%.
In conclusion, by balancing the load between two applications and using all the CPU cores available, we improved the response time by 9. We can add it to our record for the annual performance review 😌
Load balancing algorithms
A load balancer can use many algorithms to distribute the traffic, such as round-robin, weighted round-robin, least connections, and least response time. Check out this link to learn about their specificity.
To change the load-balancing algorithm in the Nginx configuration file, define it at the first line of the server's fleet declaration.
upstream <server_fleet_name> {
  <load_balancing_algorithm>;
  <server_1>;
  <server_2>;
  ...
  <server_n>;
}
The default algorithm is round-robin, to change to the least connection algorithm, our configuration will look like this:
upstream appservers {
  least_conn;

  server 127.0.0.1:4501;
  server 127.0.0.1:4502;
}
The other possible values are: ip_hash, hash, least_time, and random. Check out this link to see how to configure each of them.
Wrap up
Horizontally scaling an application and then using a load balancer to distribute the traffic load is a great way to improve the performance of your application. There are various load-balancing algorithms, so you should choose the one that best fits your needs.
Check out the Nginx documentation to learn more about the load-balancing capability.
You can find the code source on the GitHub repository.
Follow me on Twitter or subscribe to my newsletter to avoid missing the upcoming posts and the tips and tricks I occasionally share.