
Using MongoDB with Spring Boot project - Part 1


Photo by Rodolfo Cuadros on Unsplash
MongoDB is widely used to store schema-less data. One of the main reasons contributing to this is the availability of drivers for various programming languages, making the adoption easier.
The Java driver is used to connect MongoDB with applications written in Java. Today, we will see how to use a Spring Boot application to perform write operations (create, update and delete) in MongoDB for this first part.
The use case
The use case is about championship management. We have a team with many players. A team has a name, an acronym, an address formed by a city, a postal code, and a street address. A player is formed by a name, a date of birth, a position, and availability, meaning if he can play or not.
We will build an API to create teams and players, then add a player to the team.
Prerequisites
You must need these tools installed on your computer to follow this tutorial.
- JDK 11 or higher - Download's link
- Maven 3.5 or higher - Download's link
- Docker - Download's link
We need Docker to run a container of MongoDB; you can skip it if MongoDB is installed on your computer. Run the command below to start the Docker container from the MongoDB image:
docker run -d --rm --name championship-db -e MONGO_INITDB_ROOT_USERNAME=root -e MONGO_INITDB_ROOT_PASSWORD=secret mongo:6.0
Initialize the project
Let's initialize a spring boot project with the Spring initializer and select the necessary dependencies.
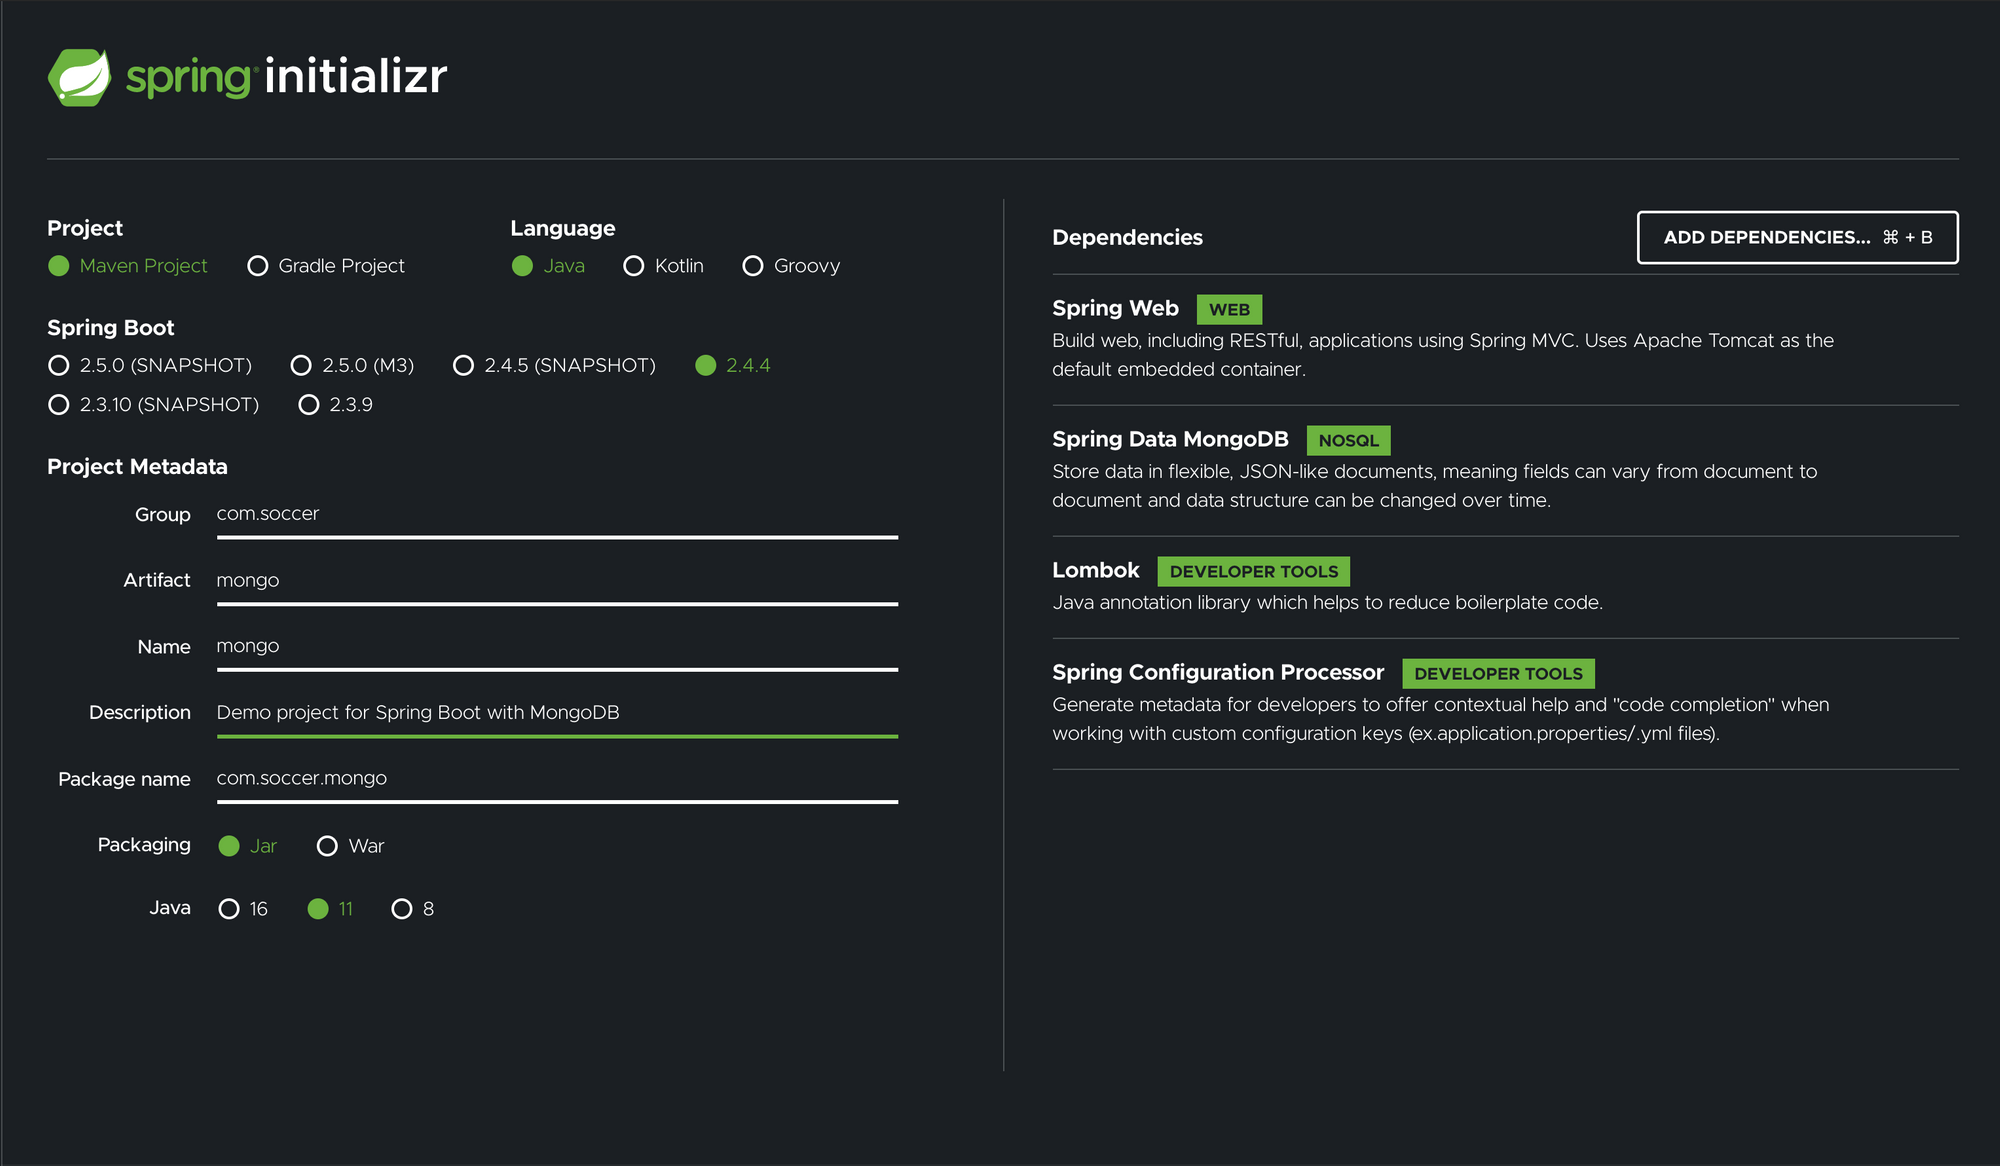
Click on "Generate" to download the project as a zip file. Extract and open it with your favorite IDE; I use IntelliJ.
Connect to MongoDB
To connect to the database, we will configure credentials inside the application properties to connect to the databases. Spring Data MongoDB provides keys to configure the database connection.
spring.data.mongodb.host=localhost
spring.data.mongodb.port=27017
spring.data.mongodb.username=root
spring.data.mongodb.password=secret
spring.data.mongodb.database=admin
spring.data.mongodb.auto-index-creation=true
Above, we provided credentials to connect to the database. We also indicate we want indexes on properties of our entities Player and Team to be created automatically.
You can check this tutorial to create a user with a password in MongoDB.

Note: If you want to provide credentials as a URL, you can use the property spring.data.mongodb.uri.
Run the application to make sure the connection to the database succeeds. The application will fail to start if the connection to MongoDB fails.
Modeling schemas
Create a new package called models that will contain the model Team and Player.
Player's schema
package com.soccer.mongo.models;

// --------- import here ------------

@Document(collection = "players")
@Accessors(chain = true)
@NoArgsConstructor
@Data
public class Player {
  @MongoId(FieldType.OBJECT_ID)
  private String id;

  @Indexed
  private String name;

  private Date birthDate;

  @Indexed
  @Field(targetType = FieldType.STRING)
  private PlayerPosition position;

  private boolean isAvailable;

  private Date createdAt;

  private Date updatedAt;
}
We use the annotation @Document to indicate the document's structure stored in the collections named "players".
@MongoId is used to indicate the property is the document's id and will be automatically generated following the Mongo ObjectId structure.
The value FieldType.OBJECT_ID indicates we want to store the value as an ObjectId there are other types like String, Array, Integer, etc. But the type ObjectId is the mostly used.
@Indexed indicate we want to create an index on this field, which is a good idea for filtering document by this property. You can pass an argument unique with the value "true" to set this property unique across the collection. It is not needed here because two players of different teams can have the same name.
@Field is used to enhance the property by changing the type; in our case, MongoDB doesn't support Enum, so we need to tell Mongo to store this property's value as a string. When retrieving the data from the collection, the value will be returned back as an Enum. You can also provide a different name for the property in MongoDB.
@Field(name = "dateOfBirth")
private Date birthDate;
Player's position Enumeration
package com.soccer.mongo.models;

import lombok.Getter;

@Getter
public enum PlayerPosition {
  GOALKEEPER("goalkeeper"),
  LEFT_FULLBACK("left_fullback"),
  RIGHT_FULLBACK("right_fullback"),
  CENTER_FULLBACK("center_fullback"),
  MIDFIELDER("midfielder"),
  LEFT_MIDFIELDER("left_midfielder"),
  RIGHT_MIDFIELDER("right_midfielder"),
  DEFENSIVE_MIDFIELDER("defensive_midfielder"),
  WINGER("winger"),
  LEFT_WINGER("left_winger"),
  RIGHT_WINGER("right_winger"),
  STRIKER("striker"),
  SECOND_STRIKER("second_striker");

  private final String position;

  PlayerPosition(String position) {
    this.position = position;
  }
}
Nothing special here; we define an Enum that holds the possible positions a player can have.
Team's schema
package com.soccer.mongo.models;

// --------- import here ------------

@Document(collection = "teams")
@Accessors(chain = true)
@Data
public class Team {
  @MongoId(FieldType.OBJECT_ID)
  private String id;

  @Indexed(unique = true)
  @Field
  private String name;

  @Field
  @Indexed(unique = true)
  private String acronym;

  private Address address;

  private Date createdAt;

  private Date updatedAt;

  @DBRef
  private Set<Player> players;

  public Team() {
    this.players = new HashSet<>();
  }
}
@DBRef indicates a reference to another document which is Player in this case. We use a HashSet because we cannot have the same player twice in the team. For instance, a Set store a list of unique elements.
The property address is an instance of the Address but is not annotated. In this case, Mongo will store this information as a nested object of the Team document.
If the property address was annotated with @DBRef, only the entity's id would be saved instead of the whole object.
The other annotation has already been covered before so let move on.
Address's property
package com.soccer.mongo.models;

// --------- import here ------------

@Accessors(chain = true)
@AllArgsConstructor
@Setter
@Getter
public class Address {
  private String city;

  private String postalCode;

  private String street;
}
We created all the models needed; run the app and verify the two collections, "players" and "teams" have been created in your database. There will be no document inside.
Repositories
A repository is an interface between our entity and the database. It provides methods to perform CRUD operations on the database. We will create one for the Player's entity and another for the Team's entity.
Create a new package called "repositories" then, create the file PlayerRepository.java and add the code below:
package com.soccer.mongo.repositories;

// --------- import here ------------

@Repository
public interface PlayerRepository extends MongoRepository<Player, String> {

}
Create another file called TeamRepository.java, then add the code below:
package com.soccer.mongo.repositories;

// --------- import here ------------

@Repository
public interface TeamRepository extends MongoRepository<Team, String> {

}
The interface is empty because by extending MongoRepository, TeamRepository inherits methods to create, read, update and delete a document in teams collections.
If you have a custom query to do, you can add a method for that in this Interface. We will see how to create one in part 2 of the tutorial.
Controllers
To test all of this, let's create two routes to create a team and create a player.
Create a new package called "controllers" and create a file SoccerController.java, then add the code below:
package com.soccer.mongo.controllers;

// --------- classes import here -------

@RestController
public class SoccerController {
  TeamRepository teamRepository;

  PlayerRepository playerRepository;

  public SoccerController(TeamRepository teamRepository, PlayerRepository playerRepository) {
    this.teamRepository = teamRepository;
    this.playerRepository = playerRepository;
  }

  @PostMapping("/teams")
  public ResponseEntity<Team> createTeam(@RequestBody CreateTeamDto createTeamDto) {
    Team teamCreated = teamRepository.save(createTeamDto.toTeam());

    return new ResponseEntity<>(teamCreated, HttpStatus.CREATED);
  }

  @PostMapping("/players")
  public ResponseEntity<Player> createPlayer(@RequestBody CreatePlayerDto createPlayerDto) {
    Player playerCreated = playerRepository.save(createPlayerDto.toPlayer());

    return new ResponseEntity<>(playerCreated, HttpStatus.CREATED);
  }
}
Testing routes
Let's use Postman to test our routes. You can use the HTTP client you want.
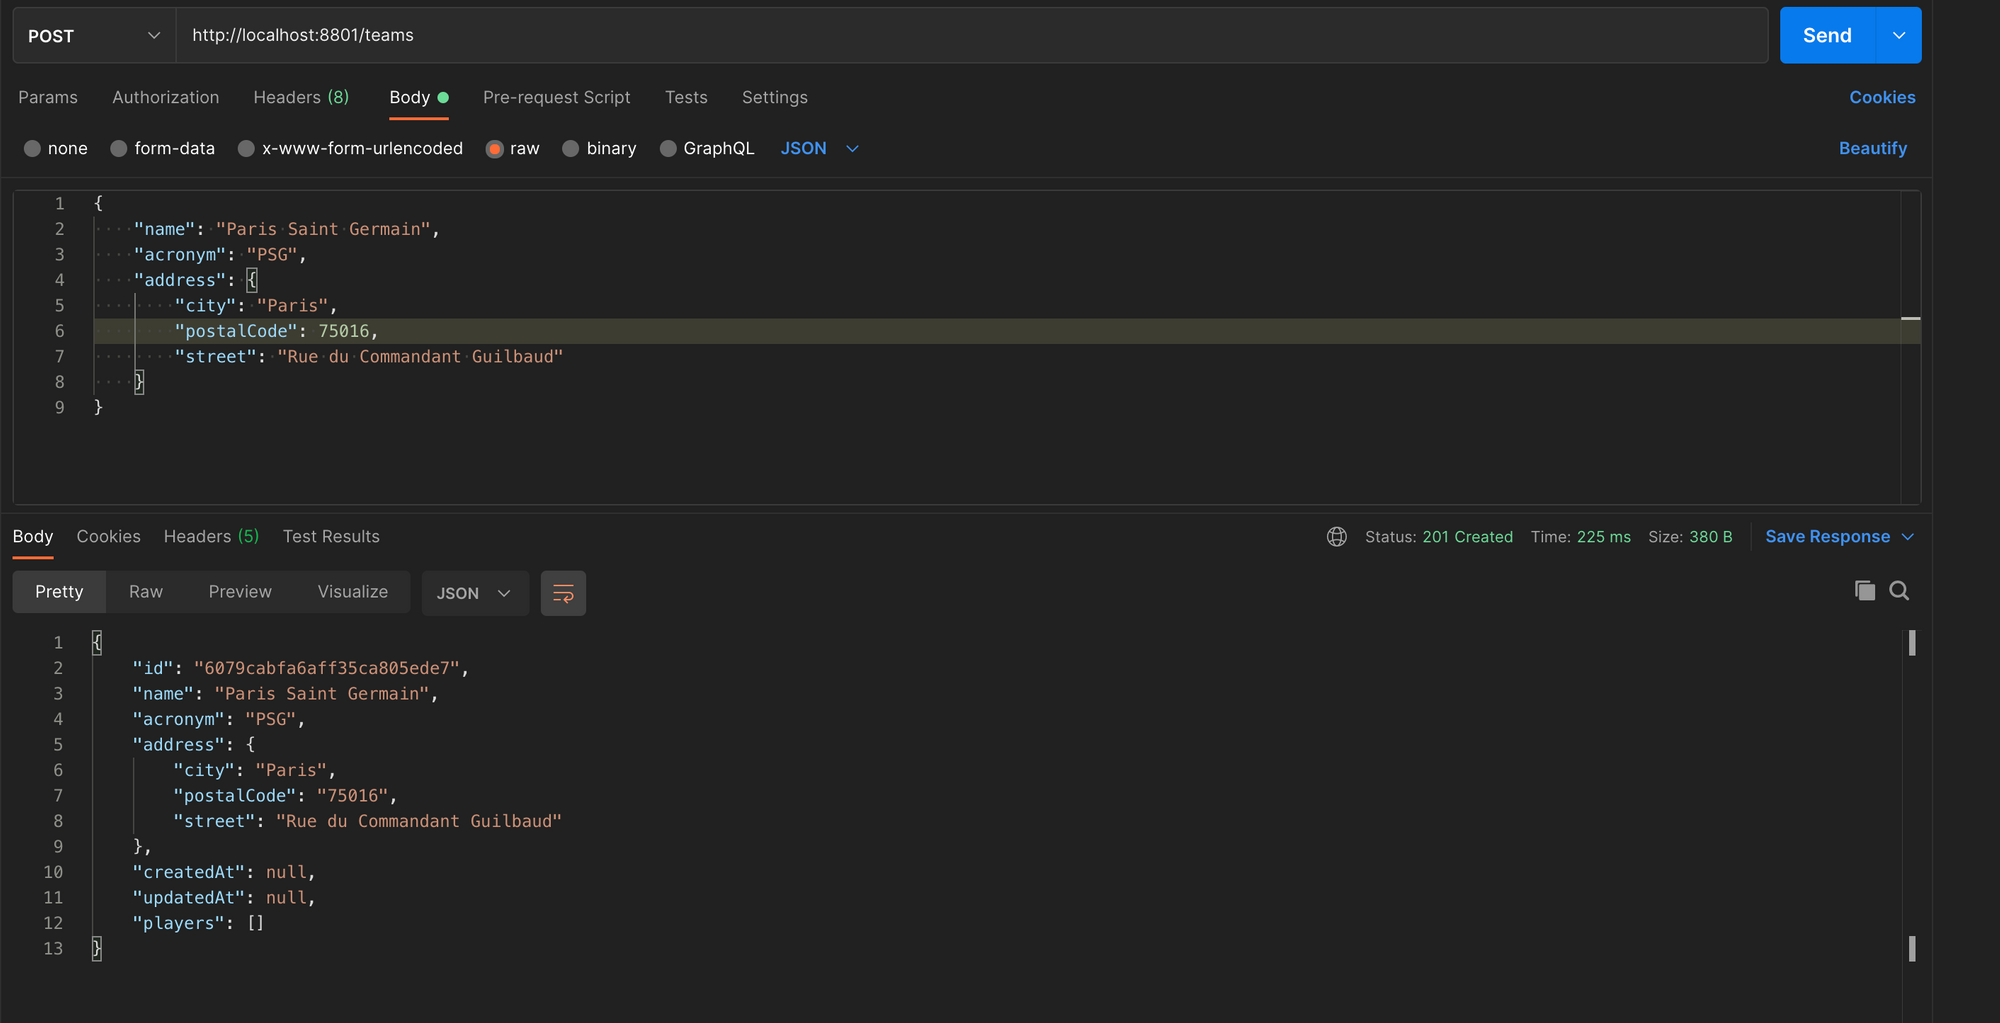
The response contains our data as expected, but..... the property createdAt and updatedAt has the value null. Yet, the value should be set automatically at the creation of the document in the collection. What happened ?.
Spring Data MongoDB doesn't provide annotation to automatically set the value of those fields. However, there is a suite of events triggered at each step of the entity manipulation by the Reposority. We will use this feature to fix this problem.
Mongo Repository Event Lifecycle
When performing change on an entity, there is a suite of events happening from the start to the end. They can be separated into two groups.
The Write Events
They are triggered when adding or updating a document in the collection like save, insert, insertList. They are listed following their trigger order:
- onBeforeConvert: It's called before the object is converted to a document by a MongoConverter.
- onBeforeSave: It's called before inserting or saving the document in the database.
- onAfterSave: It's called after inserting or saving the document in the database.
The Read Events
They are triggered for the methods that read documents in the collection like find, findAndRemove, findOne, and getCollection. They are listed following their trigger order:
- onAfterLoad: It's called after the document has been retrieved from the database.
- onAfterConvert: after the document retrieved from the database was converted to an entity.
Following this, it is clear that the best place to set value for createdAt and updatedAt is when the event onBeforeConvert is triggered because it is impossible to edit the object after being converted to a Document.
Create the listener
Create a new package called listeners, then create a class called MongoListener.java and add the code below:
package com.soccer.mongo.listeners;

import com.soccer.mongo.models.Team;
import org.springframework.data.mongodb.core.mapping.event.AbstractMongoEventListener;
import org.springframework.data.mongodb.core.mapping.event.BeforeConvertEvent;
import org.springframework.stereotype.Component;

import java.util.Date;

@Component
public class MongoListener extends AbstractMongoEventListener<Team> {
  @Override
  public void onBeforeConvert(BeforeConvertEvent<Team> event) {
    super.onBeforeConvert(event);

    Date dateNow = new Date();

    event.getSource().setCreatedAt(dateNow);
    event.getSource().setUpdatedAt(dateNow);
  }
}
We create a listener on the Team entity, and before converting the entity to a document, we set a value for createdAt and updatedAt to the current time.
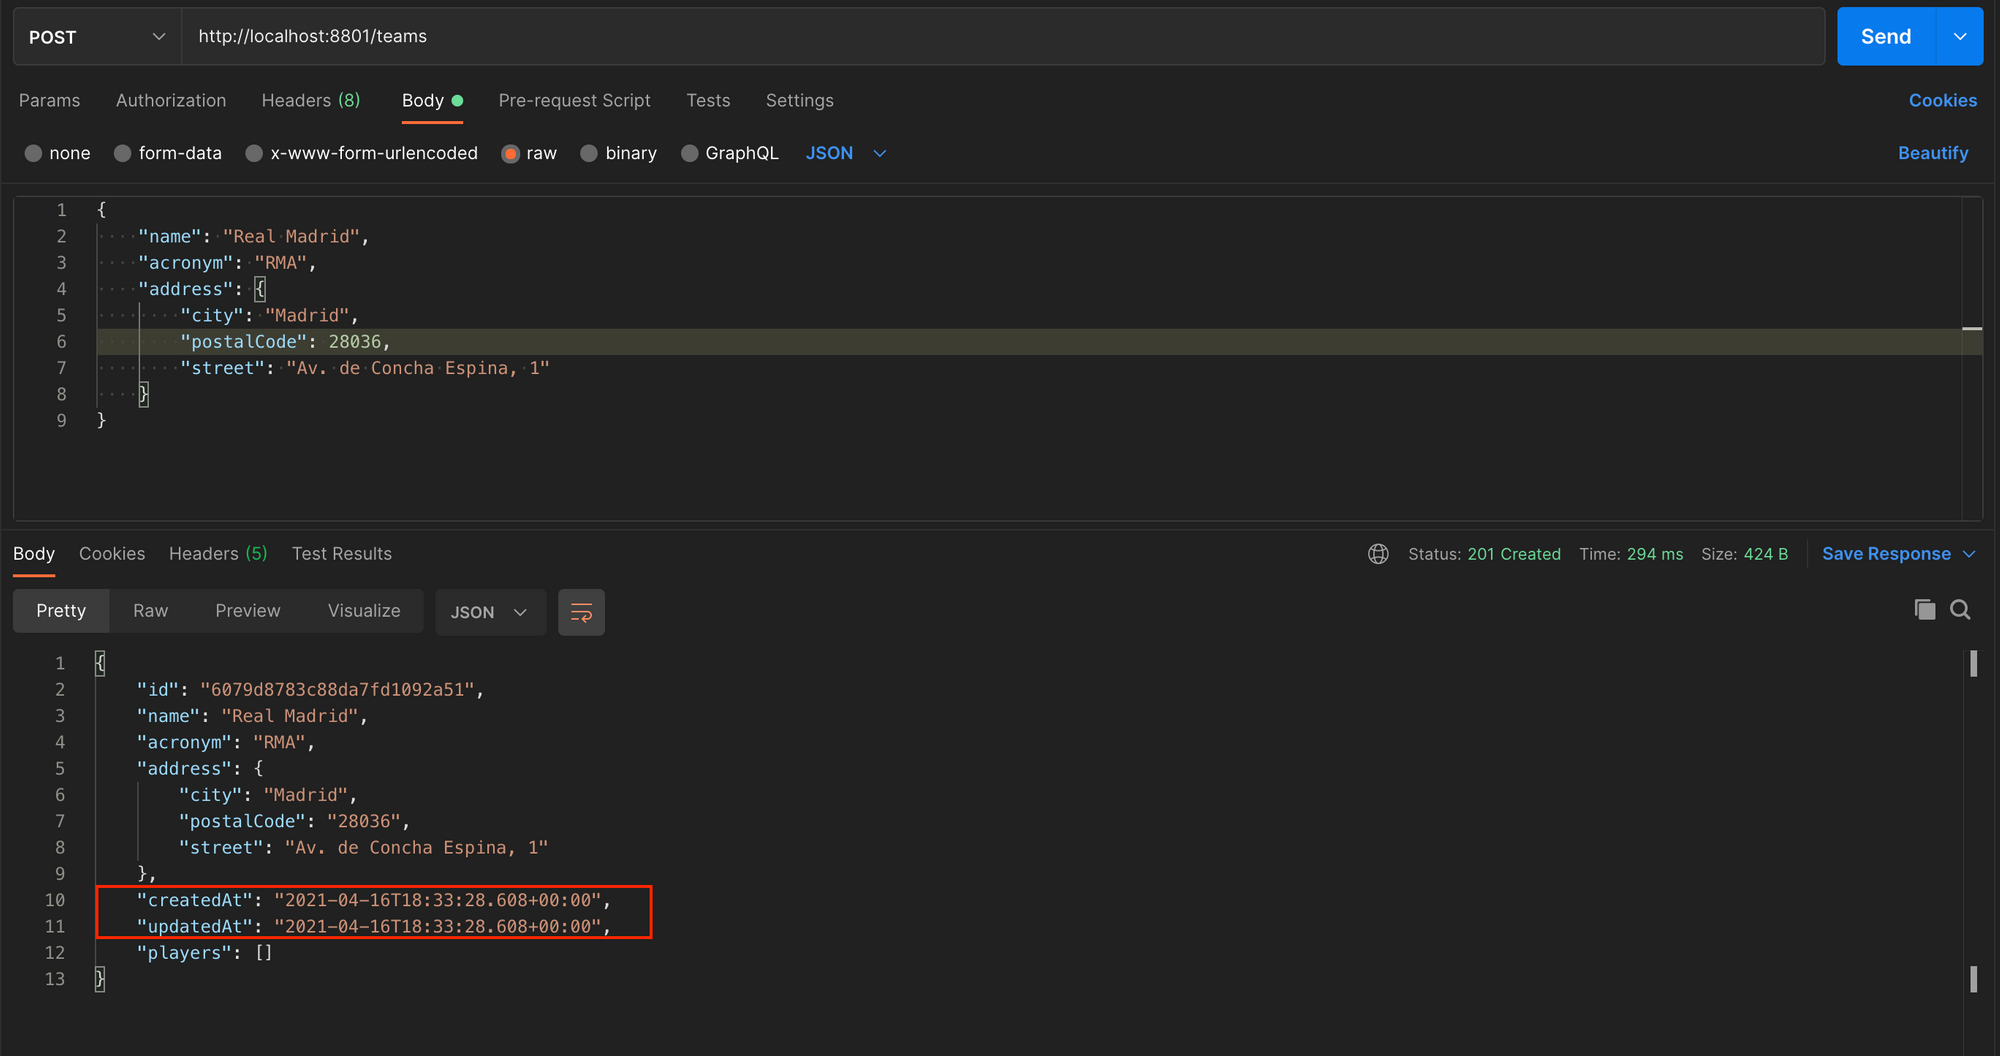
Run the application and use Postman to create a new team and see the result.
The Problem with MongoListener
Now we need to the same for entity Player. If we have 20 entities, we will do the same for each entity, which is not sustainable. We need to find a generic way to do that for all our entities with only one listener.
To achieve our goal, we will use one of the main concepts of OOP called inheritance. Since all our entity has the properties id, createdAt, and updatedAt, we will create an entity BaseModel with these three properties. All our entities will inherit this base entity. Here is a picture of the change to make:
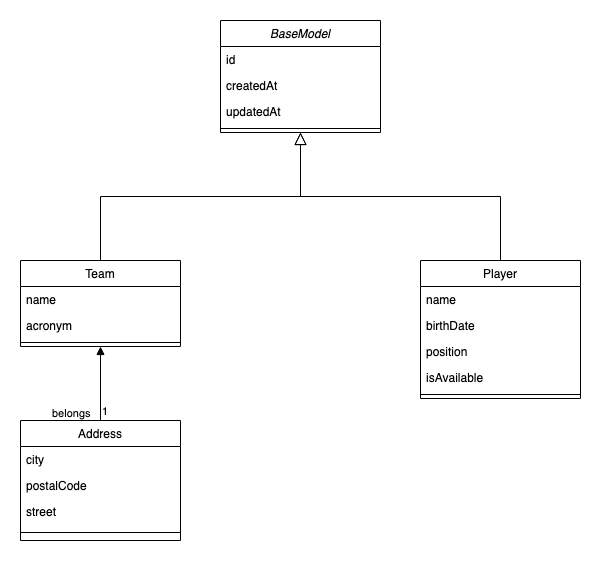
With this, We only need to tell MongoListener to listen for change on the BaseModel entity, and we are all set.
package com.soccer.mongo.listeners;

import com.soccer.mongo.models.BaseModel;
// ------- other import here ---------

@Component
public class MongoListener extends AbstractMongoEventListener<BaseModel> {
  @Override
  public void onBeforeConvert(BeforeConvertEvent<BaseModel> event) {
    super.onBeforeConvert(event);

    Date dateNow = new Date();

    event.getSource().setCreatedAt(dateNow);
    event.getSource().setUpdatedAt(dateNow);
  }
}
Create a player
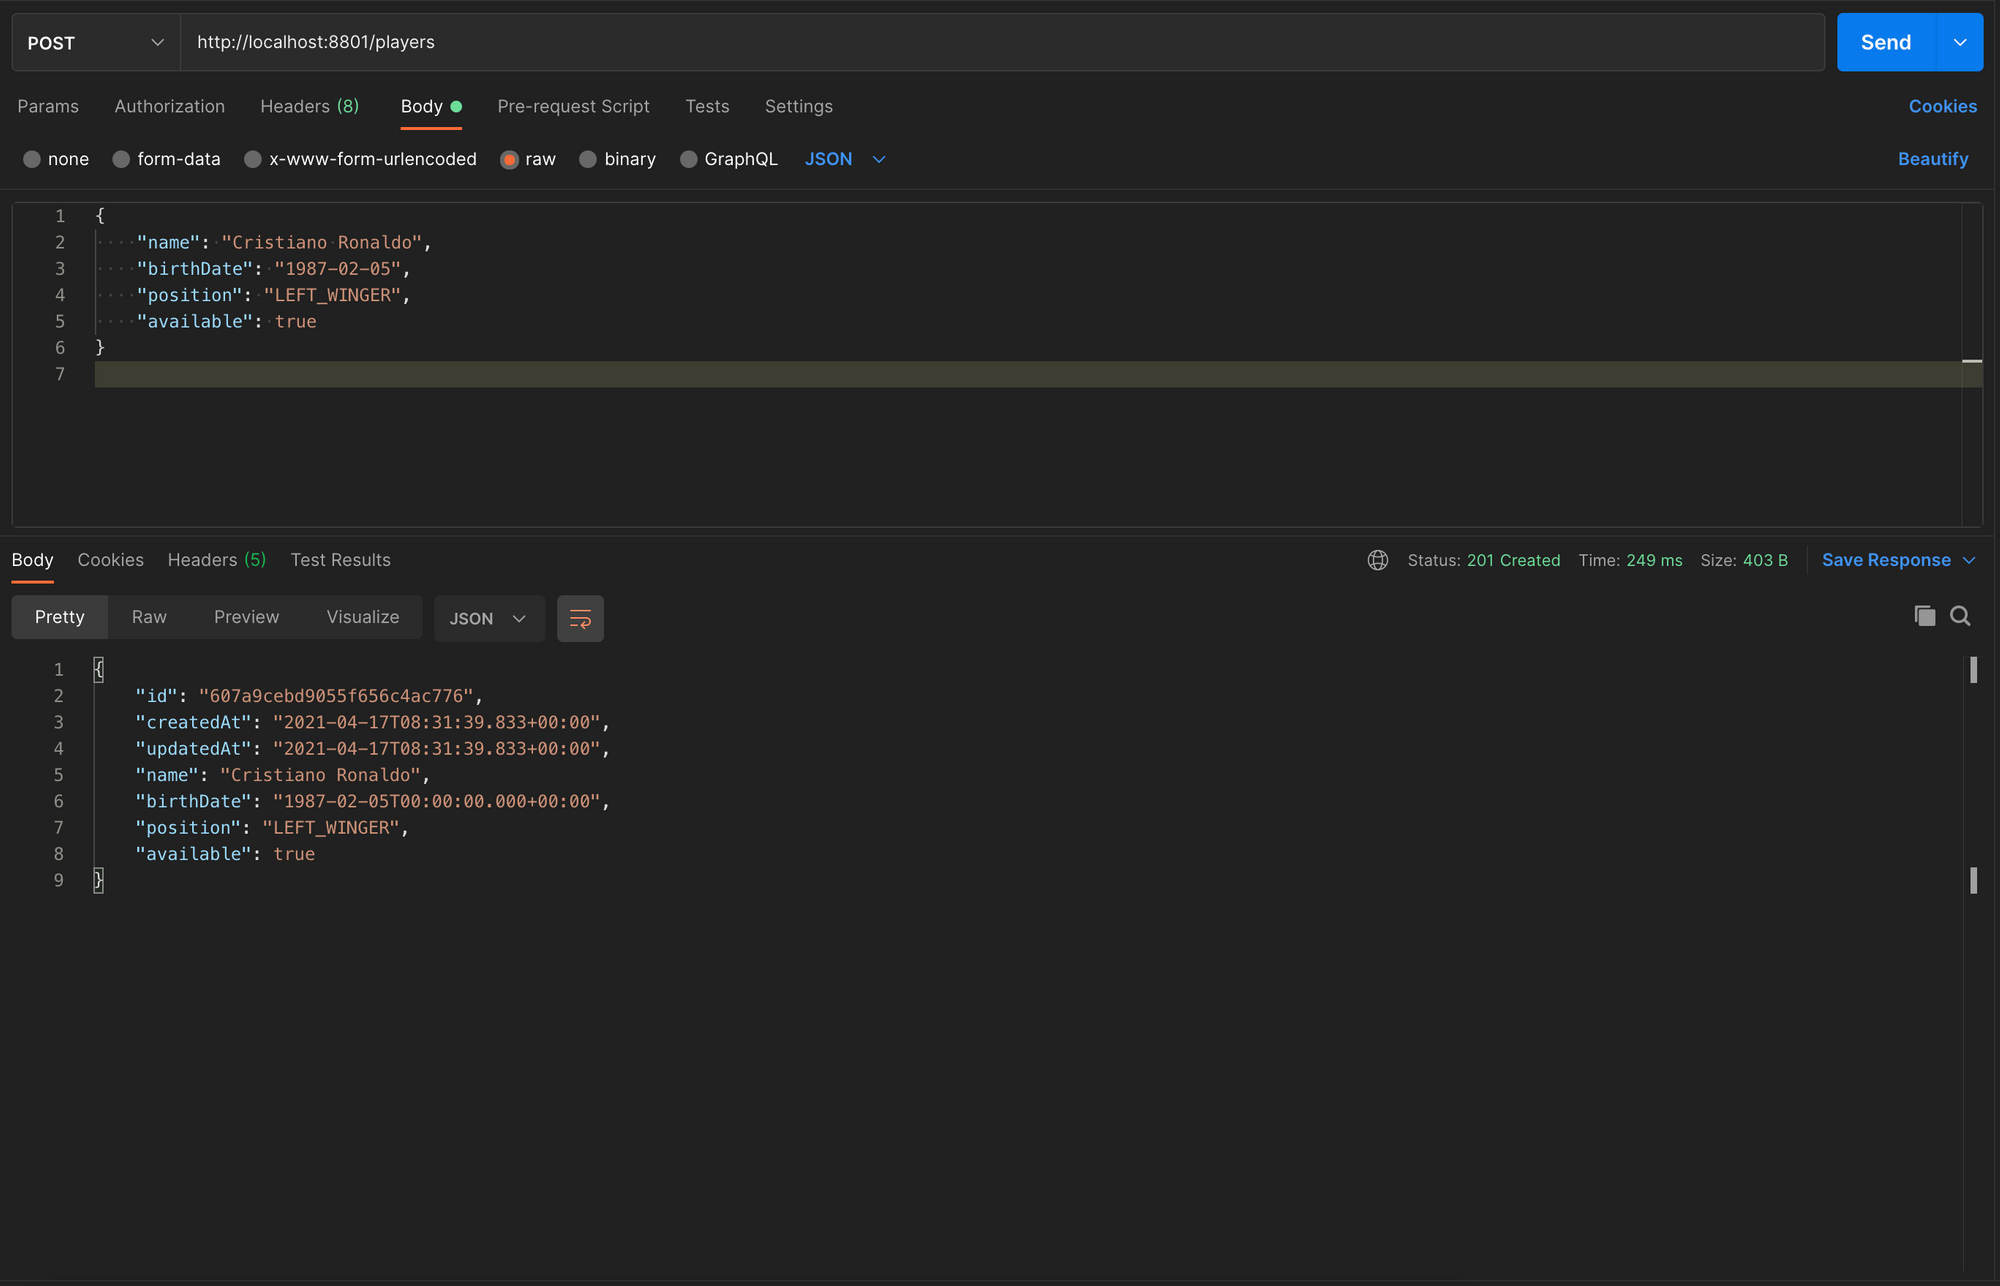
As we can see, the values of createdAt and updatedAt are well set.
Update a team
Update an entity is very straightforward, as we can see below:
@PutMapping("/teams/{id}")
public ResponseEntity<Team> updateTeam(@PathVariable String id, @RequestBody CreateTeamDto createTeamDto) {
    Optional<Team> optionalTeam = teamRepository.findById(id);

    if (optionalTeam.isEmpty()) {
      return new ResponseEntity<>(null, HttpStatus.OK);
    }

    Team teamToUpdate = optionalTeam.get()
          .setAddress(createTeamDto.getAddress())
          .setName(createTeamDto.getName())
          .setAcronym(createTeamDto.getAcronym());

    Team teamUpdated = teamRepository.save(teamToUpdate);

    return new ResponseEntity<>(teamUpdated, HttpStatus.OK);
}
Delete a team
@DeleteMapping("/teams/{id}")
public ResponseEntity<Void> deleteTeam(@PathVariable String id, @RequestBody CreateTeamDto createTeamDto) {
    teamRepository.deleteById(id);

    return new ResponseEntity<>(HttpStatus.NO_CONTENT);
}
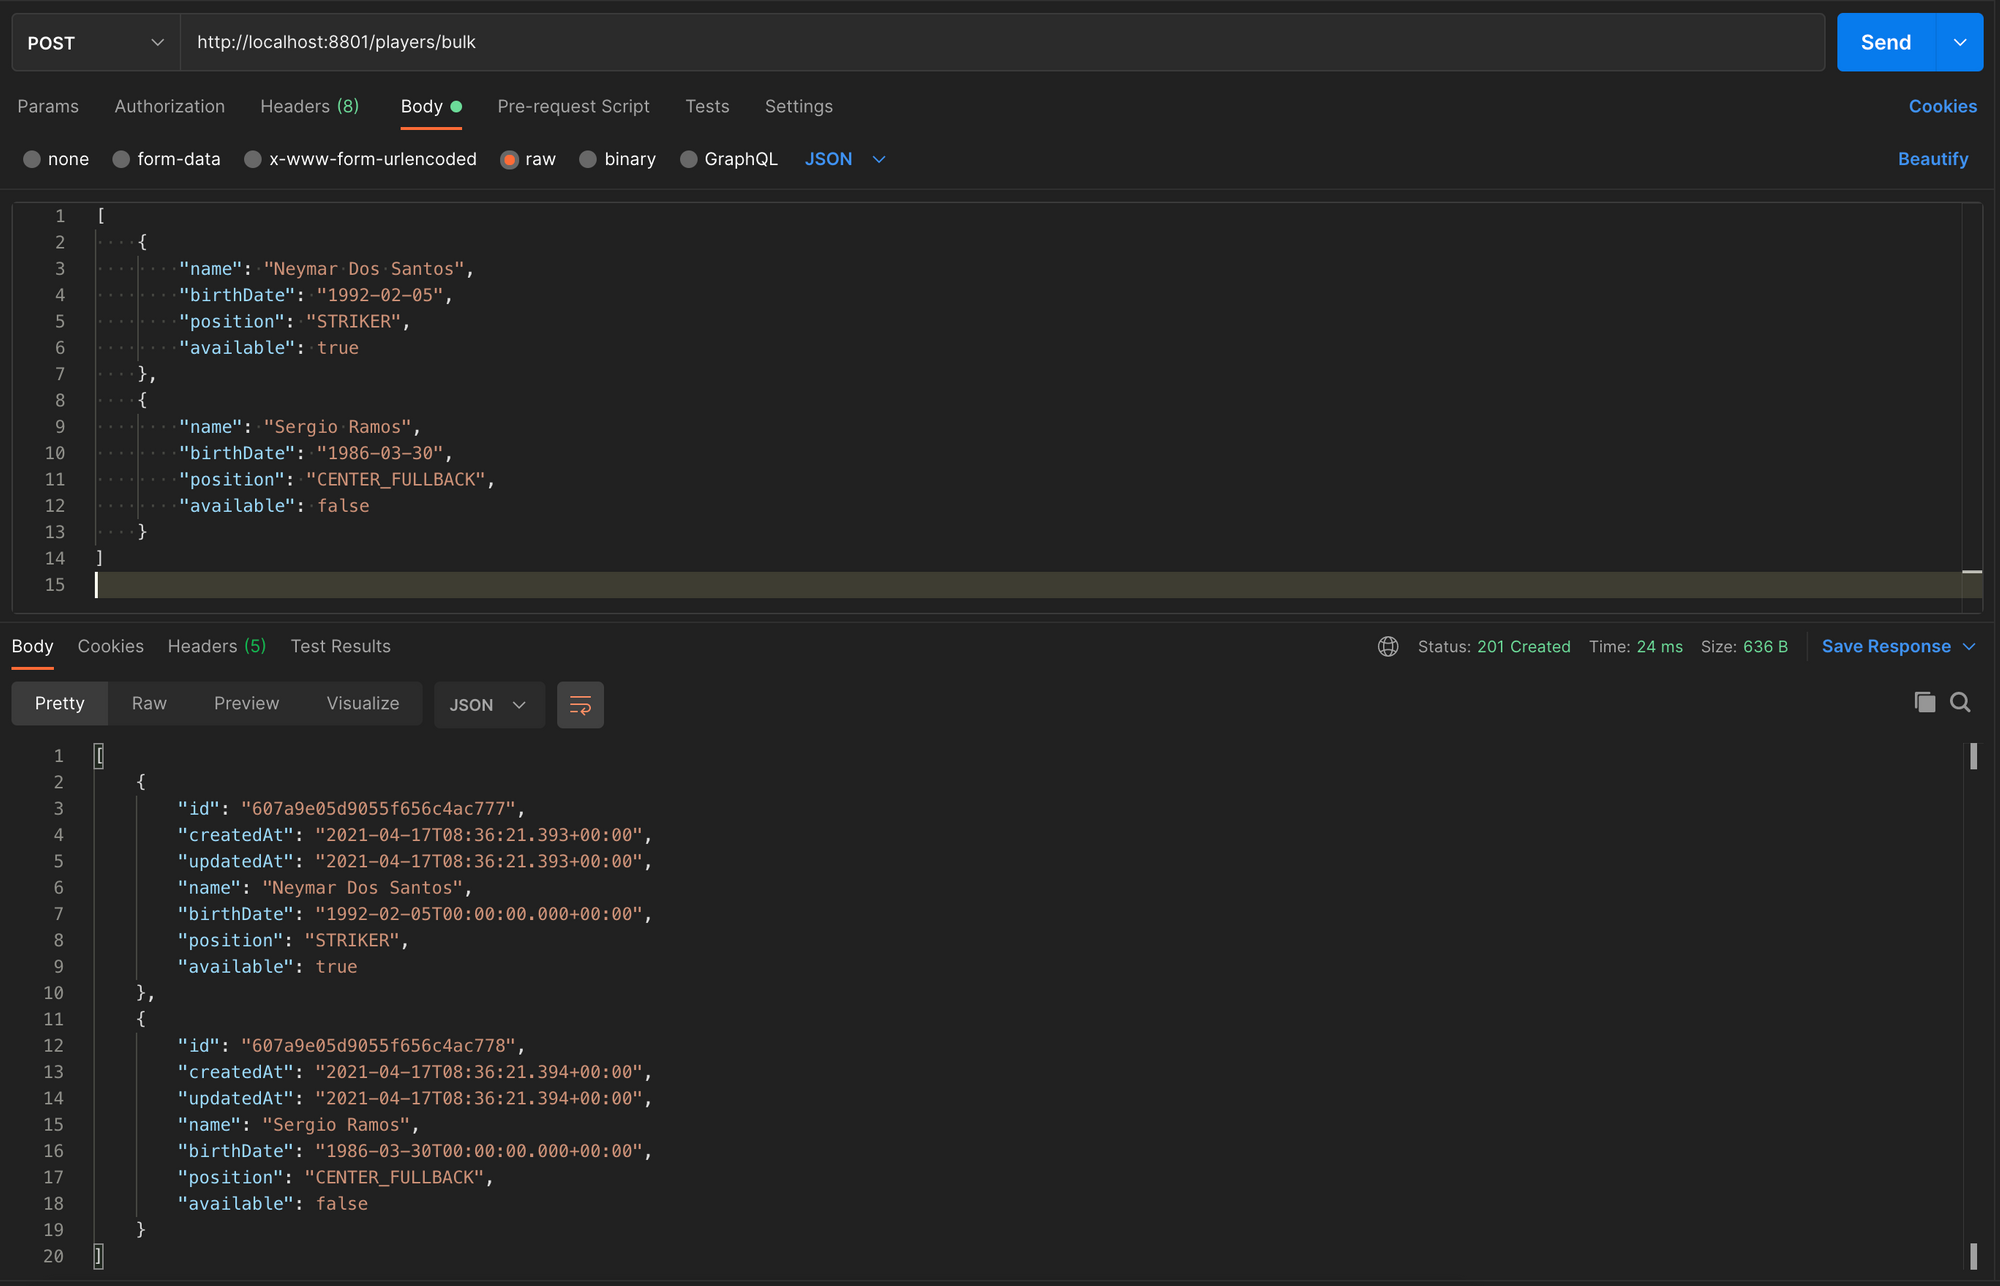
Create many players
@PostMapping("/players/bulk")
public ResponseEntity<List<Player>> createPlayers(@RequestBody List<CreatePlayerDto> createPlayerDtoList) {
    List<Player> players = createPlayerDtoList
        .stream()
        .map(CreatePlayerDto::toPlayer)
        .collect(Collectors.toList());

    List<Player> playersCreated = playerRepository.saveAll(players);

    return new ResponseEntity<>(playersCreated, HttpStatus.CREATED);
}
Below is the result in Postman
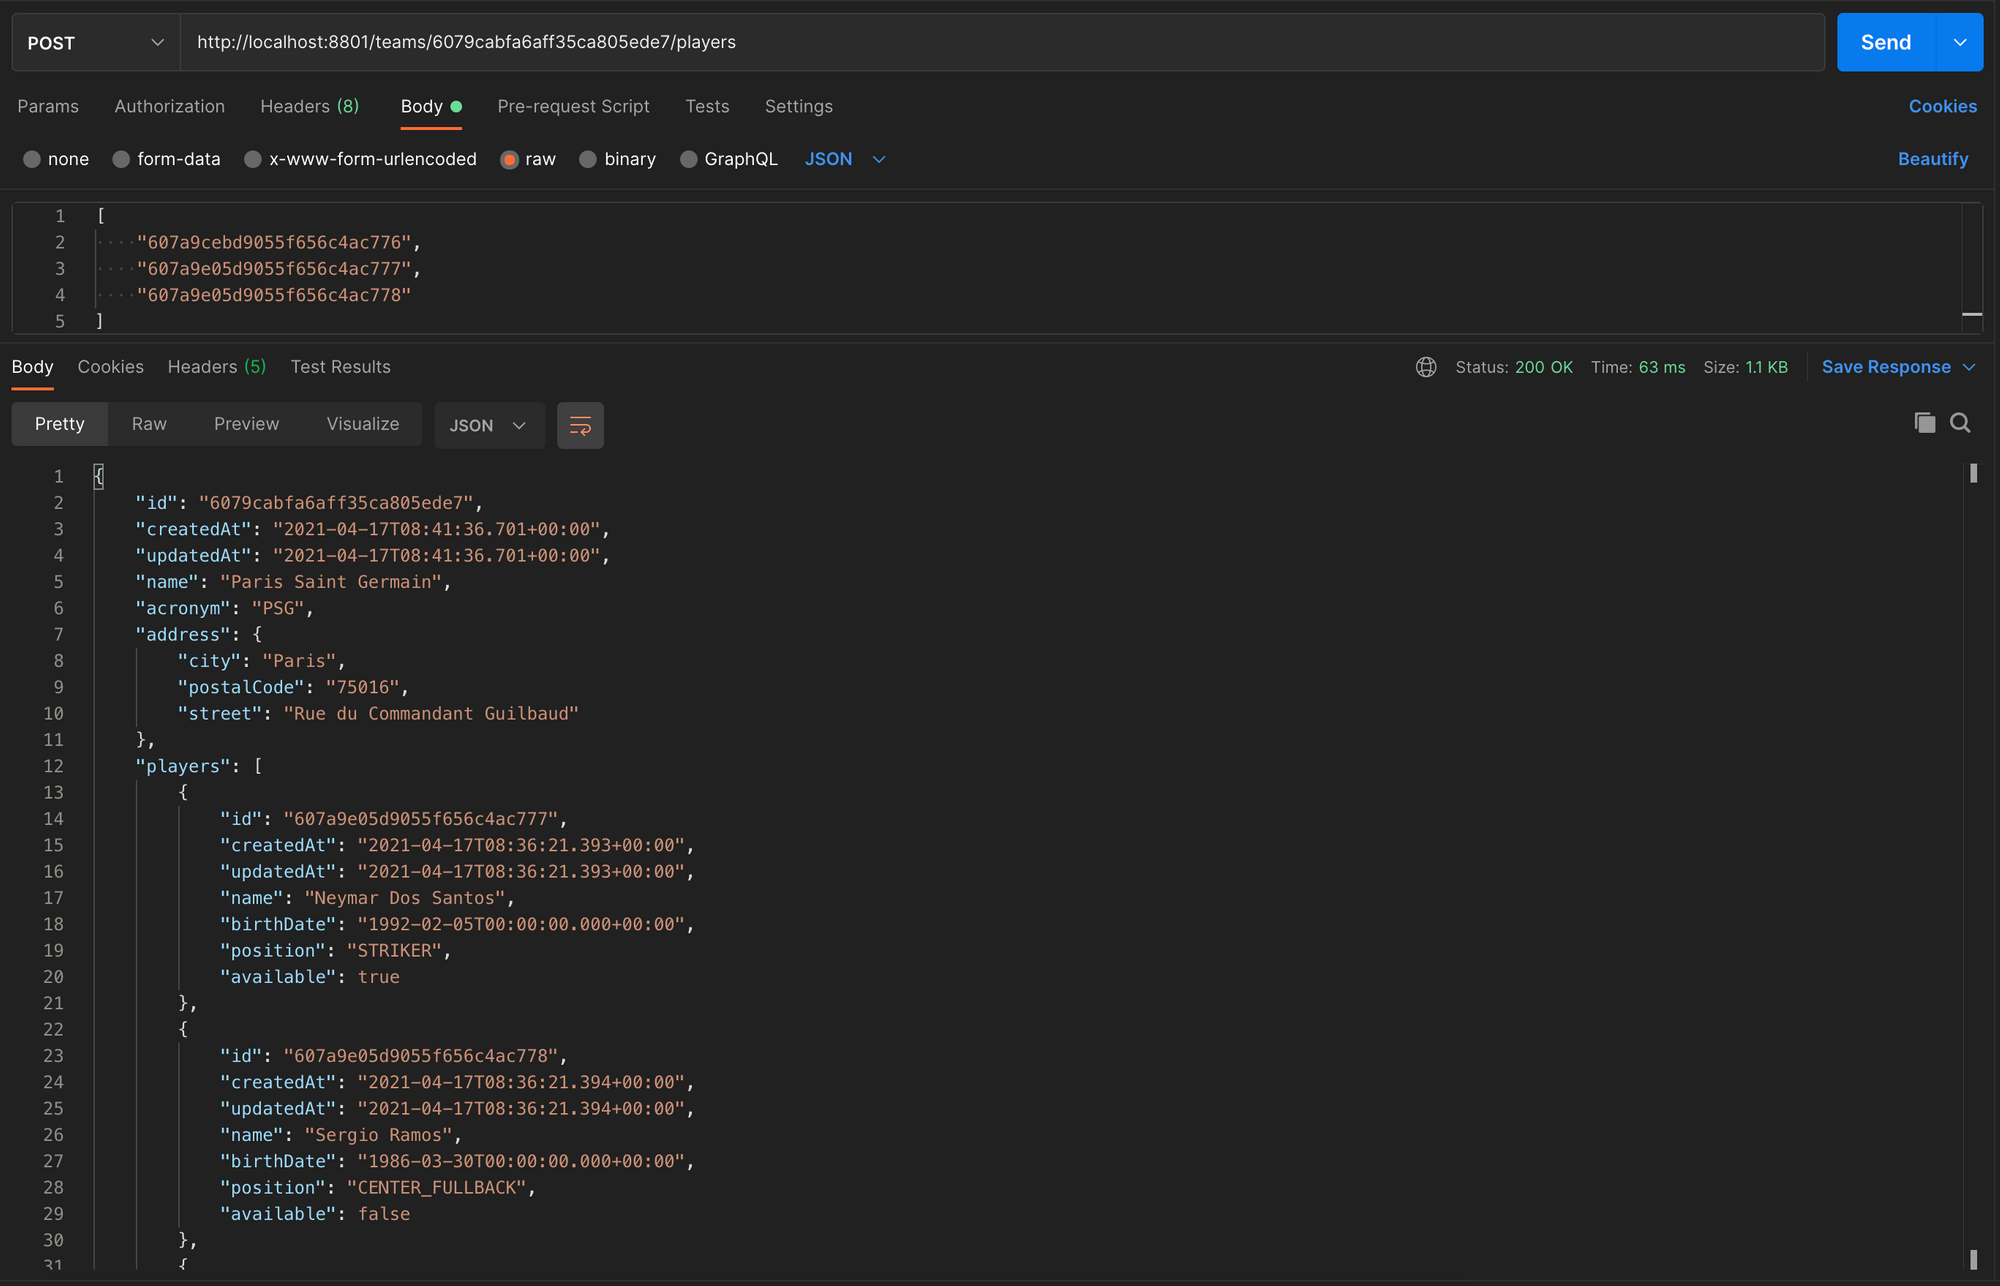
Add players to a team.
A team can have many players, and we cannot add players to existing teams until now. The code below shows how to do that:
@PostMapping("/teams/{id}/players")
public ResponseEntity<Team> addPlayersToTeam(@PathVariable String id, @RequestBody List<String> playerIds) {
    Optional<Team> optionalTeam = teamRepository.findById(id);

    if (optionalTeam.isEmpty()) {
      return new ResponseEntity<>(null, HttpStatus.OK);
    }

    Team teamToUpdate = optionalTeam.get();

    Set<Player> playersToAdd = playerIds.stream()
        .map(playerId -> playerRepository.findById(playerId))
        .filter(Optional::isPresent)
        .map(Optional::get)
        .collect(Collectors.toSet());

    teamToUpdate.setPlayers(playersToAdd);

    Team teamUpdated =  teamRepository.save(teamToUpdate);

    return new ResponseEntity<>(teamUpdated, HttpStatus.OK);
}
On Postman, we get the following result:
Conclusion
In this first part, we focused on setup a connection to MongoDB with a Spring Boot project; after that, we saw how to create the schema for our collections and finally performed action related to Write's action (insert, update, delete) in the database.
In the second part of the tutorial, we see how to perform simple queries first, then advanced queries.
You can find the code source on the GitHub repository.
Follow me on Twitter or subscribe to my newsletter to avoid missing the upcoming posts and the tips and tricks I occasionally share.