
Using PlanetScale and TypeORM to build a Node.js REST API


PlanetScale is a Serverless database for MySQL that brings a new concept of managing our database schema. It has a CLI to work the database branching, but we need a tool that makes it easier to interact with the database at the application level.
This is where the ORM comes into action; there are many ORMs in the Node.js ecosystem, and TypeORM is one of the most popular. This tutorial will show how combining these tools can provide a great developer experience while building application features.

What we will build
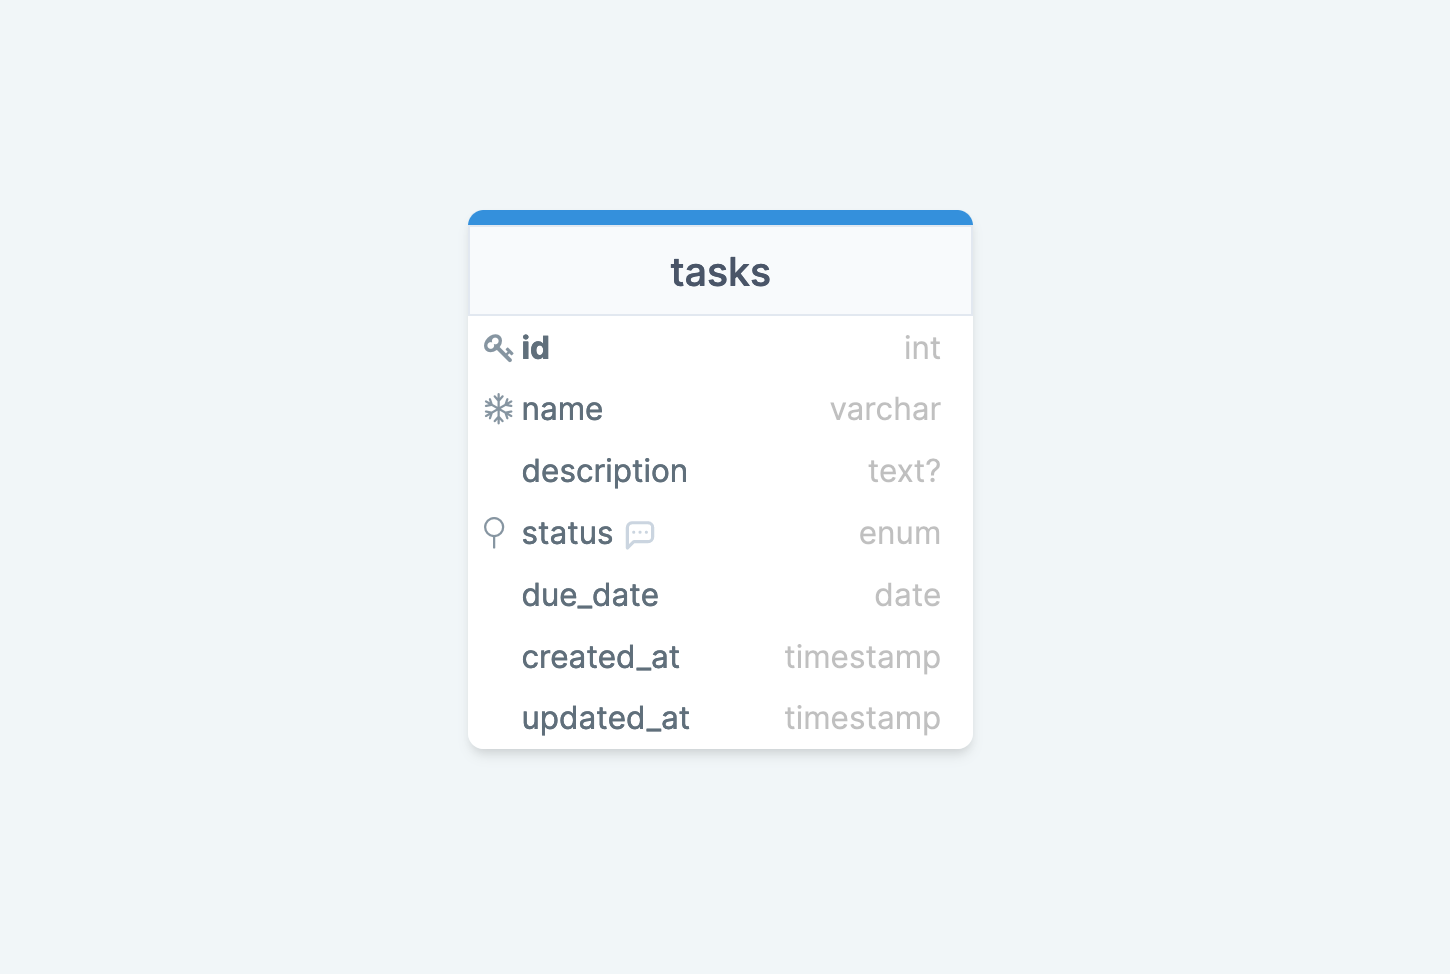
We will build a REST API that allows users to manage their tasks, aka a task manager. Below is the single table we will have in our database. I designed the schema using DrawSQL.
Here are the endpoints we will create:
| API Endpoint | Description |
|---|---|
| [POST] /tasks | Create a new task |
| [PATCH] /tasks/:id | Update a task (name, description, status, due date) |
| [DELETE] /tasks/:id | Delete a task |
| [GET] /tasks | Retrieve all tasks |
| [GET] /tasks/:id | Retrieve a task |
Create the database on PlanetScale
To create a database on PlanetScale, you must create an account. You can use the Web UI or CLI tool. I wrote a whole post on how to work with the PlanetScale CLI.
We will create a database and promote the main branch to production:
pscale auth login

pscale database create task-manager-db

pscale branch promote task-manager-db main
Our database is ready to be used by a backend application.
Create the Node.js project
With TypeORM, you can quickly initialize a Node.js project using the CLI; check out this link to learn more about it. Below is the command to create a project with a MySQL database:
npx typeorm init --name node-typeorm-planetscale --database mysql
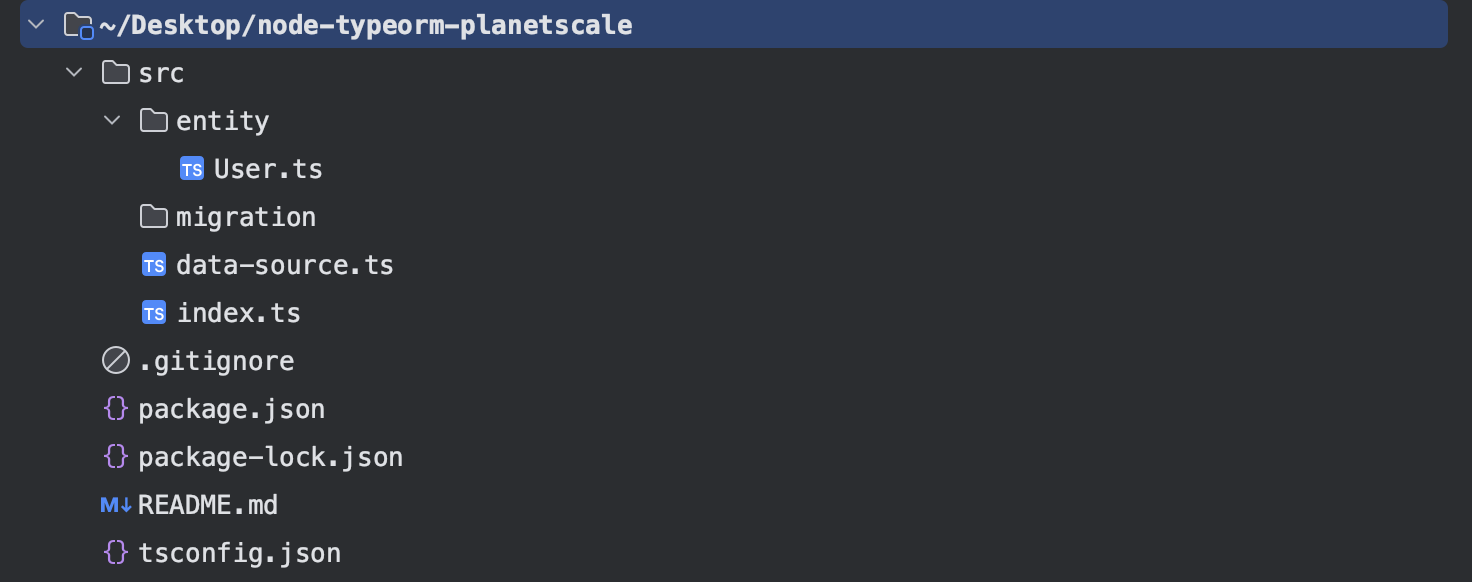
The command will create the project and install the Node dependencies. Enter the project folder, and you will see the following folder structure:
Create the task's entity
Rename the file src/entity/User.ts to src/entity/Task.ts then, replace the content with the code below:
import {
    Entity,
    PrimaryGeneratedColumn,
    Column,
    CreateDateColumn,
    UpdateDateColumn,
    Index
} from "typeorm";

export enum TaskStatus {
    PENDING = "pending",
    IN_PROGRESS = "in_progress",
    DONE = "done"
}

@Entity({ name: "tasks" })
export class Task {
    @PrimaryGeneratedColumn()
    id: number;

    @Column({  unique: true })
    name: string;

    @Column({ nullable: true })
    description: string;

    @Index()
    @Column({ type: 'varchar', length: 20, default: TaskStatus.PENDING })
    status: TaskStatus;

    @Column({ name: 'due_date', type: 'date' })
    dueDate: Date;

    @CreateDateColumn({ name: 'created_at' })
    createdAt: Date;

    @UpdateDateColumn({ name: 'updated_at' })
    updatedAt: Date;
}
Now we need to generate the migration for this code and execute it in our database, but, before that, we need to set up the connection to the database.
Create the database branch and connect to it
Let's use PlanetScale CLI to create a new branch from the main branch:
pscale branch create task-manager-db create-tasks-table
PlanetScale allows the creation of a secure proxy connection between our local computer and the remote database branch to connect to the database from our local host environment.
This has the advantage of not worrying about credentials management in the local environment.
Here is the command to connect to the database branch:
pscale connect task-manager-db create-tasks-table --port 3308
We get the output below:
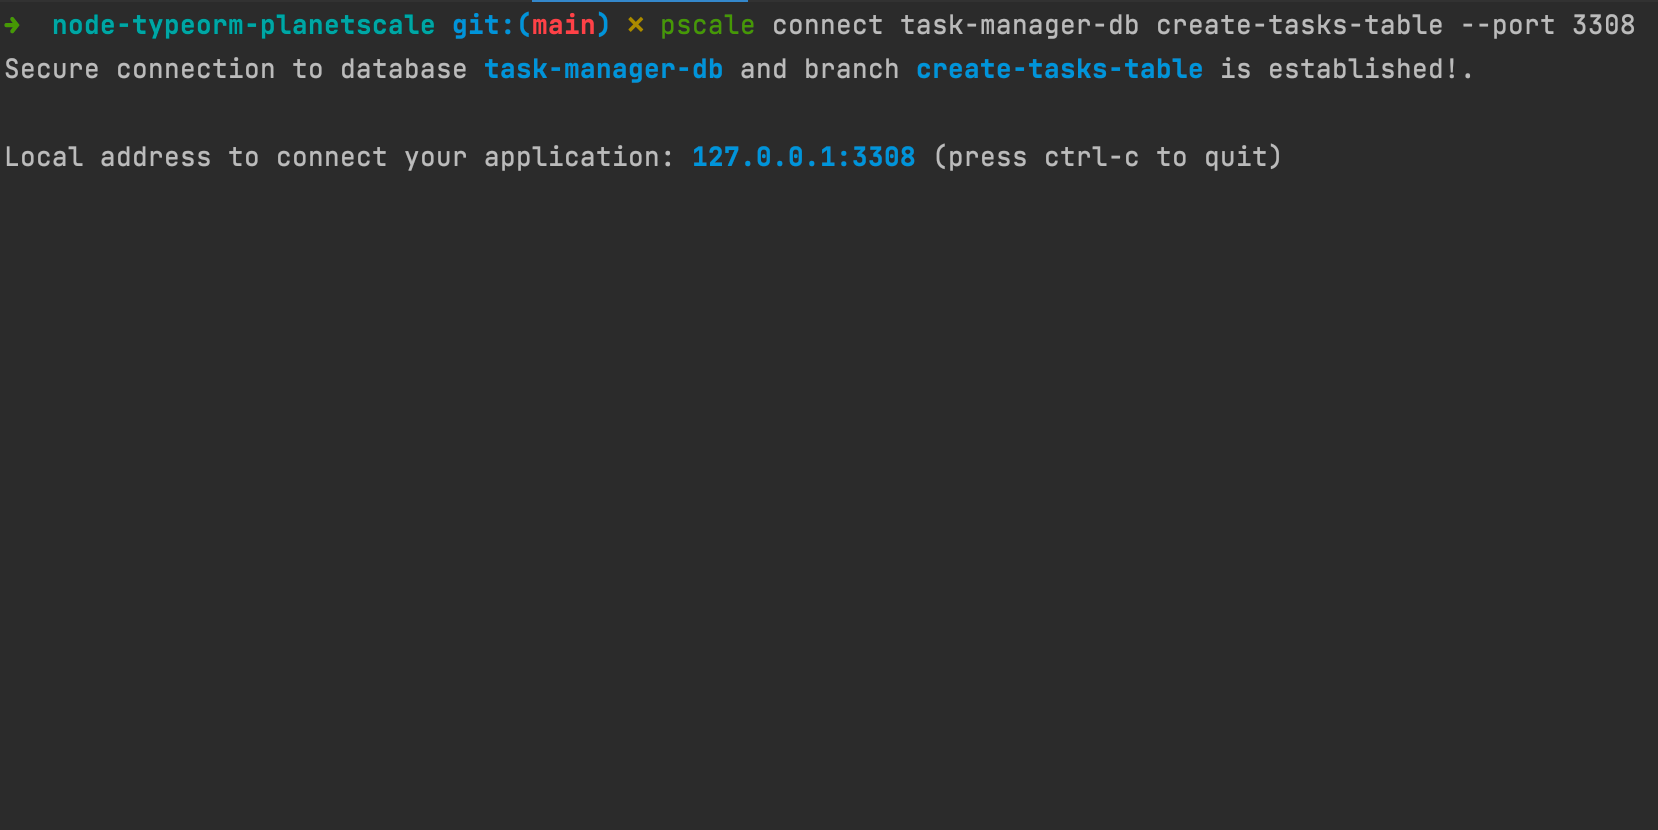
The flag --port is specified to prevent errors if port 3306 is already used (the default port for a MySQL instance). So, If you receive an error about the 3308 already used, you can replace it with another port number.
We can now connect to the database from our local computer. You might wonder what are the credentials? Here they are:
- Host: 127.0.0.1
- User: root
- Password:
- Port: 3308
- Database: task-manager-db
The equivalent connection string is:
mysql://root:@127.0.0.1:3308/task-manager-db
Run the migrations on a development branch
Before running the migrations, we need to update the TypeORM config with the database credentials, otherwise, it will not know where to execute the migration.
Open the file src/data-source.ts and replace the database credentials with the one above. The content looks like this:
import "reflect-metadata";
import { DataSource } from "typeorm";
import { Task } from "./entity/Task";

export const AppDataSource = new DataSource({
    type: "mysql",
    host: "127.0.0.1",
    port: 3308,
    username: "root",
    password: "",
    database: "task-manager-db",
    synchronize: true,
    logging: false,
    entities: [Task],
    migrations: [
        "src/migration/**/*.ts"
    ],
    subscribers: [],
});
Run the command below to generate the migration file from the Task entity using TypeORM:
npm run typeorm migration:generate -- -d ./src/data-source.ts ./src/migration/create-tasks-table
If you are using Yarn, this is the command to run:
yarn typeorm migration:generate -d ./src/data-source.ts ./src/migration/create-tasks-table
The migration file is generated inside the folder src/migration and below is the content file:
import { MigrationInterface, QueryRunner } from "typeorm";

export class CreateTasksTable1683465839472 implements MigrationInterface {
    name = 'CreateTasksTable1683465839472'

    public async up(queryRunner: QueryRunner): Promise<void> {
        await queryRunner.query(`CREATE TABLE \`tasks\` (\`id\` int NOT NULL AUTO_INCREMENT, \`name\` varchar(255) NOT NULL, \`description\` varchar(255) NULL, \`status\` varchar(20) NOT NULL DEFAULT 'pending', \`due_date\` date NOT NULL, \`created_at\` datetime(6) NOT NULL DEFAULT CURRENT_TIMESTAMP(6), \`updated_at\` datetime(6) NOT NULL DEFAULT CURRENT_TIMESTAMP(6) ON UPDATE CURRENT_TIMESTAMP(6), INDEX \`IDX_6086c8dafbae729a930c04d865\` (\`status\`), UNIQUE INDEX \`IDX_396d500ff7f1b82771ddd812fd\` (\`name\`), PRIMARY KEY (\`id\`)) ENGINE=InnoDB`);
    }

    public async down(queryRunner: QueryRunner): Promise<void> {
        await queryRunner.query(`DROP INDEX \`IDX_396d500ff7f1b82771ddd812fd\` ON \`tasks\``);
        await queryRunner.query(`DROP INDEX \`IDX_6086c8dafbae729a930c04d865\` ON \`tasks\``);
        await queryRunner.query(`DROP TABLE \`tasks\``);
    }

}
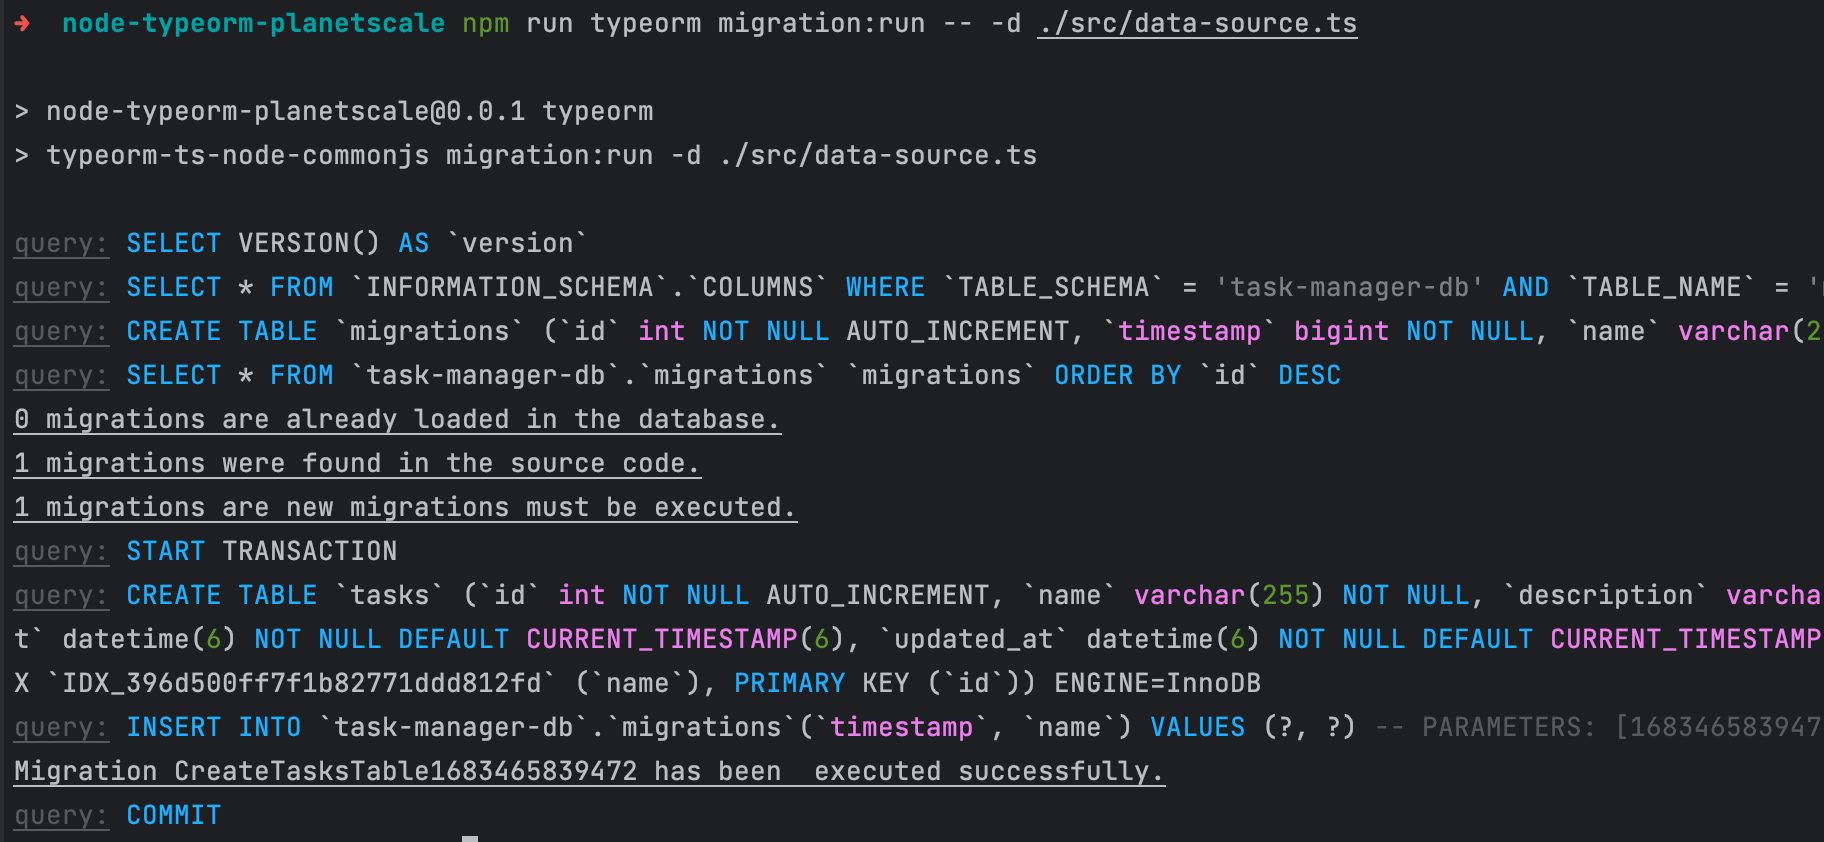
Now, we only need to execute the migration in our database:
npm run typeorm migration:run -- -d ./src/data-source.ts

# or with yarn

yarn typeorm migration:run -d ./src/data-source.ts
We get the following output:
Write the logic for each REST endpoint
First, let's install the Express that we will use to create the endpoint route and link it to the corresponding logic.
npm install express

npm install --save-dev @types/express @types/node
Inside the "src" folder, create a folder called controllers.
Inside, add a file called task.controller.ts and then add the content below:
import { Request, Response } from "express";
import { Task, TaskStatus } from "../entity/Task";
import { AppDataSource } from "../data-source";

type CreateTaskInput = {
  name: string;
  description?: string;
  dueDate: Date;
}

type UpdateTaskInput = Partial<CreateTaskInput> & {
  status?: TaskStatus;
};

export const createTask = async (req: Request, res: Response) => {
  const input: CreateTaskInput = req.body;

  try {
    const createdTask = await AppDataSource.manager.save(Task, {
      data: {
        name: input.name,
        description: input.description,
        dueDate: input.dueDate,
      },
    });

    return res.json({ data: createdTask });
  } catch (error) {
    console.error(error);

    return res.status(400).json({ message: error.message })
  }
};

export const updateTask = async (req: Request, res: Response) => {
  const id = Number(req.params.id);
  const input: UpdateTaskInput = req.body;

  const task = await AppDataSource.manager.findOne(Task, { where: [{ id }] });

  if (!task) {
    return res.status(404).json({ message: `The task with the id "${id}" not found.`})
  }

  try {
    await AppDataSource.manager.update(Task, { id },  {
      name: input.name,
      description: input.description,
      dueDate: input.dueDate,
      status: input.status,
    });

    const updatedTask = await AppDataSource.manager.findOneOrFail(Task, { where: [{ id }] });

    return res.json({ data: updatedTask });
  } catch (error) {
    console.error(error);

    return res.status(400).json({ message: error.message })
  }
};

export const deleteTask = async (req: Request, res: Response) => {
  const id = Number(req.params.id);

  const task = await AppDataSource.manager.findOne(Task, { where: [{ id }] });


  if (!task) {
    return res.status(404).json({ message: `The task with the id "${id}" not found.`})
  }

  await AppDataSource.manager.delete(Task, { id });

  return res.json({ message: "The task has been deleted successfully!" });
};

export const retrieveTask = async (req: Request, res: Response) => {
  const id = Number(req.params.id);

  const task = await AppDataSource.manager.findOne(Task, { where: [{ id }] });

  if (!task) {
    return res.status(404).json({ message: `The task with the id "${id}" not found.`})
  }

  return res.json({ data: task });
};

export const retrieveAllTasks = async (req: Request, res: Response) => {
  const tasks = await AppDataSource.manager.find(Task, { order: { createdAt: "DESC" } });

  return res.json({ data: tasks });
};
This file has five methods: createTask(), updateTask(), deleteTask(), retrieveTask(), and retrieveAllTasks() that will be assigned to each endpoint.
Create the server and API routes
Replace the content of the file src/index.ts by the content below:
import "reflect-metadata";
import express from "express";
import http from "http";
import {
    createTask,
    deleteTask,
    retrieveAllTasks,
    retrieveTask,
    updateTask
} from "./controllers/task.controller";
import { AppDataSource } from "./data-source";

const SERVER_PORT = 8100;

const app = express();
const router = express.Router();

// Express middleware
app.use(express.urlencoded({ extended: true }));
app.use(express.json());

router.post('/tasks', createTask);
router.patch('/tasks/:id', updateTask);
router.delete('/tasks/:id', deleteTask);
router.get('/tasks/:id', retrieveTask);
router.get('/tasks', retrieveAllTasks);

const server = http.createServer(app);

server.listen(SERVER_PORT, async () => {
    // Connect to database
    try {
        await AppDataSource.initialize();
    } catch (err) {
        console.error(err);
        process.exit(1);
    }

    console.info(`Server started at the port ${SERVER_PORT}`);
});
Update the tsconfig.json to add these properties:
{
	"compilerOptions" {
		// ...existing compiler options here...
		"allowSyntheticDefaultImports": true,
    	"esModuleInterop": true
    }
}
Start the server and test the API routes
Run the following command to start the server: npm run start
Use your favorite HTTP Client to test the API by sending requests to the endpoints created. I use Postman.
The API is working as expected.
Deploy the database in production
Since everything is working in the local environment, we can update the main branch. We will create a deployment request.
pscale deploy-request create task-manager-db create-tasks-table

pscale deploy-request review task-manager-db <deploy-number> --approve

pscale deploy-request deploy task-manager-db <deploy-number>
Below is a picture of these commands' execution.
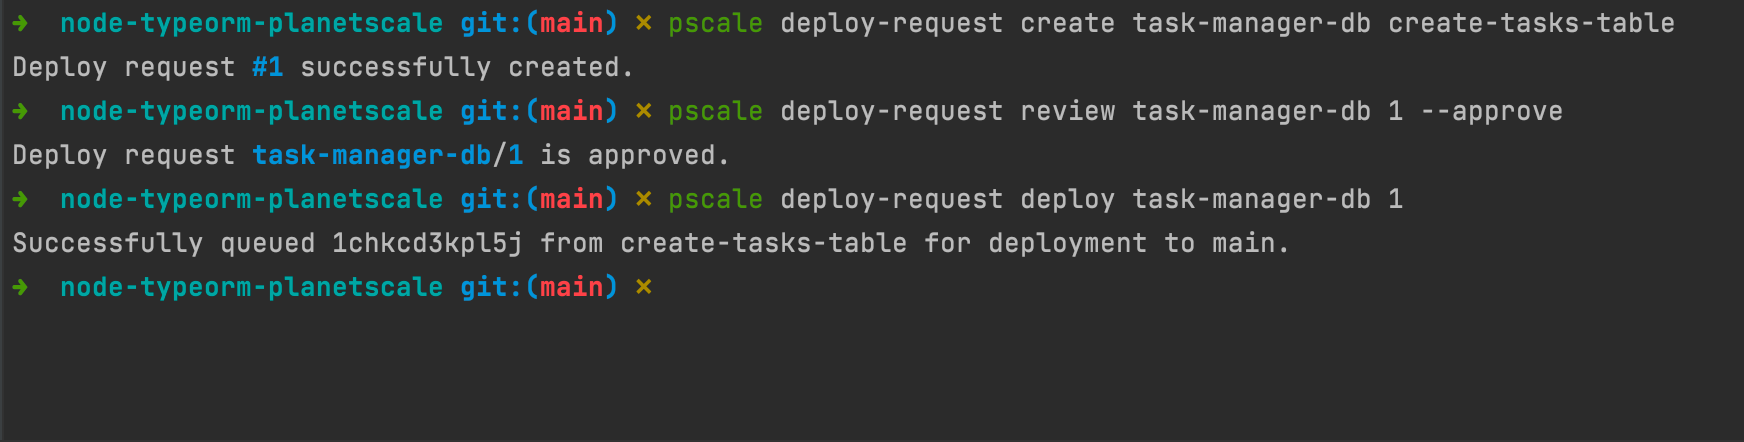
create-tasks-table with the main branch.The last thing to do is delete a database branch we used since it is no longer needed. Run the command below, then confirm the deletion.
pscale branch delete task-manager-db create-tasks-table
Wrap up
We saw how to use TypeORM to work with PlanetScale. As you can see, the combination of the two makes it easier to build features interacting with a database.
You can find the code source on the GitHub repository.
Follow me on Twitter or subscribe to my newsletter to avoid missing the upcoming posts and the tips and tricks I occasionally share.