
Apply database migrations to PlanetScale from GitHub Actions


Automating most parts of the software development lifecycle is encouraged in software engineering to benefit from productivity and improved developer experience.
A CI/CD pipeline is the preferred way to automate the release of software applications. While it is expected to automate the deployment of all kinds of applications (backend, frontend, mobile, web extension, etc...) through a CI/CD pipeline, we can achieve the same for a database when applying schema changes.
This article shows how to build a CI/CD pipeline with GitHub Actions to apply database migrations hosted on PlanetScale.
The CI/CD pipeline requirements
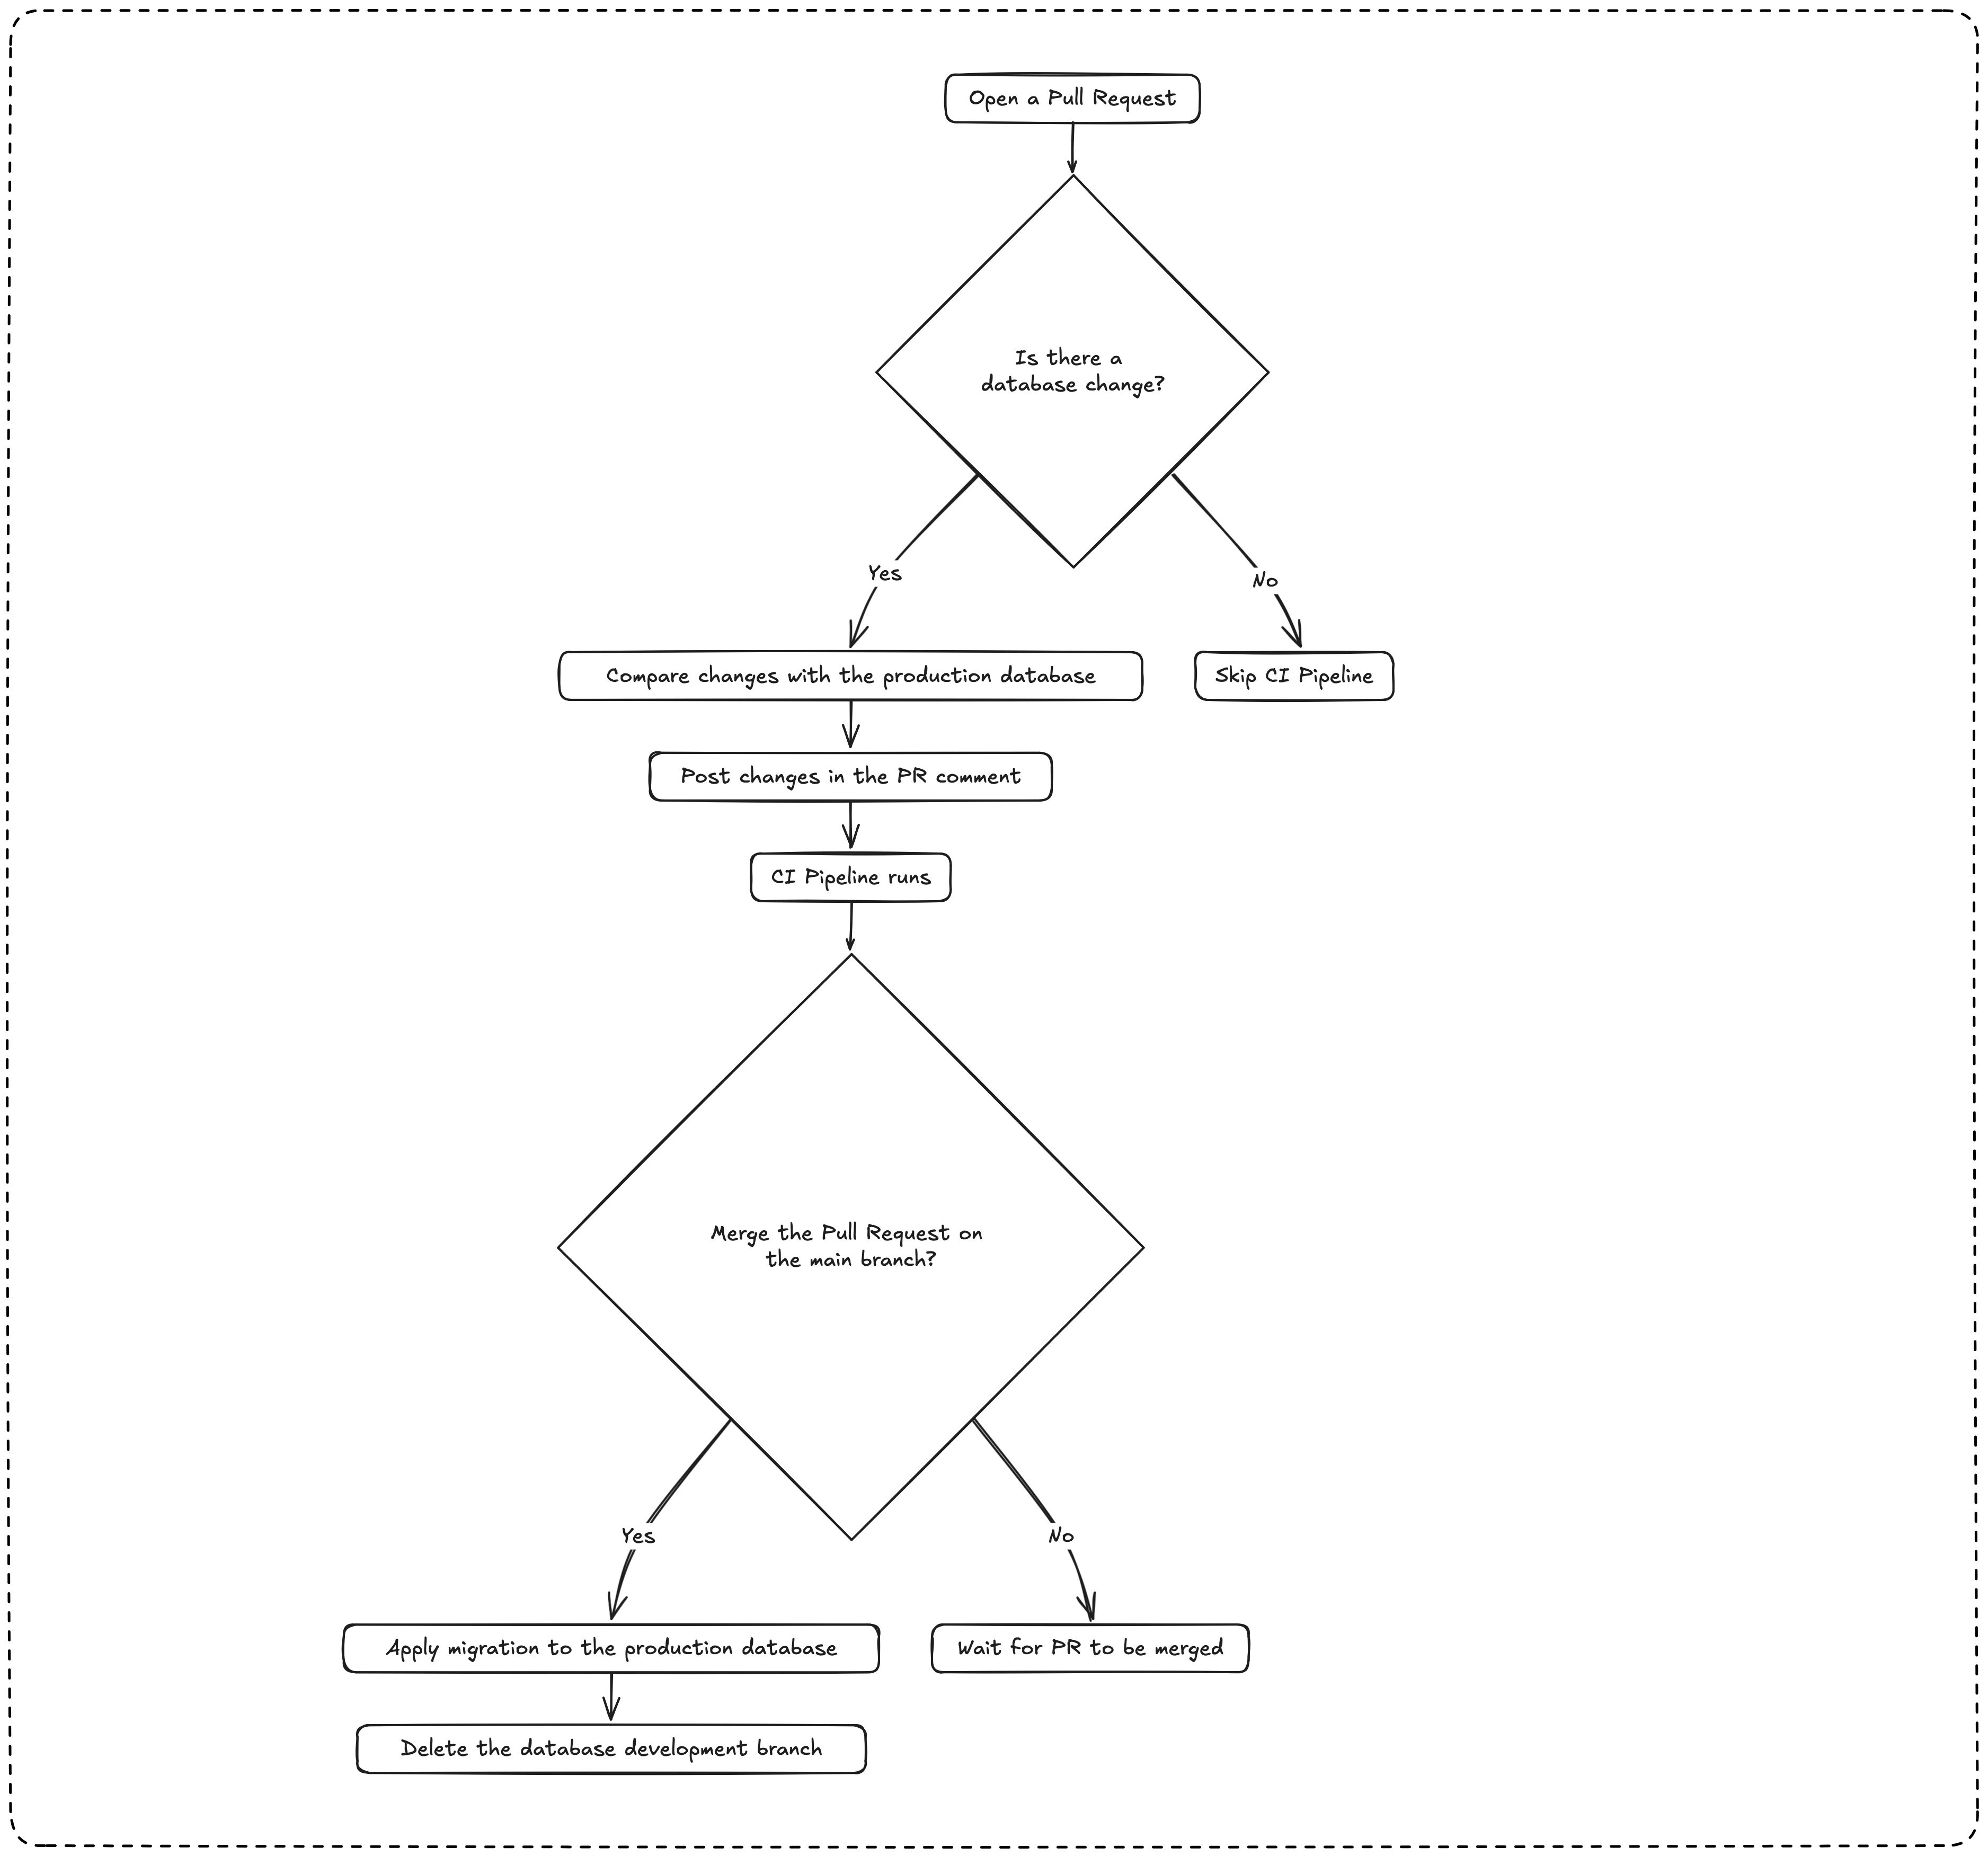
As a developer building a feature that includes performing database changes such as creating, altering, or deleting a database table:
- When I open a pull request, if there is a database change, I want to see the difference in changes with the production database in the pull request comment.
- When I merge the pull request on the main branch, I want to apply the migration to the production database and delete the database development branch.
Note: The CI pipelines must run only if there is a database change.
The use case
In this tutorial, we build a REST API in Node.js using Prisma and PlanetScale. The API exposes endpoints for creating, updating, retrieving, and deleting blog posts.
We want to allow users to:
- Define tags on their blog post to better categorize them.
- Mark the blog post slug as unique to prevent duplicates.
- Add a user to set their avatar.
These requirements imply changing the database structure, and we want to automate the process by applying them.
Our goal is to define a CI/CD pipeline for the database migrations of this API.
Prerequisites
To follow this tutorial, make sure you have the following tools installed on your computer.
- A PlanetScale database with a production branch.
- The PlanetScale CLI installed - Installation guide.
- You have basic knowledge of using GitHub Actions.
- Node.js 20.6 or higher - Download link
- NPM or Yarn (I will use Yarn)
- Docker is installed to run a shadow database for Prisma migrations.
Set up the project
We are starting from the final project we built in this tutorial, which demonstrates how to create a Node.js REST API with Prisma and PlanetScale.
Let's clone the project locally using the Git sparse checkout.
git clone --no-checkout https://github.com/tericcabrel/blog-tutorials.git

cd blog-tutorials

git sparse-checkout init --cone

git sparse-checkout set node-prisma-rest-api

git checkout @

mv node-prisma-rest-api planetscale-cicd-github-actions

cd planetscale-cicd-github-actions

yarn install

cp .env.example .env
If you followed the previous tutorial, your production database schema is up to date, so you can skip the section below.
Populate the production database with existing migrations
If you are starting from this tutorial, you must apply the existing database migrations before continuing.
Run the following commands to authenticate and create a database branch:
docker run -d -e MYSQL_ROOT_PASSWORD=secret -e MYSQL_DATABASE=blog --name core-shadow-db -p 3307:3306 mysql:8.0.37

pscale auth login

pscale branch create core-db create-main-table

# Wait for a few seconds for the database branch to be ready

pscale connect core-db create-main-table
You will get an output similar to the one below:
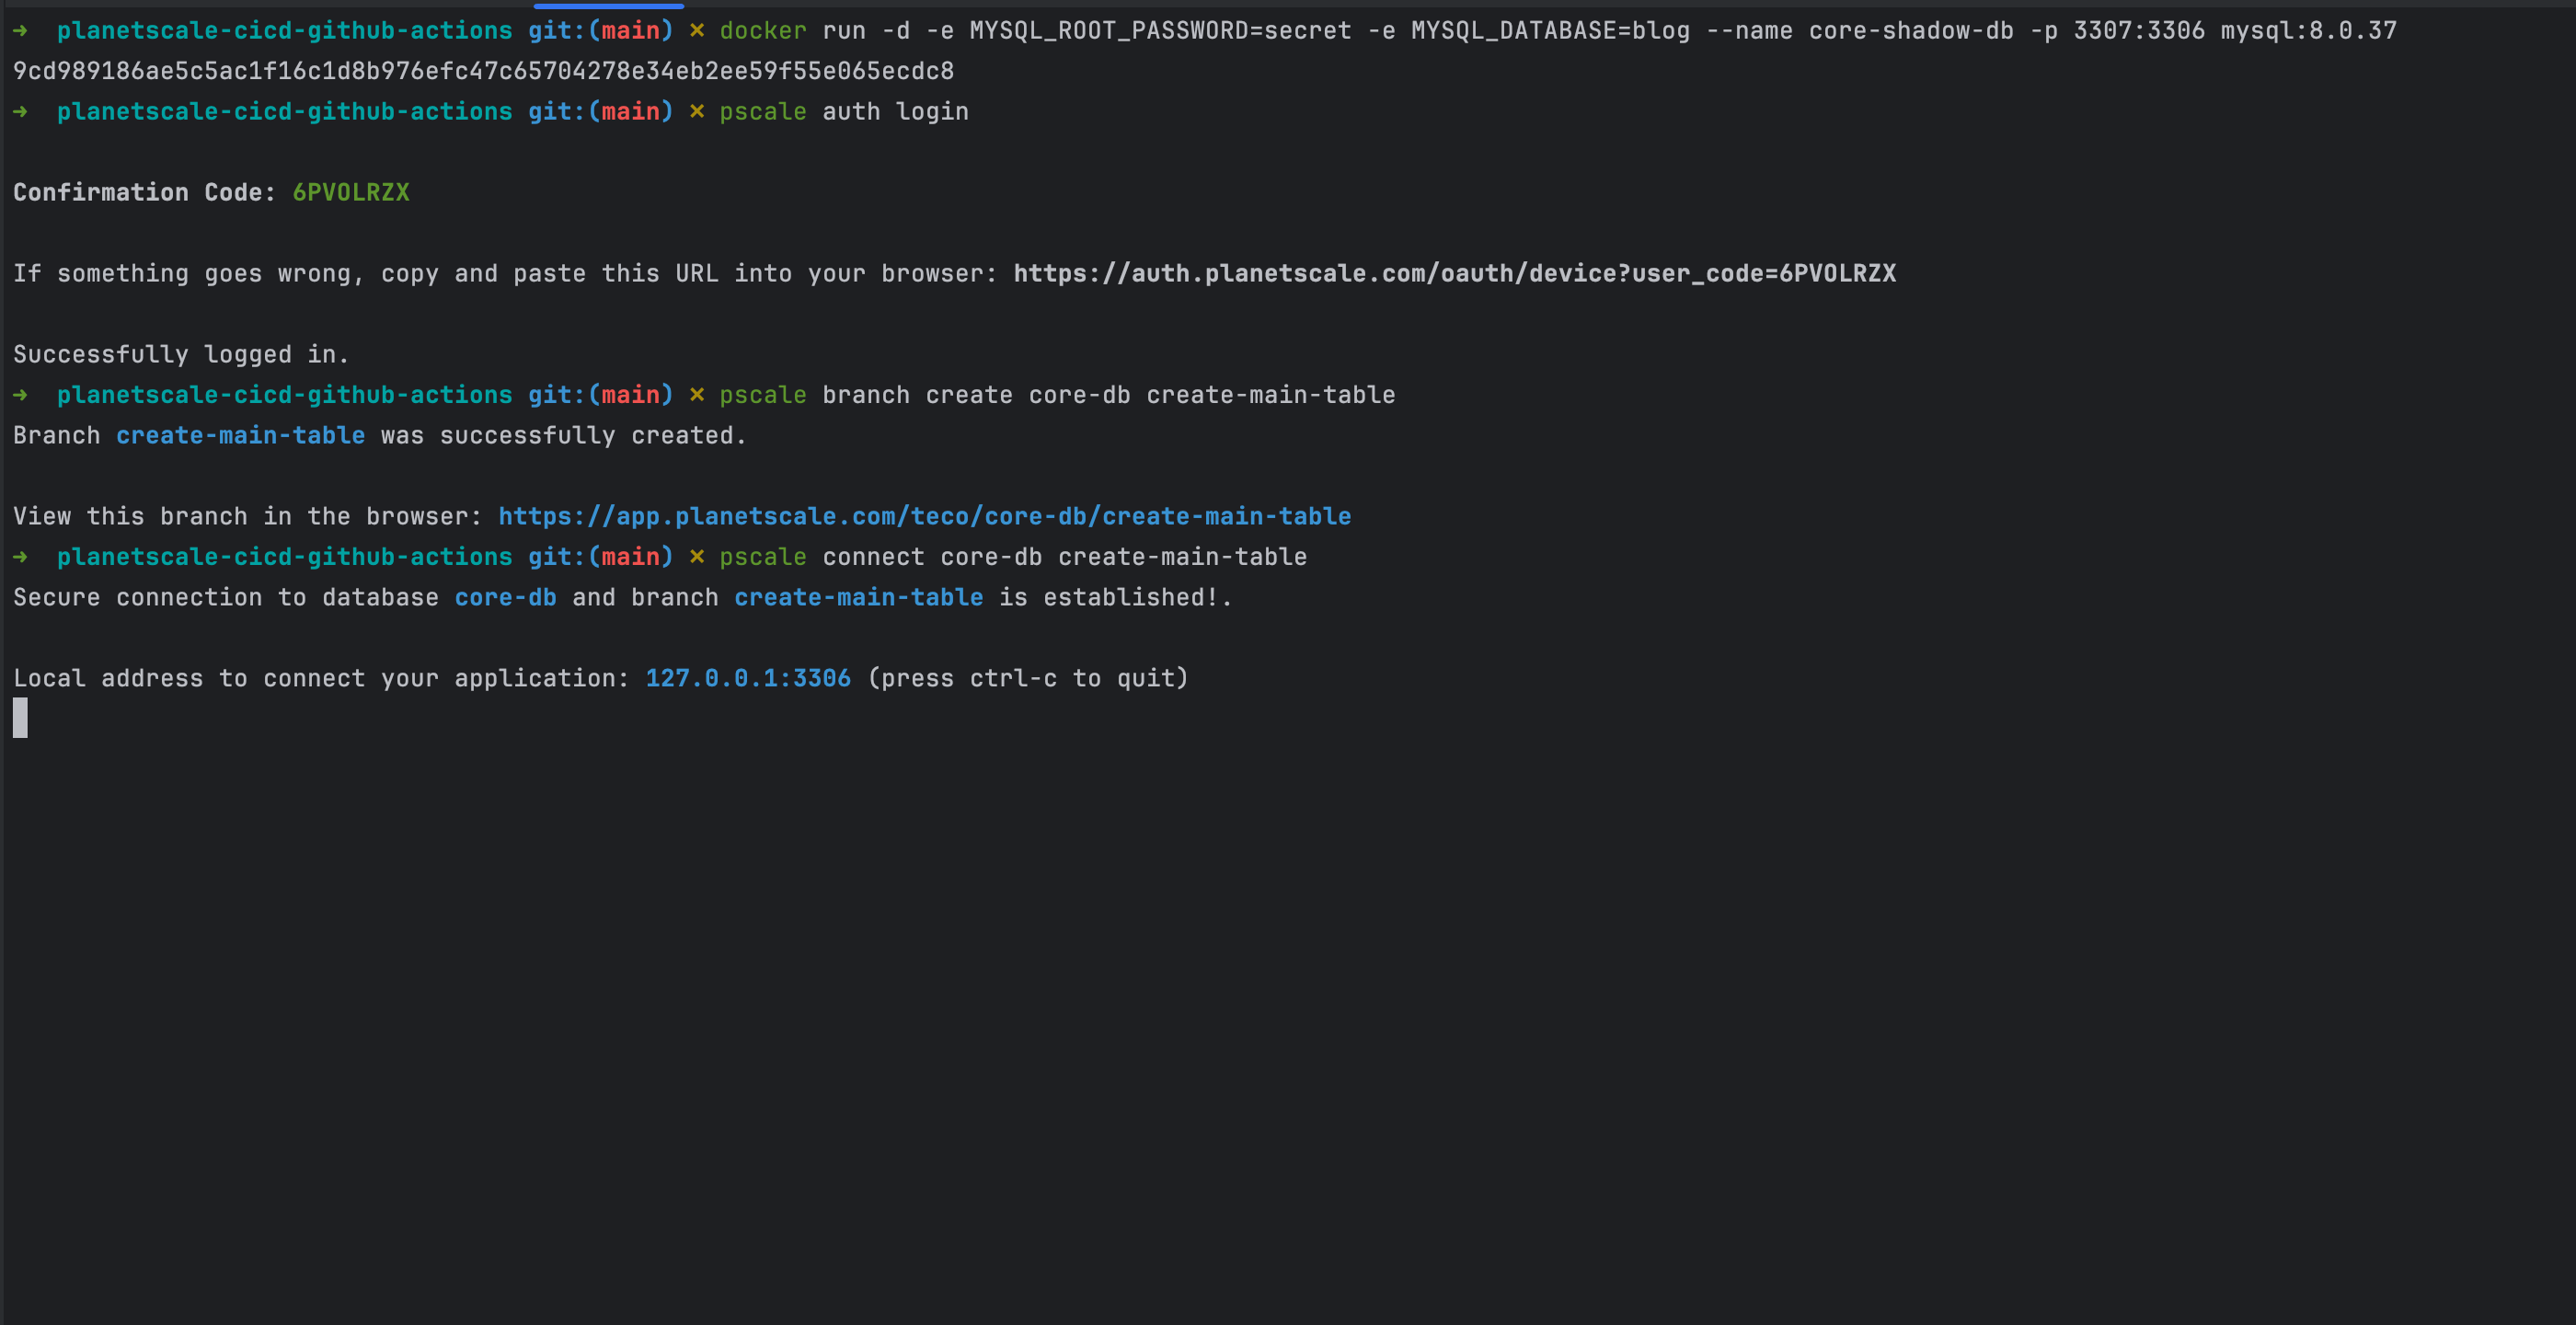
The database is accessible through port 3306, and the connection URL is mysql://root@localhost:3306/core-db
The shadow database is accessible through port 3307, and the connection URL is mysql://root:secret@localhost:3307/blog

Open the ".env" file and replace the database value of the DATABASE_URL field with the above value.
DATABASE_URL=mysql://root@localhost:3306/core-db
SHADOW_DATABASE_URL=mysql://root:secret@localhost:3307/blog
Open a new terminal and run the command below to generate and execute the database migration.
yarn prisma migrate dev --name create-main-table
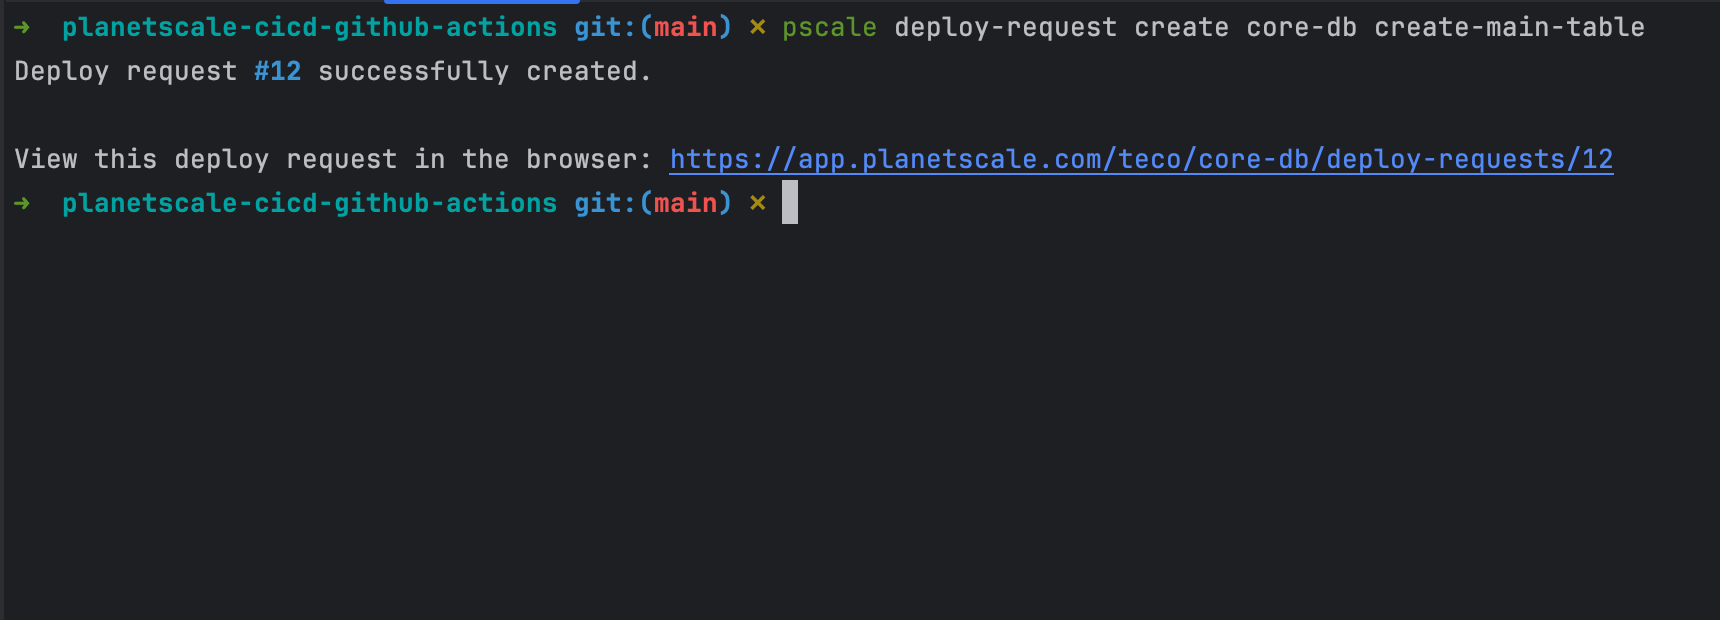
Create a deploy request to update the production database from the database branch "create-main-table"
pscale deploy-request create core-db create-main-table
The command will print the deploy request number.
Use the deploy request number to approve the changes and update the production branch.
pscale deploy-request deploy core-db <DEPLOY_REQUEST_NUMBER>
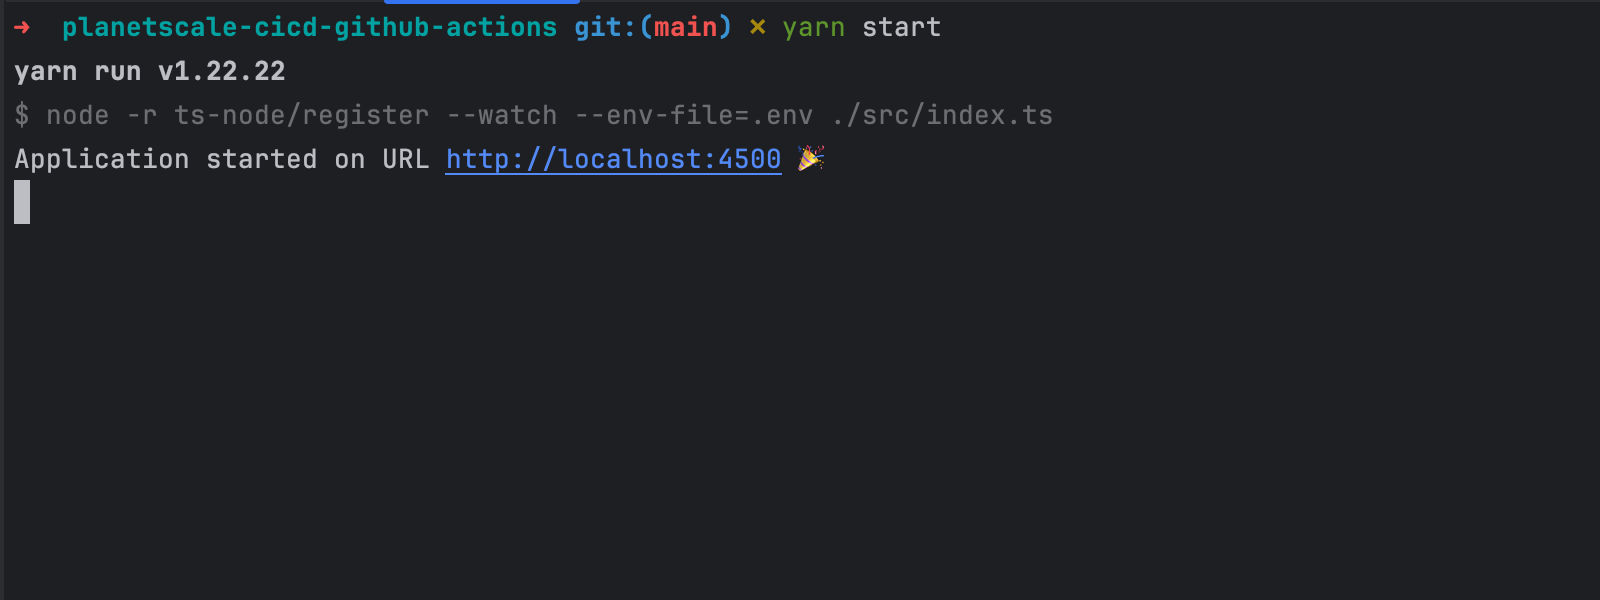
Let's try to start the REST API service by running the following command:
yarn start
The Node.js API service is connected to the database with an up-to-date schema.
Create a database migration with Prisma
We want users to add tags to their posts, set their avatar, and create unique blog posts based on the slug.
We must create a new database branch from the main
pscale branch create core-db add-post-tags-table

# Wait for a few seconds for the database branch to be ready

pscale connect core-db add-post-tags-table
Let's update the Prisma schema to define the database schema:
generator client {
  provider = "prisma-client-js"
}

datasource db {
  provider          = "mysql"
  url               = env("DATABASE_URL")
  shadowDatabaseUrl = env("SHADOW_DATABASE_URL")
  relationMode      = "prisma"
}

enum PostStatus {
  draft
  published
  archived
}

model User {
  id        Int       @id @default(autoincrement())
  email     String    @unique @db.VarChar(100)
  password  String    @db.VarChar(100)
  fullName  String    @map("full_name")
  birthDate DateTime  @map("birth_date") @db.Date
  avatar    String    @db.VarChar(255)
  createdAt DateTime  @default(now()) @map("created_at")
  updatedAt DateTime  @updatedAt @map("updated_at")
  posts     Post[]
  PostTag   PostTag[]
}

model Post {
  id         Int        @id @default(autoincrement())
  title      String
  slug       String     @unique
  content    String     @db.Text
  status     PostStatus @default(draft)
  viewCount  Int        @default(0) @map("view_count")
  isFeatured Boolean    @default(false) @map("is_featured")
  userId     Int        @map("user_id")
  createdAt  DateTime   @default(now()) @map("created_at")
  updatedAt  DateTime   @updatedAt @map("updated_at")
  author     User       @relation(fields: [userId], references: [id], onDelete: Cascade)
  PostTag    PostTag[]
}

model PostTag {
  post    Post     @relation(fields: [postId], references: [id])
  postId  Int      @map("post_id")
  user    User     @relation(fields: [userId], references: [id])
  userId  Int      @map("user_id")
  addedAt DateTime @default(now()) @map("added_at")

  @@id([postId, userId])
}
Generate a new migration for the above changes:
yarn prisma migrate dev --name add-post-tags-table
The following SQL will be executed on the production branch
-- AlterTable
ALTER TABLE `User` ADD COLUMN `avatar` VARCHAR(255) NOT NULL;

-- CreateTable
CREATE TABLE `PostTag` (
    `post_id` INTEGER NOT NULL,
    `user_id` INTEGER NOT NULL,
    `added_at` DATETIME(3) NOT NULL DEFAULT CURRENT_TIMESTAMP(3),

    PRIMARY KEY (`post_id`, `user_id`)
) DEFAULT CHARACTER SET utf8mb4 COLLATE utf8mb4_unicode_ci;

-- CreateIndex
CREATE UNIQUE INDEX `Post_slug_key` ON `Post`(`slug`);
Let's achieve that by defining the CI/CD pipeline on GitHub Actions.
Generate a PlanetScale service token
You can create a service token from:
- The PlanetScale Web console: In your PlanetScale organization account settings, go to the service token page and generate a token.
- From the PlanetScale CLI.
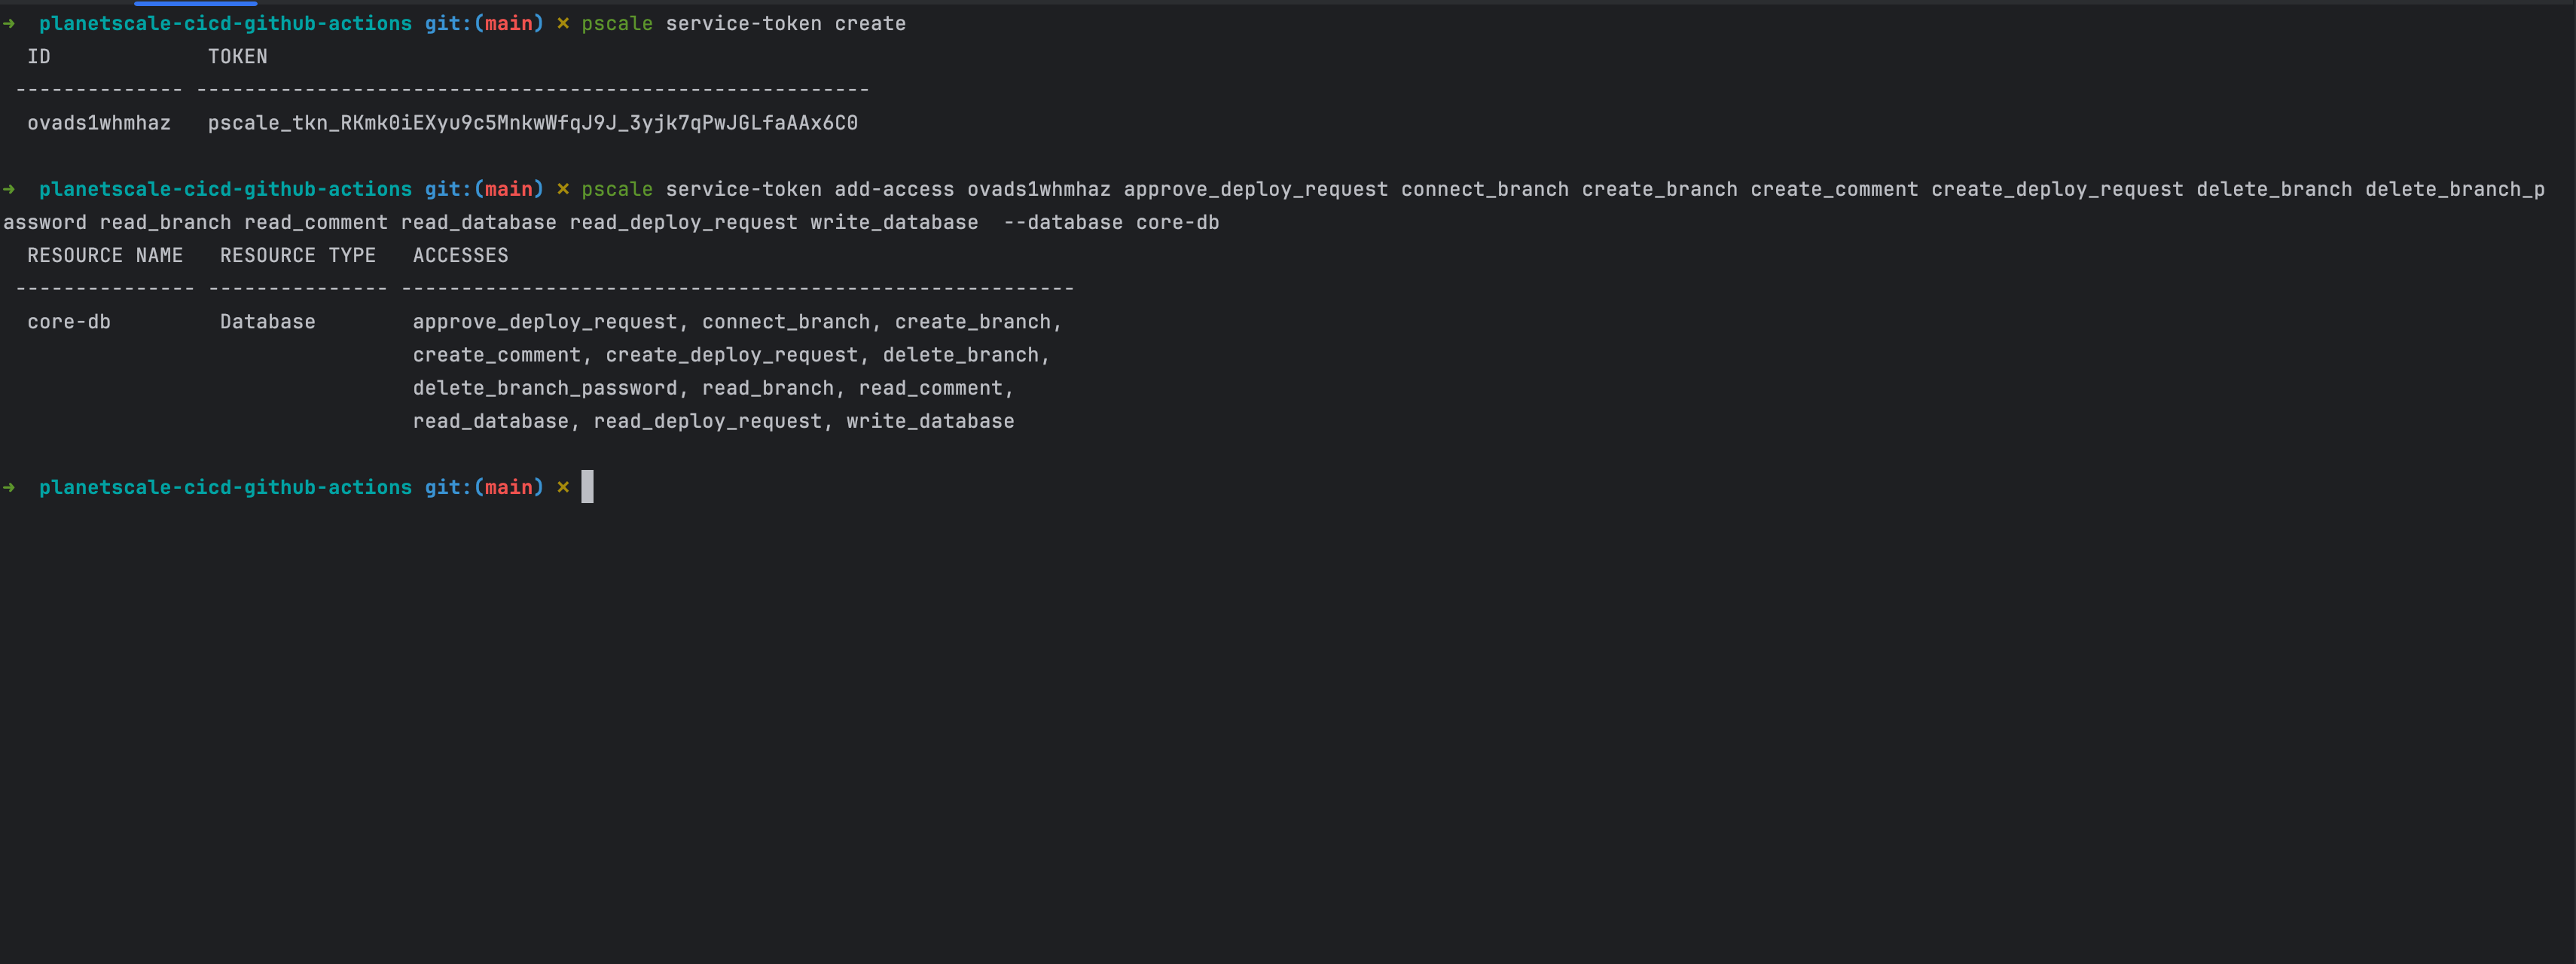
Run the following commands to create a service token using the PlanetScale CLI:
pscale service-token create

pscale service-token add-access <TOKEN_ID> approve_deploy_request connect_branch create_branch create_comment create_deploy_request delete_branch delete_branch_password read_branch read_comment read_database read_deploy_request write_database --database core-db
The first command creates the service token and prints the ID and the Value in the terminal, while the second command grants access to the database.
Replace the Token ID in the second command with your own.
Check out this link to see the list of available permissions.
Add GitHub Actions secrets for PlanetScale
To interact with your PlanetScale database from the GitHub Actions workflow, you must define the required variables injected in the CI pipeline's runner.
These variables are:
- PLANETSCALE_ORG_NAME: Your PlanetScale organization
- PLANETSCALE_DATABASE_NAME: The PlanetScale database in your organization.
- PLANETSCALE_SERVICE_TOKEN_ID: The Service token ID
- PLANETSCALE_SERVICE_TOKEN: Service token value.
The video below shows you how to add a GitHub Actions secret in a repository.
Add a GitHub Actions secret in a repository.
Check the migrations on a Pull Request opening
When a developer opens a pull request, we will check if there has been a database migration, then generate the difference between the production database and display it in the pull request comment.
PlanetScale provides a GitHub Action to simplify the configuration of our CI pipeline. Let's use it to make our life easier.
GitHub Actions for a repository lie in the folder ".github/workflows"; let's create a file "migration-db-check.yml" and add the following code:
name: Check database migration
on:
  pull_request:
    branches:
      - 'main'
    paths:
      - 'prisma/migrations/**'

env:
  PLANETSCALE_SERVICE_TOKEN_ID: ${{ secrets.PLANETSCALE_SERVICE_TOKEN_ID }}
  PLANETSCALE_SERVICE_TOKEN: ${{ secrets.PLANETSCALE_SERVICE_TOKEN }}

jobs:
  migration-detail:
    runs-on: ubuntu-latest
    permissions: write-all
    steps:
      - uses: actions/checkout@v4

      - name: Setup pscale
        uses: planetscale/setup-pscale-action@v1

      - name: Set database branch name
        run: echo "PSCALE_BRANCH_NAME=$(echo ${{ github.head_ref }} | tr -cd '[:alnum:]-'| tr '[:upper:]' '[:lower:]')" >> $GITHUB_ENV

      - name: Create deploy request on the production branch
        run: |
          DEPLOY_REQUEST_STATE=$(pscale deploy-request show ${{ secrets.PLANETSCALE_DATABASE_NAME }} ${{ env.PSCALE_BRANCH_NAME }} --org ${{ secrets.PLANETSCALE_ORG_NAME }} -f json | jq -r '.state')

          echo "Deploy request State: $DEPLOY_REQUEST_STATE"

          if [ "$DEPLOY_REQUEST_STATE" = "open" ]; then
            echo "Deploy request exists: skipping creation"
          else
            echo "Deploy request does not exist : creating..."
            pscale deploy-request create ${{ secrets.PLANETSCALE_DATABASE_NAME }} ${{ env.PSCALE_BRANCH_NAME }} \
            --org ${{ secrets.PLANETSCALE_ORG_NAME }} \
            --into main \
            --notes "Apply changes to the dev branch"
          fi

      - name: Get deploy request number
        run: |
          DEPLOY_REQUEST_NUMBER=$(pscale deploy-request show ${{ secrets.PLANETSCALE_DATABASE_NAME }} ${{ env.PSCALE_BRANCH_NAME }} --org ${{ secrets.PLANETSCALE_ORG_NAME }} -f json | jq -r '.number')
          echo "DEPLOY_REQUEST_NUMBER=$DEPLOY_REQUEST_NUMBER" >> $GITHUB_ENV

      - name: Check deployment state
        continue-on-error: false
        run: |
          for i in {1..10}; do
            DEPLOYMENT_STATE=$(pscale deploy-request show ${{ secrets.PLANETSCALE_DATABASE_NAME }} ${{ env.DEPLOY_REQUEST_NUMBER }} --org ${{ secrets.PLANETSCALE_ORG_NAME }} --format json | jq -r '.deployment_state')
            echo "Deployment State: $DEPLOYMENT_STATE"

            if [ "$DEPLOYMENT_STATE" = "ready" ]; then
              echo "Deployment state is ready. Continuing."
              echo "DEPLOY_REQUEST_OPENED=true" >> $GITHUB_ENV
              break
            fi

            echo "Deployment state is not ready. Waiting 2 seconds before checking again."
            sleep 2
          done

      - name: Collect the migration diff
        continue-on-error: false
        if: ${{ env.DEPLOY_REQUEST_OPENED }}
        run: |
          DEPLOY_DATA=$(pscale api organizations/${{ secrets.PLANETSCALE_ORG_NAME }}/databases/${{ secrets.PLANETSCALE_DATABASE_NAME }}/deploy-requests/${{ env.DEPLOY_REQUEST_NUMBER }}/deployment --org planetscale)
          CAN_DROP_DATA=$(echo "$DEPLOY_DATA" | jq -r '.deploy_operations[] | select(.can_drop_data == true) | .can_drop_data')

          echo "Deploy request opened: https://app.planetscale.com/${{ secrets.PLANETSCALE_ORG_NAME }}/${{ secrets.PLANETSCALE_DATABASE_NAME }}/deploy-requests/${{ env.DEPLOY_REQUEST_NUMBER }}" >> migration-message.txt
          echo "" >> migration-message.txt

          if [ "$CAN_DROP_DATA" = "true" ]; then
            echo ":rotating_light: You are dropping a column. Before running the migration make sure to do the following:" >> migration-message.txt
            echo "" >> migration-message.txt

            echo "1. [ ] Deploy app changes to ensure the column is no longer being used." >> migration-message.txt
            echo "2. [ ] Once you've verified it's no used, run the deploy request." >> migration-message.txt
            echo "" >> migration-message.txt
          else
            echo "When adding to the schema, the Deploy Request must be run **before** the code is deployed." >> migration-message.txt
            echo "Please ensure your schema changes are compatible with the application code currently running in production." >> migration-message.txt
            echo "" >> migration-message.txt

            echo "1. [ ] Successfully run the Deploy Request" >> migration-message.txt
            echo "2. [ ] Deploy this PR" >> migration-message.txt
            echo "" >> migration-message.txt
          fi

          echo "\`\`\`diff" >> migration-message.txt
          pscale deploy-request diff ${{ secrets.PLANETSCALE_DATABASE_NAME }} ${{ env.DEPLOY_REQUEST_NUMBER }} --org ${{ secrets.PLANETSCALE_ORG_NAME }} -f json | jq -r '.[].raw' >> migration-message.txt
          echo "\`\`\`" >> migration-message.txt

      - name: Comment pull request with the migration diff
        uses: thollander/actions-comment-pull-request@v2
        if: ${{ env.DEPLOY_REQUEST_OPENED }}
        with:
          filePath: migration-message.txt
This action workflow has eight steps:
- Check out the GitHub repository.
- Install the GitHub Action to set up PlanetScale.
- Infer the database branch from the pull request branch name and expose it as an environment variable. This implies that your Git branch name must be the same as your PlanetScale database branch.
- Create a deploy request from the database branch to the production branch,
- Retrieve the deploy request number.
- Check the deployment state to ensure there is no error.
- If the deploy request does not contain an error, we retrieve the migration difference between the production branch and the current one and save it in a text file.
- Add a comment about the migration difference to the pull request.
This workflow is triggered only for a pull request on the main branch where there is a change in the folder "prisma/migrations" containing the generated database migrations.
Run the GitHub Actions workflow
Create a branch, commit your changes, push to the remote repository
git checkout -b add-post-tags-table

git add .

git commit -m "Apply migrations for adding post tags"

git push origin add-post-tags-table
Create a pull request. The CI pipeline will start automatically.
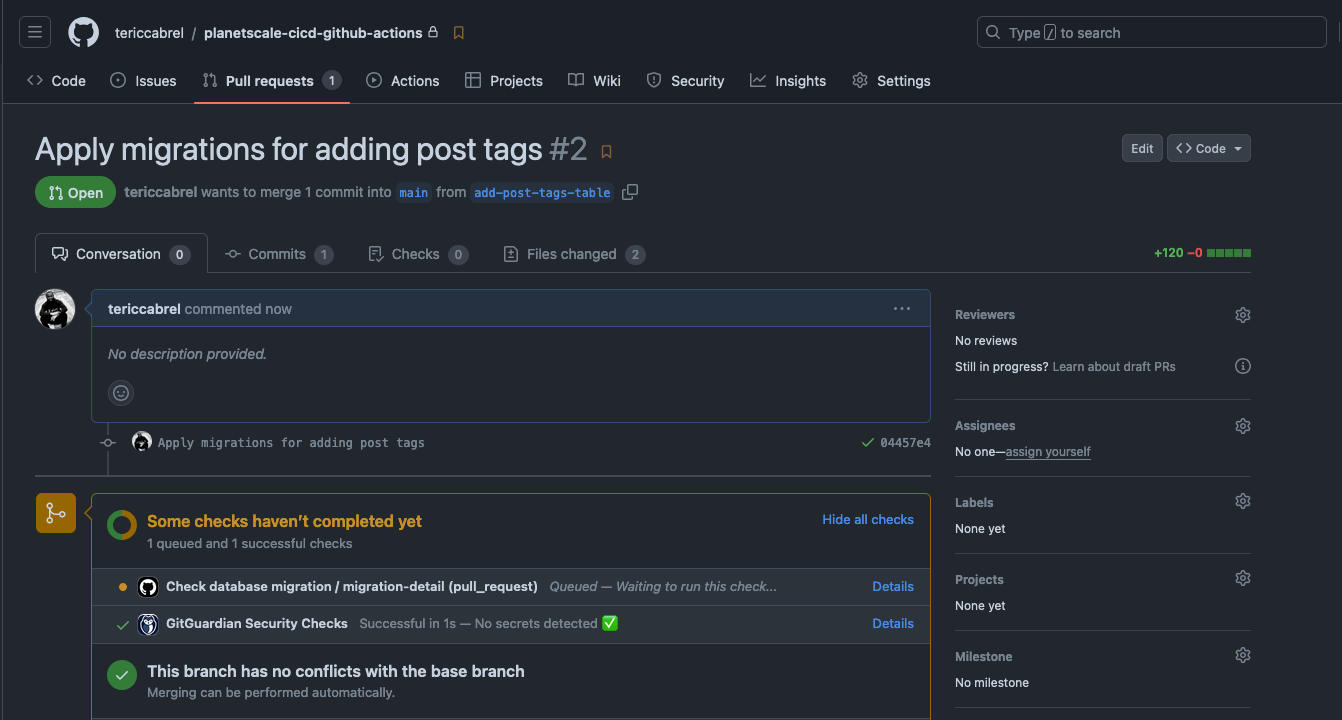
Once the GitHub Actions workflow finishes, the Pull request will include a comment highlighting the change that will be applied.
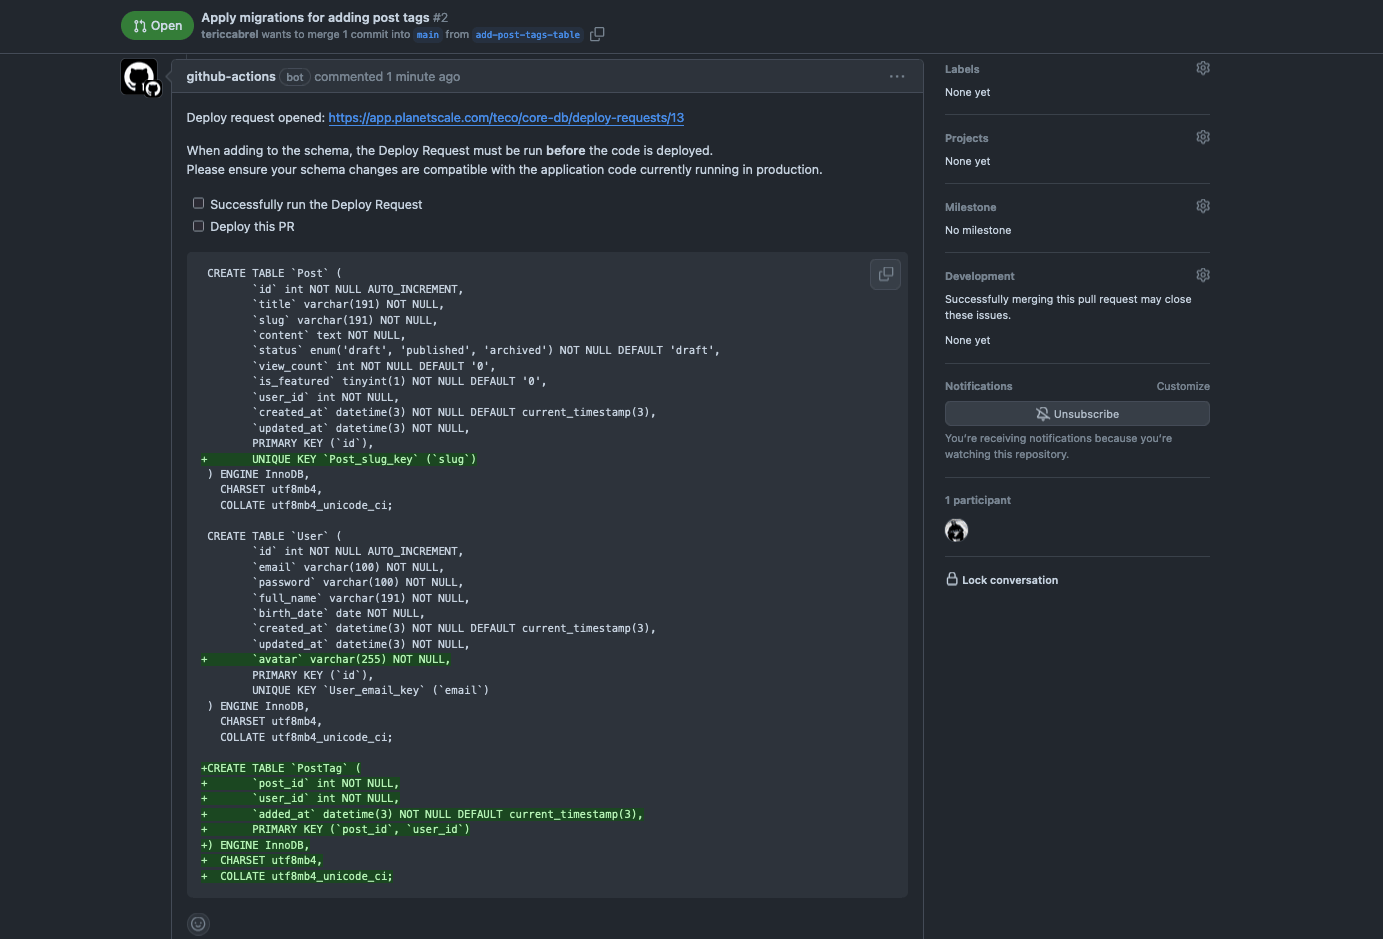
This is helpful because the pull request reviewers can see and evaluate the impact of the changes on the database. For example, a reviewer can spot a database-breaking change.
Apply the migrations on a Pull request merge
Once the pull request is merged, we want to apply the migration to the production database and delete the development branch.
Create a file ".github/workflows/migration-db-deploy.yml" and add the following code:
name: Deploy database migration
on:
  push:
    branches:
      - 'main'
    paths:
      - 'prisma/migrations/**'

env:
  PLANETSCALE_SERVICE_TOKEN_ID: ${{ secrets.PLANETSCALE_SERVICE_TOKEN_ID }}
  PLANETSCALE_SERVICE_TOKEN: ${{ secrets.PLANETSCALE_SERVICE_TOKEN }}

jobs:
  apply-migration:
    runs-on: ubuntu-latest
    steps:
      - uses: actions/checkout@v4

      - name: Setup pscale
        uses: planetscale/setup-pscale-action@v1

      - name: Get the branch name and the deploy request number
        run: |
          DEPLOYER_REQUEST_LIST=$(pscale deploy-request list ${{ secrets.PLANETSCALE_DATABASE_NAME }} --org ${{ secrets.PLANETSCALE_ORG_NAME }} -f json)
          DEPLOY_REQUEST_NUMBER=$(echo "$DEPLOYER_REQUEST_LIST" | jq -r '.[] | select(.into_branch == "main" and .state == "open") | .number')
          PSCALE_BRANCH_NAME=$(echo "$DEPLOYER_REQUEST_LIST" | jq -r '.[] | select(.into_branch == "main" and .state == "open") | .branch')

          if [ -z "$DEPLOY_REQUEST_NUMBER" ]; then
            echo "No open deploy request found in the production branch."
            exit 1
          fi

          echo "DEPLOY_REQUEST_NUMBER=$DEPLOY_REQUEST_NUMBER" >> $GITHUB_ENV
          echo "PSCALE_BRANCH_NAME=$PSCALE_BRANCH_NAME" >> $GITHUB_ENV

      - name: Check deployment state
        continue-on-error: false
        run: |
          for i in {1..10}; do
            DEPLOYMENT_STATE=$(pscale deploy-request show ${{ secrets.PLANETSCALE_DATABASE_NAME }} ${{ env.DEPLOY_REQUEST_NUMBER }} --org ${{ secrets.PLANETSCALE_ORG_NAME }} -f json | jq -r '.deployment_state')
            echo "Deployment State: $DEPLOYMENT_STATE"

            if [ "$DEPLOYMENT_STATE" = "ready" ]; then
              echo "Deployment state is ready. Continuing."
              echo "DEPLOY_REQUEST_OPENED=true" >> $GITHUB_ENV
              break
            fi

            echo "Deployment state is not ready. Waiting 2 seconds before checking again."
            sleep 2
          done

      - name: Deploy schema migration in the production branch
        continue-on-error: false
        run: |
          pscale deploy-request deploy ${{ secrets.PLANETSCALE_DATABASE_NAME }} ${{ env.DEPLOY_REQUEST_NUMBER }} --org ${{ secrets.PLANETSCALE_ORG_NAME }} --wait
          pscale deploy-request skip-revert ${{ secrets.PLANETSCALE_DATABASE_NAME }} ${{ env.DEPLOY_REQUEST_NUMBER }} --org ${{ secrets.PLANETSCALE_ORG_NAME }}

      - name: Delete the database branch
        if: ${{ success() }}
        run: |
          pscale branch delete ${{ secrets.PLANETSCALE_DATABASE_NAME }} ${{ env.PSCALE_BRANCH_NAME }} --org ${{ secrets.PLANETSCALE_ORG_NAME }} --force
          echo "The branch \"${{ env.PSCALE_BRANCH_NAME }}\" has been successfully."
This action workflow has eight steps:
- Check out the GitHub repository.
- Install the GitHub Action to set up PlanetScale.
- Get the database branch name and the deploy request number.
- Check the deployment state to ensure there is no error.
- Apply the migration on the production branch.
- Delete the development database branch.
Make a commit, then push the changes on the pull request. Verify that the workflow is not deployed.
Once all checks pass, merge the pull request to the main branch and wait for the pipeline to complete.
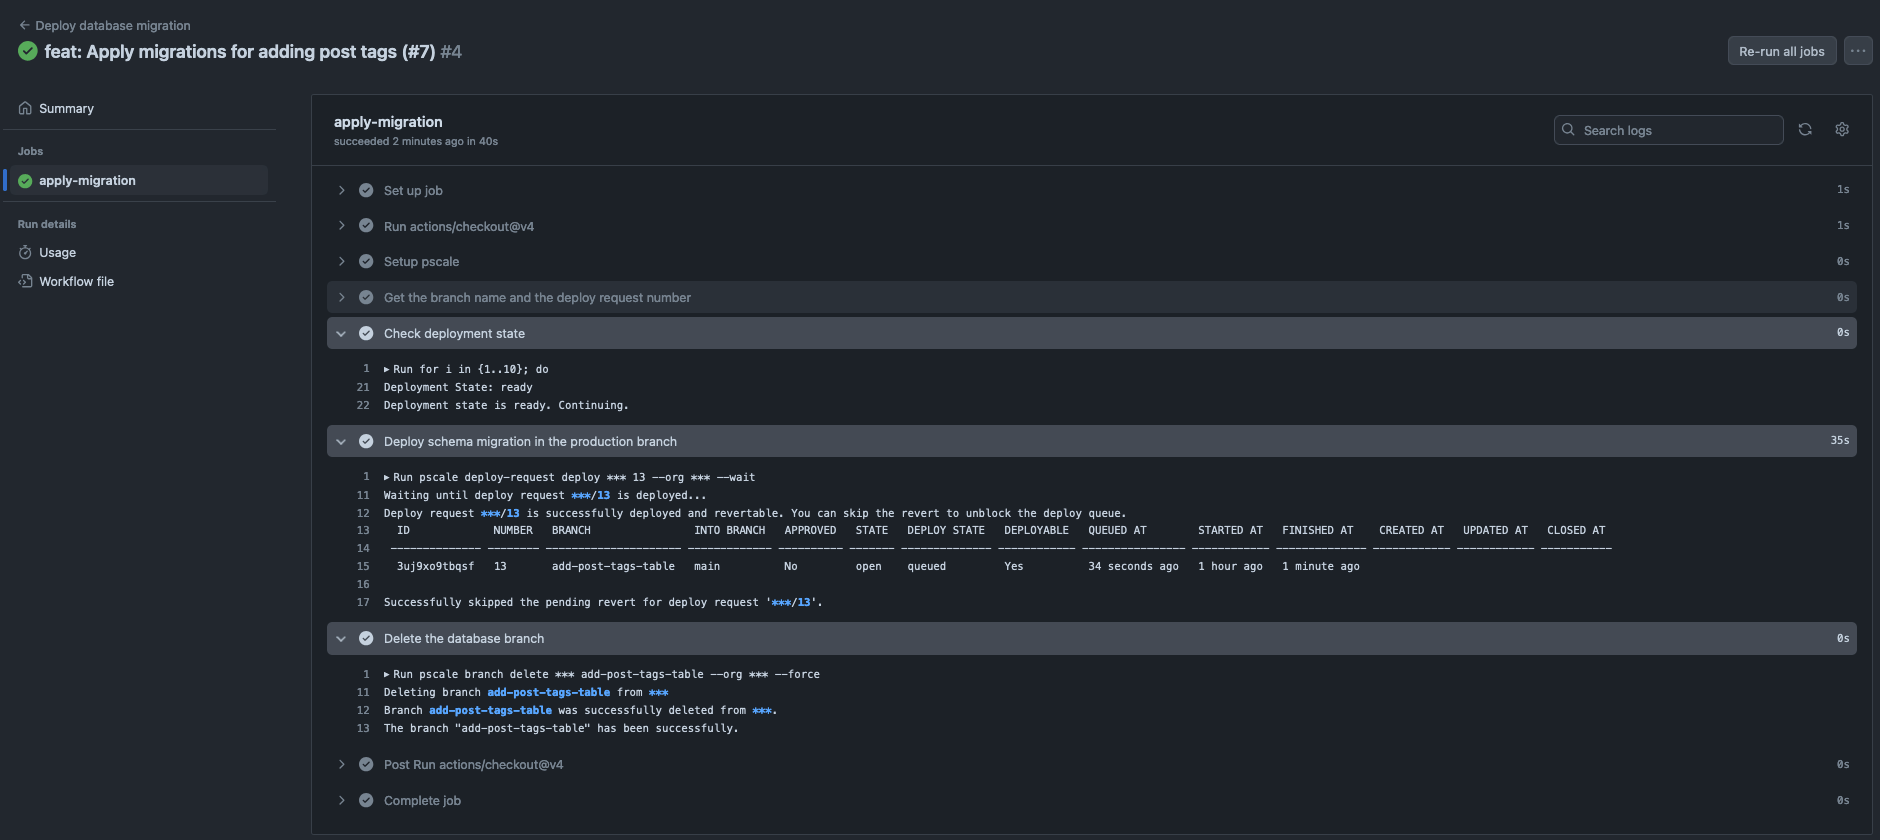
You can now check your production database schema to ensure the changes have been applied.
Suggestion for better database migration automation
Now that you have automated the application of database changes in production, you should be more cautious to avoid introducing breaking changes.
Here are some recommendations:
- Do not include application code with database migration files in the same pull request. This will ease the code review since reviewers will only consider the impact of the changes on the database.
- When you make database-breaking changes, such as renaming a column or changing its type, follow the Expand and Contract pattern to safely achieve them.
- PlanetScale can notify you when there is a conflict in the deployment request; remember to check when it happens and solve it.
- Check the recommendation in your PlanetScale web console to improve your database's performance. Now that you have an automated CI/CD pipeline, it is easy to apply these recommendations.
Wrap up
Automating the deployment of database changes through a CI/CD pipeline on GitHub Actions is a great way to have a deterministic process for applying changes to your database.
With features like database branch, deploy request, and CLI provided by PlanetScale, you can include other developers in the code review to prevent breaking changes from being applied to the production database.
You can find the code source on the GitHub repository.
Follow me on Twitter or subscribe to my newsletter to avoid missing the upcoming posts and the tips and tricks I occasionally share.