
Automate the deployment of a SpringBoot application using GitHub Actions CI/CD


CI/CD stands for Continuous Integration/Continuous Delivery, a set of practices used in software development to automate the process of building, testing, and deploying code changes.
Continuous Integration involves automatically building and testing code changes as they are made, while Continuous Delivery involves automatically deploying those changes to production environments. These practices help to improve efficiency, reduce errors, and increase the speed and frequency of software releases.
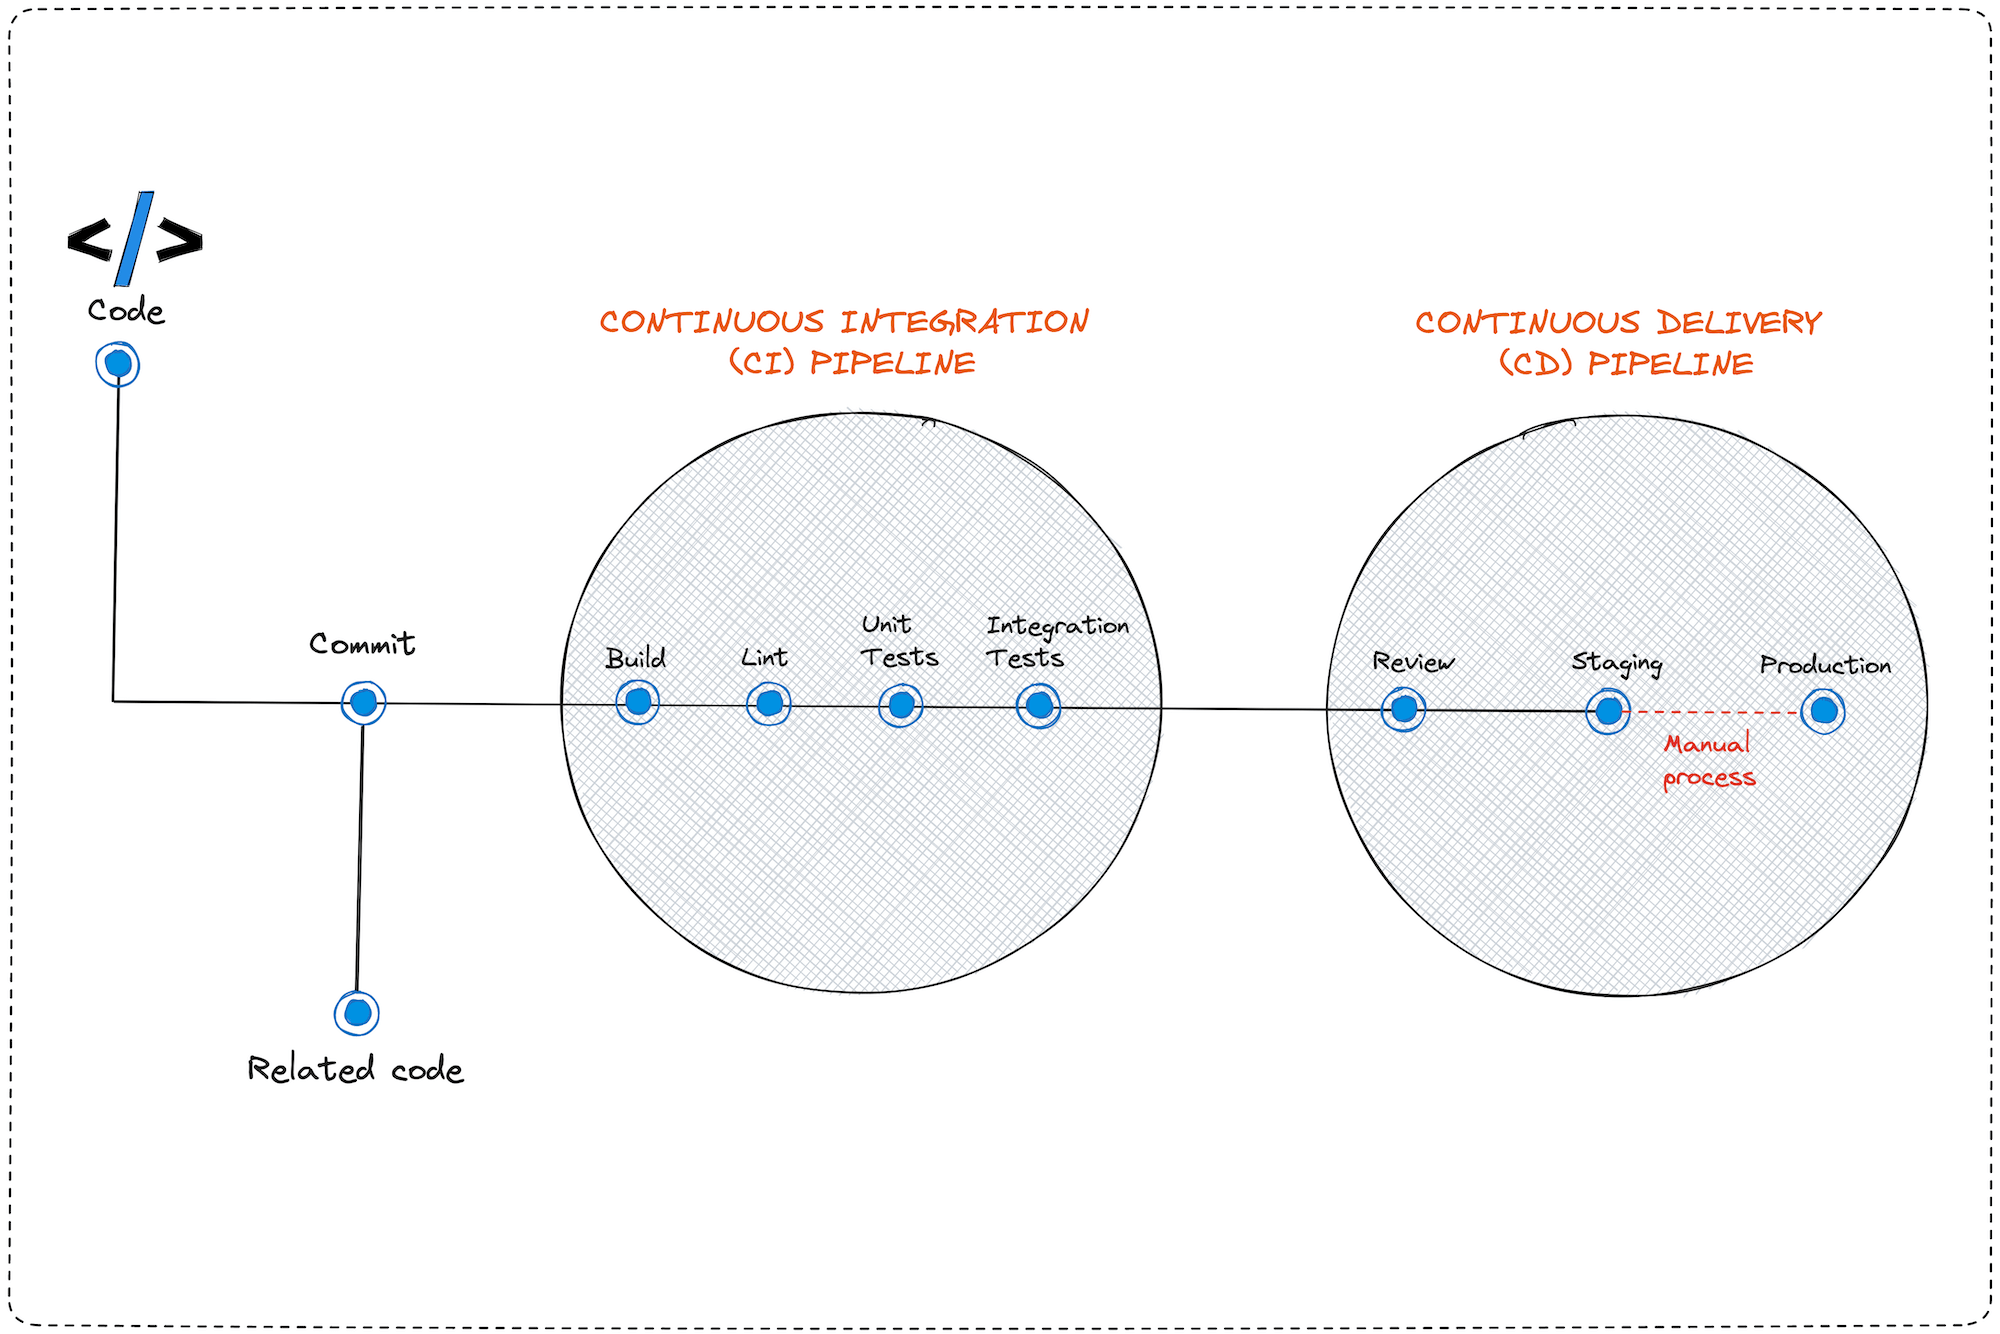
In this post, we saw how to deploy a Spring boot application using Docker and Nginx as a reverse proxy. In a real-world scenario, we will want a CI/CD pipeline that handles the integrity check and deploy the application in production whenever we push a new code version.
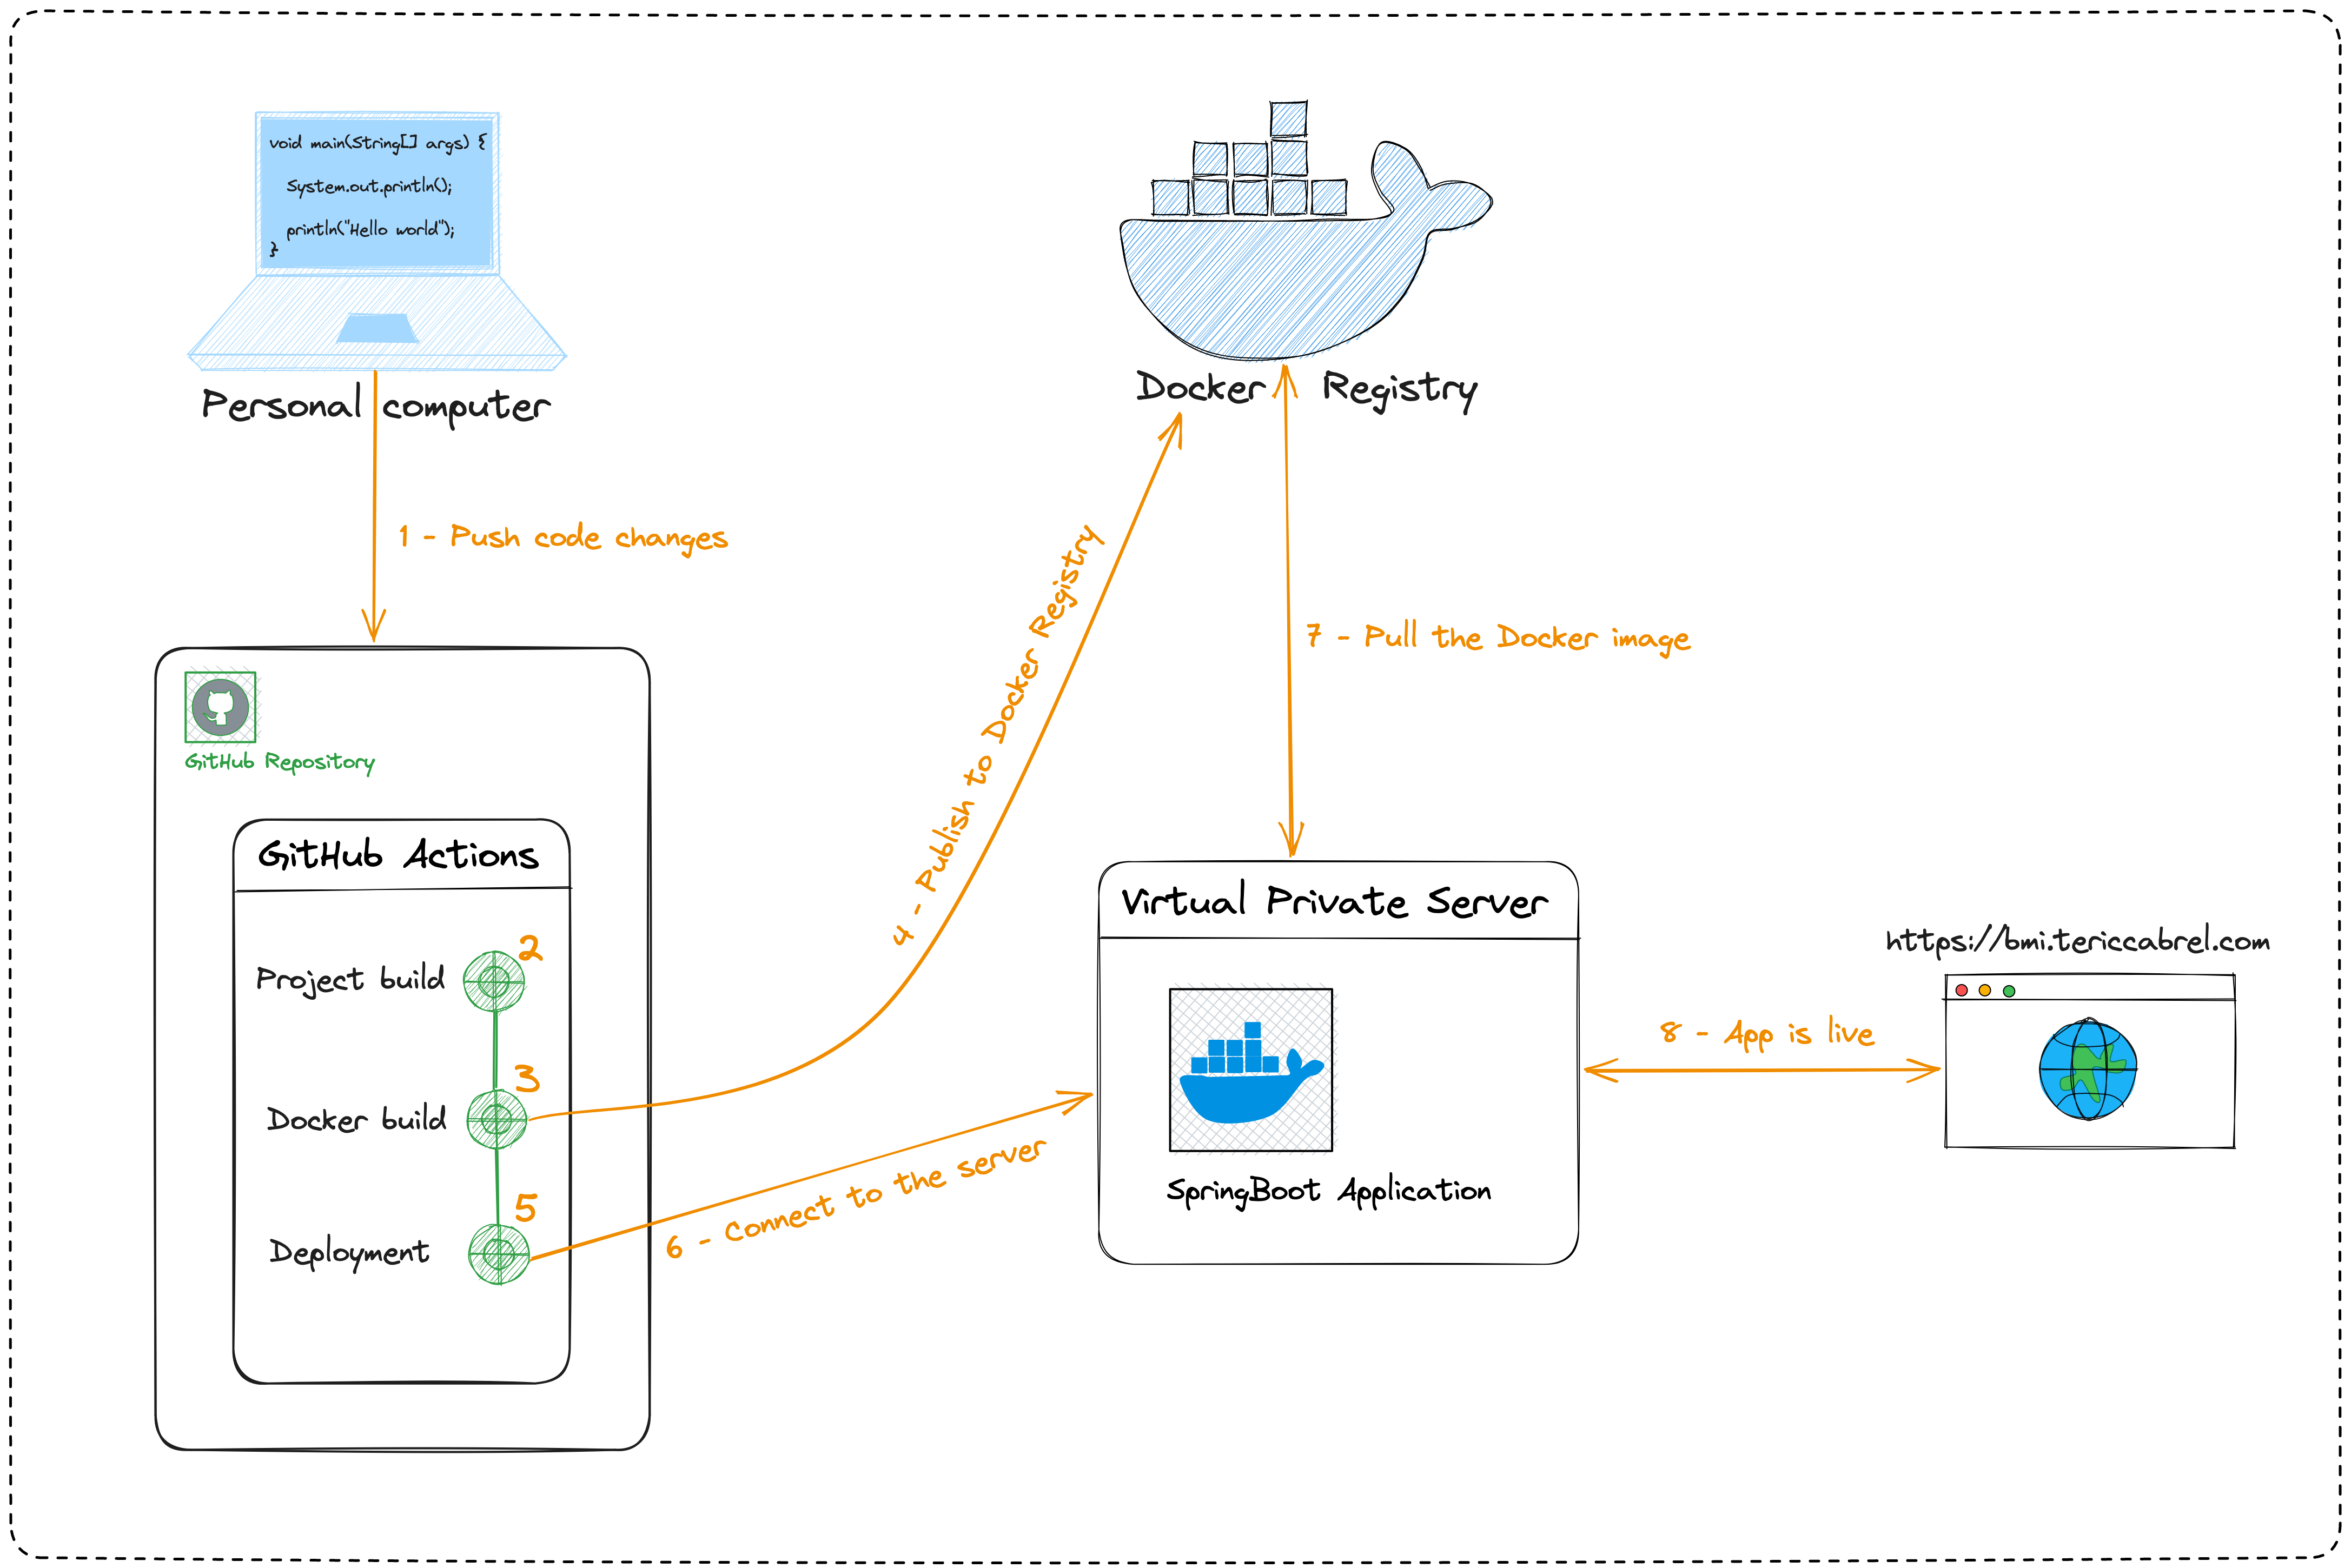
What we will build
I have a working SpringBoot application running on a Virtual Private Server under Docker.
When I edit the application's code, make a commit, and push the changes to the remote repository, A CI/CD pipeline to run tests, build the docker image, and publish it to the Docker Hub.
After the Docker image is published, trigger the deployment of the former on our Virtual Private Server. Once the deployment is done, verify the changes are visible on the online application.
Below is the diagram of the whole workflow:
Prerequisites
To follow this tutorial, you must have a Virtual Private Server where your SpringBoot application runs with Docker. The Reverse proxy and SSL certificate don't matter since they are unrelated to the application deployment.
You can follow the blog below to achieve this first requirement.

For running the project locally, you need these tools installed on your computer to run and package the project locally:
- Java Development Kit 11 or later - Download's link
- Apache Maven 3.7+ - Download link
- Docker to create the image of the application - Download link
Set up the project
As a starter project, we will use the final project code of this blog post about deploying a SpringBoot application with Docker and Nginx.
The project runs on my Virtual private server and is accessible to the internet at this URL: https://bmi.tericcabrel.com

Let's set up this project locally by running the following command:
git clone https://github.com/tericcabrel/bmi -b with-docker

cd bmi

mv Dockerfile Dockerfile-app

mvn install

npm install

mvn spring-boot:run
The project will start on port 8000; navigate to the URL http://localhost:8000.

We have the same application run locally, so we can view the changes we make to the application.
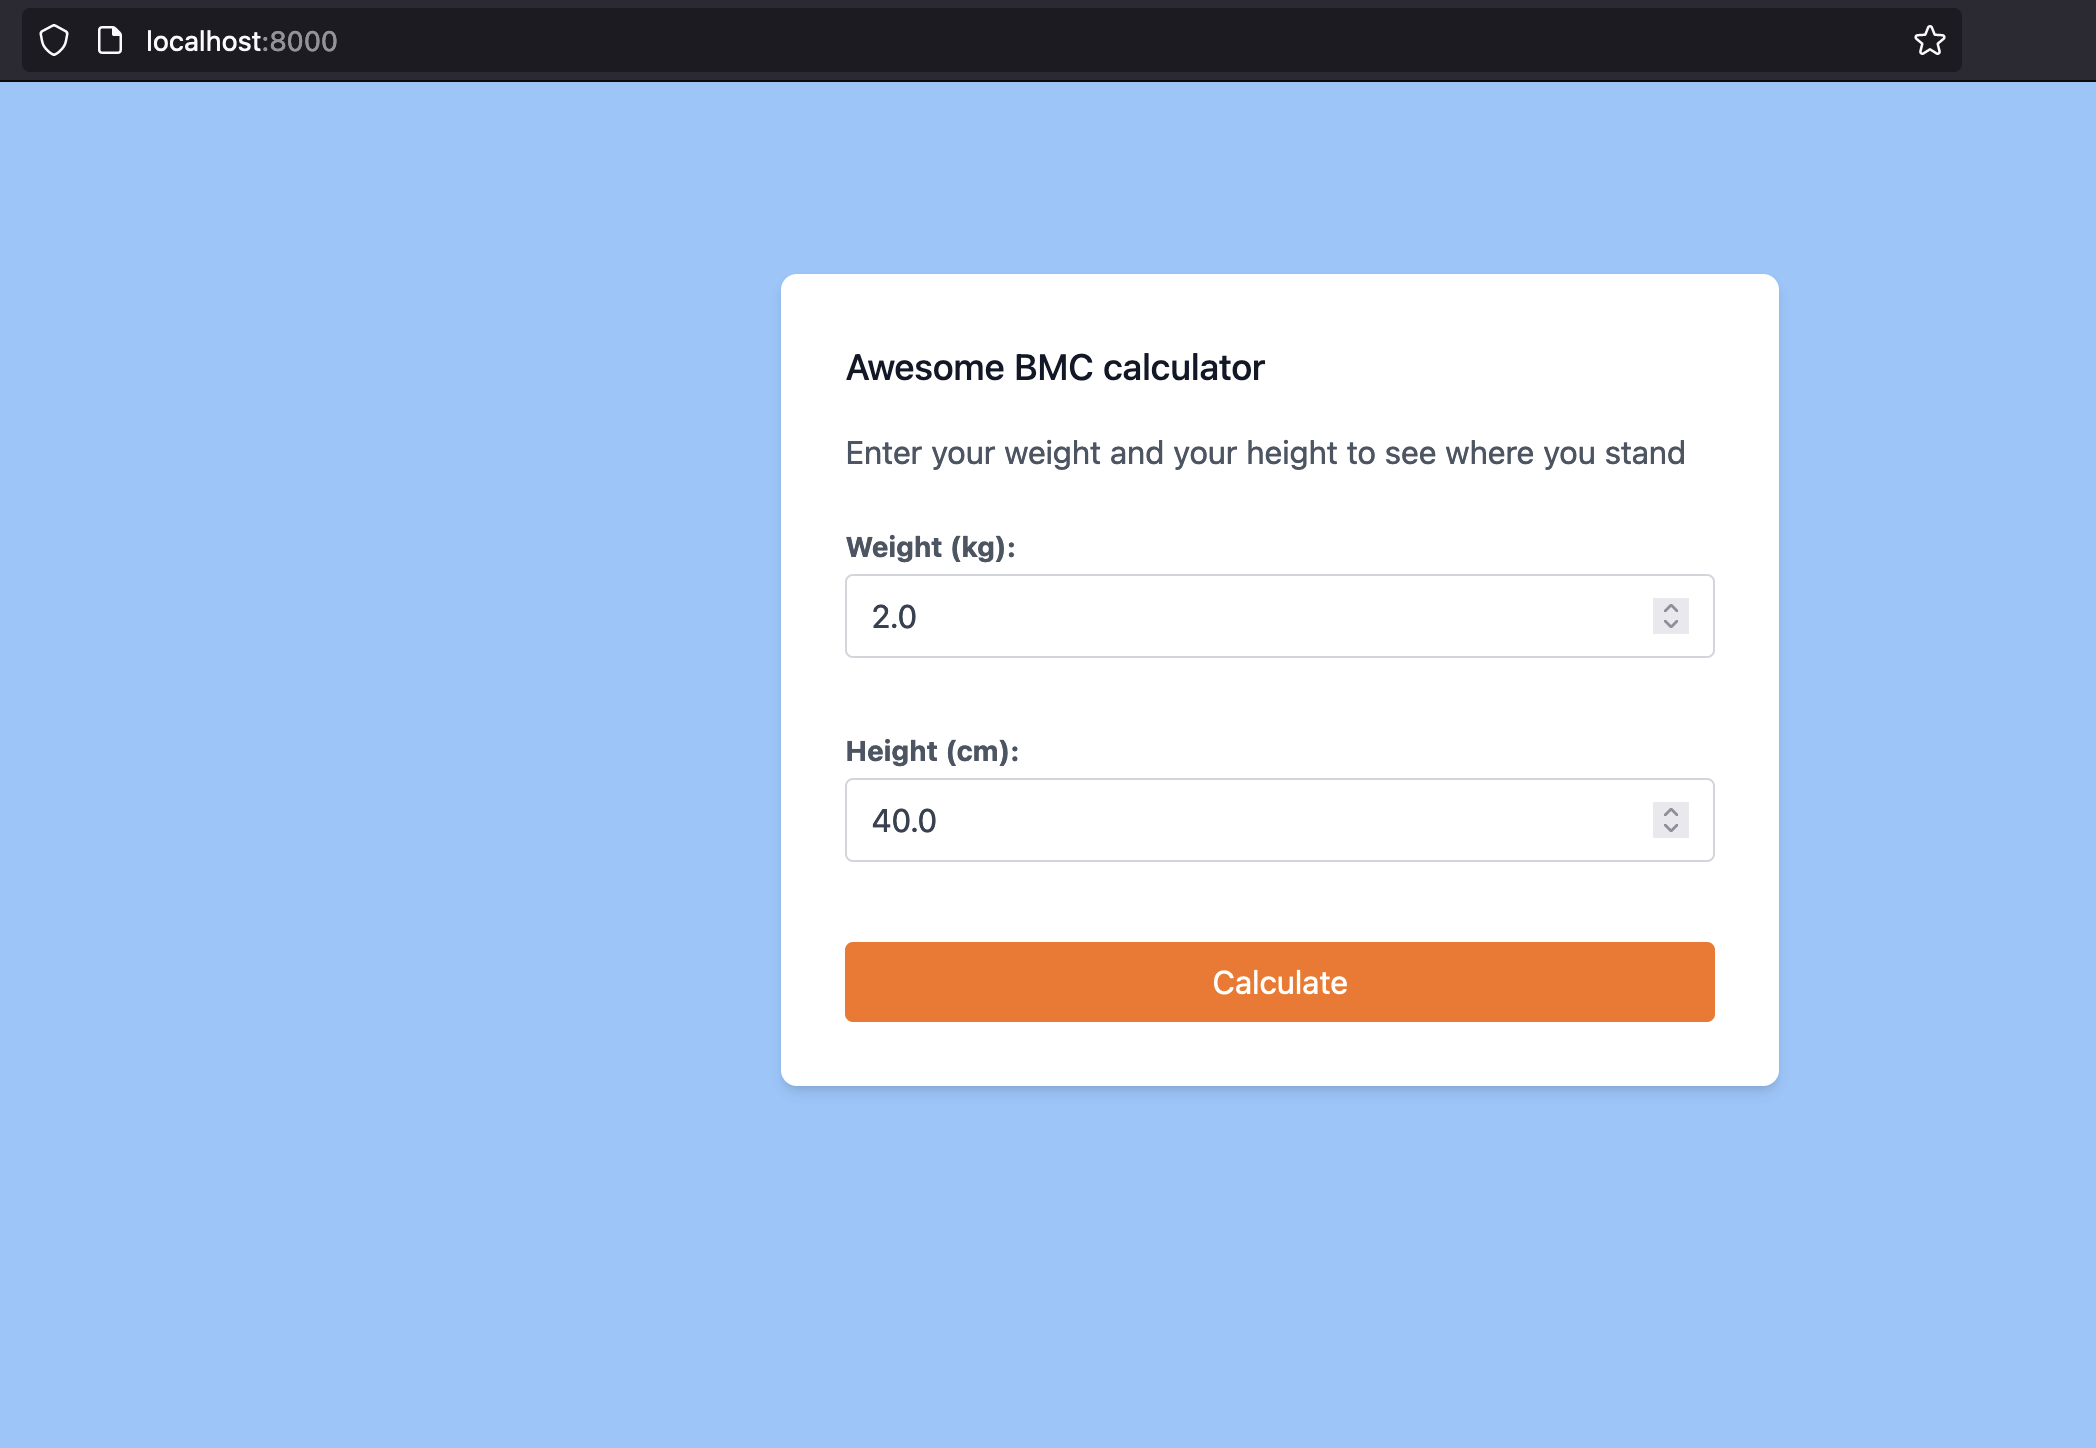
Add a change to the project
Here are the three changes we will make to the project:
- Change the background color to blue.
- Change the button background color to orange.
- Change the title text to "Awesome BMC calculator"
Create a new Git branch named "change-project-ui", so all the changes will happen there.
git checkout -b change-project-ui
Open the project in your favorite editor, then open the file src/main/resources/templates/index.html and replace the code with the one below:
<!DOCTYPE html>
<html lang="en" xmlns:th="http://wwww.thymeleaf.org">
<head>
    <meta charset="UTF-8">
    <link rel="stylesheet" th:href="@{/css/main.css}" />
    <title>Awesome BMC calculator</title>
</head>
<body class="bg-blue-300 w-full h-screen">
    <div class="container px-5 sm:py-24 md:py-24 lg:py-24 xl:py-24 mx-auto flex flex-col">
        <div th:if="${result}"
            class="lg:w-1/3 md:w-1/2 w-full mx-auto my-8 bg-green-200 border-green-600 by text-green-600 border-l-4 p-4"
            role="alert"
        >
            <p>
                Your BMI is <b th:text="${result.bmi}">0</b> which corresponds to <b th:text="${result.description}">None</b>
            </p>
        </div>
        <form
            th:action="@{/}"
            method="post"
            th:object="${userInfo}"
        >
            <div class="lg:w-1/3 md:w-1/2 bg-white rounded-lg p-8 flex flex-col mx-auto w-full mt-10 md:mt-0 relative z-10 shadow-md">
                <h2 class="text-gray-900 text-lg mb-4 font-medium title-font">Awesome BMC calculator</h2>
                <p class="leading-relaxed mb-5 text-gray-600">Enter your weight and your height to see where you stand</p>

                <div class="relative mb-4">
                    <label for="weight" class="leading-7 font-bold text-sm text-gray-600">Weight (kg):</label>
                    <input
                        type="number" id="weight" name="weight" step="1" min="0" max="800"
                        th:field="*{weight}"
                        class="w-full bg-white rounded border border-gray-300 focus:border-indigo-500 focus:ring-2 focus:ring-indigo-200 text-base outline-none text-gray-700 py-1 px-3 leading-8 transition-colors duration-200 ease-in-out"
                    />
                    <span class="text-xs text-red-600" th:each="error : ${#fields.errors('weight')}" th:text="${error}">
                        The value must be between 2 and 800
                    </span>
                </div>
                <div class="relative mt-4 mb-10">
                    <label for="height" class="leading-7 font-bold text-sm text-gray-600">Height (cm):</label>
                    <input type="number" id="height" name="height" step="1" min="20" max="250"
                        th:field="*{height}"
                        class="w-full bg-white rounded border border-gray-300 focus:border-indigo-500 focus:ring-2 focus:ring-indigo-200 text-base outline-none text-gray-700 py-1 px-3 leading-8 transition-colors duration-200 ease-in-out"
                    />

                    <span class="text-xs text-red-600" th:each="error : ${#fields.errors('height')}" th:text="${error}">
                        The value must be between 40 and 250
                    </span>
                </div>

                <button type="submit" class="text-white bg-orange-500 border-0 py-2 px-6 focus:outline-none hover:bg-blue-600 rounded text-md">Calculate</button>
            </div>
        </form>
    </div>
</body>
</html>
Run the command below to generate the CSS file from the Tailwind CSS class names, and then start the SpringBoot application:
yarn build:css

mvn spring-boot:run
Navigate to the URL http://localhost:8000; you will see the changes on the application.
The next step will configure everything needed to automatically deploy the changes in the production application accessible at https://bmi.tericcabrel.com.
Initialize the GitHub Actions file
The GitHub Actions file is stored in the folder .github/workflows. Inside this folder, you can organize your workflow file as you want.
Let's create a file named bmi-workflow.yaml and add the code below:
name: BMI application workflow
on:
  pull_request:
    branches: [ main ]
    paths:
      - 'src/**'
      - '.github/workflows/app-workflow.yaml'
  push:
    branches: [ main ]
    paths:
      - 'src/**'
      - '.github/workflows/app-workflow.yaml'

jobs:
In the above code, we define the name of the Github Action; you can give whatever you want that helps you quickly identify the action when it is running.
We define two events that trigger the GitHub Action.
- pull_request: when we create a pull request from any branch to the main branch.
- push: when we push from the local main branch to the remote one.
But we added another constraint which is: for these two events, only trigger the action if the files edited is the GitHub Action file itself or any file under the folder src.
With this restriction, we prevent running the action uselessly; for example, when you edit the README file, there is no need to build a Docker and redeploy the application.
For other available events, check out the official documentation link.
The jobs properties will hold all the pipeline jobs we need. Check out this link to learn more about GitHub Action jobs.
Define GitHub Action jobs
We need three pipeline jobs for this project; they will be executed sequentially, and some will depend on others.
It is possible to have many jobs running parallel depending on your need. Let's write the first job.
The "Project build" job
This job will have the following responsibilities:
- Cloning the project into the GitHub VM instance running our action
- Set the Java version to use (Java 11 here from the
adoptdistribution) - Install the Maven dependencies and cache them so we can reuse them later; it will speed up the dependencies installation step
- Run the tests
Update the file bmi-workflow.yaml to add the code below under the "jobs" property:
jobs:
  project-build:
    runs-on: ubuntu-latest

    steps:
      - uses: actions/checkout@v3

      - name: Set up JDK 11
        uses: actions/setup-java@v3
        with:
          java-version: '11'
          distribution: 'adopt'

      - name: Set up the Maven dependencies caching
        uses: actions/cache@v3
        with:
          path: ~/.m2
          key: ${{ runner.os }}-m2-${{ hashFiles('**/pom.xml') }}
          restore-keys: ${{ runner.os }}-m2

      - name: Install Maven dependencies
        run: mvn install

      - name: Run tests
        run: mvn --batch-mode --update-snapshots verify
The job must run on the latest version of Ubuntu. About the dependencies caching, the cache is invalidated when the pom.xml change.
The "Docker build and push" job
This job has two constraints:
- It depends on the previous job because we don't need to execute this one if the previous job fails.
- It must be triggered when the branch is merged on the
mainbranch. This avoids building a new Docker image whenever you create or update a pull request. Also, if the code is merged on the main branch, it usually means the code integrity is sane.
Here are the responsibilities of this job:
- Cloning the project into the GitHub VM instance running our action.
- Set the Java version to use (Java 11 here from the
adoptdistribution) - Install the Maven dependencies and cache them.
- Build the Docker image and publish it to the Docker Hub registry
Update the file bmi-workflow.yaml to add the code below after the "project-build" job:
  docker-build:
    if: ${{ github.ref == 'refs/heads/main' }}
    runs-on: ubuntu-latest
    needs:
      - project-build
    steps:
      - uses: actions/checkout@v3

      - name: Set up JDK 11
        uses: actions/setup-java@v3
        with:
          java-version: '11'
          distribution: 'adopt'

      - name: Cache Maven packages
        uses: actions/cache@v3
        with:
          path: ~/.m2
          key: ${{ runner.os }}-m2-${{ hashFiles('**/pom.xml') }}
          restore-keys: ${{ runner.os }}-m2

      - name: Set up QEMU
        uses: docker/setup-qemu-action@v2

      - name: Set up Docker Buildx
        uses: docker/setup-buildx-action@v2

      - name: Dashboard to Docker Hub
        uses: docker/login-action@v2
        with:
          username: ${{ secrets.DOCKERHUB_USERNAME }}
          password: ${{ secrets.DOCKERHUB_TOKEN }}

      - name: Build and push
        uses: docker/build-push-action@v4
        with:
          context: .
          file: Dockerfile-app
          push: true
          tags: tericcabrel/bmi:latest
To build the Docker image, we use the predefined GitHub action that you can find in the GitHub Action Marketplace.
We provide the credentials to the Docker Hub and the location of the Dockerfile; the Action's job handles the rest.
Below is the code that defines the two constraints enumerated in the above code.
if: ${{ github.ref == 'refs/heads/main' }}
needs:
  - project-build
The "deployment" job
This job has two constraints as the previous one:
- It depends on the
docker-buildjob since we don't need to deploy anything if no new image is published to the Docker Hub. - It must be triggered when the branch is merged on the
mainbranch.
Here are the responsibilities of this job:
- Create a file and store the server's private key inside.
- Execute the deployment script
Update the file bmi-workflow.yaml to add the code below after the "docker-build" job:
  deploy:
    if: ${{ github.ref == 'refs/heads/main' }}
    runs-on: ubuntu-latest
    needs:
      - docker-build
    steps:
      - uses: actions/checkout@v3
      - name: Add Server key
        run: |
          touch key.txt && echo "${{ secrets.SERVER_KEY }}" > key.txt
          chmod 600 key.txt
      - name: Deploy the application
        env:
          SERVER_HOST: ${{ secrets.SERVER_HOST }}
          SERVER_PORT: ${{ secrets.SERVER_PORT }}
          SERVER_USER: ${{ secrets.SERVER_USER }}
        run: |
          set -e
          ./deploy.sh
The deployment script
This script will perform the following tasks:
- Connect to the server using the private SSH key
- Pull the Docker image from the Docker Hub registry
- Stop the container if it is running
- Start a new container using the latest Docker image.
In the project root directory, create a file named deploy.sh and add the code below:
#!/bin/bash

start=$(date +"%s")

ssh -p ${SERVER_PORT} ${SERVER_USER}@${SERVER_HOST} -i key.txt -t -t -o StrictHostKeyChecking=no << 'ENDSSH'
docker pull tericcabrel/bmi:latest

CONTAINER_NAME=bmiapp
if [ "$(docker ps -qa -f name=$CONTAINER_NAME)" ]; then
    if [ "$(docker ps -q -f name=$CONTAINER_NAME)" ]; then
        echo "Container is running -> stopping it..."
        docker stop $CONTAINER_NAME;
    fi
fi

docker run -d --rm -p 8000:8000 --name $CONTAINER_NAME tericcabrel/bmi:latest

exit
ENDSSH

if [ $? -eq 0 ]; then
  exit 0
else
  exit 1
fi

end=$(date +"%s")

diff=$(($end - $start))

echo "Deployed in : ${diff}s"
The most important part of this code is the following block:
ssh -p ${SERVER_PORT} ${SERVER_USER}@${SERVER_HOST} -i key.txt -t -t -o StrictHostKeyChecking=no << 'ENDSSH'


ENDSSH
This code establishes an SSH connection to the server where your application is running and executes all the commands between << 'ENDSSH' and ENDSSH.
The flag -o StrictHostKeyChecking=no is very important to disable the SSH host key verification. You know that question you get when connecting to a server for the first time?
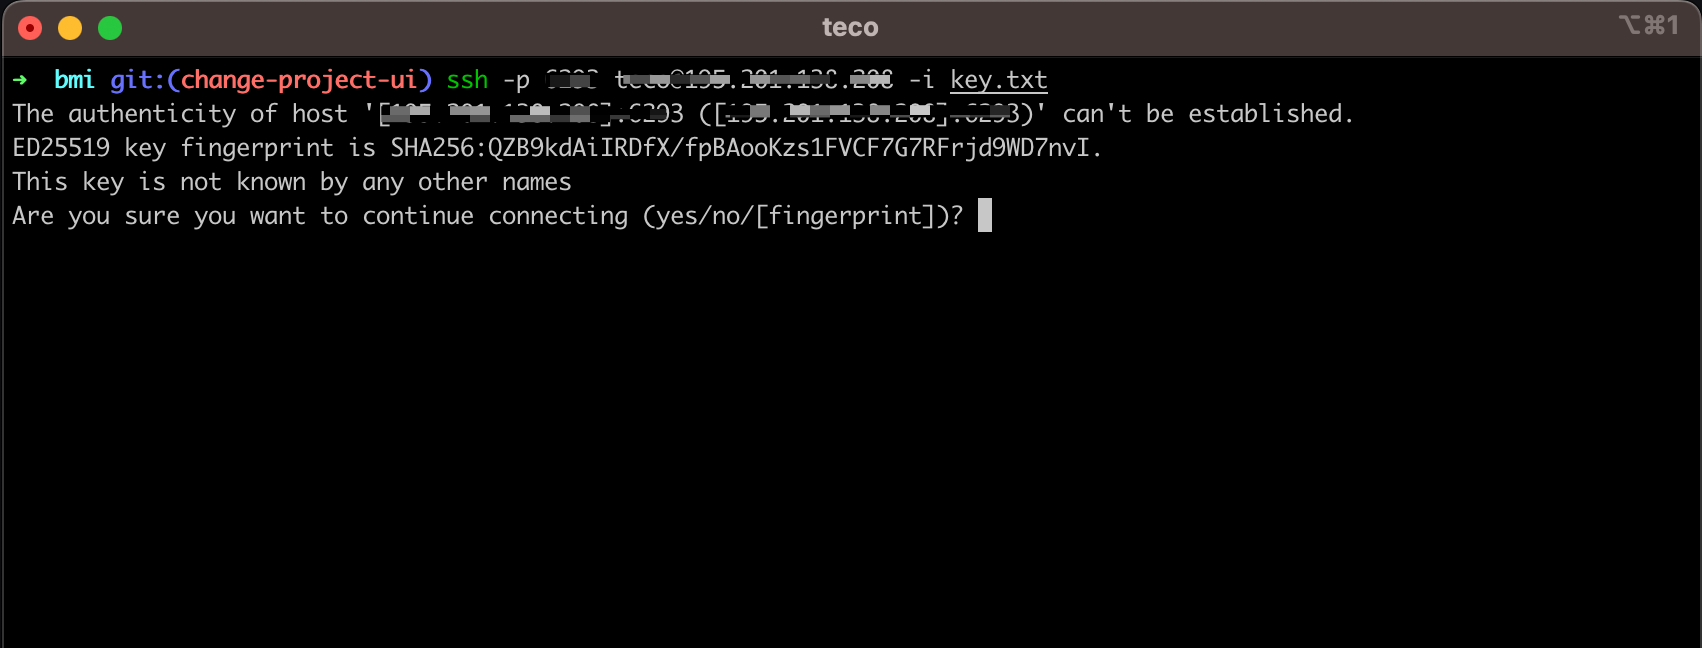
This action requires user input, yet in an automated system such as the VM instance of a CI job, we cannot interact with the terminal (and we don't want to). Adding the option above, skip this SSH host key verification.
Make the script executable using the following command:
chmod +x deploy.sh
Test the GitHub Actions
In the GitHub Action workflow file, we used some secrets variables (${{ secrets.DOCKERHUB_USERNAME }}, ${{ secrets.SERVER_HOST }}, etc...) that we must define in the GitHub repository so they are available when the Action jobs are running.
This table lists the variable to define:
| Variable name | Description |
|---|---|
| DOCKERHUB_USERNAME | The username of the Docker Hub user |
| DOCKERHUB_TOKEN | The personal token of the Docker Hub user. I show how to generate it in this post |
| SERVER_HOST | The IP address of the server where your application is running on Docker |
| SERVER_PORT | The server SSH port. It is port 22 by default |
| SERVER_USER | The user to connect to the server with |
| SERVER_KEY | The private SSH key of the server |
To generate the private SSH key of the server, log into the server and run the command ssh-keygen, follow the instructions, and you will find the private key in the folder $HOME/.ssh/id_rsa.
Run the command cat $HOME/.ssh/id_rsa and copy the content printed in the terminal.
Adding GitHub Actions secrets
Once you have those values, follow the video below that shows how to add the DOCKERHUB_USERNAME secret. Repeat it on your side to add your GitHub Actions secrets.
View the change in production
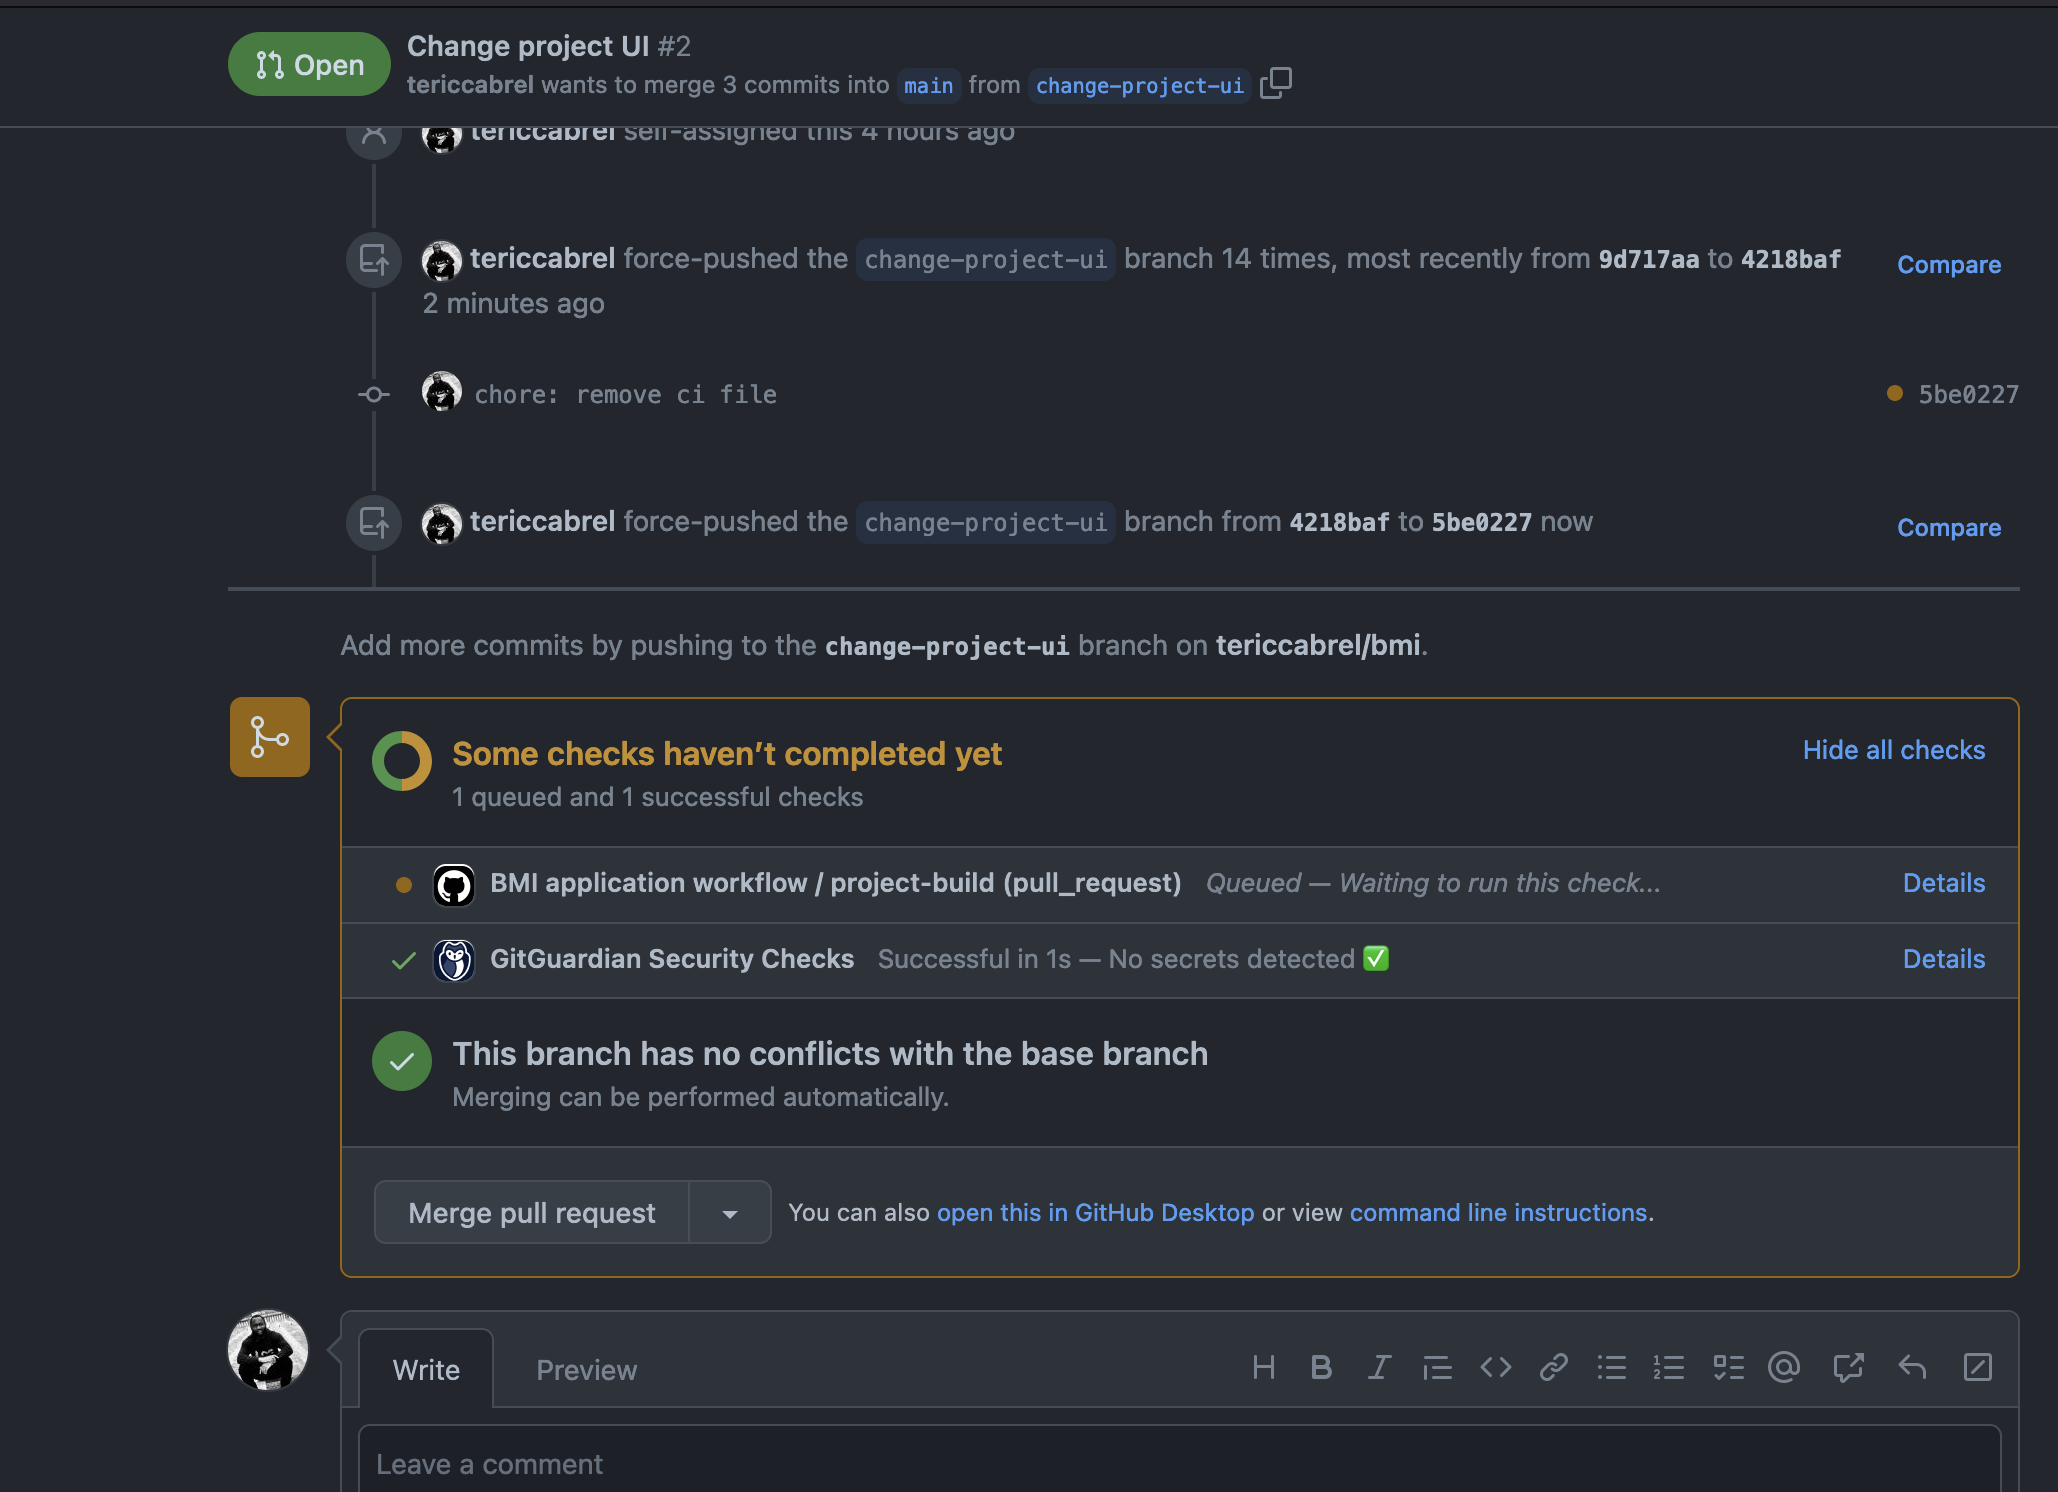
Create a commit of the changes, push the changes to the remote repository, and go to the GitHub repository to create a pull request.
Once the pull request is created, scroll to the bottom, and you will see a running GitHub Action having the name "BMI application workflow".
If you click on the link labeled as "Details", on the page displayed, you click on the menu "Summary" located at the top left, you will see the following schema of your GitHub Actions workflow:
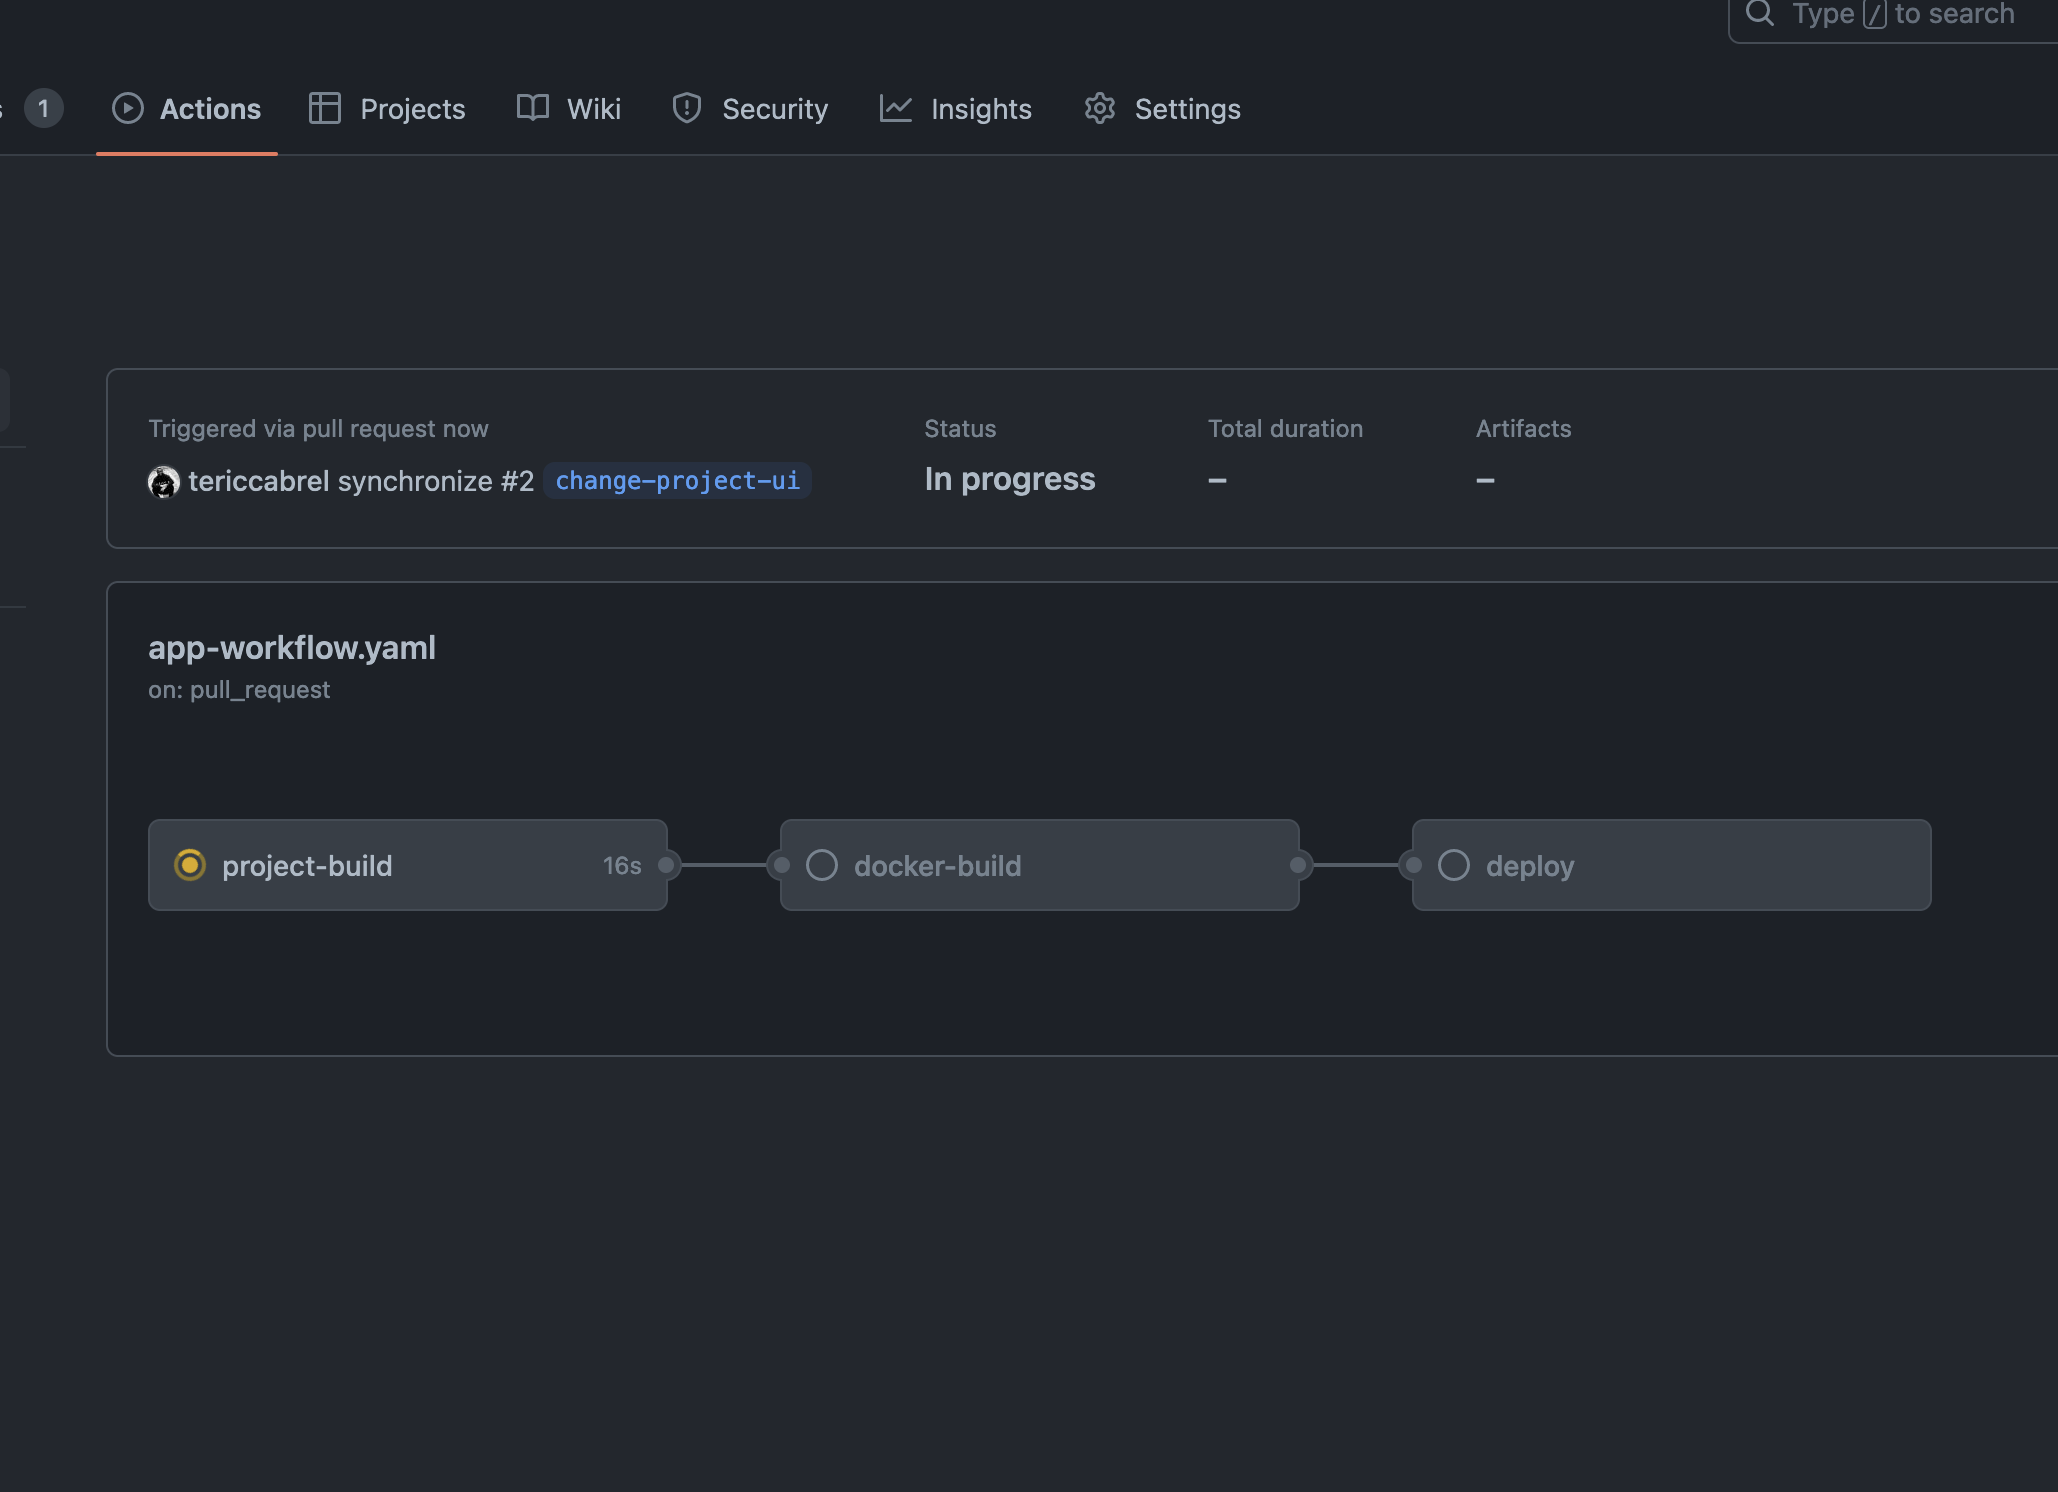
Only the project-build is running, and the two others are disabled because they are waiting for the project-build job to finish.
Once the project-build job succeed, merge the pull request to master, and wait for the pipeline to finish. You know it when all the Action jobs are green, as in this picture:
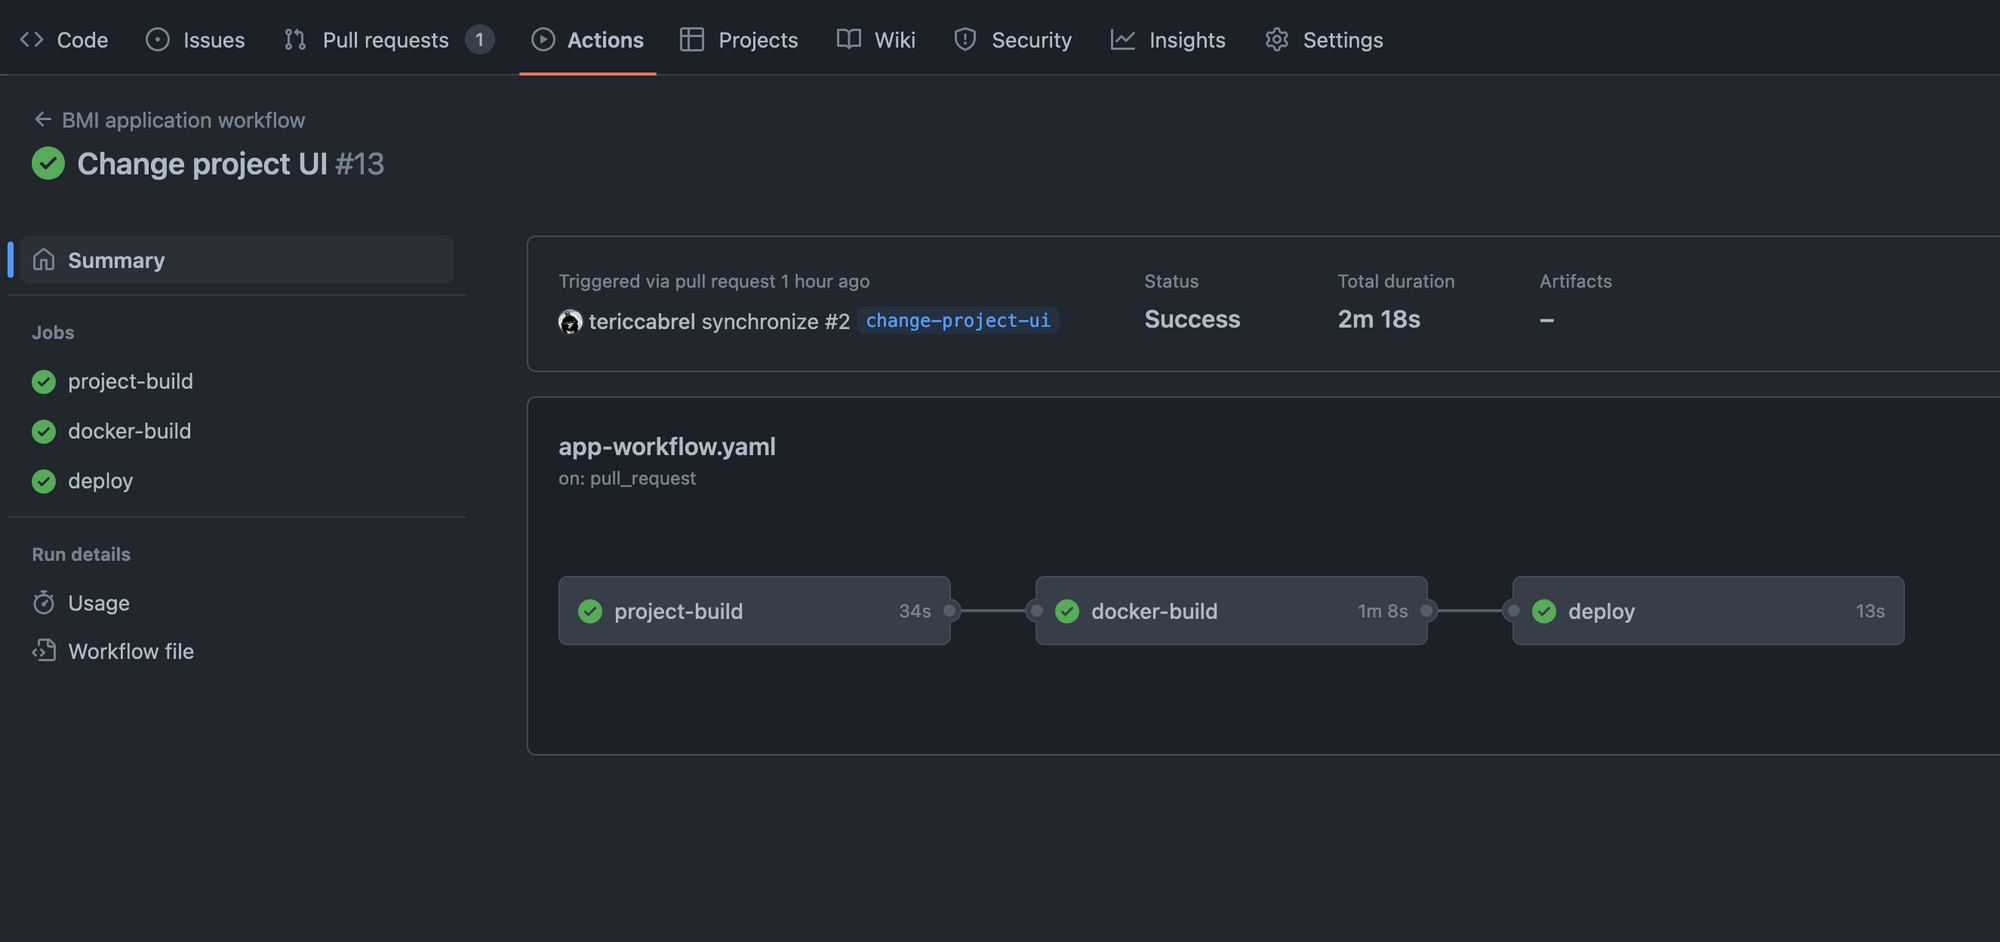
Go to your project URL and verify the changes are present! If you changed the CSS or Javascript, perform a hard reload of the page to download cached assets.
We have an automated CI/CD pipeline to deploy our SpringBoot application.
Wrap up
Automating the deployment of an application has many benefits, such as a lower time to deliver features, catching bugs earlier before they reach the end user, preventing code regression, and giving a deterministic process of deploying the application in production.
GitHub Actions is great, easy to onboard, and has a generous free tier plan. You can still do many with GitHub Actions, so I advise you to check out the documentation and the marketplace.
You can find the code source on the GitHub repository.
Follow me on Twitter or subscribe to my newsletter to avoid missing the upcoming posts and the tips and tricks I occasionally share.