
Deploy a Spring Boot application with Docker and Nginx Reverse Proxy


Photo by Fern M. Lomibao / Unsplash
In this tutorial, we saw how to deploy the Spring Boot application as a JAR file. Ultimately, we highlighted some shortcomings in this process, especially regarding deployment management and application monitoring.
With Docker, you can make your application's build and package reproducible. This avoids the risk of a failed build due to changes on the computer performing the build (OS update, software update, etc.). The environment is not a concern when it comes to running the application.
You can efficiently run many containers for the same application, get better monitoring provided by Docker, and finally retrieve the application's logs by applying filters for granular search.
Prerequisites
To follow this tutorial, make sure you have these tools installed on your computer. This is only required to run and package the project locally:
- Java Development Kit 11 or later - Download's link
- Apache Maven 3.8+ - Download link
- Docker to create the image of the application - Download link
Prepare the Virtual Private Server
We will deploy the application on a server; if you already have one, you can proceed to the next step.
You can buy a VPS on Hetzner, which provides affordable server with good performance. The server running this blog and all my side projects are hosted here. Use my referral link to get €20 after you sign up.
Once you get the server, you will need to configure it so that it can make a web application accessible to the Internet. I wrote a post on a minimal configuration you need to do to host a Web application here.
 Eric Cabrel TIOGO
I use a Virtual Private Server running Ubuntu 20.04, so the instructions might differ if you use another Linux distribution.
Install the required software
To run the Docker image on the server, we need to install Docker, which will start a container and expose a port to access the application from the host. To make it accessible to the Internet, we will configure a reverse proxy using Nginx.
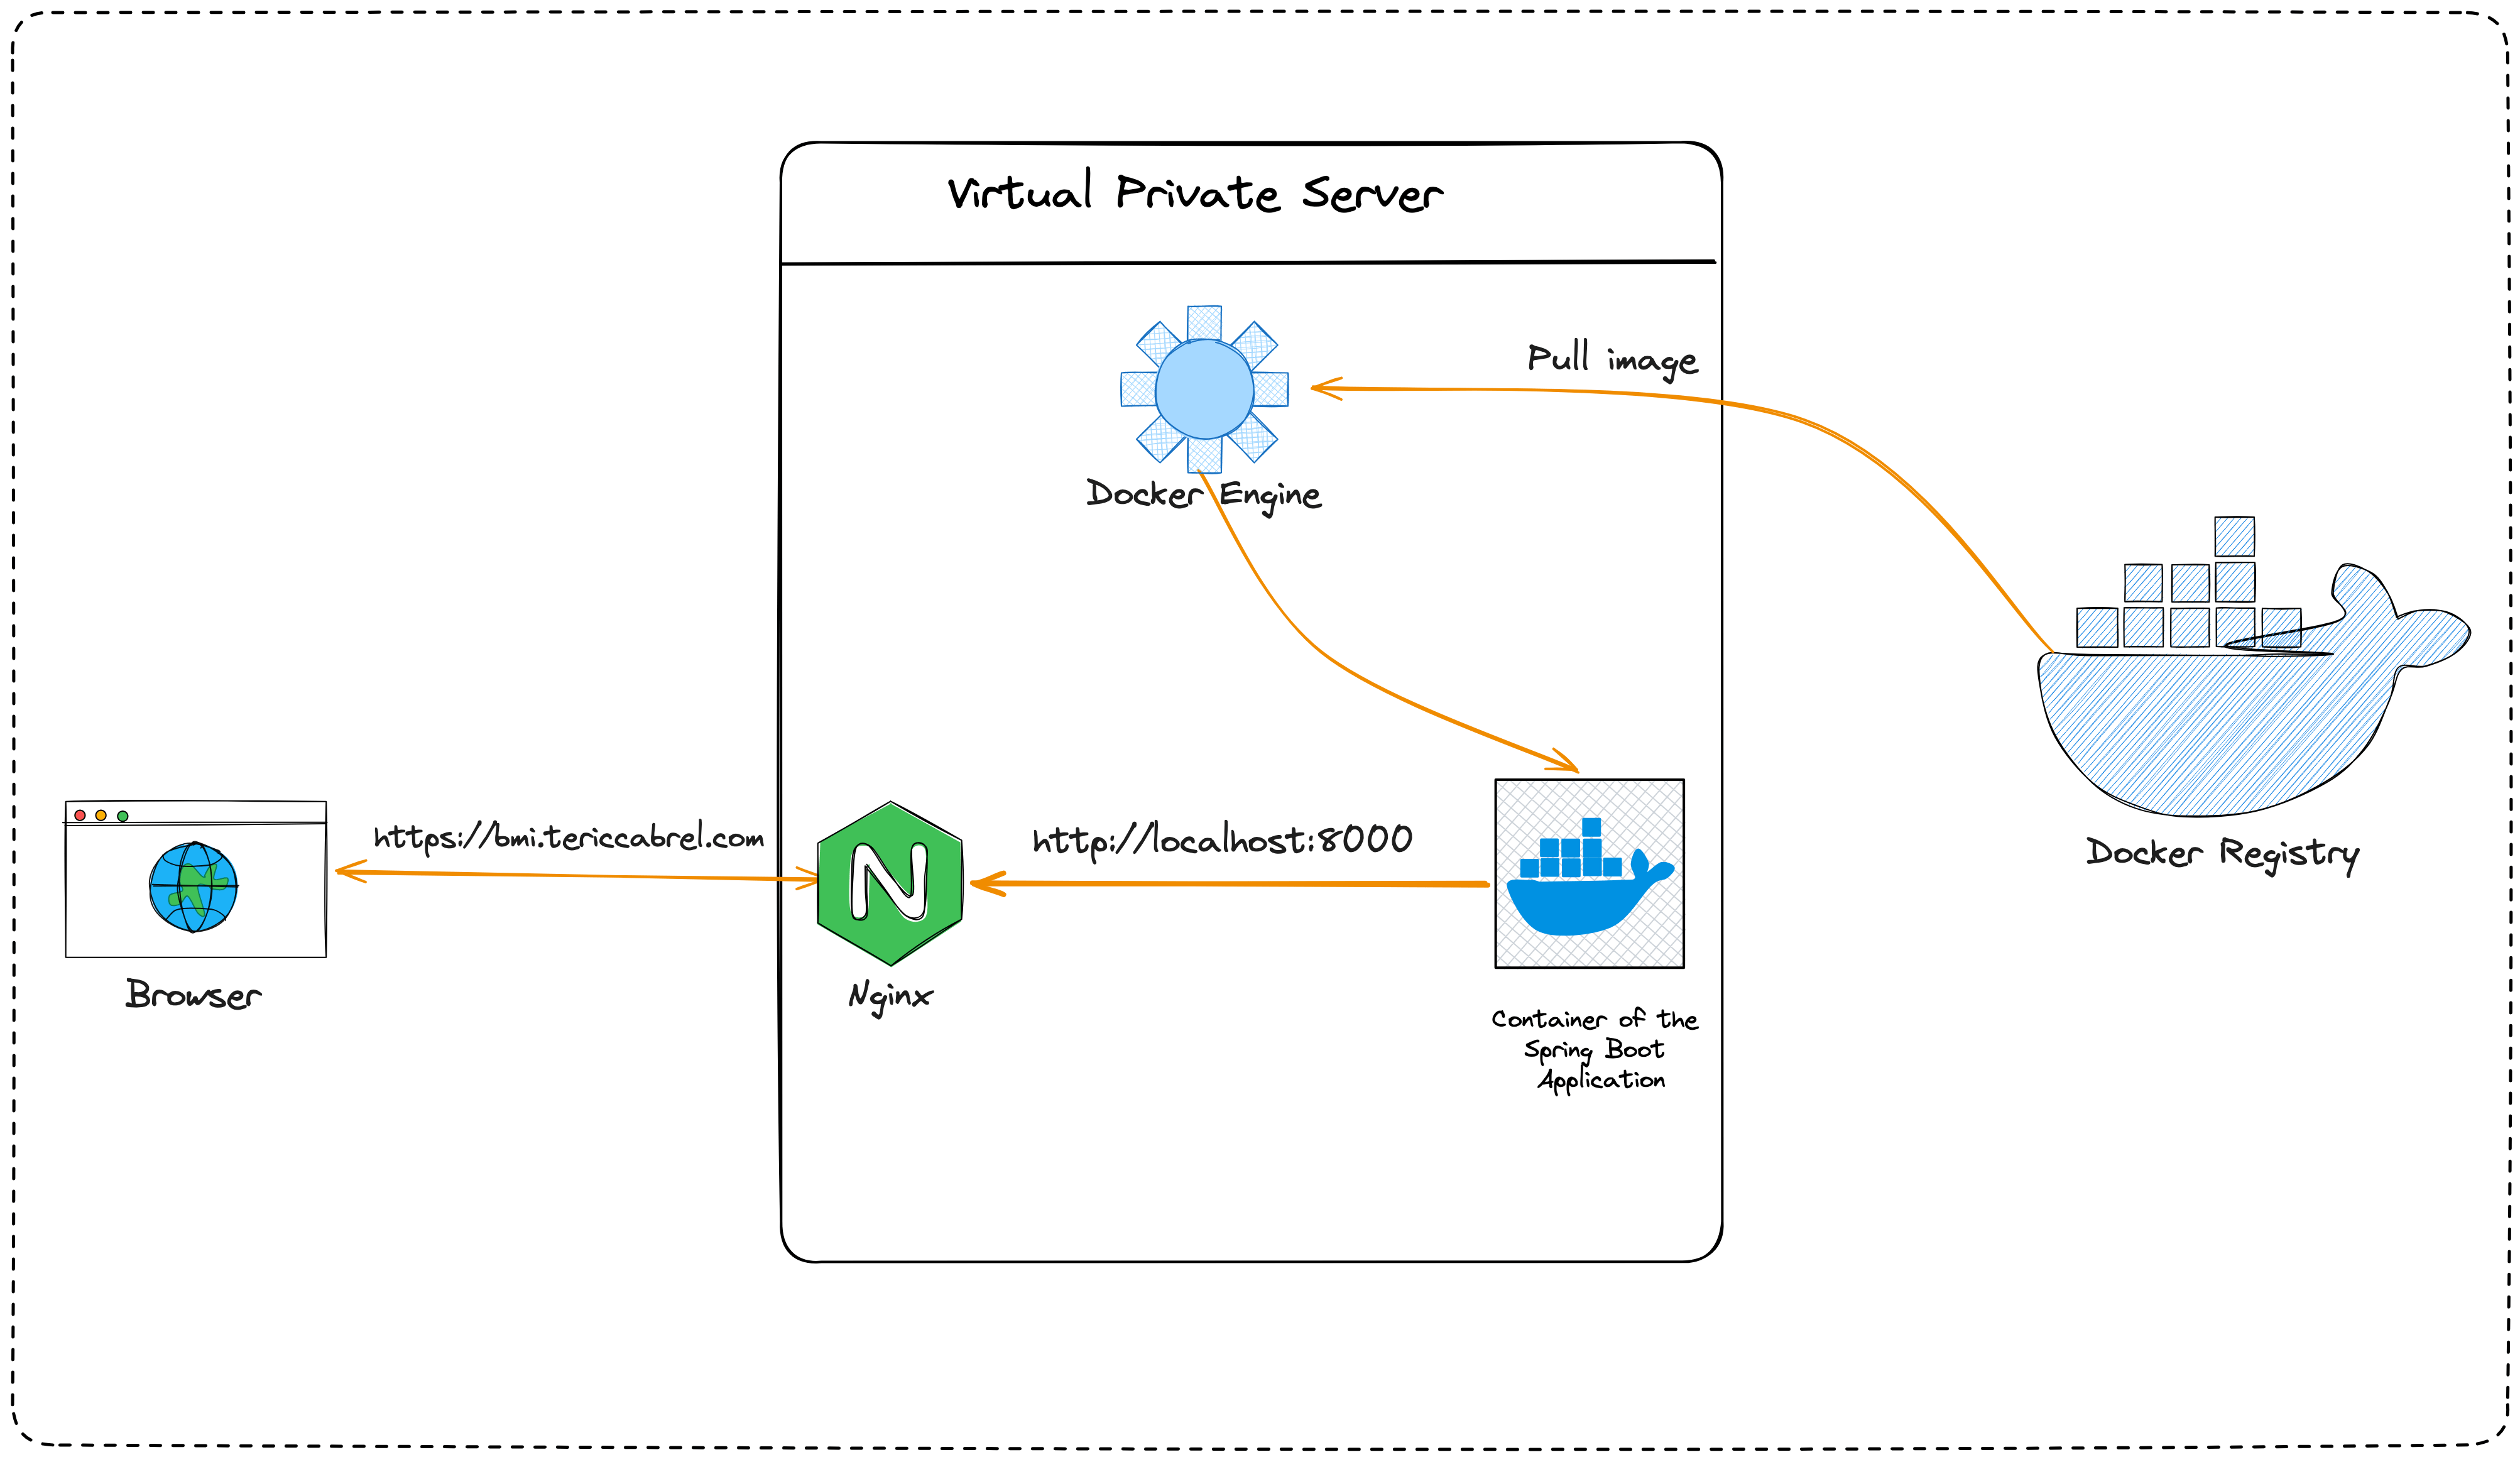
Install Docker on the server
Check out this article from Digital Ocean on how to install Docker on Ubuntu 20.04
 Brian Hogan
Install Nginx
Run the command below to install Nginx:
sudo apt update
sudo apt install nginx
Allow HTTP and HTTPS requests in the Firewall and forward them to the web server Nginx
sudo ufw allow 'Nginx Full'
Ensure Nginx is running by checking its status:
systemctl status nginx
Set up the project locally
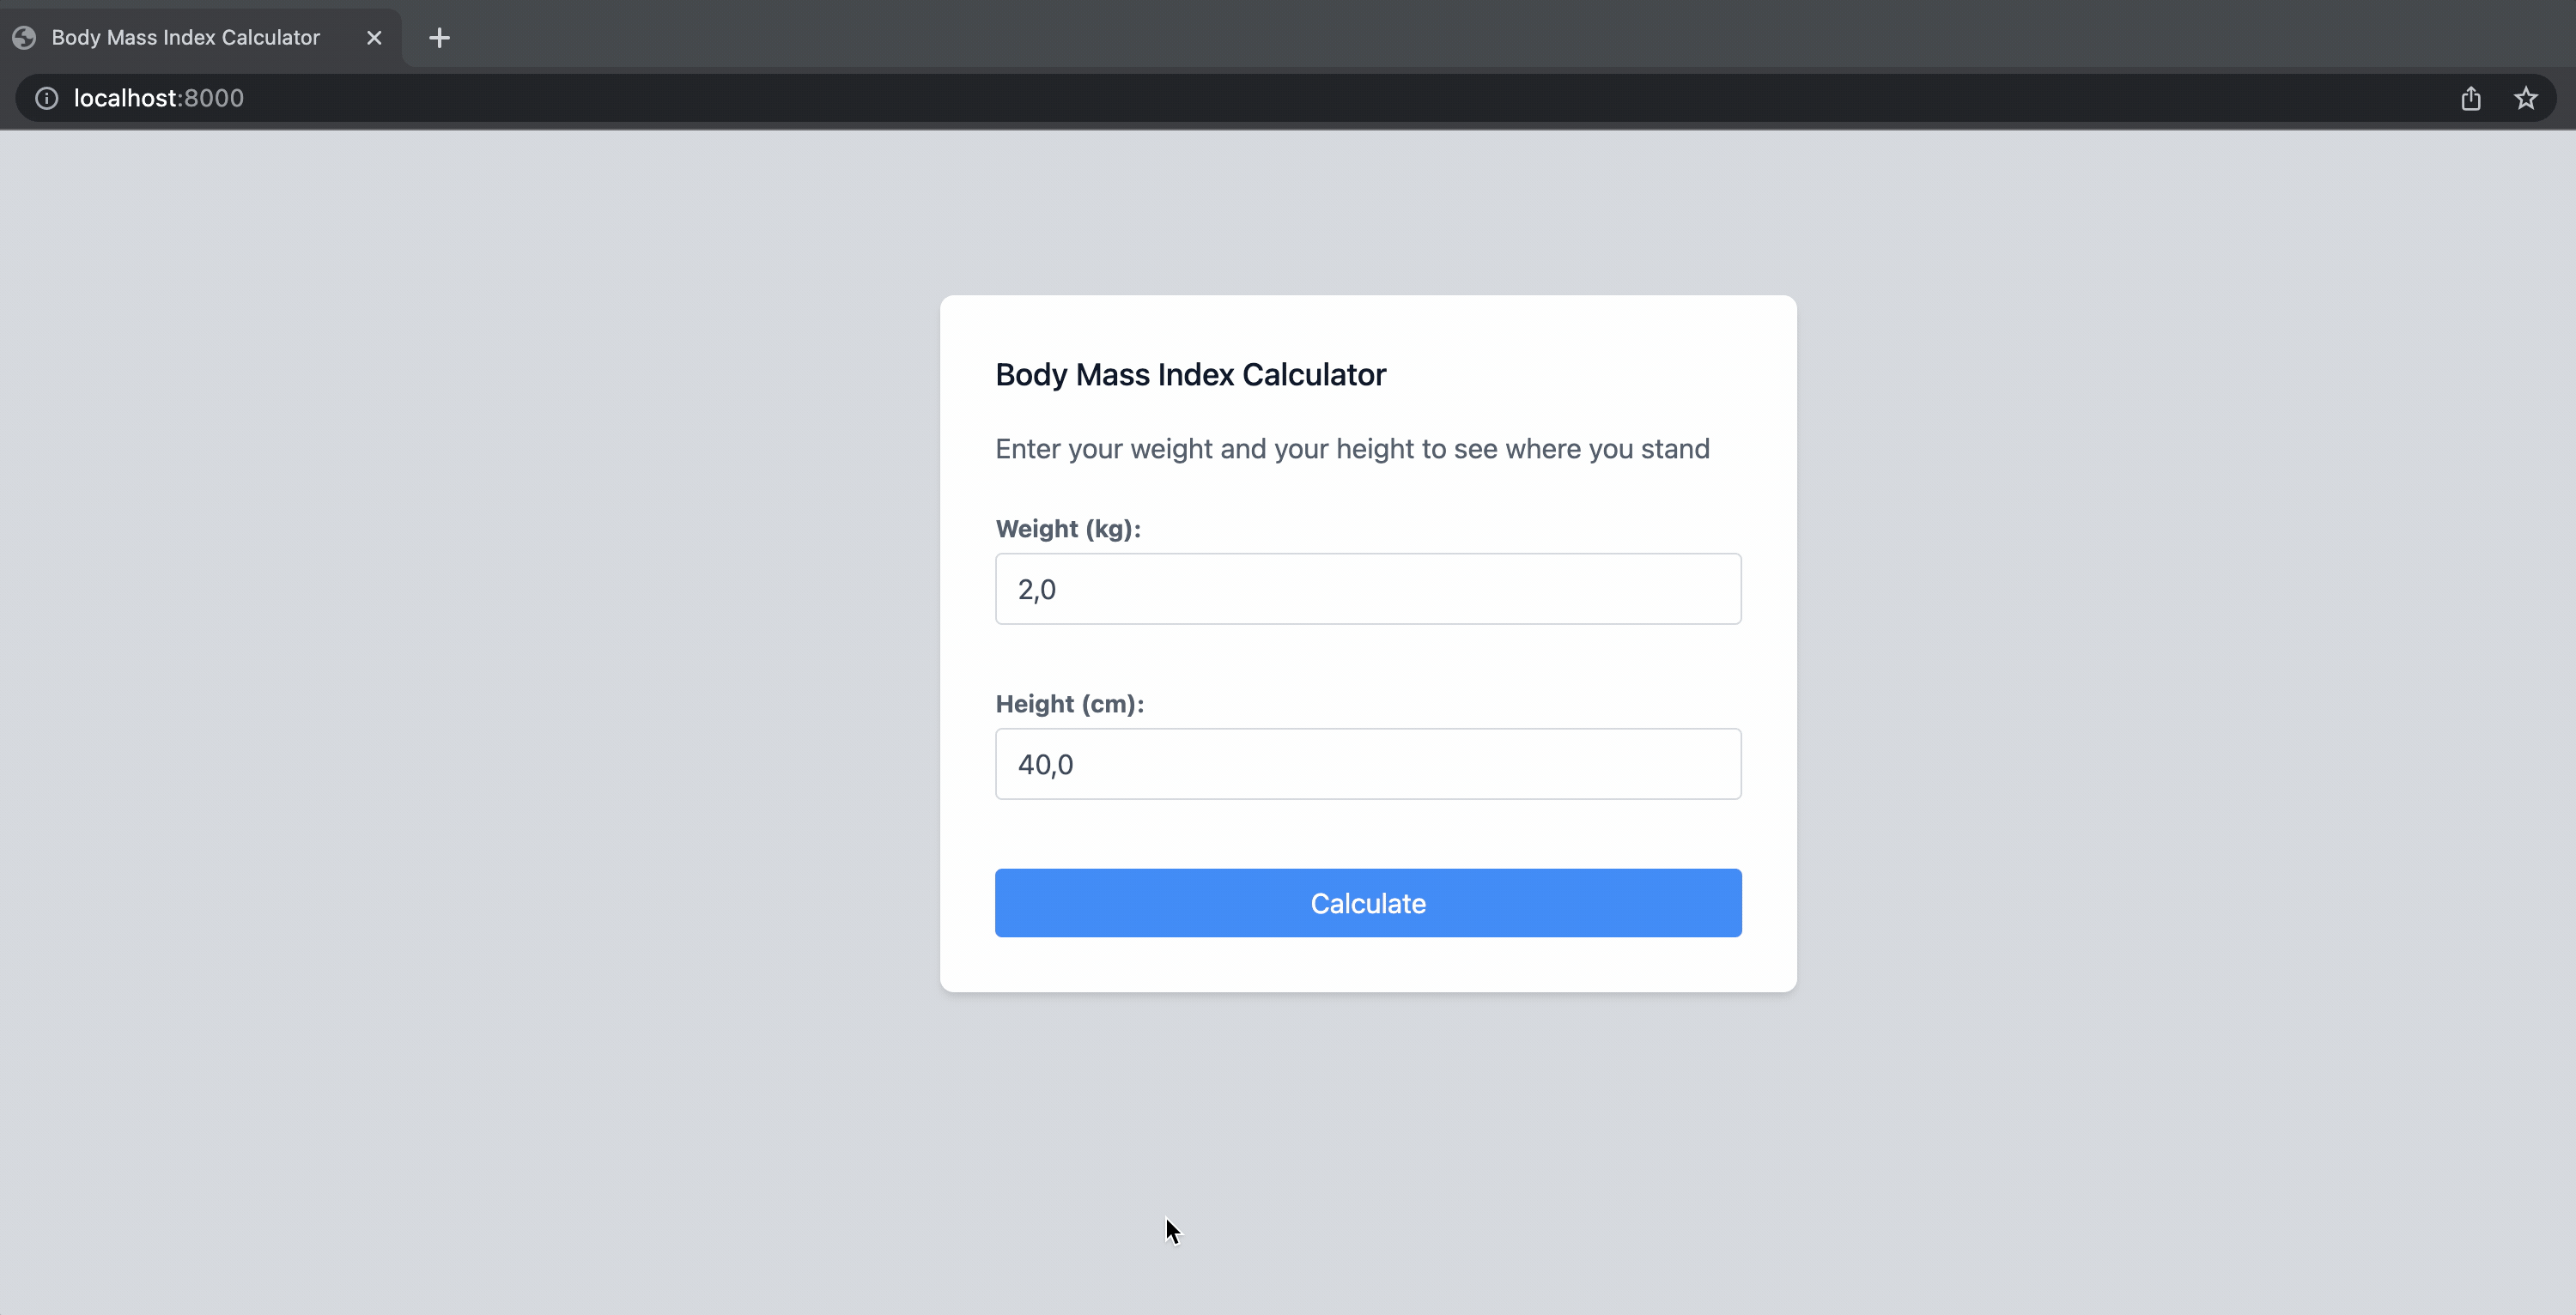
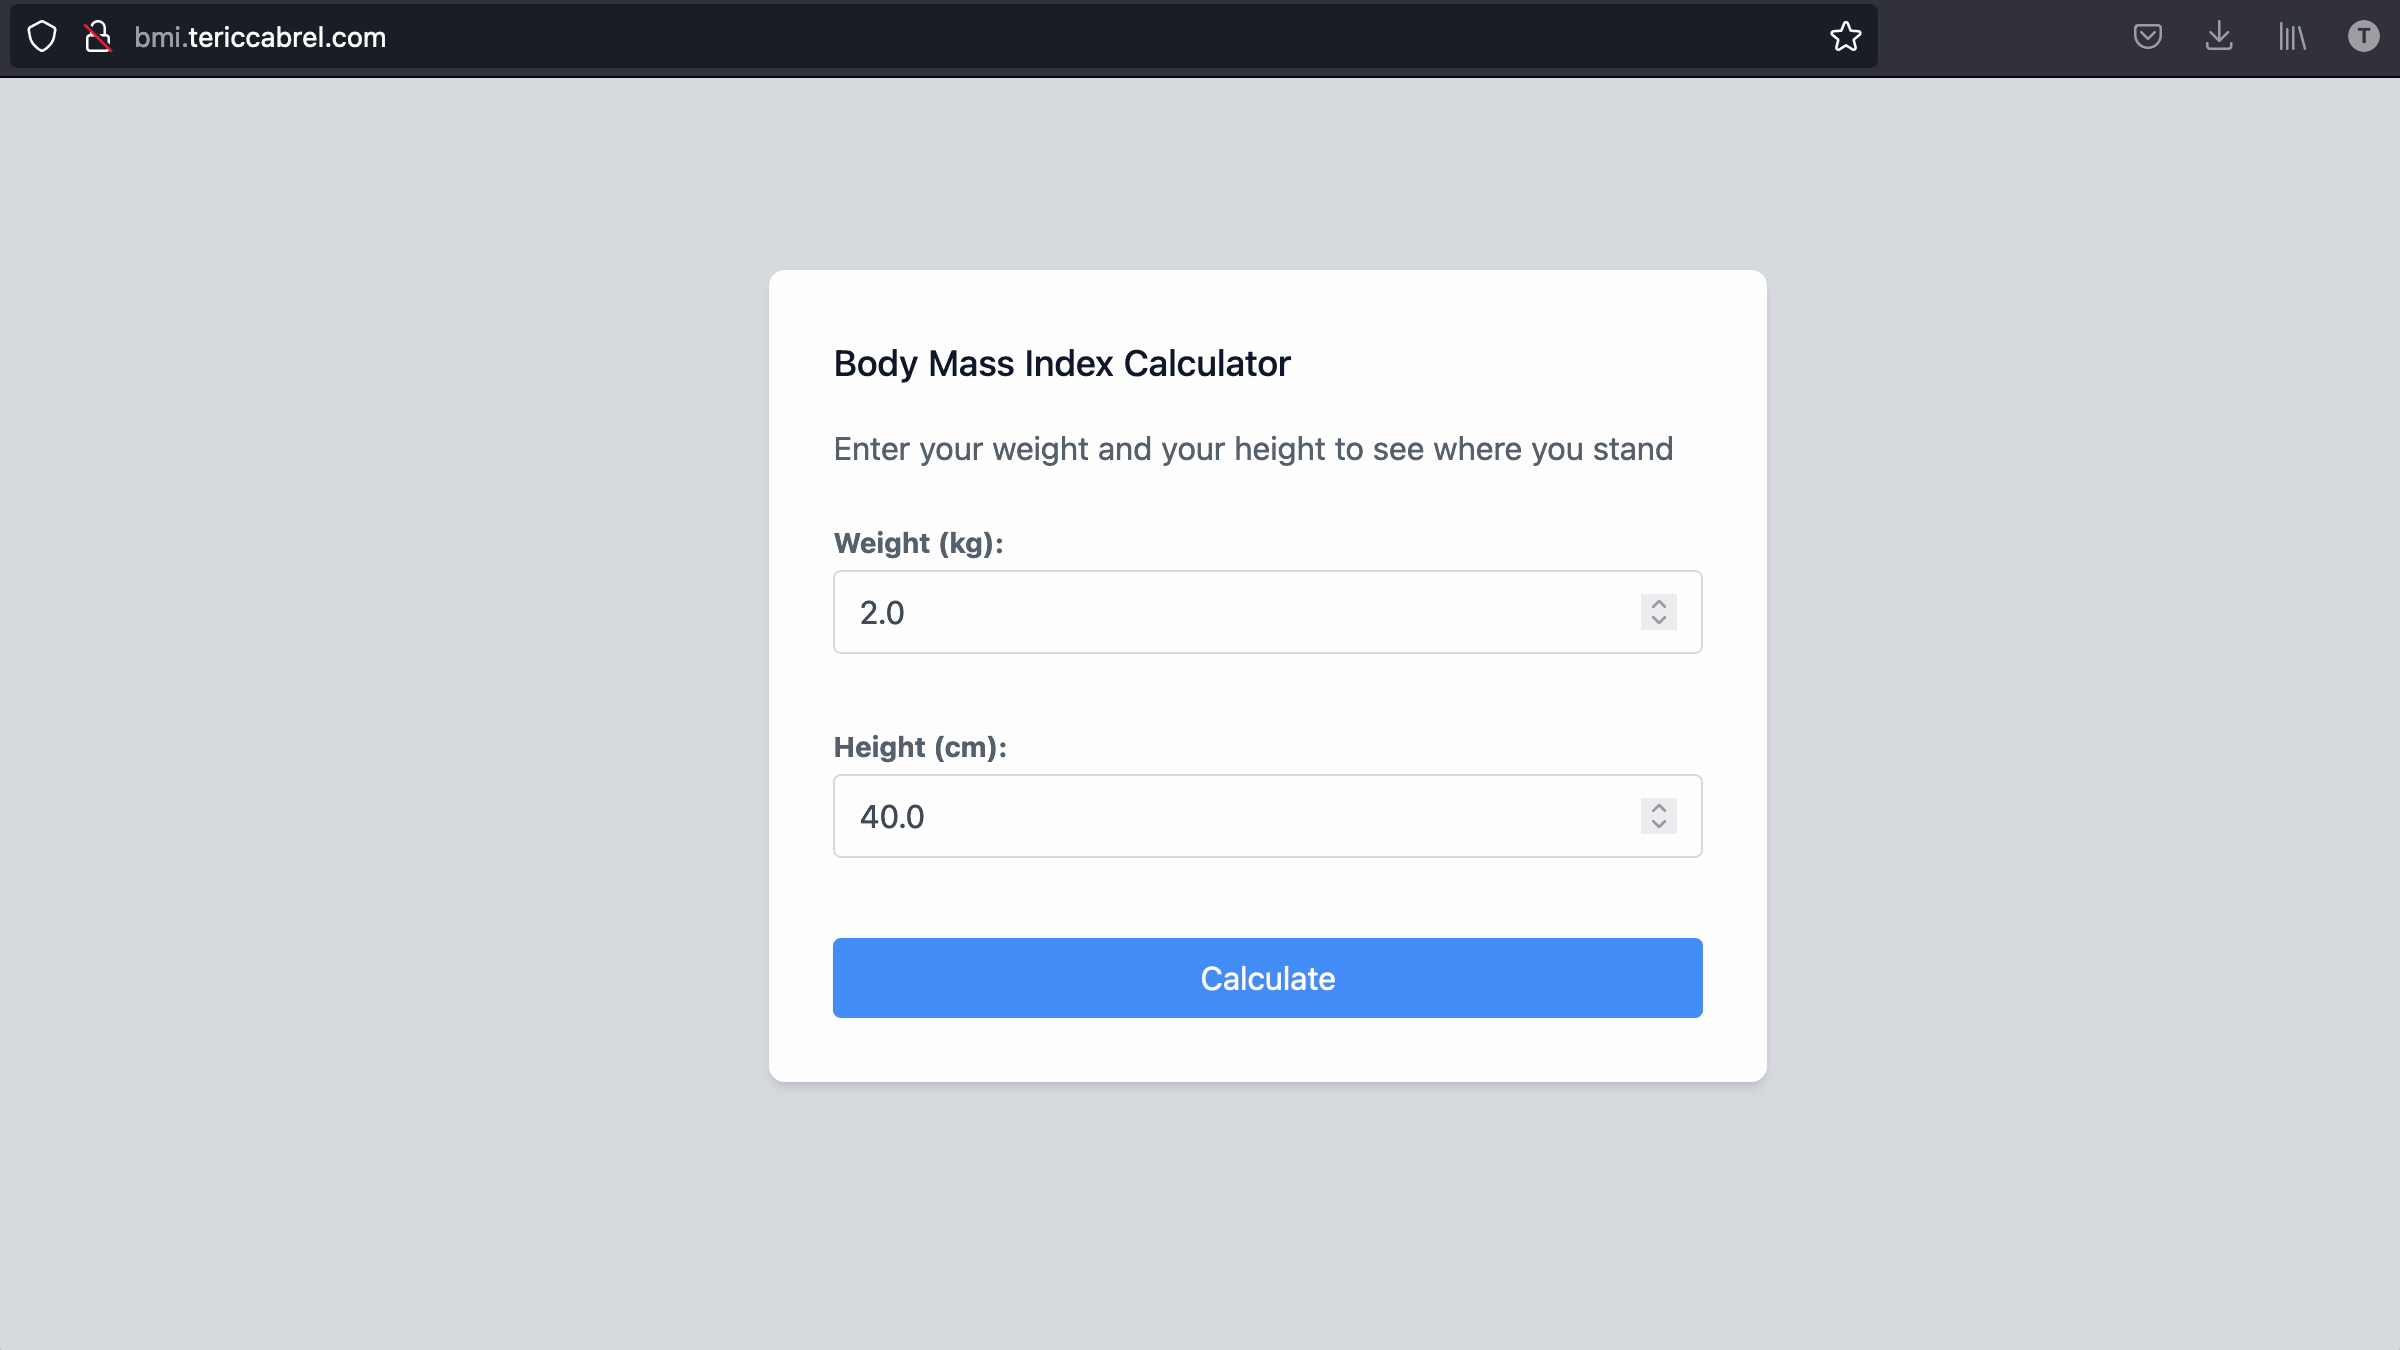
I prepared a Spring Boot project for this post. It is a web application for calculating the Body Mass Index. The source code is on my GitHub repository.
 tericcabrel
Let's clone it and run it locally.
git clone https://github.com/tericcabrel/bmi.git

cd bmi

mvn install

mvn spring-boot:run
Navigate to http://localhost:8000 on your browser.
Run the Spring Boot application locally.
Build the Docker image
In the root project directory, create a file named "Dockerfile" and add the code below:
FROM maven:3.8.3-jdk-11-slim AS build

RUN mkdir /project

COPY . /project

WORKDIR /project

RUN mvn clean package

FROM adoptopenjdk/openjdk11:jre-11.0.15_10-alpine

RUN mkdir /app

RUN addgroup -g 1001 -S tecogroup

RUN adduser -S teco -u 1001

COPY --from=build /project/target/bmi-1.0.jar /app/bmi.jar

WORKDIR /app

RUN chown -R teco:tecogroup /app

CMD java $JAVA_OPTS -jar bmi.jar
We are taking advantage of the Docker multistage building to make the image building agnostic from the computer and the operating system where the build is happening.
In the first stage, we use the Maven Docker image to build and package the application in a JAR file.
In the second stage, we use the OpenJDK Docker image for Java 11 from the Alpine distribution, which is lighter than the others. A container runs with the root user by default, which is good for security.
To prevent this, we create a User named "teco" along with the user group "tecogroup" and finally, we define it as the owner of everything inside the "app" folder.
Run the command below to build the Docker image:
docker build -t tericcabrel/bmi:v1 .
Run the Docker image locally
Run the command below to start a Docker container from the image:
docker run -it --rm -p 8000:8000 --name bmiapp tericcabrel/bmi:v1
We get the following output:
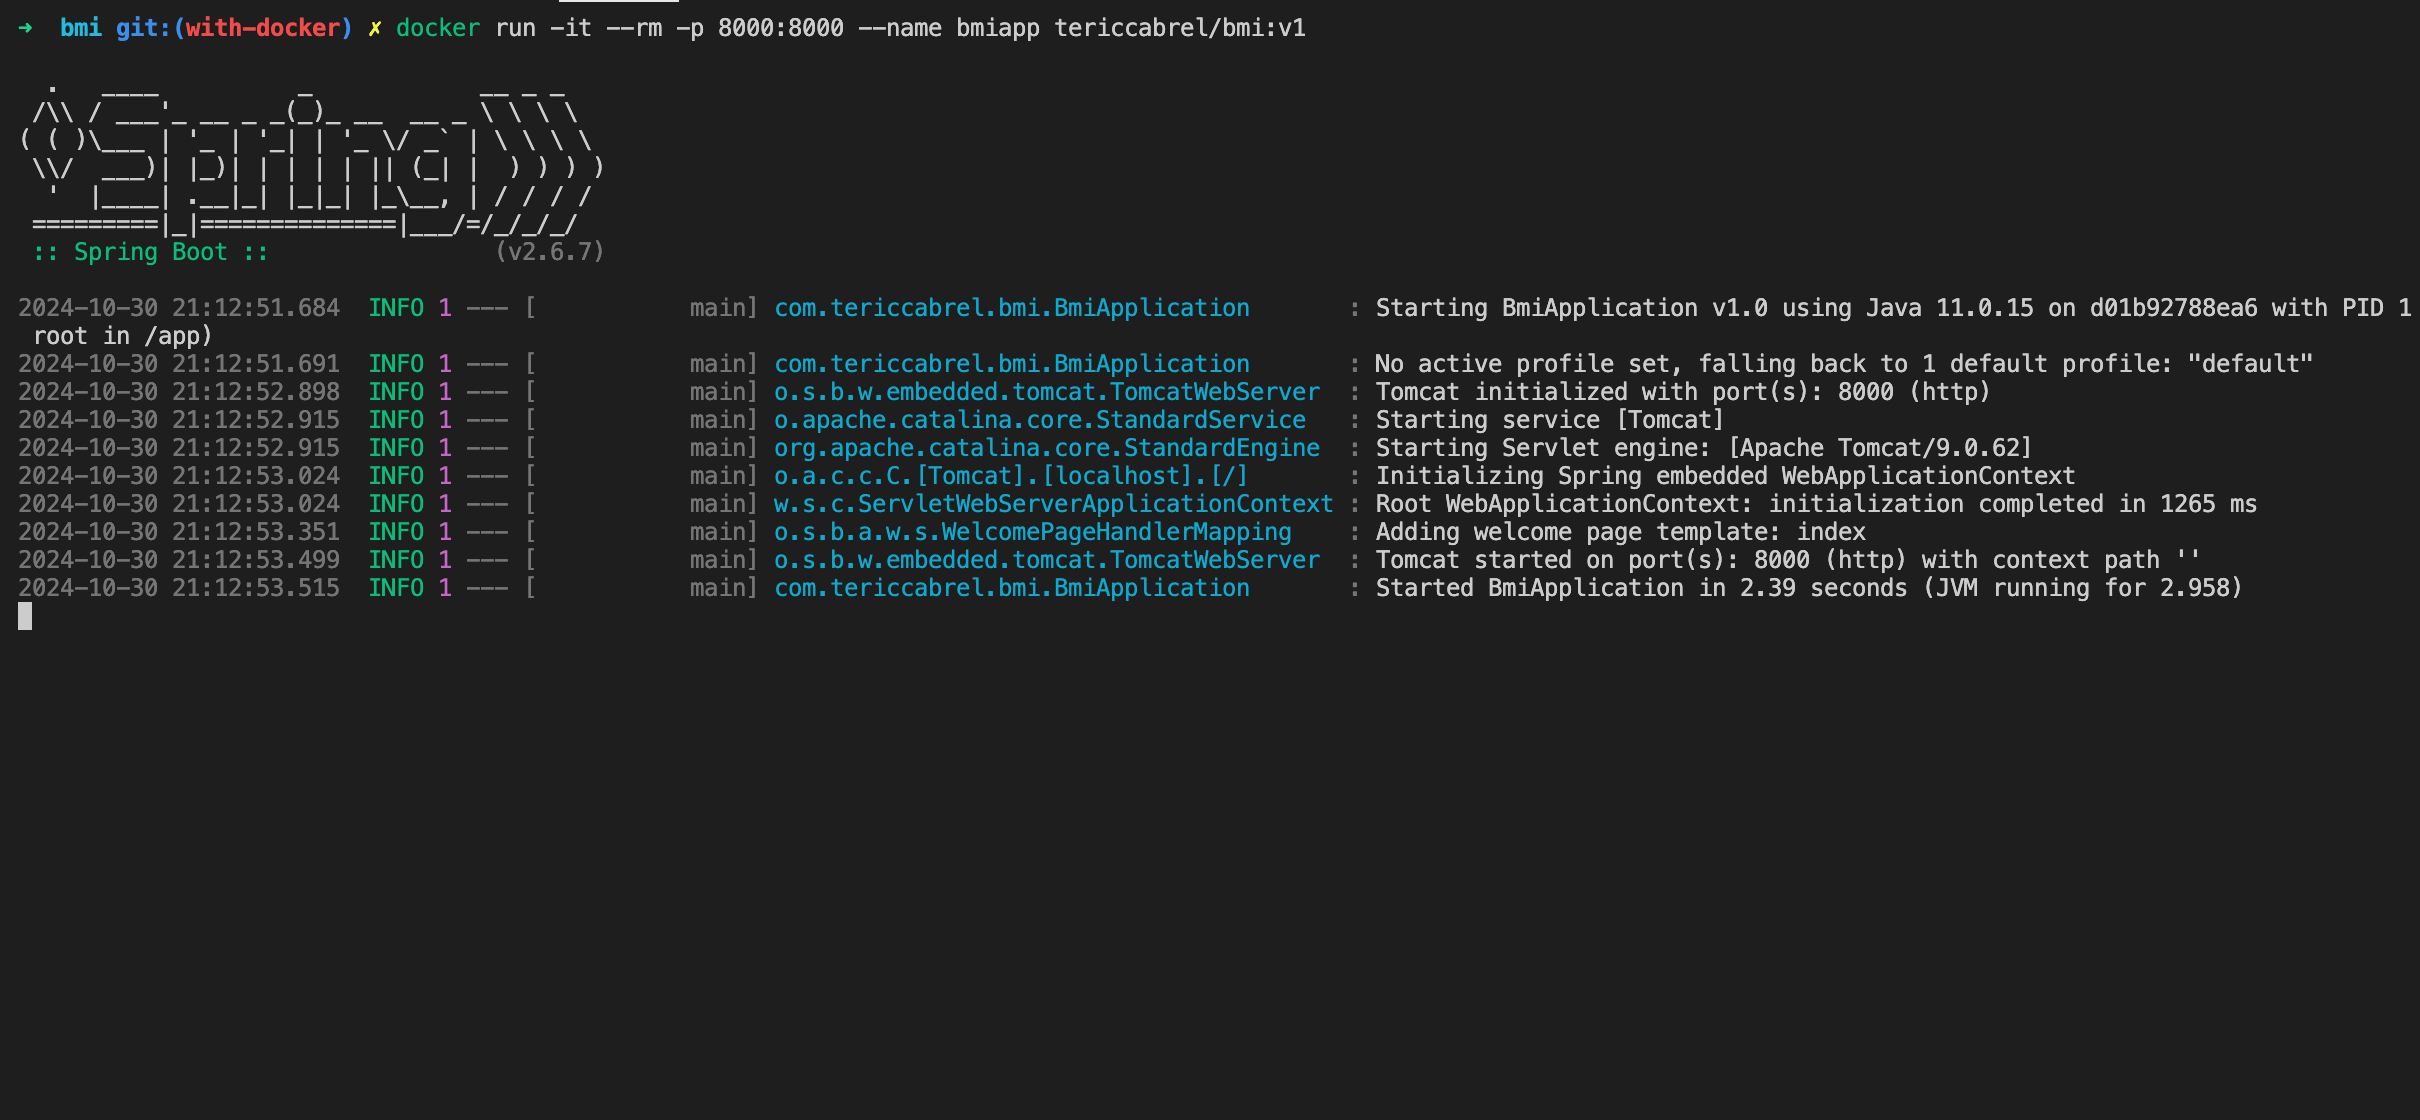
Navigate to http://localhost:8000 on your browser.
Push the image to the Docker Hub
We know the Docker image works, but it is still on our computer, and no one can pull it. We will push the image to the Docker Hub to make it available from everywhere.
Run the commands below:
docker login --username=tericcabrel

docker tag tericcabrel/bmi:v1 tericcabrel/bmi:v1

docker push tericcabrel/bmi:v1
To better understand how to push a Docker image to the Docker Hub, I wrote this post for you; and if you use the AWS Elastic container registry, I wrote this one for you.
We can now pull the Docker image from the VPS and run it.
Pull and run the image on the server
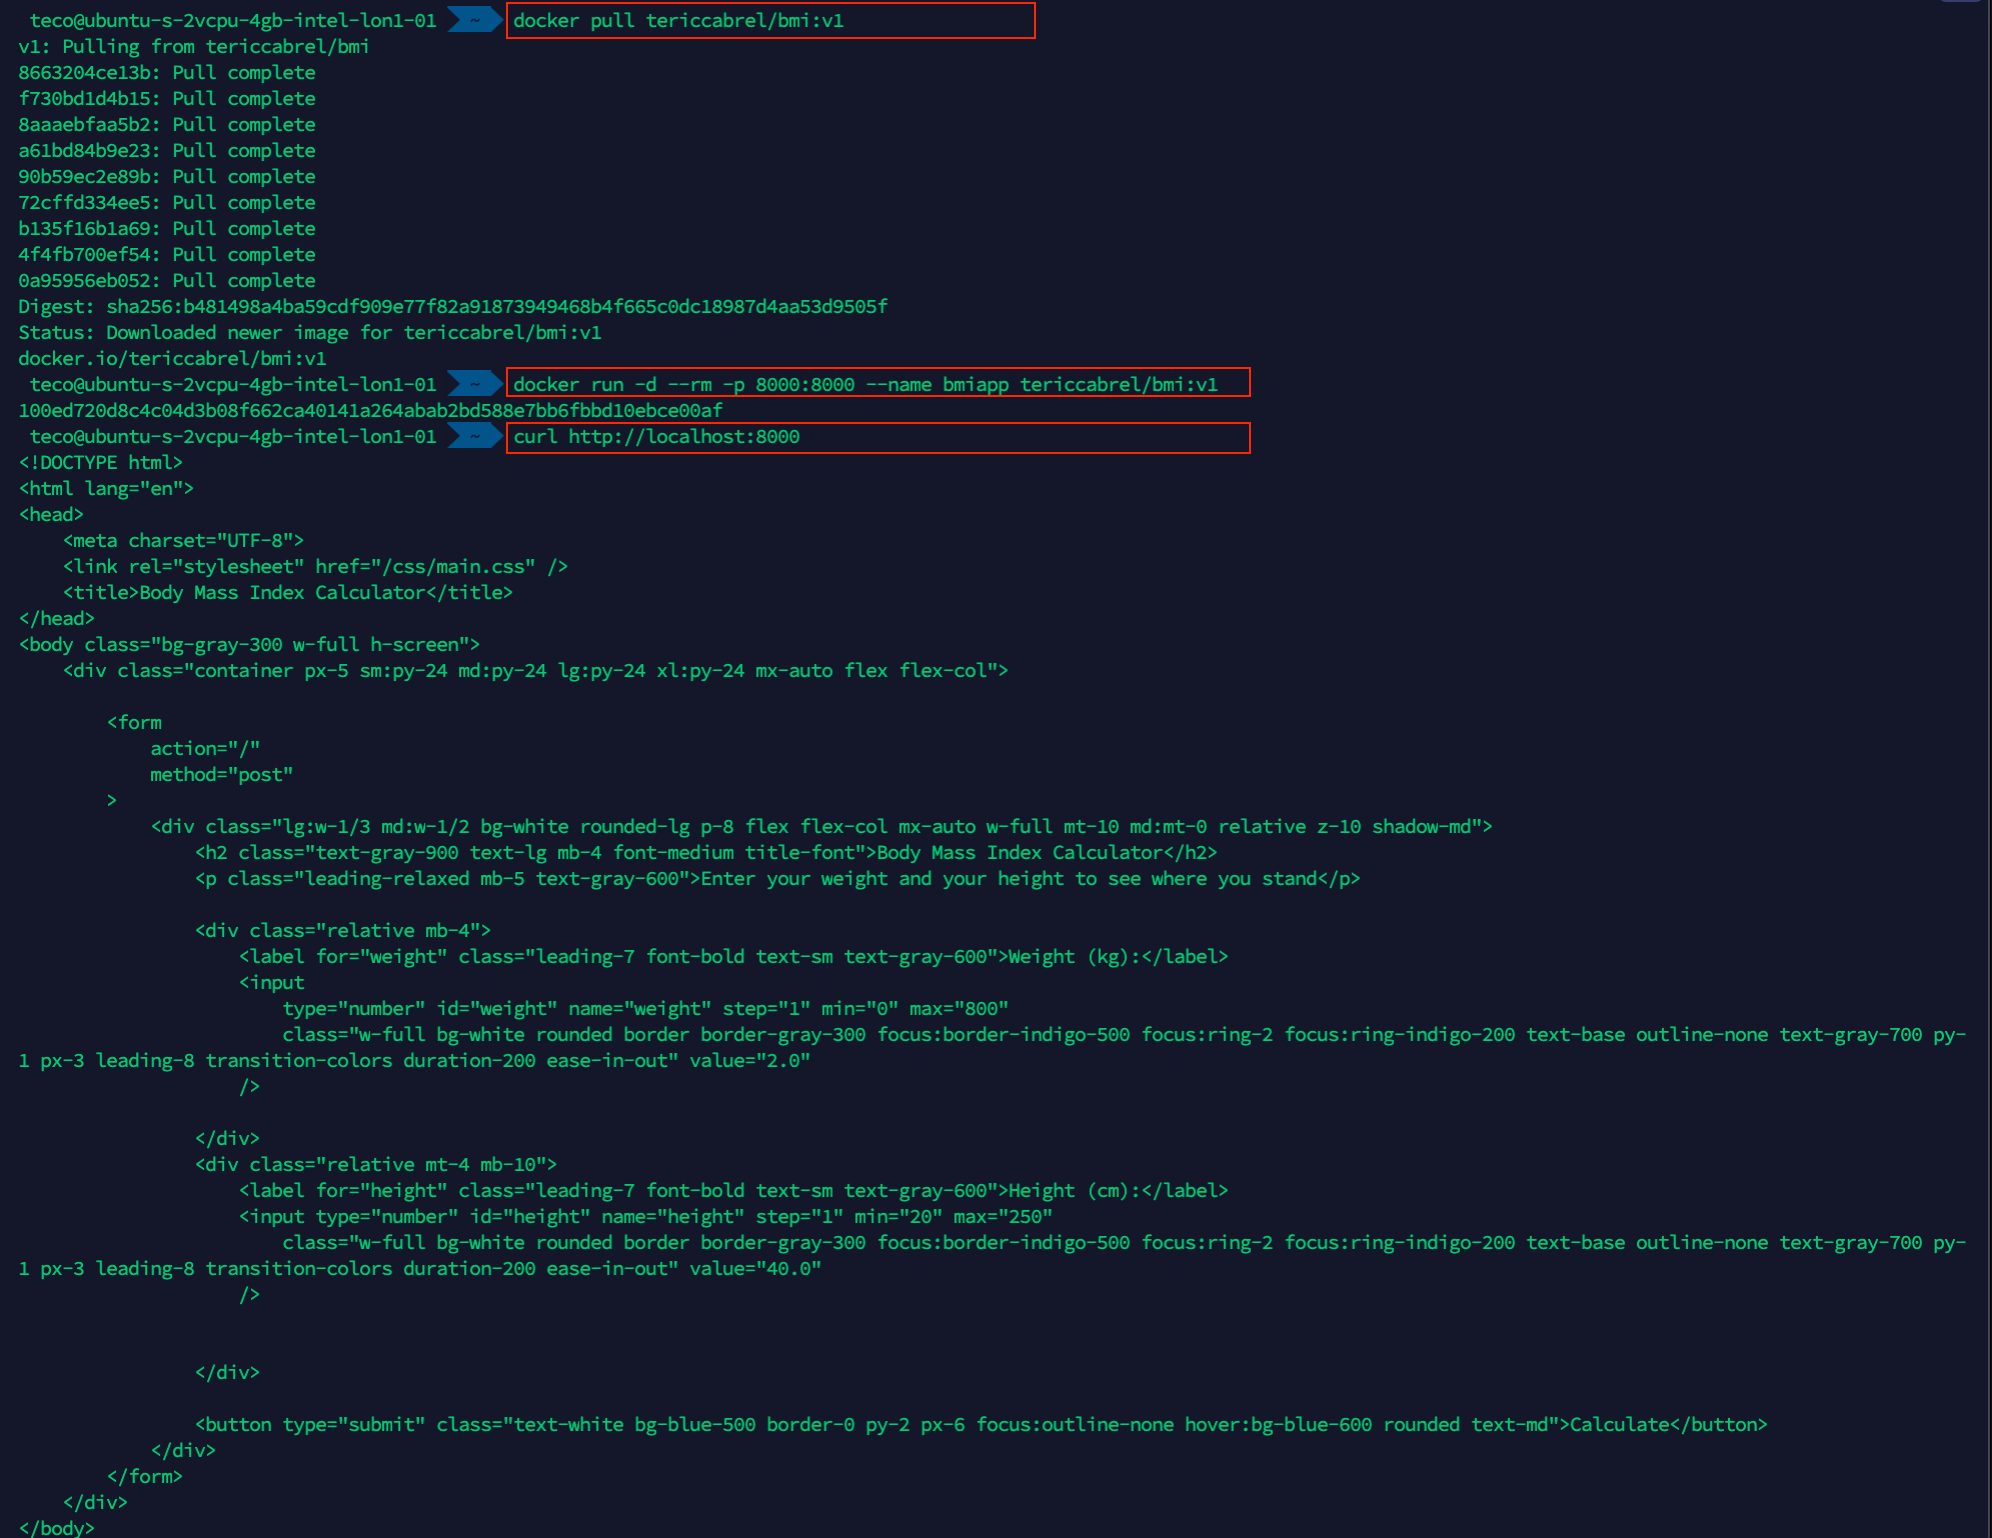
On the server, we have already installed Docker, so run the command below to pull the image and start a Docker container:
docker pull tericcabrel/bmi:v1

docker run -d --rm -p 8000:8000 --name bmiapp tericcabrel/bmi:v1

curl http://localhost:8000
- We pull the Docker image from the Docker Hub.
- We start a container from the image and indicate we want to run the process in the background using the option "-d" contrary to the option "-it" which means to run interactively.
- When we send a request to http://localhost:8000, we get a response with HTML content. However, we cannot access it through the browser yet.
Create the DNS record
My domain's name is tericcabrel.com; I will create a subdomain bmi.tericcabrel.com that points to the VPS IP address. Log into the client space of your hosting platform and do that. My domain name is registered at OVH.
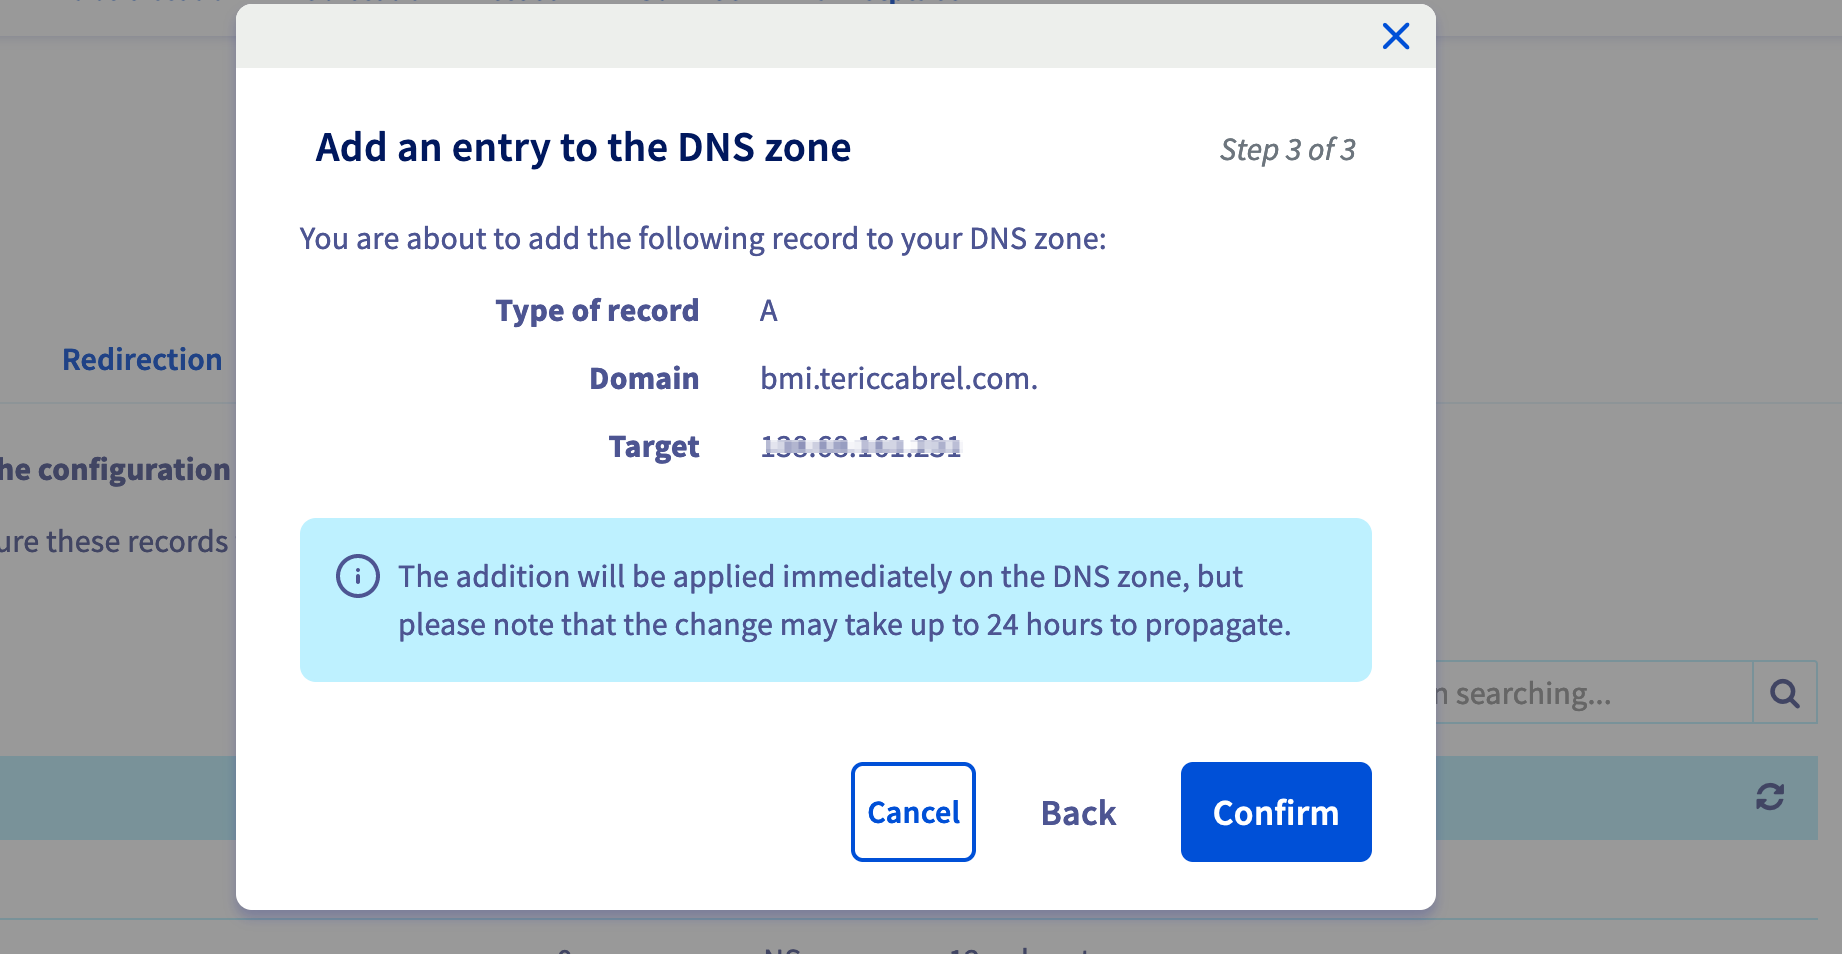
The change can take up to 24 hours to propagate. You can use this website to check if the DNS is ready.
Configure the reverse proxy with Nginx
Nginx is already installed on the VPS. Create an Nginx configuration for the website with the command below:
sudo nano /etc/nginx/sites-available/bmi.tericcabrel.com
Note: The file's name is bmi.tericcabrel.com I usually name it like that to quickly find the application I want to apply for a change. Feel free to call it as you wish.
Paste the code below inside the file, save, and exit:
server {
    server_name  bmi.tericcabrel.com;
    index index.html index.htm;
    access_log /var/log/nginx/bmiapp.log;
    error_log  /var/log/nginx/bmiapp-error.log error;

    location / {
        proxy_set_header X-Forwarded-For $proxy_add_x_forwarded_for;
        proxy_set_header X-Forwarded-Proto $scheme;
        proxy_set_header X-Real-IP $remote_addr;
        proxy_set_header Host $http_host;
        proxy_pass http://127.0.0.1:8000;
        proxy_redirect off;
    }
}
Don't forget to replace "bmi.tericcabrel.com" with your domain or subdomain in the above configuration.
Enable the website with the command below:
sudo ln -s /etc/nginx/sites-available/bmi.tericcabrel.com /etc/nginx/sites-enabled/bmi.tericcabrel.com
We created a symbolic link of our config file inside the folder sites-enabled; it is because Nginx only considers the websites present in this folder.
Let's verify if there is no Nginx error, then reload it to take the changes into account:
sudo nginx -t

sudo nginx -s reload
Navigate to http://bmi.tericcabrel.com to see the result:
It works!!!
Add SSL certificate with Letsencrypt
Install Certbot, which is the tool responsible for certificate generation:
sudo apt install snapd
sudo snap install --classic certbot
Generate and install an SSL certificate for our domain
sudo certbot --nginx -d bmi.tericcabrel.com
Reload Nginx configuration: sudo nginx -s reload
Navigate to https://bmi.tericcabrel.com.

Wrap up
Deploying a Spring Boot application with Docker is a better approach because it makes it easier to manage and monitor the running application. This approach will also benefit you when you face scaling issues.
Solutions like Docker Swarm and Kubernetes integrate easily with Docker. After this, the next step is to automate this process inside the CI/CD pipeline. I wrote a complete post about deploying our application in a CI/CD on GitHub Actions.
You can find the code source of the application deployed in this post on the GitHub repository.
Follow me on Twitter or subscribe to my newsletter to avoid missing the upcoming posts and the tips and tricks I occasionally share.