
Read environment variables in a Node.js application


When building a backend application in Node.js, we interact with external services such as databases, external APIs, or SDKs; which usually requires connection string or API key to authenticate again the services.
This sensitive information gives access to your system's data; thus, developers must avoid hard coding these values in their source code. Instead, you must load them at the application launch and use predefined variables to access the values.
In this tutorial, we will see how to read environment variables in the Node.js application in written I JavaScript and then written in TypeScript.
Additionally, we will learn how to validate the environment variables definition at the application start up.
The use case
You are building a backend API that will be served in four countries: France, England, Spain, and Germany. Your backend must respond with different data depending on the country (e.g., A Payroll SaaS solution).
When launching an instance of your backend, you must load the targeted country so the application can read it and serve an accurate response.
Prerequisites
To follow this tutorial, make sure you have the following tools installed on your computer.
- Node.js 20.6 or higher - I wrote about how to install Node.js.
- A Node.js Package Manager such as NPM or Yarn.

Read environment variables with the Node.js native package
Starting from Node.js v20.6.0, Node.js supports .env files for configuring environment variables. With Node.js supporting it, you don't need to manage the loading of this environment by yourself or use a third-party package.
A .env file is a file whose structure follows the key-value pairs separated by a = sign; each line must contain a single key-value pair.
An example of a .env file looks like this:
VARIABLE_ONE=var1
VARIABLE_TWO=var2
VARIABLE_THREE=var3
VARIABLE_N=varn
Implementation
Let's set up a new Node.js project by running the command below:
mkdir node-app-env

cd node-app-env

npm init -y
The last command will create a package.json file representing the configuration file from the Node.js project.
Create the .env file for the application environment variables:
touch .env
Let's define the variable representing the country, which we call the key COUNTRY which can have the following values:
| Country | Value |
|---|---|
| France | FR |
| England | EN |
| Spain | ES |
| Germany | DE |
Open the .env file and add the country variable with the value FR.
A variable PORT with the value 8000 will also be defined, indicating the port on which the backend server will start.
Our .enf file looks like this:
COUNTRY=FR
PORT=8000
Now, we will write the code that uses the country and print a message in the corresponding language of that country.
Create a file app.js and add the code below:
const country = process.env.COUNTRY;
const serverPort = process.env.PORT;

const messages = {
    FR: "Bonjour le monde!",
    EN: "Hello world!",
    ES: "Hola, mundo!",
    DE: "Hallo Welt!",
}

console.log(`Application started on the port ${serverPort}`);

const result = messages[country];

console.log(result);
On the above code, we access to the variable defined in the .env file using object process.env.
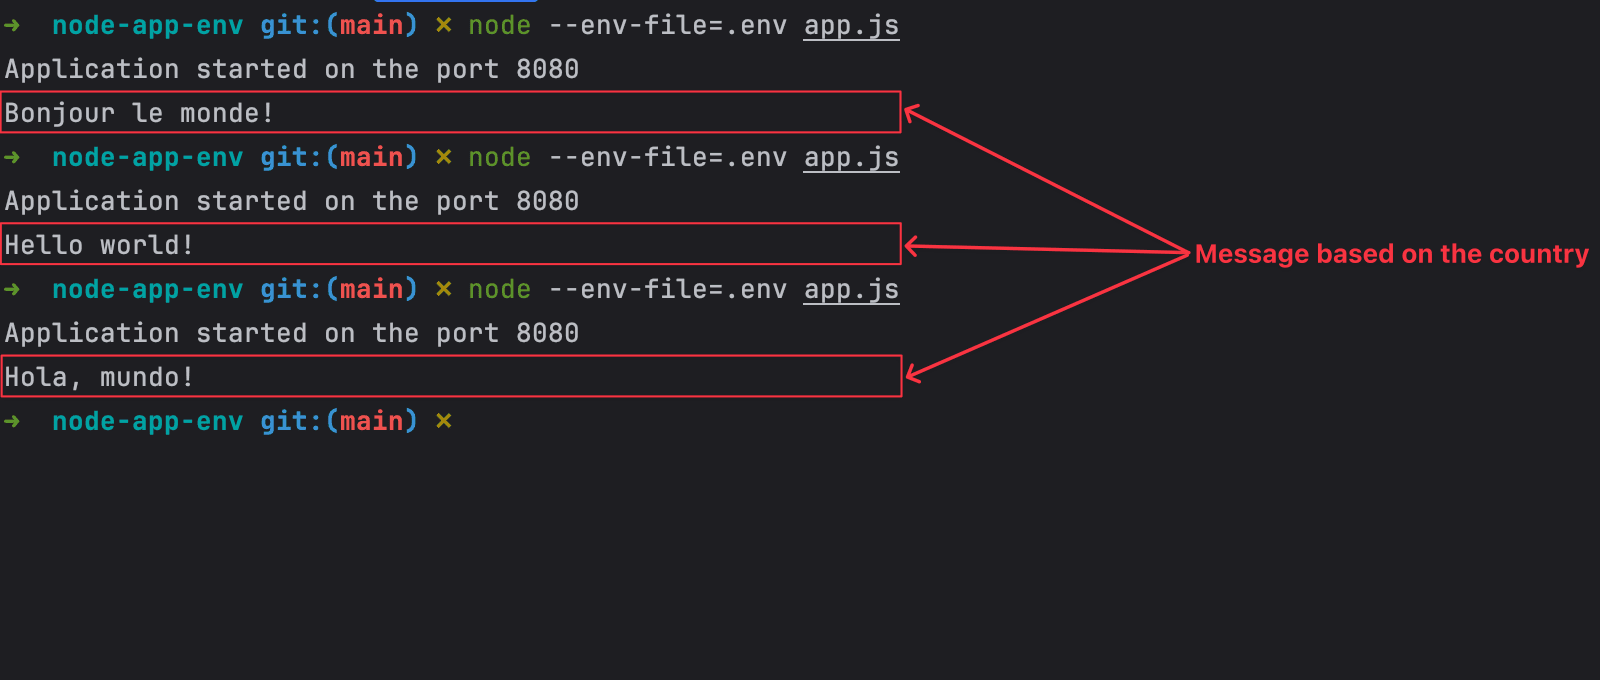
Run the command below the run application with the environment variables.
node --env-file=.env app.js
The option env-file is used to indicate the environment variable to read. We get the following output:
Node.js with TypeScript
TypeScript is widely used to build Node.js thanks to its advantages which the is static types checking.
To run a TypeScript file, we must configure our current Node.js project to support it; it is done by running the following commands:
yarn add -D typescript @types/node ts-node

npx tsconfig.json
The first command installs dependencies to parse TypeScript files and execute them. The second command generates a tsconfig.json file which define the TypeScript configuration of the project.
Create a src folder, add a file app.ts then add the code below:
type SupportedLanguages = 'FR' | 'EN' | 'ES' | 'DE';

const country = process.env.COUNTRY as SupportedLanguages;
const serverPort = process.env.PORT;

const messages: Record<SupportedLanguages, string> = {
    FR: "Bonjour le monde!",
    EN: "Hello world!",
    ES: "Hola, mundo!",
    DE: "Hallo Welt!",
}

console.log(`TypeScript application started on the port ${serverPort}`);

const result = messages[country];

console.log(result);
The file code is almost the same as the JavaScript one except the variables type we added, which comes from TypeScript.
ts-node is the TypeScript execution and REPL for node.js we will use to run the app.ts file. The common syntax is the one below:
ts-node <typescript_entry_file>.ts
However, to pass the Node.js option --env-file, we will use the Node.js executable as we do with a JavaScript file and pass ts-node a loader.
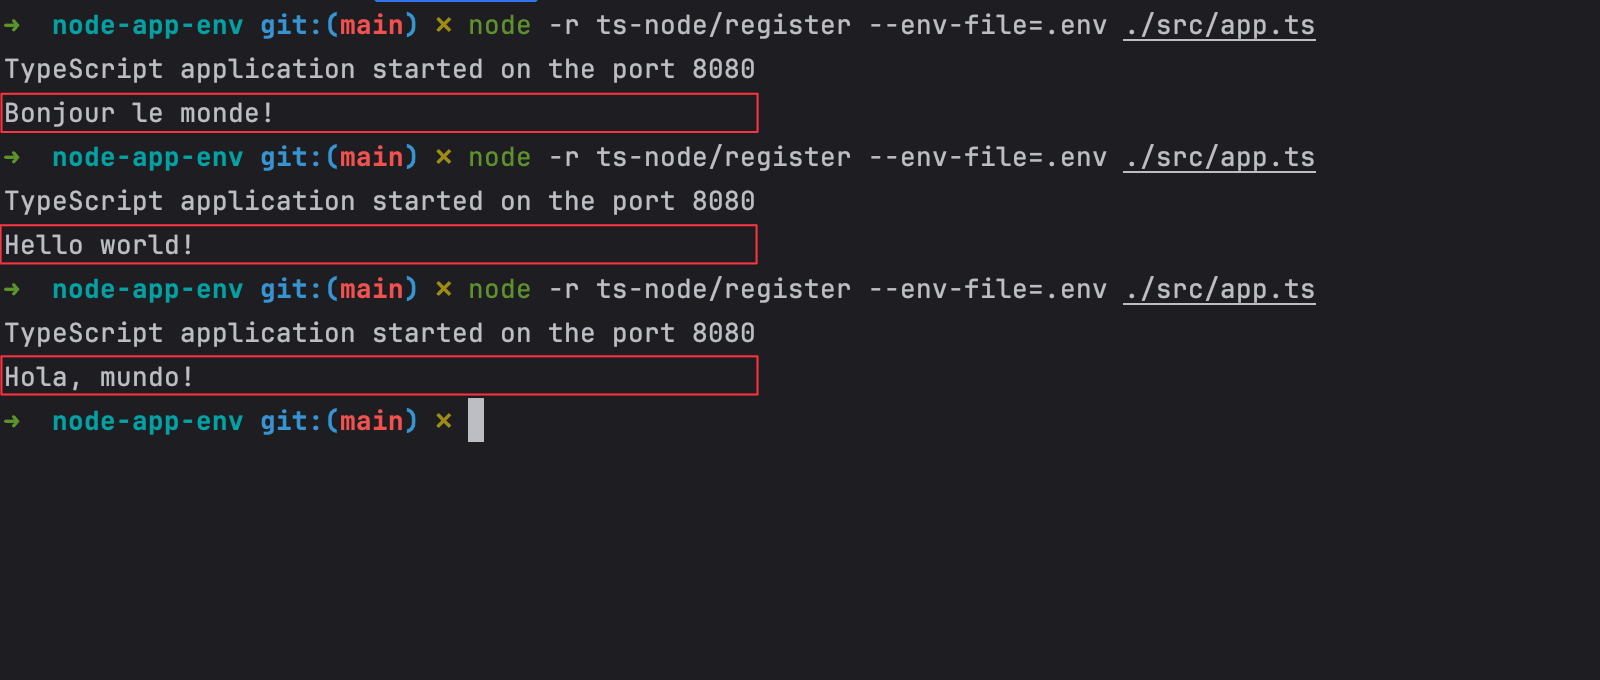
Run the command below to run the TypeScript with the environment variables loading:
node -r ts-node/register --env-file=.env ./src/app.ts
We still get the same output as before:
Validate environment variables at runtime
Although our TypeScript application now loads the environment variables from the .env file, there are some issues with the current implementation:
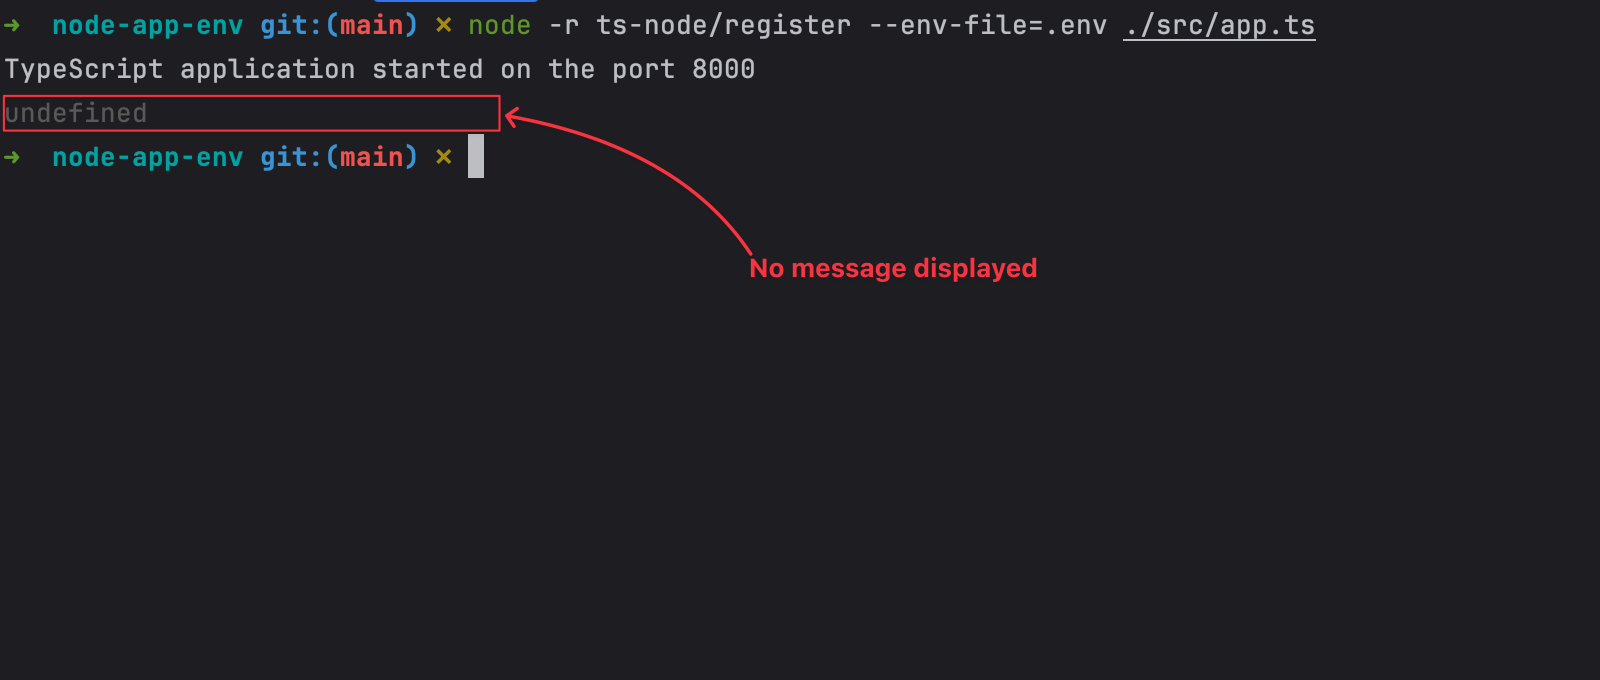
- Required variables are not verified before the application launch; if you set the empty variables and run the application, you get the following output:
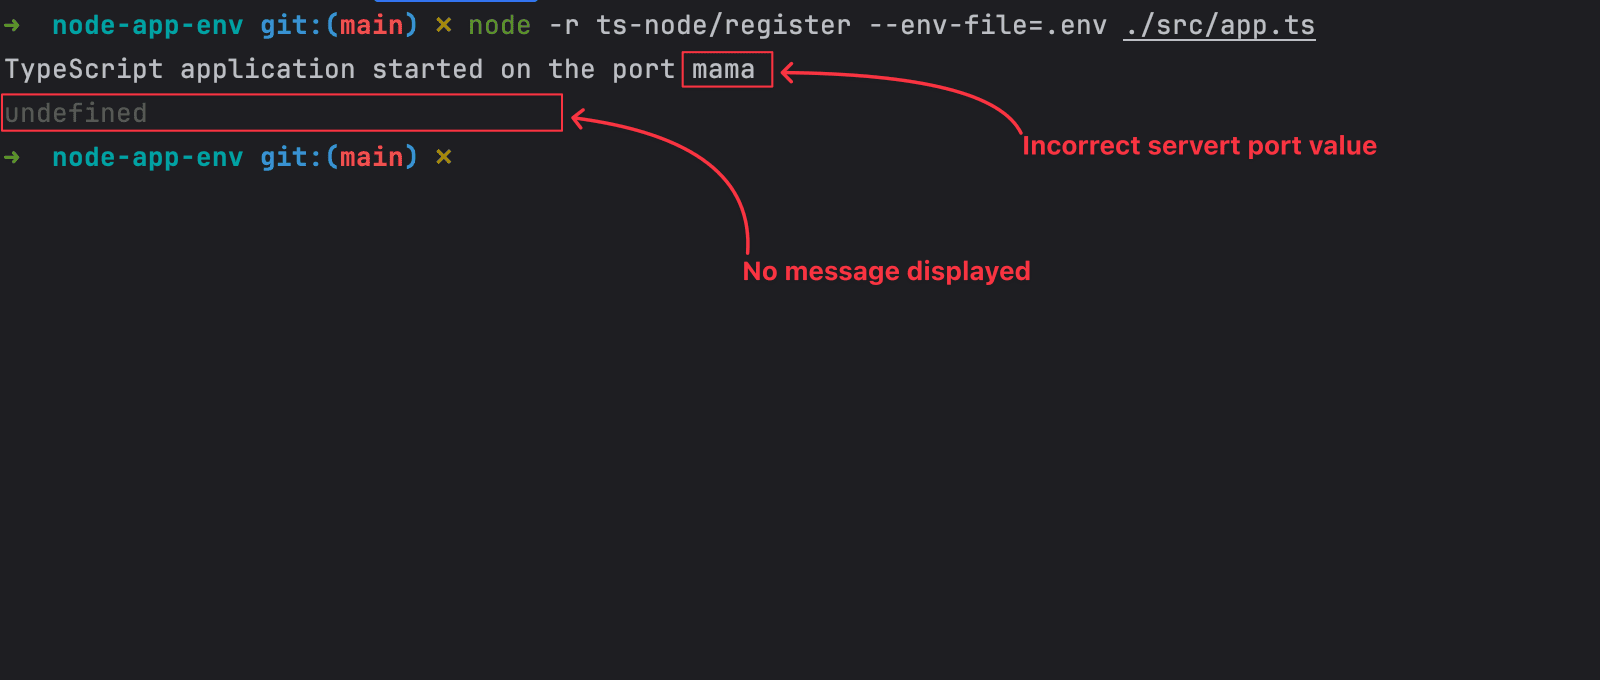
- Environment variables type checking is not done; if you set the variable COUNTRY to
100and the PORT tomamaand run the application, you get the following output:
- The COUNTRY variable values are not restricted to supported ones; if you set the value to
ITand run the application, you get the following output:
- No autocompletion when using the environment variables in the project code.
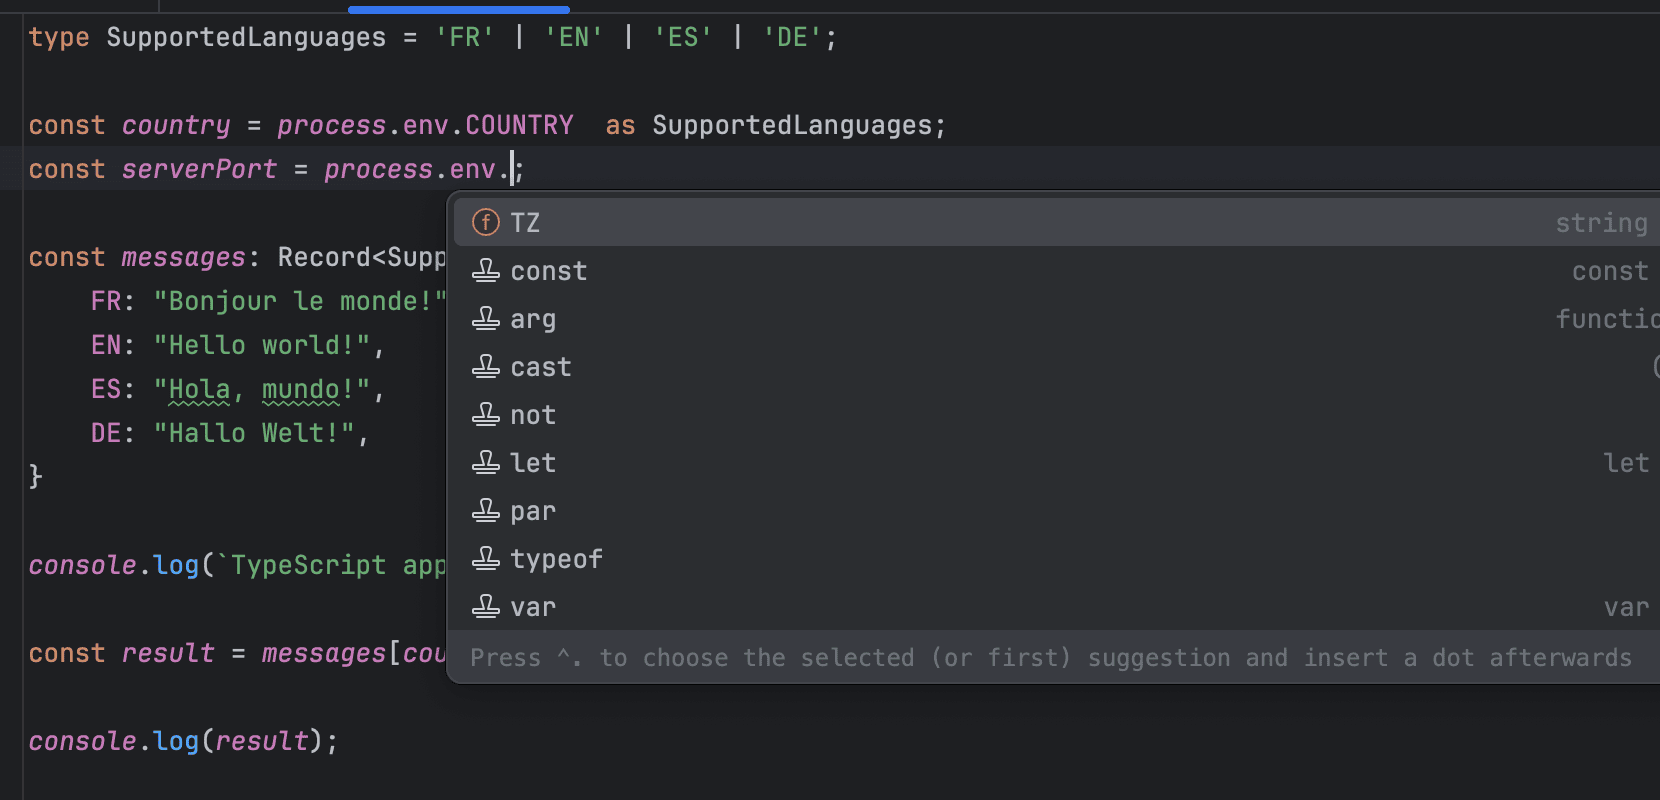
We will use the TypeScript features and a Node.js package called Zod to fix these issues by validating the environment variables at the runtime and extend the Node.js process environment type to add our custom environment variables.
Let's install the Node.js package:
yarn add zod
Using Zod, we will define a validation schema for the environment variables; the criteria for our two variables are the following:
| Variable | Validation rules |
|---|---|
| COUNTRY |
|
| PORT |
|
Let's create a file env.ts and add the code below:
import { z } from 'zod';

const environmentVariablesSchema = z.object({
  COUNTRY: z.enum(['FR', 'EN', 'ES', 'DE']),
  PORT: z.preprocess((value) => Number(value), z.number())
    .refine((value) => value >= 1 && value <= 65_535, 'Must be between 1 and 65535'),
});

export type EnvironmentVariables = z.infer<typeof environmentVariablesSchema>

declare global {
  namespace NodeJS {
    // @ts-ignore
    interface ProcessEnv extends EnvironmentVariables {}
  }
}

export const validateEnvironmentVariables = () => {
  const result = environmentVariablesSchema.safeParse(process.env);

  if (!result.success) {
    const errors = result.error.errors.reduce((acc, error) => {
      const key = Array.isArray(error.path) ? error.path.join('.') : error.path;

      return Object.assign({ [key]: error.message }, acc);
    }, {});

    throw new Error(`Invalid environment variables: \n${JSON.stringify(errors, null, 2)}`);
  }
};
The above code does the following:
- Define the environment variables validation schema with Zod.
- Create the TypeScript type from the environment variables validation schema.
- Extend the ProcessEnv type with the environment variables type.
- Create and export a function to validate the environment variables and throw an error if a variable is invalid.
Let's update the file src/app.ts to validate the environment variables at the beginning.
import { EnvironmentVariables, validateEnvironmentVariables } from '../env';

validateEnvironmentVariables();

type SupportedLanguages = EnvironmentVariables['COUNTRY'];

const country = process.env.COUNTRY;
const serverPort = process.env.PORT;

const messages: Record<SupportedLanguages, string> = {
    FR: 'Bonjour le monde!',
    EN: 'Hello world!',
    ES: 'Hola, mundo!',
    DE: 'Hallo Welt!',
}

console.log(`TypeScript application started on the port ${serverPort}`);

const result = messages[country];

console.log(result);
Test it by running the application with valid and invalid environment variables files.
Runtime environment variables validation with Zod and TypeScript.
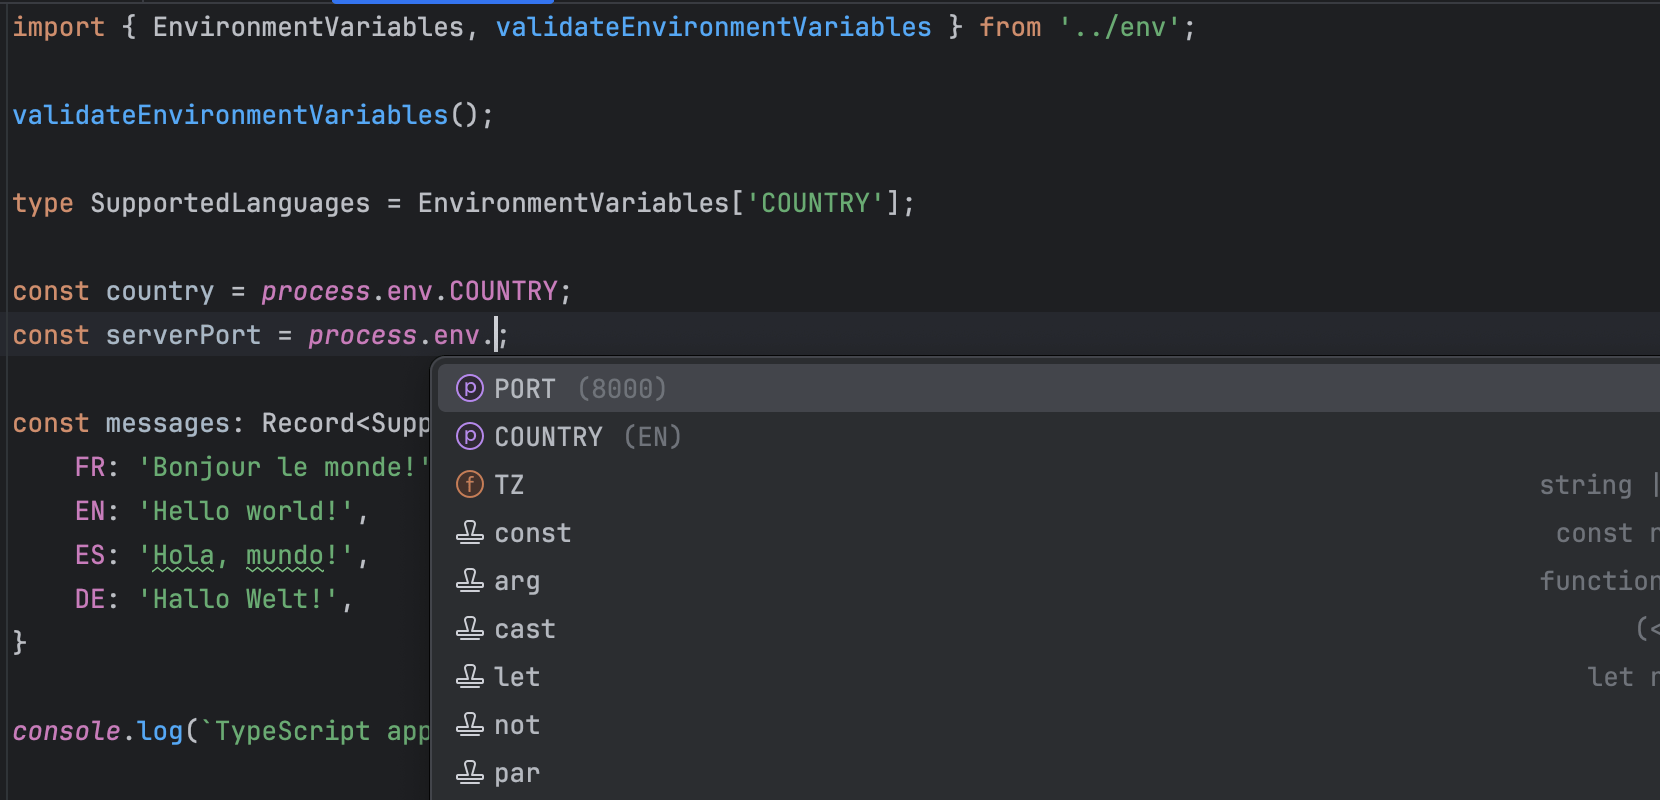
In addition, we have autocompletion when accessing the properties of the process.env.
Best practices with environment variables
To efficiently work with environment variables and improve security, here are some best practices you should embrace:
- Exclude the
.envfile from Git versioning by adding it to the.gitignorefile. - Create an environment variables template file
.env.examplewith some default values. - Document dependencies between variables such mutually exclusive or inclusive variables.
- Separate environment variables configuration file for each deployment environment (dev, staging, production, etc...)
- Use third-party providers to management environment variables for different deployment environment to get features such as key rotation and version history.
Wrap up
With the support for .env files, Node.js simplifies the management of environment variables without relying on a library. By validating your environment variables at the application launch using Zod, you prevent unexpected errors due to missing variables.
With TypeScript, you can improve the developer experience when working with environment variables by providing autocompletion for custom variables.
You will need to learn more about Zod to write powerful validation rules.
You can find the code source on the GitHub repository.
Follow me on Twitter or subscribe to my newsletter to avoid missing the upcoming posts and the tips and tricks I occasionally share.