Validate Request Body and Parameter in Spring Boot

Never trust user input
A typical Web application workflow is: to receive a request with some inputs, perform a treatment with the input received, and finally return a response.
When developing our application, we usually test only the "happy path" or think the end-user can't provide bad inputs. To prevent that, we can validate the inputs before processing the request.
Spring offers an elegant way to do that, and we will see how to do it in this tutorial.
The use case
We need to build a system where a user can make a reservation for a room in a hotel. The user must provide his address information when registering. The possible actions are:
- Register a user with his address.
- Make a reservation for an existing user.
Beneath is the Entity-Relation diagram of the system made with drawSQL:
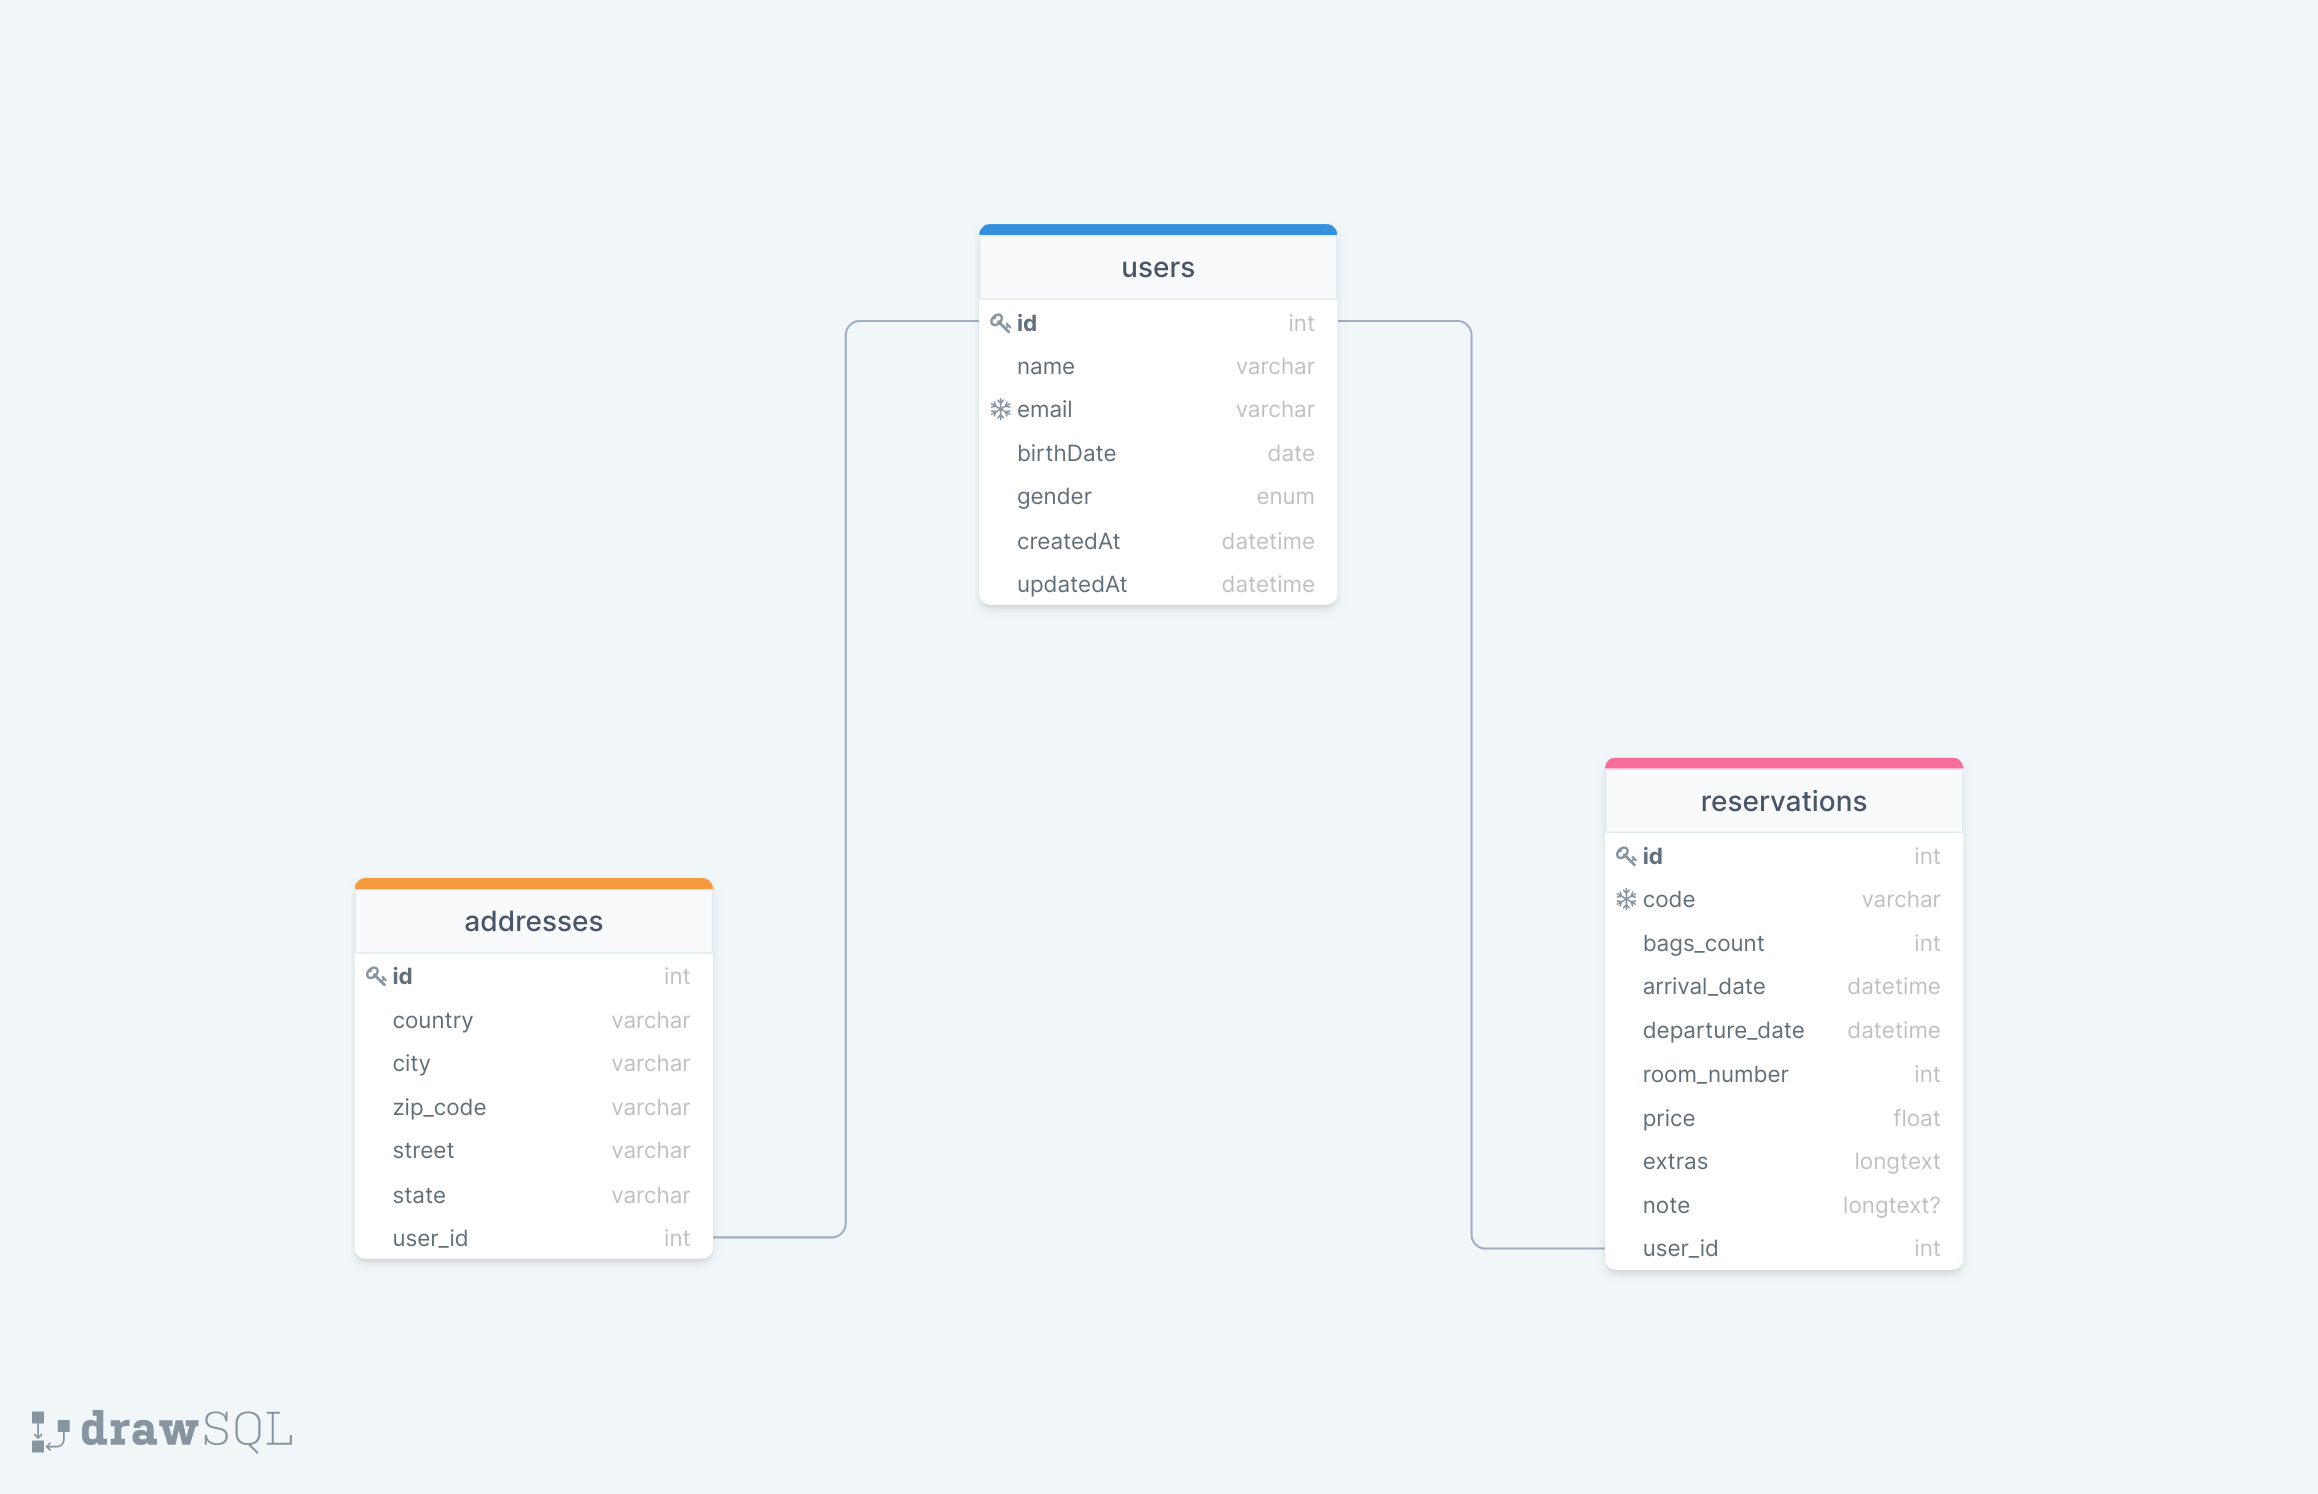
We will not cover the authentication in this tutorial, but check out my post if you want to learn how to implement a JWT authentication in your SpringBoot application.

Prerequisites
For this tutorial, you need the following tools installed on your computer:
- JDK 11 or higher - Download link
- Maven 3.5 or higher - Download link
- MySQL 8.0 - Download link
You can use Docker if you don't want to install MySQL on your computer. Indeed, you can start a Docker container from a MySQL Docker image. It will be enough to complete this tutorial.
docker run -it -e MYSQL_ROOT_PASSWORD=secretpswd -e MYSQL_DATABASE=hotels --name hotels-mysql -p 3307:3306 mysql:8.0
Set up the project
Let's create a new spring project from start.spring.io with the required dependencies.
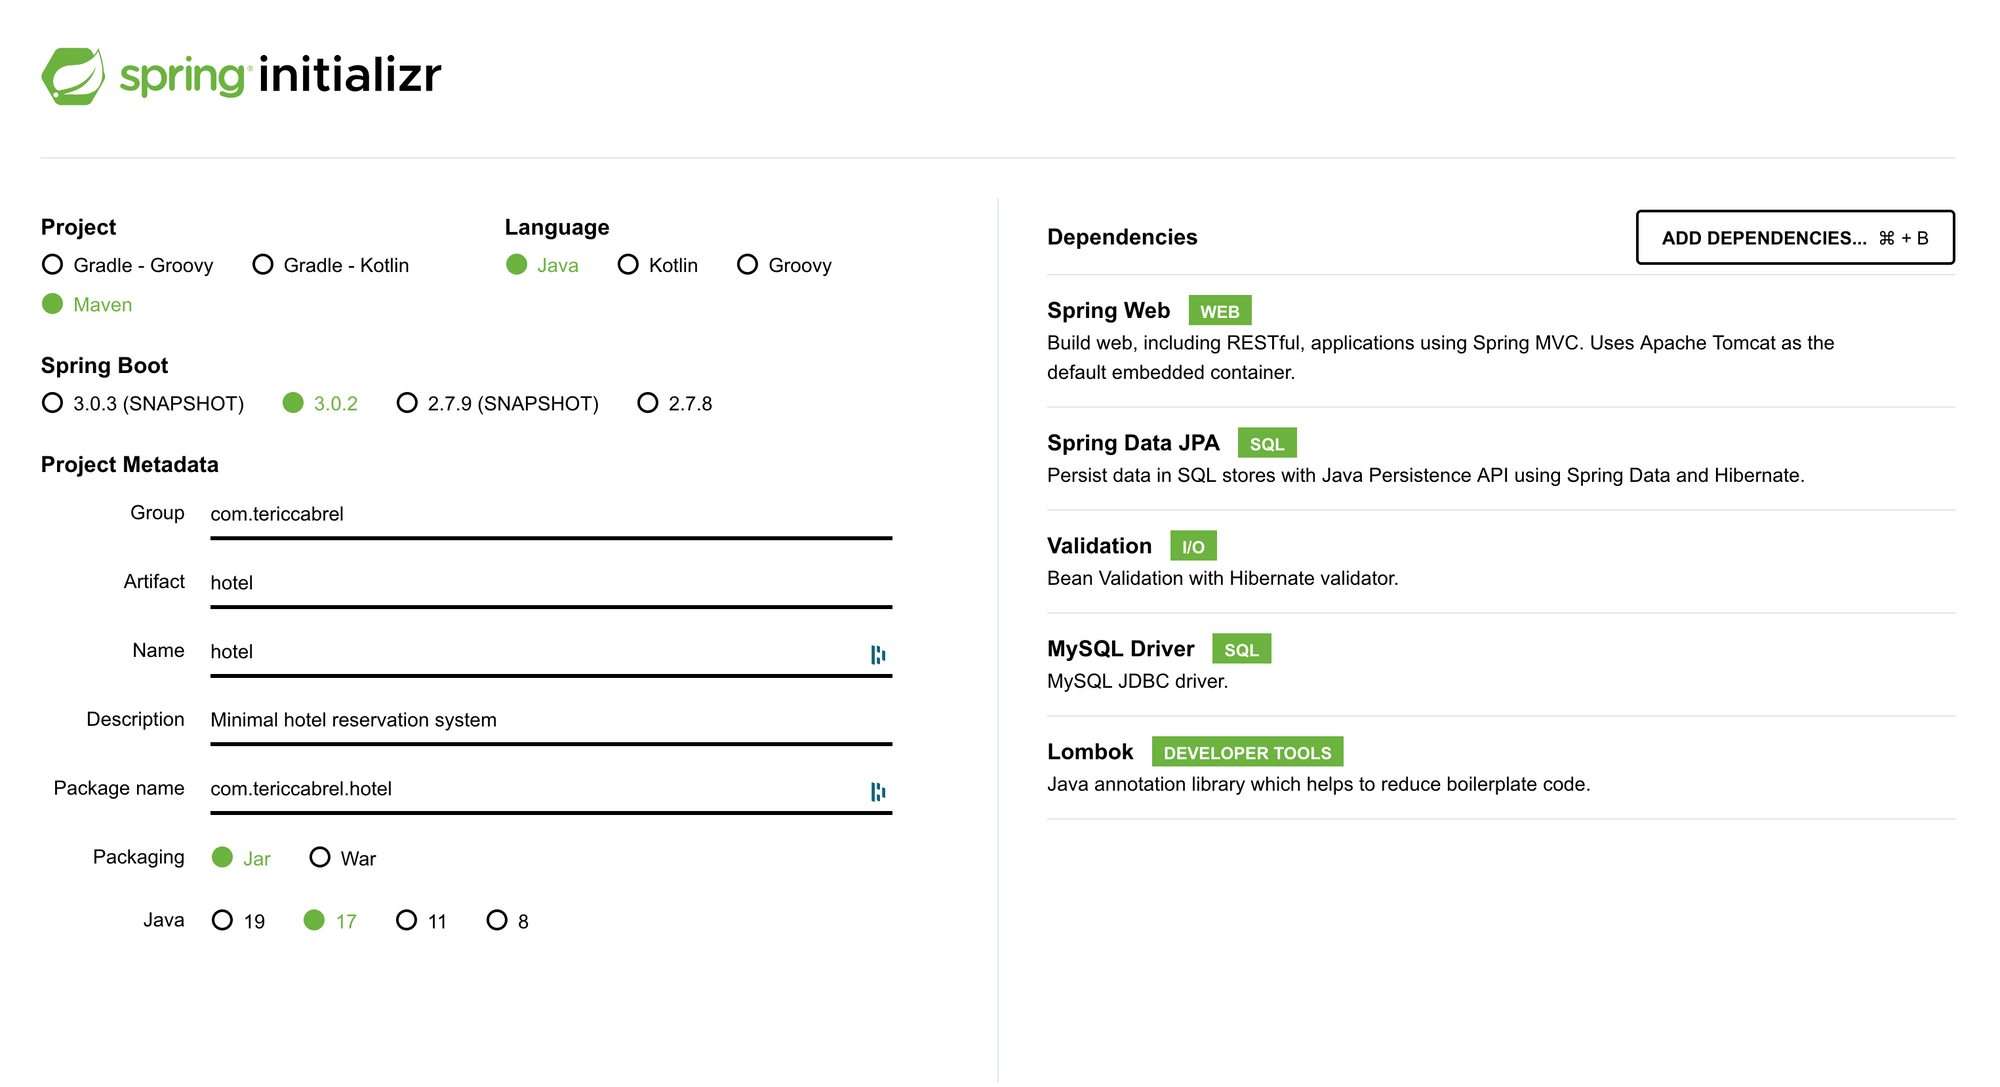
The dependency responsible for input validation is Bean Validation with Hibernate validator. This library has no link with Hibernate's persistence aspect, provided here by Spring Data JPA, which is responsible for providing methods for storing data in the database.

Open the project in your IDE and set the server port and database credentials in application.properties file.
server.port=4650

spring.datasource.url=jdbc:mysql://localhost:3307/hotels?serverTimezone=UTC&useSSL=false
spring.datasource.username=root
spring.datasource.password=secretpswd

## Hibernate properties
spring.jpa.hibernate.use-new-id-generator-mappings=false
spring.jpa.hibernate.ddl-auto=update
spring.jpa.show-sql=false
spring.jpa.open-in-view=false
Create entities and services
We need to create the entities' User, Address, and Reservation. For each entity, we will create the related Repository and Service. Since it is not the main topic of this tutorial, find the code of these files in the GitHub repository:
- Entities are inside the package models.
- Entities Repositories are inside the package repositories.
- Services are inside the package services.
Register a user
We need to create the endpoint to handle this action and define the object that will receive the input required to create the user.
Create the model for the request body
When registering a new user, we also provide information on his address in the body. We need to structure our object to handle that by creating a class called AddressDTO that will hold all properties for the address, and there will be a property of type AddressDTO inside the class RegisterUserDTO.
The class names are suffixed with DTO (Data Transfer Object) because they transport data from one layer (controller) to another layer (persistence). A common use case of his usage is when we must apply some transformation data before passing them to the other layer. I will write a more detailed post about it later.
Create a package called dtos inside the package models, then create two classes, AddressDto.java and RegisterUserDto.java.
Add validation
Hibernate Validator provides built-in constraints that will be used to validate our input. To see the full list, check out this link.
AddressDto.java
package com.tericcabrel.hotel.models.dtos;

import com.tericcabrel.hotel.models.Address;
import javax.validation.constraints.NotBlank;
import javax.validation.constraints.Pattern;
import javax.validation.constraints.Pattern.Flag;
import lombok.Data;

@Data
public class AddressDto {
  @NotBlank(message = "The country is required.")
  private String country;

  @NotBlank(message = "The city is required.")
  private String city;

  @NotBlank(message = "The Zip code is required.")
  @Pattern(regexp = "^\\d{1,5}$", flags = { Flag.CASE_INSENSITIVE, Flag.MULTILINE }, message = "The Zip code is invalid.")
  private String zipCode;

  @NotBlank(message = "The street name is required.")
  private String street;

  private String state;

  public Address toAddress() {
    return new Address()
        .setCountry(country)
        .setCity(city)
        .setZipCode(zipCode)
        .setStreet(street)
        .setState(state);
  }
}
RegisterUserDto.java
package com.tericcabrel.hotel.models.dtos;

import com.tericcabrel.hotel.models.User;
import java.util.Date;
import javax.validation.Valid;
import javax.validation.constraints.Email;
import javax.validation.constraints.NotEmpty;
import javax.validation.constraints.NotNull;
import javax.validation.constraints.Past;
import javax.validation.constraints.Pattern.Flag;
import javax.validation.constraints.Size;
import lombok.Data;

@Data
public class RegisterUserDto {
  @NotEmpty(message = "The full name is required.")
  @Size(min = 2, max = 100, message = "The length of full name must be between 2 and 100 characters.")
  private String fullName;

  @NotEmpty(message = "The email address is required.")
  @Email(message = "The email address is invalid.", flags = { Flag.CASE_INSENSITIVE })
  private String email;

  @NotNull(message = "The date of birth is required.")
  @Past(message = "The date of birth must be in the past.")
  private Date dateOfBirth;

  @NotEmpty(message = "The gender is required.")
  private String gender;

  @Valid
  @NotNull(message = "The address is required.")
  private AddressDto address;

  public User toUser() {
    return new User()
        .setName(fullName)
        .setEmail(email.toLowerCase())
        .setBirthDate(dateOfBirth)
        .setGender(gender)
        .setAddress(address.toAddress());
  }
}
Create a route to test registration
Let's create an endpoint responsible for registering a new user. Create a package called controllers, then create a controller called UserController.java. Add the code below:
package com.tericcabrel.hotel.controllers;

/*      CLASSES IMPORT HERE        */

@RequestMapping(value = "/user")
@RestController
public class UserController {
  private final UserService userService;

  public UserController(UserService userService) {
    this.userService = userService;
  }

  @PostMapping("/register")
  public ResponseEntity<User> registerUser(@Valid @RequestBody RegisterUserDto registerUserDto) {
    User createdUser = userService.create(registerUserDto.toUser());

    return new ResponseEntity<>(createdUser, HttpStatus.CREATED);
  }
}
The most important part of the code above is using the @Valid annotation.
When Spring finds an argument annotated with @Valid, it automatically validates it and throws an exception if the validation fails.
Run the application and make sure there is no error at the launch.
Test with postman
Our app launched; open Postman, send a request with all the input to null and see the result.
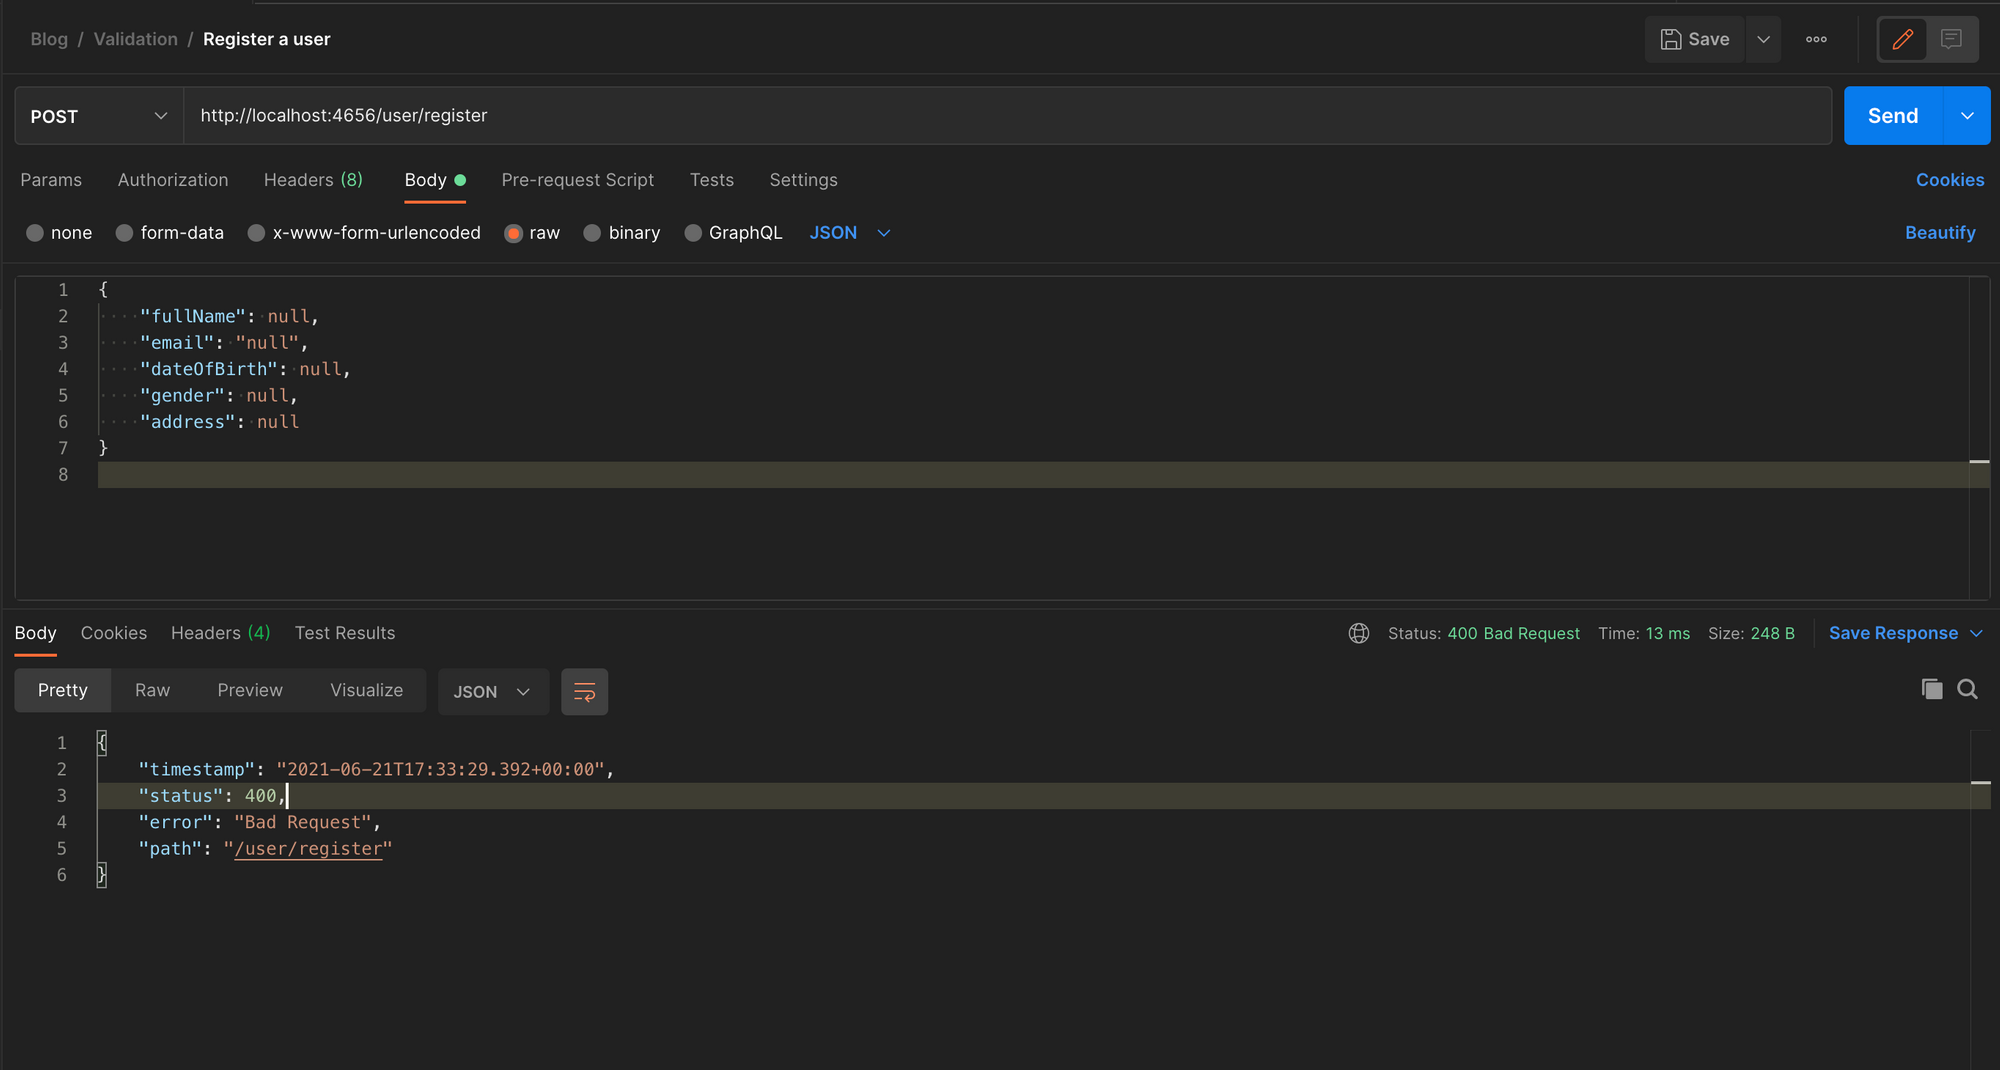
The application responds with an HTTP status code 400 with the message "Bad Request" and nothing more? Let's check the application console to see what happened:

As we can see, an exception of type MethodArgumentNotValidException has been thrown, but since the exception is not caught anywhere, the response fallback to a Bad Request.
Handle validation error exception
Spring provides a specialized annotation of @Component called @ControllerAdvice which allows handling exceptions thrown by methods annotated with @RequestMapping and similar in one single global component.
Create a package called exceptions, then create a file called GlobalExceptionHandler.java, and finally, add the code below:
package com.tericcabrel.hotel.exceptions;

import java.util.HashMap;
import java.util.List;
import java.util.Map;
import java.util.stream.Collectors;
import org.springframework.context.support.DefaultMessageSourceResolvable;
import org.springframework.http.HttpHeaders;
import org.springframework.http.HttpStatus;
import org.springframework.http.ResponseEntity;
import org.springframework.web.bind.MethodArgumentNotValidException;
import org.springframework.web.bind.annotation.ControllerAdvice;
import org.springframework.web.context.request.WebRequest;
import org.springframework.web.servlet.mvc.method.annotation.ResponseEntityExceptionHandler;

@ControllerAdvice
public class GlobalExceptionHandler extends ResponseEntityExceptionHandler {
  @Override
  protected ResponseEntity<Object> handleMethodArgumentNotValid(
      MethodArgumentNotValidException ex, HttpHeaders headers,
      HttpStatus status, WebRequest request) {

    Map<String, List<String>> body = new HashMap<>();

    List<String> errors = ex.getBindingResult()
        .getFieldErrors()
        .stream()
        .map(DefaultMessageSourceResolvable::getDefaultMessage)
        .collect(Collectors.toList());

    body.put("errors", errors);

    return new ResponseEntity<>(body, HttpStatus.BAD_REQUEST);
  }
}
Launch the app and make the call on Postman.
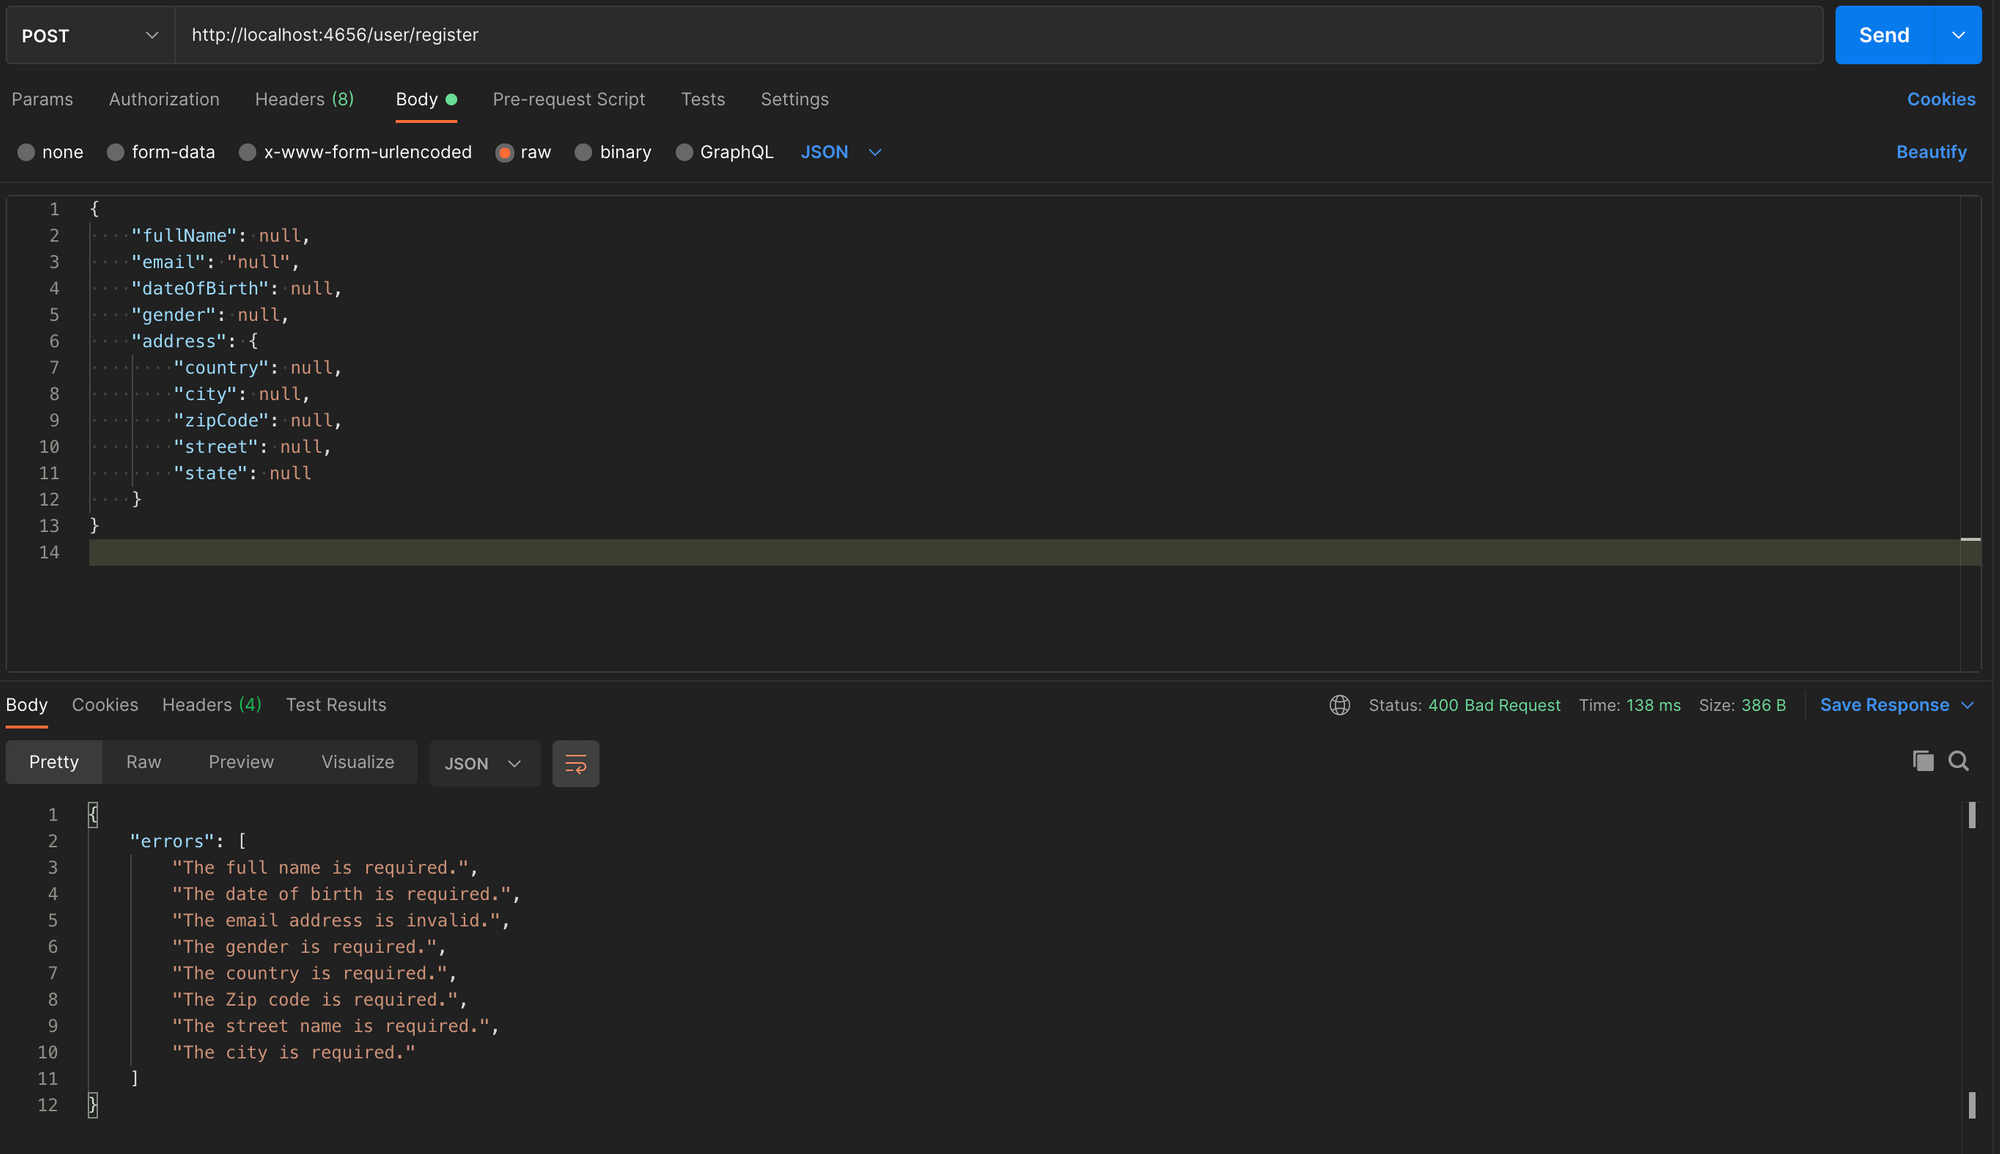
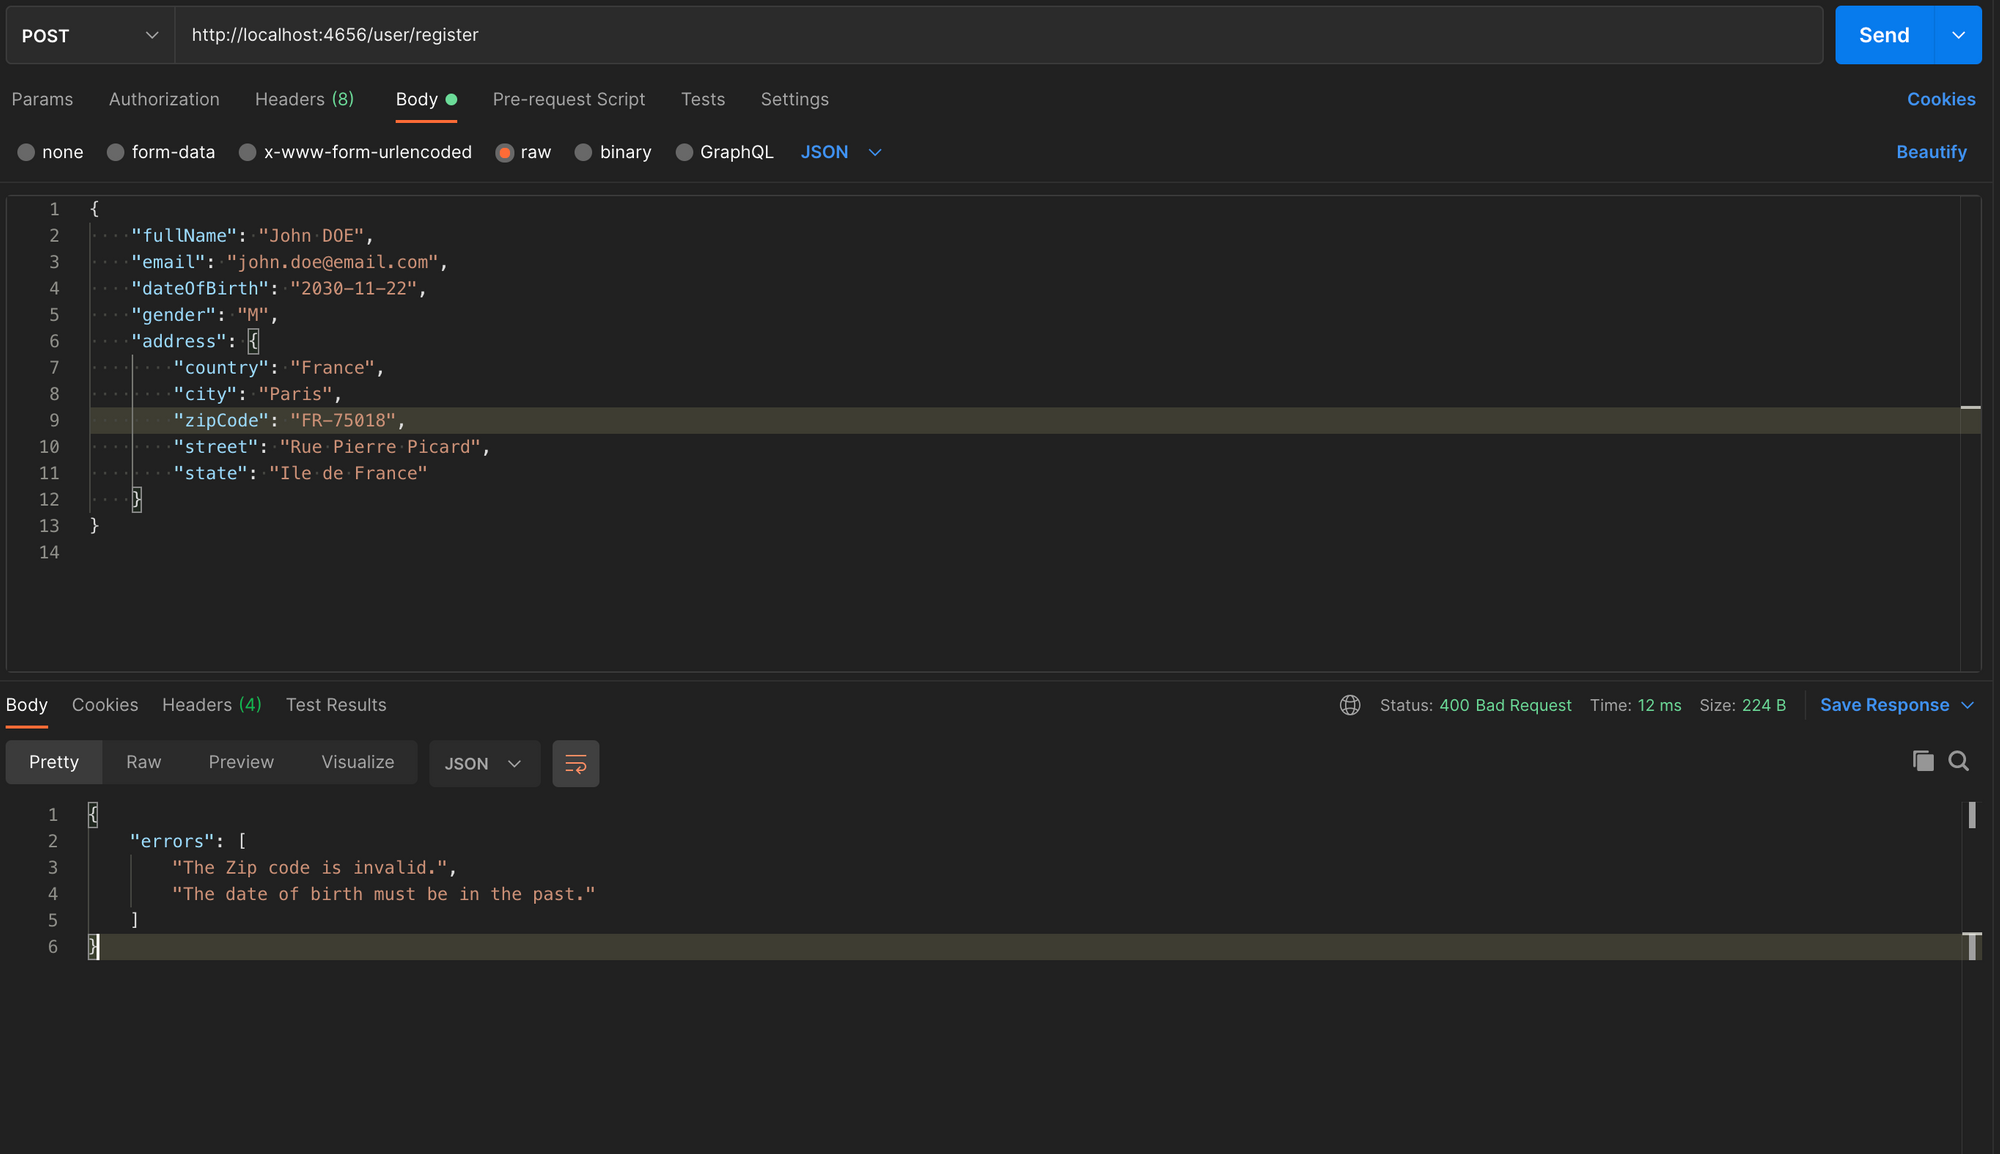
Test the birth date validation and the ZIP code with alphabetical letters (The ZIP code in France can't have letters).
Create a reservation
Let's do the same by creating CreateReservationDto.java, then add the code below:
package com.tericcabrel.hotel.models.dtos;

import com.tericcabrel.hotel.models.Reservation;
import java.util.Date;
import javax.validation.constraints.FutureOrPresent;
import javax.validation.constraints.Max;
import javax.validation.constraints.Min;
import javax.validation.constraints.NotEmpty;
import javax.validation.constraints.NotNull;
import javax.validation.constraints.Positive;
import lombok.Data;

@Data
public class CreateReservationDto {
  @NotNull(message = "The number of bags is required.")
  @Min(value = 1, message = "The number of bags must be greater than 0")
  @Max(value = 3, message = "The number of bags must be greater than 3")
  private int bagsCount;

  @NotNull(message = "The departure date is required.")
  @FutureOrPresent(message = "The departure date must be today or in the future.")
  private Date departureDate;

  @NotNull(message = "The arrival date is required.")
  @FutureOrPresent(message = "The arrival date must be today or in the future.")
  private Date arrivalDate;

  @NotNull(message = "The room's number is required.")
  @Positive(message = "The room's number must be greater than 0")
  private int roomNumber;

  @NotNull(message = "The extras is required.")
  @NotEmpty(message = "The extras must have at least one item.")
  private String[] extras;

  @NotNull(message = "The user's Id is required.")
  @Positive(message = "The user's Id must be greater than 0")
  private int userId;

  private String note;

  public Reservation toReservation() {
    return new Reservation()
        .setBagsCount(bagsCount)
        .setDepartureDate(departureDate)
        .setArrivalDate(arrivalDate)
        .setRoomNumber(roomNumber)
        .setExtras(extras)
        .setNote(note);
  }
}
Find the code for ReservationController.java in the source code repository.
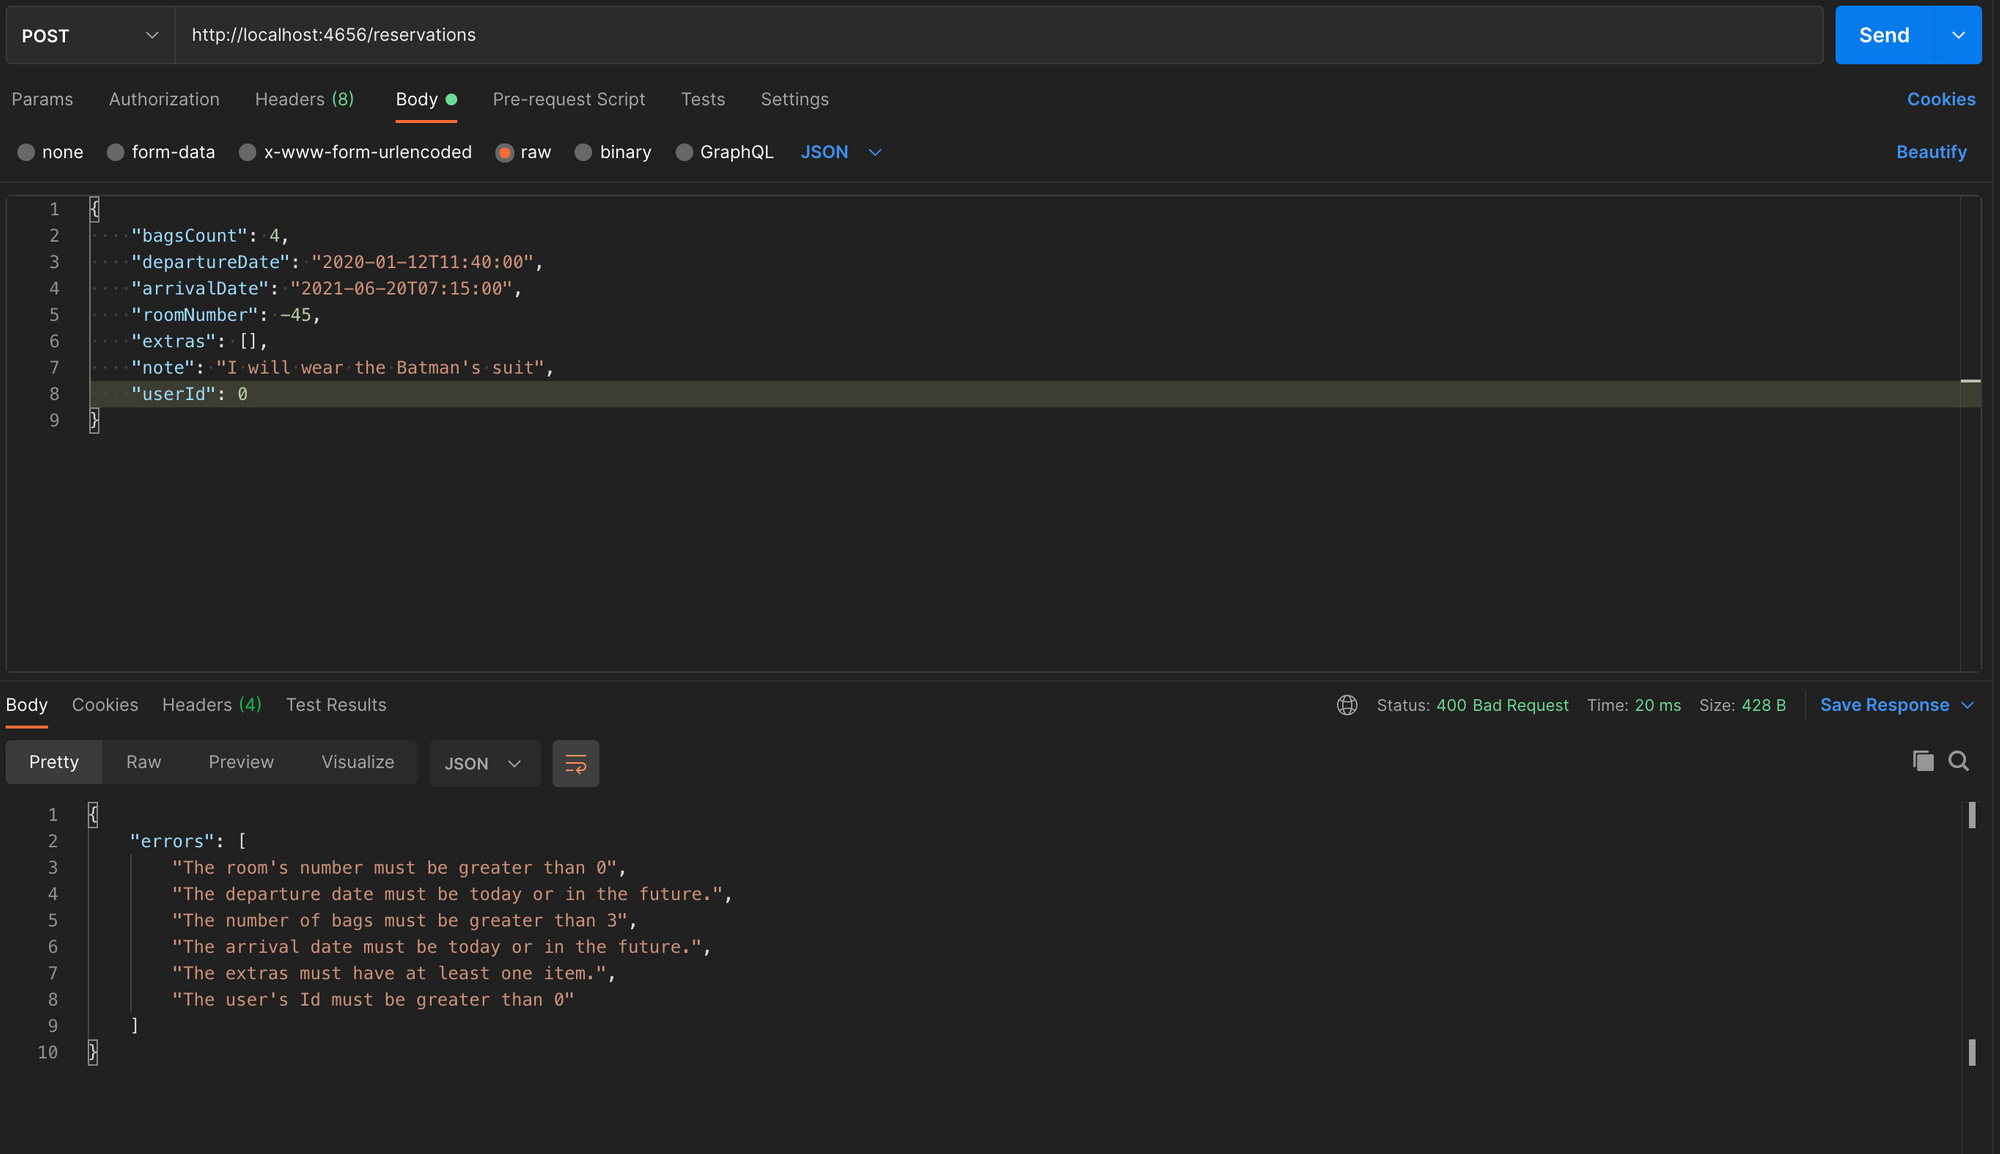
Test with postman
Validate Request parameter
Now, we want to retrieve a reservation through the generated unique code.
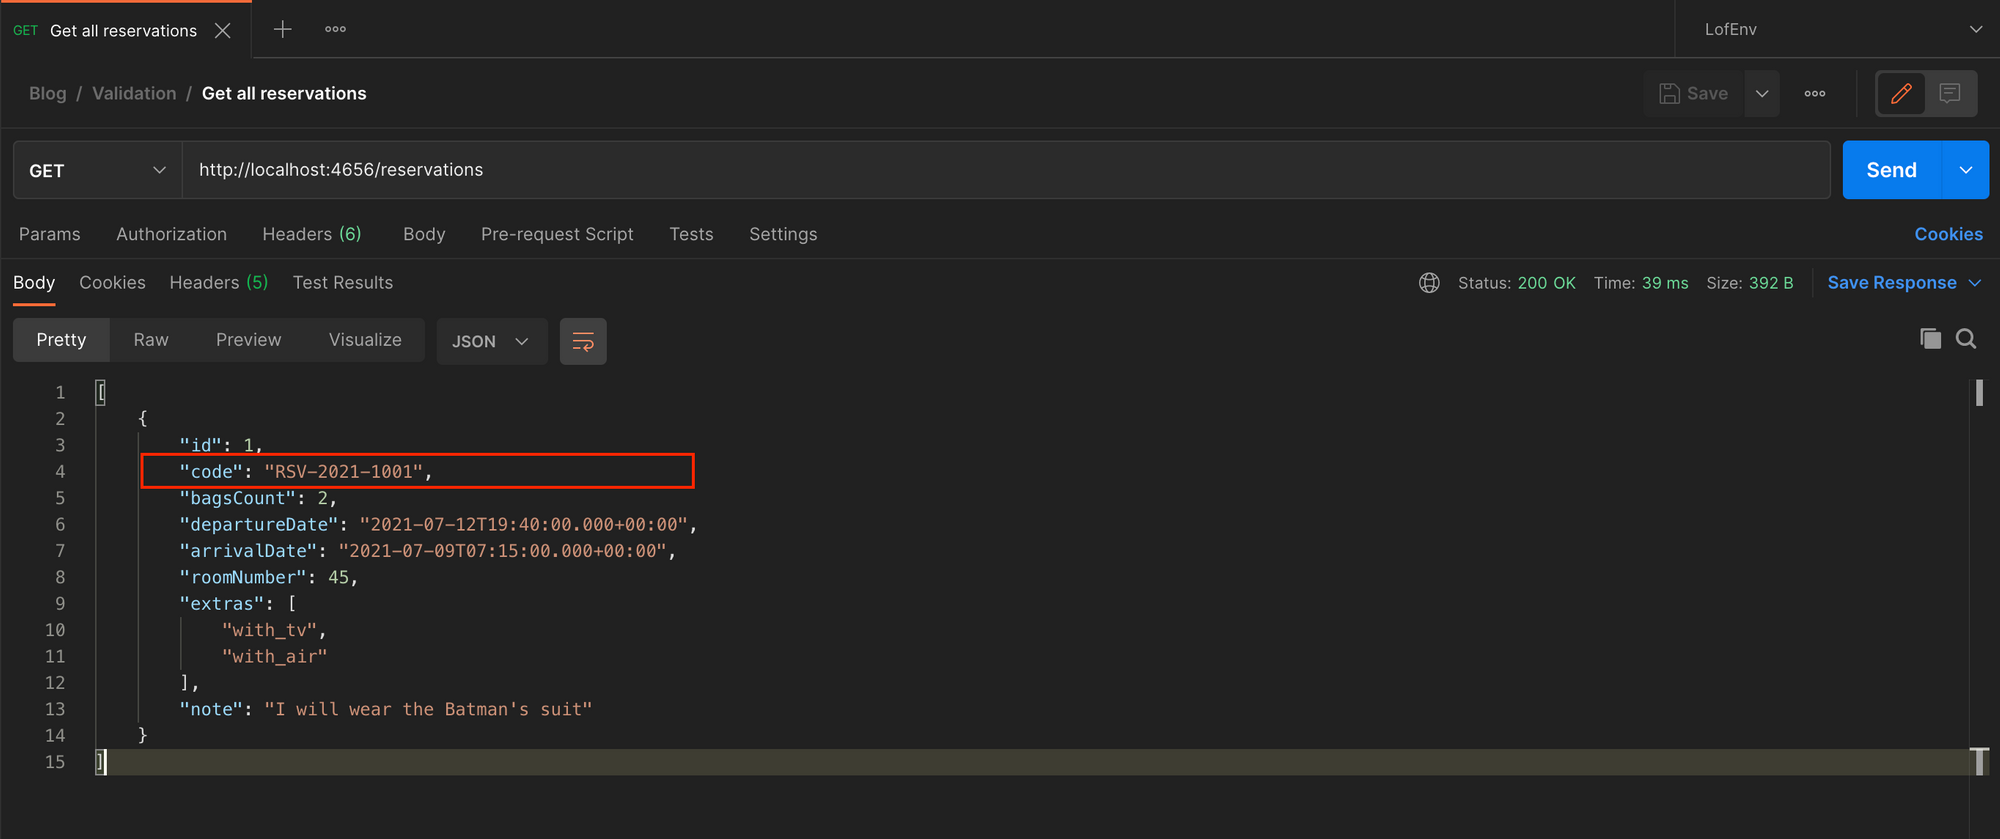
The endpoint will look like this: /reservations/RSV-2021-1001. Since the user provided the reservation's code, we must validate it to avoid making an unnecessary database call. If the code provided is not in this good format, we are sure it will not be found in the database.
When creating a route with Spring Web, adding an annotation rule to validate the input is possible. In our case, we will apply a Regex the validate the format of the reservation's code.
Inside the ReservationController.java, add the code below:
@GetMapping("/{code}")
  public ResponseEntity<Reservation> oneReservation(@Pattern(regexp = "^RSV(-\\d{4,}){2}$") @PathVariable String code)
      throws ResourceNotFoundException {
    Optional<Reservation> optionalReservation = reservationService.findByCode(code);

    if (optionalReservation.isEmpty()) {
      throw new ResourceNotFoundException("No reservation found with the code: " + code);
    }

    return new ResponseEntity<>(optionalReservation.get(), HttpStatus.OK);
  }
If you run the application and call the route with a bad code, nothing happens because we need to tell the controller to validate parameters with annotation rules. We achieve that with the annotation @Validated, which is added to the ReservationController class:
@Validated
@RequestMapping(value = "/reservations")
@RestController
public class ReservationController {
	// code here
}
Now, run the application and test with a bad reservation code.
Ooops!!! The application throws an internal server error, and the console looks like this:

The validation failed as expected, but a new exception of type ConstraintViolationException has been thrown.
Since it is not caught by the application, an internal server error is returned. Update the GlobalExceptionHandler.java to catch this exception:
@ExceptionHandler(ConstraintViolationException.class)
  public ResponseEntity<?> constraintViolationException(ConstraintViolationException ex, WebRequest request) {
    List<String> errors = new ArrayList<>();

    ex.getConstraintViolations().forEach(cv -> errors.add(cv.getMessage()));

    Map<String, List<String>> result = new HashMap<>();
    result.put("errors", errors);

    return new ResponseEntity<>(result, HttpStatus.BAD_REQUEST);
}
Launch the application and test. Now we got an error with a clear message.

Conclusion
We can implement a solid request input validation that makes our backend more resilient and error-prone to bad user input.
Throughout the tutorial, we used predefined validation rules, but we can also create our custom validation rule for a specialized use case. Check out this tutorial to learn how.
You can find the code source on the GitHub repository.
Follow me on Twitter or subscribe to my newsletter to avoid missing the upcoming posts and the tips and tricks I occasionally share.


