
Implement JWT authentication in a Spring Boot 3 application


In the ever-evolving landscape of web development and application security, the need for robust authentication mechanisms has never been more critical. When exposing an API to the public, ensuring only authorized access to the resources is essential.
One of the most popular and effective authentication methods in modern web applications is JSON Web Tokens (JWT). It provides a flexible and stateless way to verify the identity of users and secure API endpoints; it is also called Token-Based Authentication.
In this article, we will explore the implementation of JWT authentication in a Spring Boot 3 application.
What we will build
The API must expose routes where some are accessible without authentication while others require one. The table below enumerates them:
| API route | Access status | Description |
|---|---|---|
| [POST] /auth/signup | Unprotected | Register a new user |
| [POST] /auth/login | Unprotected | Authenticate a user |
| [GET] /users/me | Protected | Retrieve the current authenticated user |
| [GET] /users | Protected | Retrieve all the users |
Prerequisites
You must need these tools installed on your computer to follow this tutorial.
- JDK 11 or higher - Download link
- Maven 3.8 or higher - Download link
- MySQL running on Docker - Download's link
- An HTTP client such as Postman, Insomnia, cURL, etc.
We need Docker to run a container for MySQL 8; you can skip it if MySQL is installed on your computer. Run the command below to start the Docker container from the MySQL image:
docker run -d -e MYSQL_ROOT_PASSWORD=secret -e MYSQL_DATABASE=taskdb --name mysqldb -p 3307:3306 mysql:8.0
Set up the project
The Spring Boot project needs these four dependencies:
- The Spring Web: to build Web, including RESTful applications using Spring MVC. It uses Apache Tomcat as the default embedded container.
- The Spring Security: Allows implementing authentication and access-based control.
- The Spring Data JPA: Persist data in SQL stores with Java Persistence API using Spring Data and Hibernate.
- MySQL Driver for Java: The MySQL driver makes it possible to interact with a database from a Java application.
The Spring Boot online project starter helps us create the project with these dependencies; go to the URL start.spring.io to generate a new project.
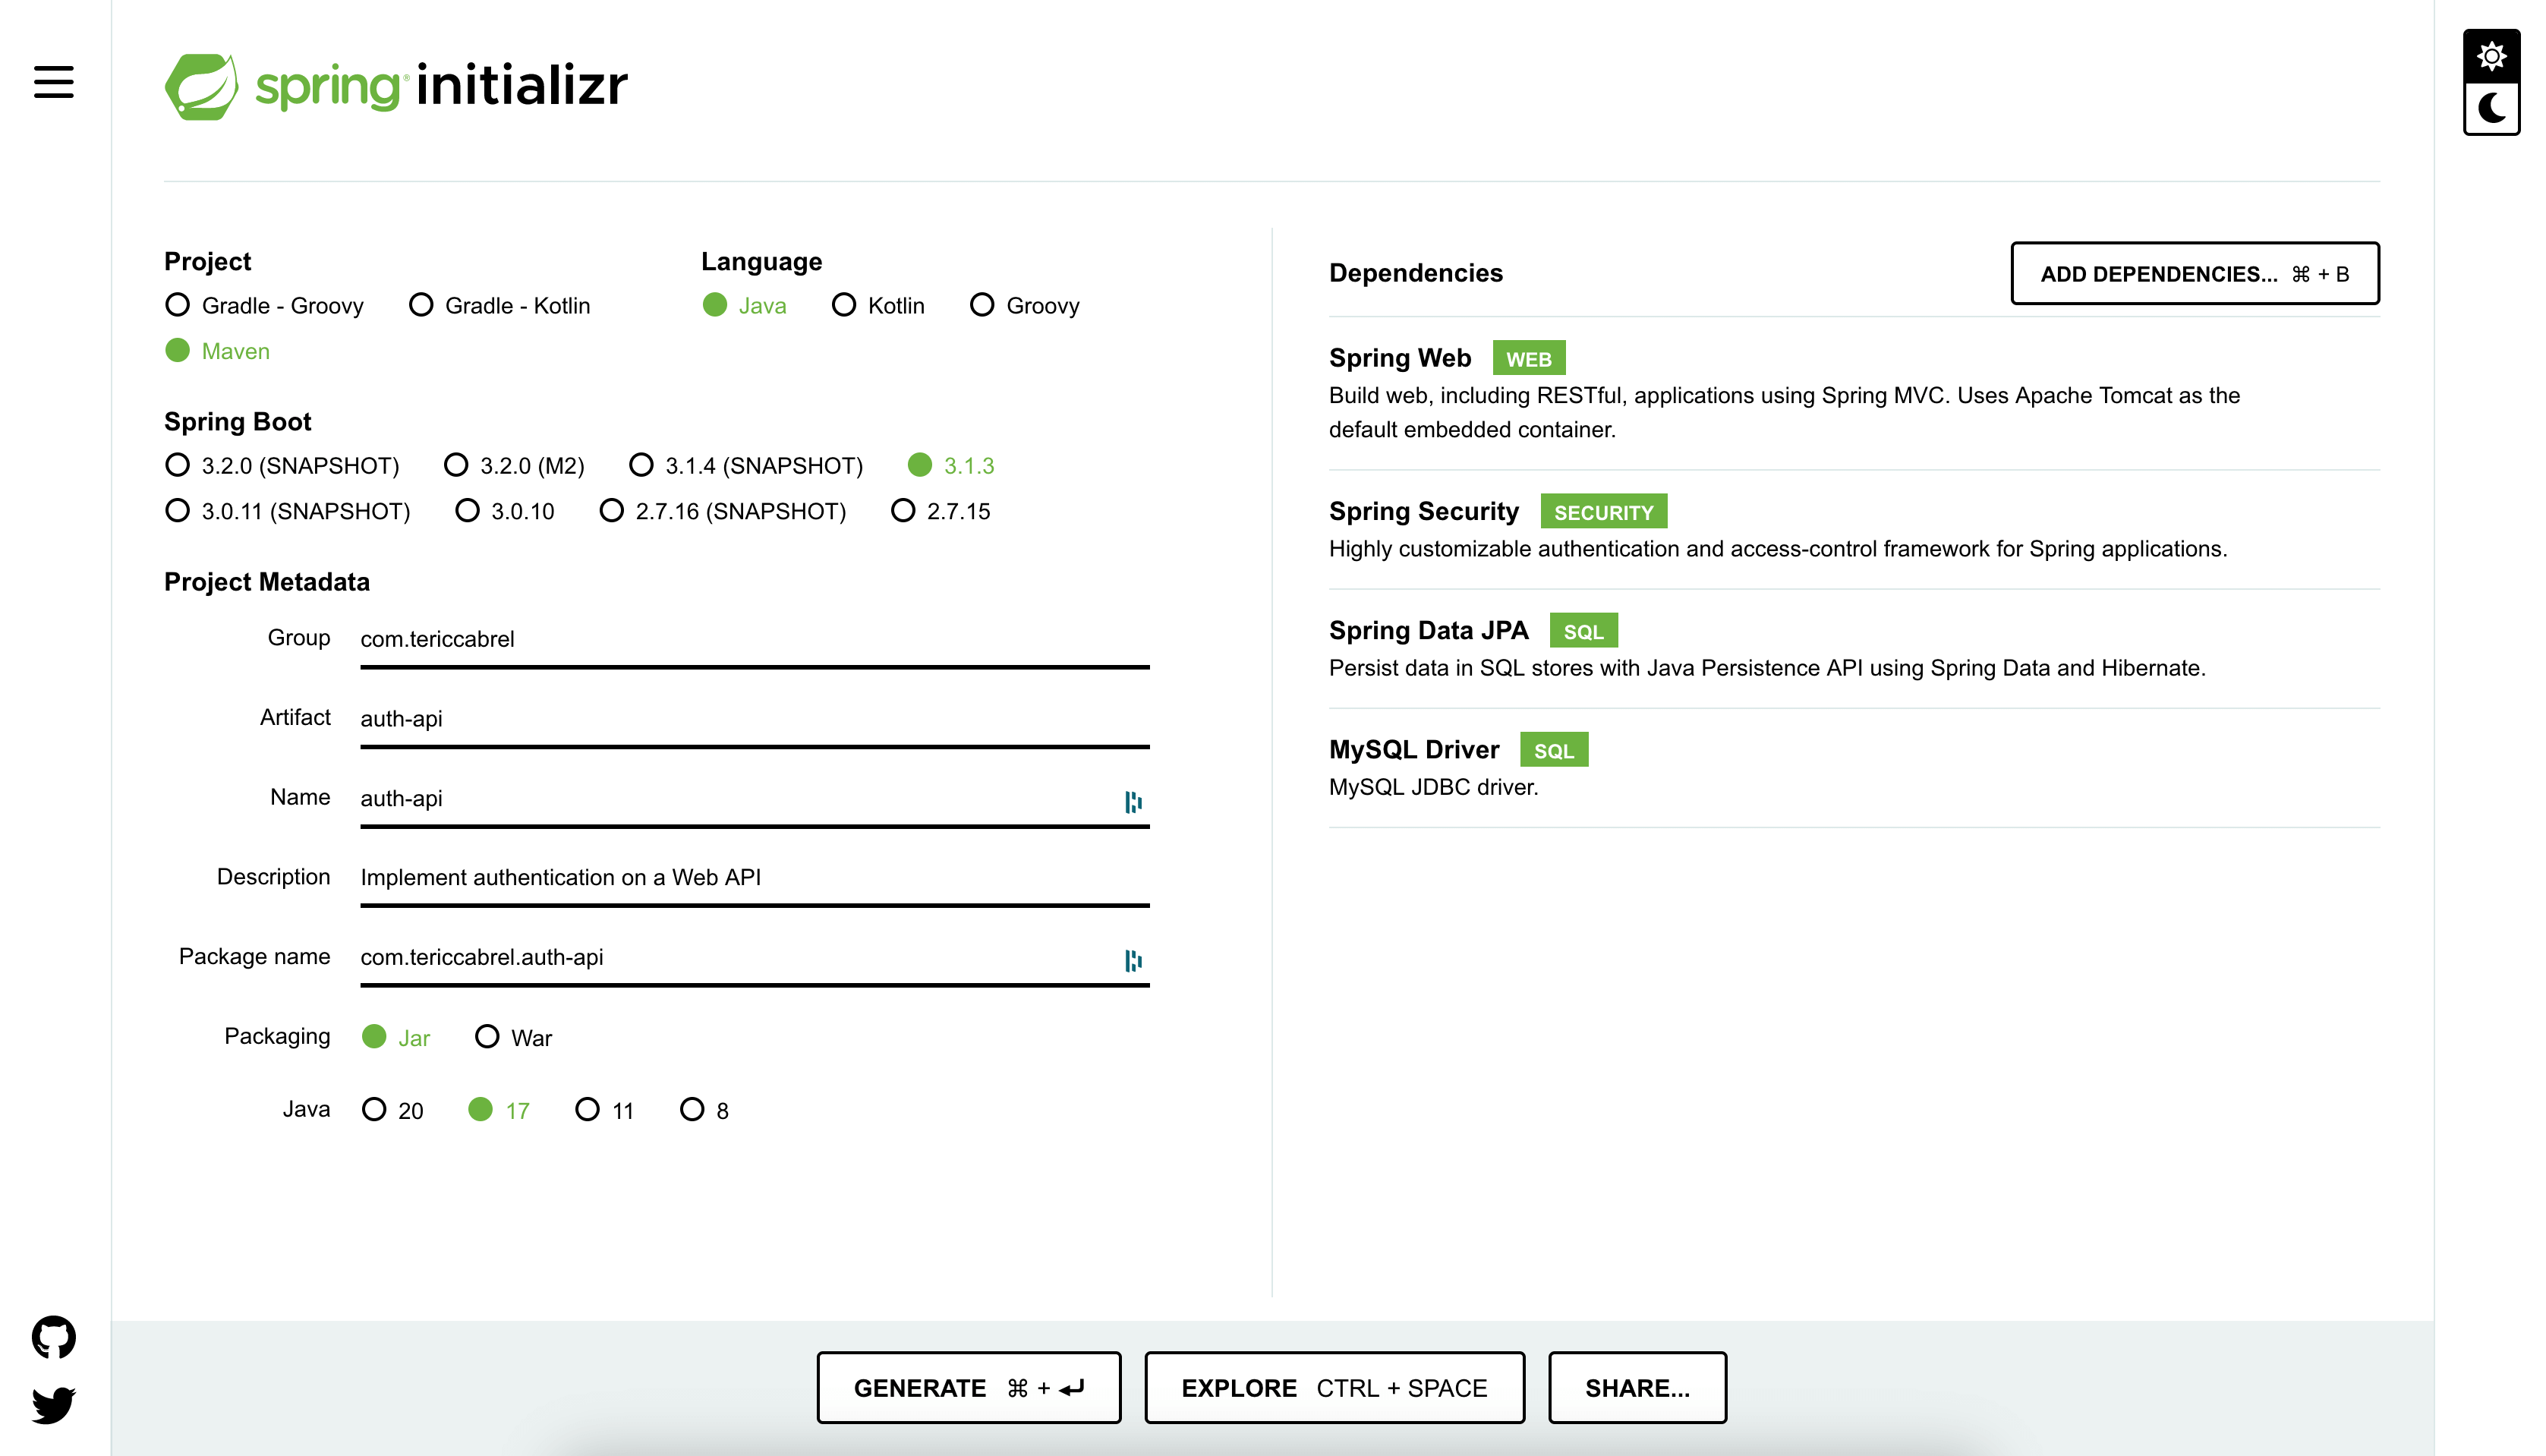
I chose Java 17 and Maven as the dependency manager, but you can use whatever you want.
Click on the button "Generate" to download the project, open it in your IDE, and install the Maven dependencies.
Configure the database connection
Let's configure the application to connect to the database and perform database table creation (using Hibernate under the hood). Open the application configuration file src/resources/application.properties and add the code below:
server.port=8005

spring.datasource.url=jdbc:mysql://localhost:3307/taskdb?serverTimezone=UTC&allowPublicKeyRetrieval=true&useSSL=false
spring.datasource.username=root
spring.datasource.password=secret

## Hibernate properties
spring.jpa.hibernate.ddl-auto=update
spring.jpa.open-in-view=false
Run the application with the command mvn spring-boot:run; it will start at port 8005.
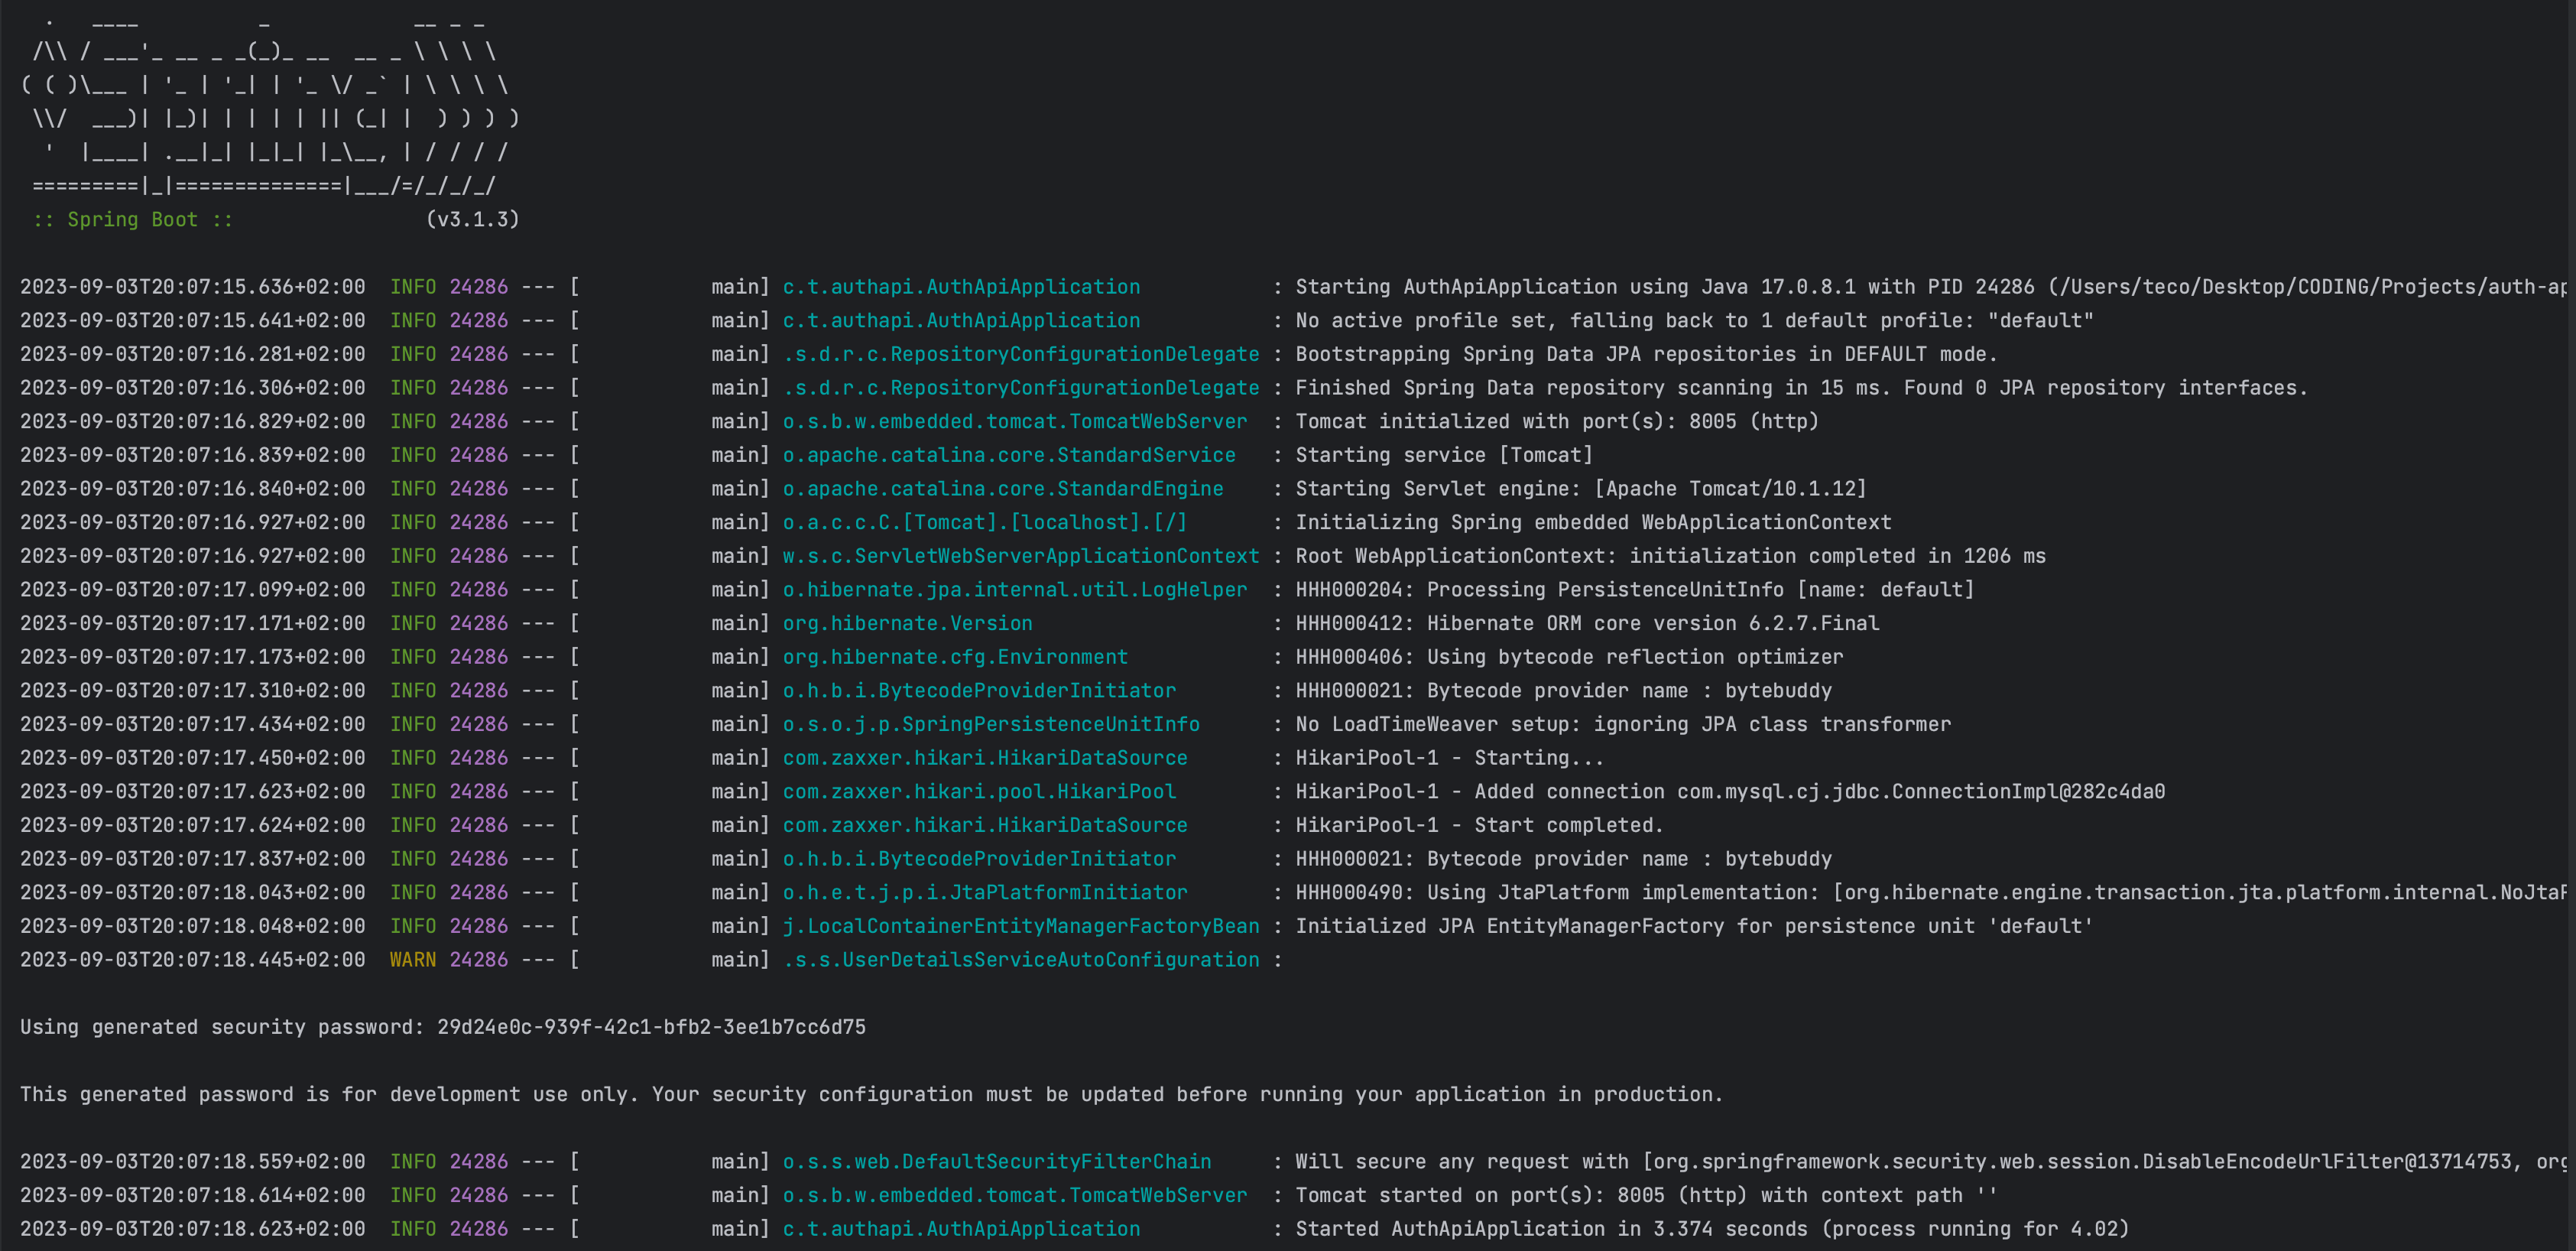
If we pay attention to the console when starting the application, we can see the message displaying a security password generated because Spring Security has the HTTP Basic authentication enabled by default.
Install JSON Web Token dependencies
We need a library to encode, decode, and validate the JWT token in the application. We will use JJWT, so open the pom.xml and the code below in the "dependencies" XML tag:
<dependencies>
    <!---- existing dependencies here....... ---->
    <dependency>
			<groupId>io.jsonwebtoken</groupId>
			<artifactId>jjwt-api</artifactId>
			<version>0.11.5</version>
		</dependency>
		<dependency>
			<groupId>io.jsonwebtoken</groupId>
			<artifactId>jjwt-impl</artifactId>
			<version>0.11.5</version>
		</dependency>
		<dependency>
			<groupId>io.jsonwebtoken</groupId>
			<artifactId>jjwt-jackson</artifactId>
			<version>0.11.5</version>
		</dependency>
</dependencies>
Save and run mvn install to install the dependencies.
Create the user entity
We perform authentication to ensure the users accessing the system are known, meaning they are stored in the database.
The first step is to define the user in our system, and it is done by creating a JPA Entity that will generate the related table in the database. It is recommended to keep the history of database changes using migrations; I wrote a post about using Flyway to handle database migrations.
Inside the package entities create a file User.java and add the code below:
package com.tericcabrel.authapi.entities;

import jakarta.persistence.*;
import org.hibernate.annotations.CreationTimestamp;
import org.hibernate.annotations.UpdateTimestamp;

import java.util.Date;

@Table(name = "users")
@Entity
public class User {
    @Id
    @GeneratedValue(strategy = GenerationType.AUTO)
    @Column(nullable = false)
    private Integer id;

    @Column(nullable = false)
    private String fullName;

    @Column(unique = true, length = 100, nullable = false)
    private String email;

    @Column(nullable = false)
    private String password;

    @CreationTimestamp
    @Column(updatable = false, name = "created_at")
    private Date createdAt;

    @UpdateTimestamp
    @Column(name = "updated_at")
    private Date updatedAt;

    // Getters and setters
}
Inside the package repositories, create a file UserRepository.java; it represents the Data access layer for the User entity. Add the code below:
package com.tericcabrel.authapi.repositories;

import com.tericcabrel.authapi.entities.User;
import org.springframework.data.repository.CrudRepository;
import org.springframework.stereotype.Repository;

import java.util.Optional;

@Repository
public interface UserRepository extends CrudRepository<User, Integer> {
    Optional<User> findByEmail(String email);
}
The function findByEmail() will be used later when implementing the user authentication.
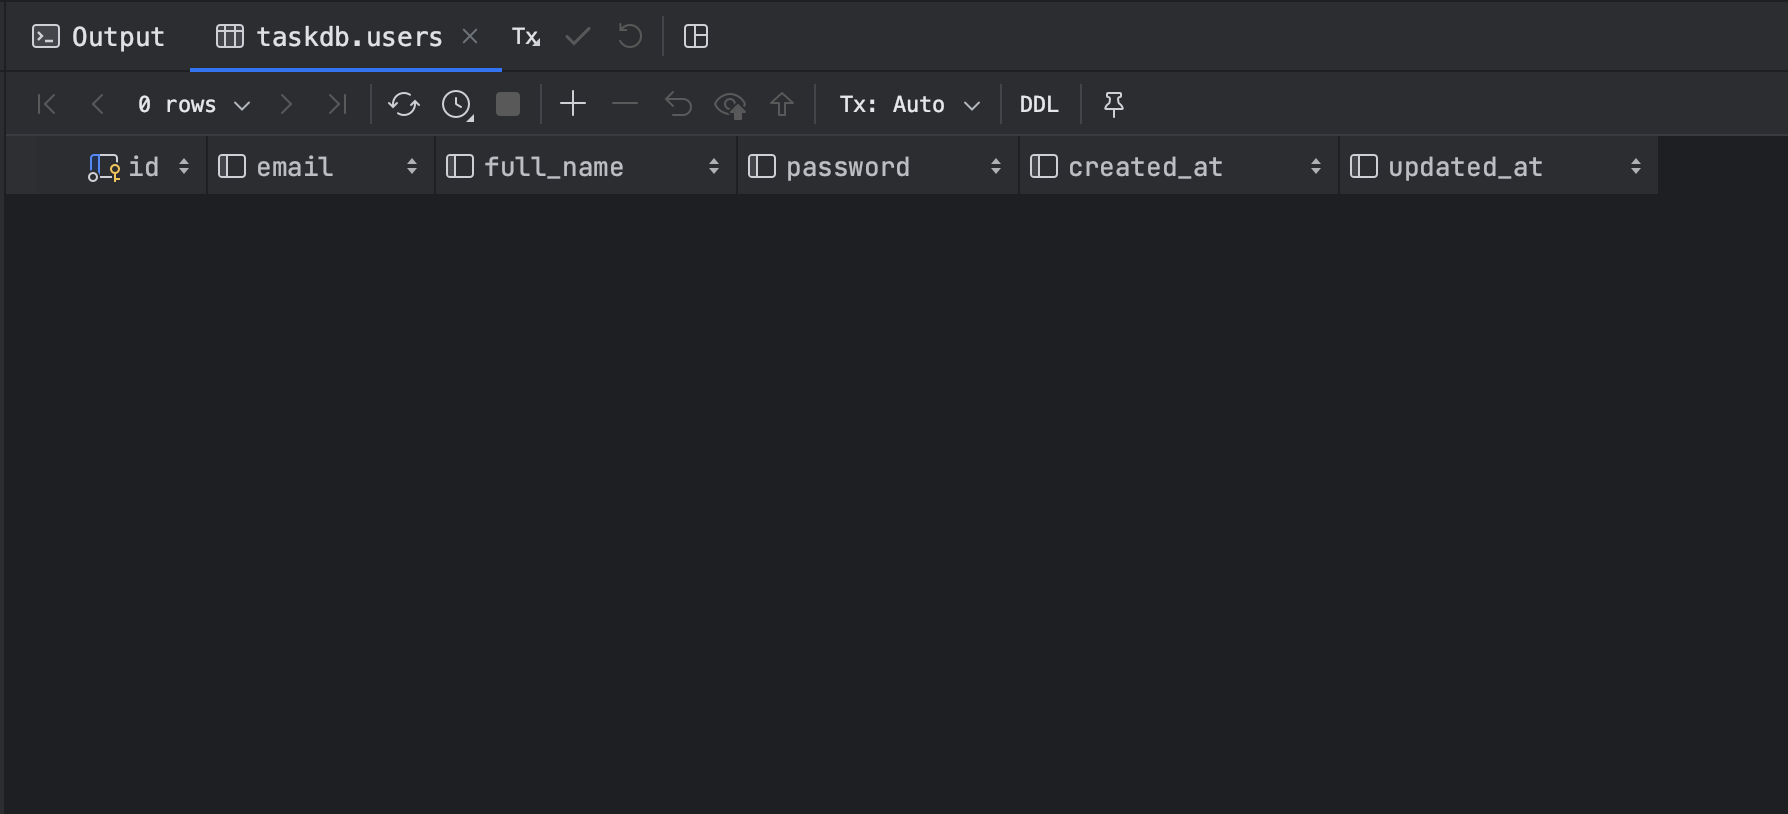
Run the application with the command mvn spring-boot:run; The table "users" will be created in the database.
Extend the User Entity with authentication details
To manage user details related to authentication, Spring Security provides an Interface named "UserDetails" with properties and methods that the User entity must override the implementation.
Update the file "User.java to" implement the UserDetails interface; below is the code of the file:
@Table(name = "users")
@Entity
public class User implements UserDetails {
    @Id
    @GeneratedValue(strategy = GenerationType.AUTO)
    @Column(nullable = false)
    private Integer id;

    @Column(nullable = false)
    private String fullName;

    @Column(unique = true, length = 100, nullable = false)
    private String email;

    @Column(nullable = false)
    private String password;

    @CreationTimestamp
    @Column(updatable = false, name = "created_at")
    private Date createdAt;

    @UpdateTimestamp
    @Column(name = "updated_at")
    private Date updatedAt;

    @Override
    public Collection<? extends GrantedAuthority> getAuthorities() {
        return List.of();
    }

    public String getPassword() {
        return password;
    }

    @Override
    public String getUsername() {
        return email;
    }

    @Override
    public boolean isAccountNonExpired() {
        return true;
    }

    @Override
    public boolean isAccountNonLocked() {
        return true;
    }

    @Override
    public boolean isCredentialsNonExpired() {
        return true;
    }

    @Override
    public boolean isEnabled() {
        return true;
    }

    // Getters and setters
}
The method "getAuthorities()" returns the user's roles list; it is helpful to manage permissions. We return an empty list because we will not cover role-based access control.
The method "getUsername()" returns the email address because it is unique information about the user.
Create the JWT service
To generate, decode, or validate a JSON Web token, we must expose the related methods that use the libraries we installed earlier. We will group them into a service class named JwtService.
Create a package services, then add the file JwtService.java and past the code below:
package com.tericcabrel.authapi.services;

import io.jsonwebtoken.Claims;
import io.jsonwebtoken.Jwts;
import io.jsonwebtoken.SignatureAlgorithm;
import io.jsonwebtoken.io.Decoders;
import io.jsonwebtoken.security.Keys;
import java.security.Key;
import java.util.Date;
import java.util.HashMap;
import java.util.Map;
import java.util.function.Function;

import org.springframework.beans.factory.annotation.Value;
import org.springframework.security.core.userdetails.UserDetails;
import org.springframework.stereotype.Service;

@Service
public class JwtService {
    @Value("${security.jwt.secret-key}")
    private String secretKey;

    @Value("${security.jwt.expiration-time}")
    private long jwtExpiration;

    public String extractUsername(String token) {
        return extractClaim(token, Claims::getSubject);
    }

    public <T> T extractClaim(String token, Function<Claims, T> claimsResolver) {
        final Claims claims = extractAllClaims(token);
        return claimsResolver.apply(claims);
    }

    public String generateToken(UserDetails userDetails) {
        return generateToken(new HashMap<>(), userDetails);
    }

    public String generateToken(Map<String, Object> extraClaims, UserDetails userDetails) {
        return buildToken(extraClaims, userDetails, jwtExpiration);
    }

    public long getExpirationTime() {
        return jwtExpiration;
    }

    private String buildToken(
            Map<String, Object> extraClaims,
            UserDetails userDetails,
            long expiration
    ) {
        return Jwts
                .builder()
                .setClaims(extraClaims)
                .setSubject(userDetails.getUsername())
                .setIssuedAt(new Date(System.currentTimeMillis()))
                .setExpiration(new Date(System.currentTimeMillis() + expiration))
                .signWith(getSignInKey(), SignatureAlgorithm.HS256)
                .compact();
    }

    public boolean isTokenValid(String token, UserDetails userDetails) {
        final String username = extractUsername(token);
        return (username.equals(userDetails.getUsername())) && !isTokenExpired(token);
    }

    private boolean isTokenExpired(String token) {
        return extractExpiration(token).before(new Date());
    }

    private Date extractExpiration(String token) {
        return extractClaim(token, Claims::getExpiration);
    }

    private Claims extractAllClaims(String token) {
        return Jwts
                .parserBuilder()
                .setSigningKey(getSignInKey())
                .build()
                .parseClaimsJws(token)
                .getBody();
    }

    private Key getSignInKey() {
        byte[] keyBytes = Decoders.BASE64.decode(secretKey);
        return Keys.hmacShaKeyFor(keyBytes);
    }
}
The methods that will be used are generateToken(), isTokenValid() and getExpirationTime().
To generate the JWT token, we need a secret key and the token expiration time; these values are read from the application configuration properties file using the annotation @Value.
We must update the application.properties to define these values:
security.jwt.secret-key=3cfa76ef14937c1c0ea519f8fc057a80fcd04a7420f8e8bcd0a7567c272e007b
# 1h in millisecond
security.jwt.expiration-time=3600000
The secret key must be an HMAC hash string of 256 bits; otherwise, the token generation will throw an error. I used this website to generate one.
The token expiration time is expressed in milliseconds, so remember if your token expires too soon.
Override the security configuration
By default, the HTTP basic authentication, but we want to override it to perform the:
- Perform the authentication by finding the user in our database.
- Generate a JWT token when the authentication succeeds.
To override the implementation, let's create a package configs, add the file ApplicationConfiguration.java and add the code below:
package com.tericcabrel.authapi.configs;


import com.tericcabrel.authapi.repositories.UserRepository;
import org.springframework.context.annotation.Bean;
import org.springframework.context.annotation.Configuration;
import org.springframework.security.authentication.AuthenticationManager;
import org.springframework.security.authentication.AuthenticationProvider;
import org.springframework.security.authentication.dao.DaoAuthenticationProvider;
import org.springframework.security.config.annotation.authentication.configuration.AuthenticationConfiguration;
import org.springframework.security.core.userdetails.UserDetailsService;
import org.springframework.security.core.userdetails.UsernameNotFoundException;
import org.springframework.security.crypto.bcrypt.BCryptPasswordEncoder;

@Configuration
public class ApplicationConfiguration {
    private final UserRepository userRepository;

    public ApplicationConfiguration(UserRepository userRepository) {
        this.userRepository = userRepository;
    }

    @Bean
    UserDetailsService userDetailsService() {
        return username -> userRepository.findByEmail(username)
                .orElseThrow(() -> new UsernameNotFoundException("User not found"));
    }

    @Bean
    BCryptPasswordEncoder passwordEncoder() {
        return new BCryptPasswordEncoder();
    }

    @Bean
    public AuthenticationManager authenticationManager(AuthenticationConfiguration config) throws Exception {
        return config.getAuthenticationManager();
    }

    @Bean
    AuthenticationProvider authenticationProvider() {
        DaoAuthenticationProvider authProvider = new DaoAuthenticationProvider();

        authProvider.setUserDetailsService(userDetailsService());
        authProvider.setPasswordEncoder(passwordEncoder());

        return authProvider;
    }
}
The userDetailsService() defines how to retrieve the user using the UserRepository that is injected.
The passwordEncoder() creates an instance of the BCryptPasswordEncoder() used to encode the plain user password.
The authenticationProvider() sets the new strategy to perform the authentication.
If you re-run your application at this step, you will not see the password generated in the console as before. We have successfully overridden the authentication method.
Create the authentication middleware
For every request, we want to retrieve the JWT token in the header "Authorization", and validate it:
- If the token is invalid, reject the request if the token is invalid or continues otherwise.
- If the token is valid, extract the username, find the related user in the database, and set it in the authentication context so you can access it in any application layer.
In the package configs, create a file JwtAuthenticationFilter.java and add the code below that implements everything explained previously:
package com.tericcabrel.authapi.configs;

import com.tericcabrel.authapi.services.JwtService;
import jakarta.servlet.FilterChain;
import jakarta.servlet.ServletException;
import jakarta.servlet.http.HttpServletRequest;
import jakarta.servlet.http.HttpServletResponse;
import org.springframework.lang.NonNull;
import org.springframework.security.authentication.UsernamePasswordAuthenticationToken;
import org.springframework.security.core.Authentication;
import org.springframework.security.core.context.SecurityContextHolder;
import org.springframework.security.core.userdetails.UserDetails;
import org.springframework.security.core.userdetails.UserDetailsService;
import org.springframework.security.web.authentication.WebAuthenticationDetailsSource;
import org.springframework.web.filter.OncePerRequestFilter;
import org.springframework.web.servlet.HandlerExceptionResolver;

import java.io.IOException;

@Component
public class JwtAuthenticationFilter extends OncePerRequestFilter {
    private final HandlerExceptionResolver handlerExceptionResolver;

    private final JwtService jwtService;
    private final UserDetailsService userDetailsService;

    public JwtAuthenticationFilter(
        JwtService jwtService,
        UserDetailsService userDetailsService,
        HandlerExceptionResolver handlerExceptionResolver
    ) {
        this.jwtService = jwtService;
        this.userDetailsService = userDetailsService;
        this.handlerExceptionResolver = handlerExceptionResolver;
    }

    @Override
    protected void doFilterInternal(
        @NonNull HttpServletRequest request,
        @NonNull HttpServletResponse response,
        @NonNull FilterChain filterChain
    ) throws ServletException, IOException {
        final String authHeader = request.getHeader("Authorization");

        if (authHeader == null || !authHeader.startsWith("Bearer ")) {
            filterChain.doFilter(request, response);
            return;
        }

        try {
            final String jwt = authHeader.substring(7);
            final String userEmail = jwtService.extractUsername(jwt);

            Authentication authentication = SecurityContextHolder.getContext().getAuthentication();

            if (userEmail != null && authentication == null) {
                UserDetails userDetails = this.userDetailsService.loadUserByUsername(userEmail);

                if (jwtService.isTokenValid(jwt, userDetails)) {
                    UsernamePasswordAuthenticationToken authToken = new UsernamePasswordAuthenticationToken(
                            userDetails,
                            null,
                            userDetails.getAuthorities()
                    );

                    authToken.setDetails(new WebAuthenticationDetailsSource().buildDetails(request));
                    SecurityContextHolder.getContext().setAuthentication(authToken);
                }
            }

            filterChain.doFilter(request, response);
        } catch (Exception exception) {
            handlerExceptionResolver.resolveException(request, response, null, exception);
        }
    }
}
A great thing to do here is to use caching to find the user by his email address to improve the performance. I wrote a blog post to show you how to implement caching in the SpringBoot application.

Configure the application requester filter
The custom authentication is ready, and the remaining thing is to define what criteria an incoming request must match before being forwarded to application middleware. We want the following criteria:
- There is no need to provide the CSRF token because we will use it.
- The request URL path matching
/auth/signupand/auth/logindoesn't require authentication. - Any other request URL path must be authenticated.
- The request is stateless, meaning every request must be treated as a new one, even if it comes from the same client or has been received earlier.
- Must use the custom authentication provider, and they must be executed before the authentication middleware.
- The CORS configuration must allow only POST and GET requests.
In the package configs, create a file JwtAuthenticationFilter.java and add the code below:
package com.tericcabrel.authapi.configs;

import org.springframework.context.annotation.Bean;
import org.springframework.context.annotation.Configuration;
import org.springframework.security.authentication.AuthenticationProvider;
import org.springframework.security.config.annotation.web.builders.HttpSecurity;
import org.springframework.security.config.annotation.web.configuration.EnableWebSecurity;
import org.springframework.security.config.http.SessionCreationPolicy;
import org.springframework.security.web.SecurityFilterChain;
import org.springframework.security.web.authentication.UsernamePasswordAuthenticationFilter;
import org.springframework.web.cors.CorsConfiguration;
import org.springframework.web.cors.CorsConfigurationSource;
import org.springframework.web.cors.UrlBasedCorsConfigurationSource;

import java.util.List;

@Configuration
@EnableWebSecurity
public class SecurityConfiguration {
    private final AuthenticationProvider authenticationProvider;
    private final JwtAuthenticationFilter jwtAuthenticationFilter;

    public SecurityConfiguration(
        JwtAuthenticationFilter jwtAuthenticationFilter,
        AuthenticationProvider authenticationProvider
    ) {
        this.authenticationProvider = authenticationProvider;
        this.jwtAuthenticationFilter = jwtAuthenticationFilter;
    }

    @Bean
    public SecurityFilterChain securityFilterChain(HttpSecurity http) throws Exception {
        http.csrf()
                .disable()
                .authorizeHttpRequests()
                .requestMatchers("/auth/**")
                .permitAll()
                .anyRequest()
                .authenticated()
                .and()
                .sessionManagement()
                .sessionCreationPolicy(SessionCreationPolicy.STATELESS)
                .and()
                .authenticationProvider(authenticationProvider)
                .addFilterBefore(jwtAuthenticationFilter, UsernamePasswordAuthenticationFilter.class);

        return http.build();
    }

    @Bean
    CorsConfigurationSource corsConfigurationSource() {
        CorsConfiguration configuration = new CorsConfiguration();

        configuration.setAllowedOrigins(List.of("http://localhost:8005"));
        configuration.setAllowedMethods(List.of("GET","POST"));
        configuration.setAllowedHeaders(List.of("Authorization","Content-Type"));

        UrlBasedCorsConfigurationSource source = new UrlBasedCorsConfigurationSource();

        source.registerCorsConfiguration("/**",configuration);

        return source;
    }
}
Our authentication is done and ready to be tested.
Create the authentication service
This service will contain the logic for registering a new user and authenticating an existing user.
Create a new package dtos that will have the DTOs for both actions.
Create the file RegisterUserDto.java and add the code below:
package com.tericcabrel.authapi.dtos;

public class RegisterUserDto {
    private String email;

    private String password;

    private String fullName;

    // getters and setters here...
}
Create the file LoginUserDto.java and add the code below:
package com.tericcabrel.authapi.dtos;

public class LoginUserDto {
    private String email;

    private String password;

    // getters and setters here...
}
We didn't apply any validation in the DTO for brevity, and if you are interested in learning how I wrote this complete blog post below to help you:

In the package services, create a file AuthenticationService.java and add the code below:
package com.tericcabrel.authapi.services;

import com.tericcabrel.authapi.dtos.LoginUserDto;
import com.tericcabrel.authapi.dtos.RegisterUserDto;
import com.tericcabrel.authapi.entities.User;
import com.tericcabrel.authapi.repositories.UserRepository;
import org.springframework.security.authentication.AuthenticationManager;
import org.springframework.security.authentication.UsernamePasswordAuthenticationToken;
import org.springframework.security.crypto.password.PasswordEncoder;
import org.springframework.stereotype.Service;

@Service
public class AuthenticationService {
    private final UserRepository userRepository;

    private final PasswordEncoder passwordEncoder;

    private final AuthenticationManager authenticationManager;

    public AuthenticationService(
        UserRepository userRepository,
        AuthenticationManager authenticationManager,
        PasswordEncoder passwordEncoder
    ) {
        this.authenticationManager = authenticationManager;
        this.userRepository = userRepository;
        this.passwordEncoder = passwordEncoder;
    }

    public User signup(RegisterUserDto input) {
        User user = new User()
                .setFullName(input.getFullName())
                .setEmail(input.getEmail())
                .setPassword(passwordEncoder.encode(input.getPassword()));

        return userRepository.save(user);
    }

    public User authenticate(LoginUserDto input) {
        authenticationManager.authenticate(
                new UsernamePasswordAuthenticationToken(
                        input.getEmail(),
                        input.getPassword()
                )
        );

        return userRepository.findByEmail(input.getEmail())
                .orElseThrow();
    }
}
Create user registration and authentication routes
We can now create the routes /auth/signup and /auth/login for user registration and authentication, respectively.
Create a package controllers, add the file AuthenticationController.java and add the code below:
import com.tericcabrel.authapi.entities.User;
import com.tericcabrel.authapi.dtos.LoginUserDto;
import com.tericcabrel.authapi.dtos.RegisterUserDto;
import com.tericcabrel.authapi.responses.LoginResponse;
import com.tericcabrel.authapi.services.AuthenticationService;
import com.tericcabrel.authapi.services.JwtService;
import org.springframework.http.ResponseEntity;
import org.springframework.web.bind.annotation.PostMapping;
import org.springframework.web.bind.annotation.RequestBody;
import org.springframework.web.bind.annotation.RequestMapping;
import org.springframework.web.bind.annotation.RestController;

@RequestMapping("/auth")
@RestController
public class AuthenticationController {
    private final JwtService jwtService;

    private final AuthenticationService authenticationService;

    public AuthenticationController(JwtService jwtService, AuthenticationService authenticationService) {
        this.jwtService = jwtService;
        this.authenticationService = authenticationService;
    }

    @PostMapping("/signup")
    public ResponseEntity<User> register(@RequestBody RegisterUserDto registerUserDto) {
        User registeredUser = authenticationService.signup(registerUserDto);

        return ResponseEntity.ok(registeredUser);
    }

    @PostMapping("/login")
    public ResponseEntity<LoginResponse> authenticate(@RequestBody LoginUserDto loginUserDto) {
        User authenticatedUser = authenticationService.authenticate(loginUserDto);

        String jwtToken = jwtService.generateToken(authenticatedUser);

        LoginResponse loginResponse = new LoginResponse().setToken(jwtToken).setExpiresIn(jwtService.getExpirationTime());

        return ResponseEntity.ok(loginResponse);
    }
}
The authentication request returns a LoginReponse instance; below is the code of that file:
public class LoginResponse {
    private String token;

    private long expiresIn;

    public String getToken() {
        return token;
    }

	// Getters and setters...
}
Test the implementation
Run the application, open an HTTP client, and send a POST request to /auth/signup with the information in the request body.
Call the API route to register a new user.
Now, let's try to authenticate with the user we registered. Send a POST request to /auth/login with the information in the request body.
Call the API route to authenticate a user and generate the JWT.
Create restricted endpoints to retrieve users
The endpoints /users/me and /users respectively return the authenticated user from the JWT token provided and the list of all the users.
Create the file UserController.java and add the code below:
package com.tericcabrel.authapi.controllers;

import com.tericcabrel.authapi.entities.User;
import com.tericcabrel.authapi.services.UserService;
import org.springframework.http.ResponseEntity;
import org.springframework.security.core.Authentication;
import org.springframework.security.core.context.SecurityContextHolder;
import org.springframework.web.bind.annotation.GetMapping;
import org.springframework.web.bind.annotation.RequestMapping;
import org.springframework.web.bind.annotation.RestController;

import java.util.List;

@RequestMapping("/users")
@RestController
public class UserController {
    private final UserService userService;

    public UserController(UserService userService) {
        this.userService = userService;
    }

    @GetMapping("/me")
    public ResponseEntity<User> authenticatedUser() {
        Authentication authentication = SecurityContextHolder.getContext().getAuthentication();

        User currentUser = (User) authentication.getPrincipal();

        return ResponseEntity.ok(currentUser);
    }

    @GetMapping("/")
    public ResponseEntity<List<User>> allUsers() {
        List <User> users = userService.allUsers();

        return ResponseEntity.ok(users);
    }
}
In the above code, we retrieve the authenticated user from the security context that has been set in the file JwtAuthenticationFilter.java at line 68.
we can see the UserService is injected in the controller and provides the function allUsers() that retrieves the list of users in the database and returns it.
Before testing the implementation, let's create the UserService.java in the package services and add the code below:
package com.tericcabrel.authapi.services;

import com.tericcabrel.authapi.entities.User;
import com.tericcabrel.authapi.repositories.UserRepository;
import org.springframework.stereotype.Service;

import java.util.ArrayList;
import java.util.List;

@Service
public class UserService {
    private final UserRepository userRepository;

    public UserService(UserRepository userRepository) {
        this.userRepository = userRepository;
    }

    public List<User> allUsers() {
        List<User> users = new ArrayList<>();

        userRepository.findAll().forEach(users::add);

        return users;
    }
}
Test the implementation
Re-run the application and follow this scenario:
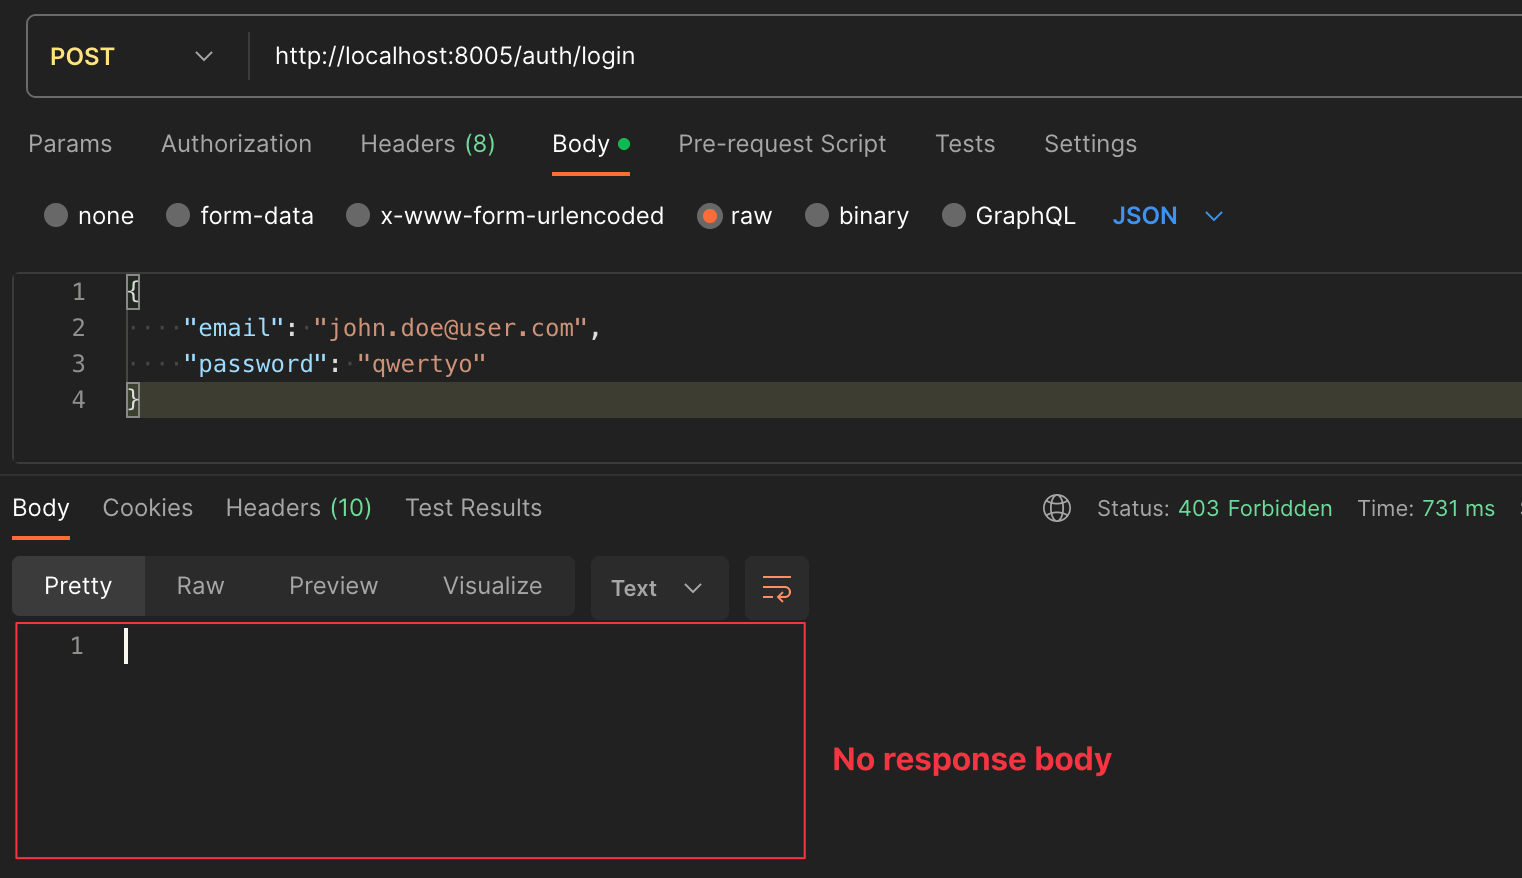
- Send a GET request to
/users/meand/users, you will get a 403 error - Authenticate with POST request at
/auth/loginand obtain the JWT token. - Put the JWT token in the authorization header of the request
/users/meand/users; you will get an HTTP response code 200 with the data.
Call the protected API routes using the JWT generated through the login
Customize authentication error messages
The API prevents access from an unauthenticated user or returns a status error when the authentication credentials aren't valid. Still, there is no additional message to give more details to developers consuming the API.
There are different authentications we want to return a more explicit message. The table below enumerates them:
| Authentication Error | Exception thrown | HTTP Status code |
|---|---|---|
| Bad login credentials | BadCredentialsException | 401 |
| Account locked | AccountStatusException | 403 |
| Not authorized to access a resource | AccessDeniedException | 403 |
| Invalid JWT | SignatureException | 401 |
| JWT has expired | ExpiredJwtException | 401 |
To handle these errors, we must use the Spring global exception handler to catch the exception thrown and customize the response to send to the client.
Create a package exceptions then create a file named GlobalExceptionHandler.java and add the code below:
package com.tericcabrel.authapi.exceptions;

import io.jsonwebtoken.ExpiredJwtException;
import io.jsonwebtoken.security.SignatureException;
import org.springframework.http.HttpStatusCode;
import org.springframework.http.ProblemDetail;
import org.springframework.security.access.AccessDeniedException;
import org.springframework.security.authentication.AccountStatusException;
import org.springframework.security.authentication.BadCredentialsException;
import org.springframework.web.bind.annotation.ExceptionHandler;
import org.springframework.web.bind.annotation.RestControllerAdvice;

@RestControllerAdvice
public class GlobalExceptionHandler {
    @ExceptionHandler(Exception.class)
    public ProblemDetail handleSecurityException(Exception exception) {
        ProblemDetail errorDetail = null;

        // TODO send this stack trace to an observability tool
        exception.printStackTrace();

        if (exception instanceof BadCredentialsException) {
            errorDetail = ProblemDetail.forStatusAndDetail(HttpStatusCode.valueOf(401), exception.getMessage());
            errorDetail.setProperty("description", "The username or password is incorrect");

            return errorDetail;
        }

        if (exception instanceof AccountStatusException) {
            errorDetail = ProblemDetail.forStatusAndDetail(HttpStatusCode.valueOf(403), exception.getMessage());
            errorDetail.setProperty("description", "The account is locked");
        }

        if (exception instanceof AccessDeniedException) {
            errorDetail = ProblemDetail.forStatusAndDetail(HttpStatusCode.valueOf(403), exception.getMessage());
            errorDetail.setProperty("description", "You are not authorized to access this resource");
        }

        if (exception instanceof SignatureException) {
            errorDetail = ProblemDetail.forStatusAndDetail(HttpStatusCode.valueOf(403), exception.getMessage());
            errorDetail.setProperty("description", "The JWT signature is invalid");
        }

        if (exception instanceof ExpiredJwtException) {
            errorDetail = ProblemDetail.forStatusAndDetail(HttpStatusCode.valueOf(403), exception.getMessage());
            errorDetail.setProperty("description", "The JWT token has expired");
        }

        if (errorDetail == null) {
            errorDetail = ProblemDetail.forStatusAndDetail(HttpStatusCode.valueOf(500), exception.getMessage());
            errorDetail.setProperty("description", "Unknown internal server error.");
        }

        return errorDetail;
    }
}
Re-run the application and try to authenticate with invalid credentials, send a request with an expired JWT or an invalid JWT, etc...
Authentication errors response returned with detailed information.
Wrap up
In this post, we saw how to implement the JSON Web Token authentication in a Spring Boot application. Here are the main steps of this process:
- JWT authentication filter to extract and validate the token from the request header.
- Whitelist some API routes and protect those requiring a token.
- Perform the authentication, generate the JWT, and set an expiration time.
- Use the JWT generated to access protected routes.
- Catch authentication exceptions to customize the response sent to the client.
With this implementation, you have the basis to protect your API, and you can go a step further by implementing a Role-Based Access Control (RBAC) following my tutorial to restrict a resource based on the user role and permission.
You can find the code source on the GitHub repository.
Follow me on Twitter or subscribe to my newsletter to avoid missing the upcoming posts and the tips and tricks I occasionally share.