
Asynchronous communication between Node.js applications using RabbitMQ


Photo by Modestas Urbonas / Unsplash
In the previous post, we saw how to connect Install RabbitMQ on the server and enable the Web administration interface. From this UI, we can browse available queues, messages published in a queue, exchanges, etc...
AMQP is the protocol used to allow the connection between many services. To support most programming languages, connectors will enable you to interact with the server by exchanging messages with others applications.
We will use the Node.js package of the AMQP to communicate between two Node.js applications.
The use case
RabbitMQ is great for event-driven applications, which will act as the bridge to exchange information between applications.
Let's say we are building a website application where the core back-end communicates with a notification service responsible for emailing users. When a user register, we must send a confirmation email with a confirmation code. The email sending should not block the response to the client.
The picture below shows the system architecture.
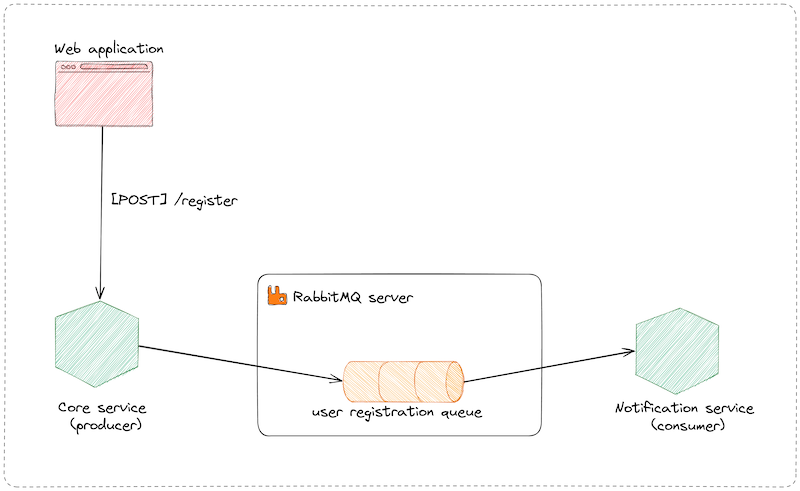
In the event-driven architecture, we use the term producer and consumer to designate the application that sends the message into the queue and the one that reads the message from the queue.
Prerequisites
To follow this post, you will need to install this tool on your computer:
- Node.js 16 or higher - download link
- A Node.js package manager such as NPM or Yarn
Set up the project
The first project will be the producer responsible for sending messages in the queue.
We will use the Node.js starter project we built in this post; the project contains a branch called express that comes with the Express framework. We will use it further in this tutorial.
Run the commands below:
git clone https://github.com/tericcabrel/node-ts-starter.git -b express  app-producer

cd app-producer

cp .env.example .env

# Update the environment variable if needed
nano .env

yarn install

yarn start
Navigate to the URL http://localhost:4500 to ensure everything works.
Connect to the RabbitMQ server
From a Node.js application, to interact with the RabbitMQ server, we will use the Node.js package that abstracts the commands to send. We will use the package named amqplib.
Run the command below to install it:
yarn add amqplib
yarn add -D @types/amqplib
We connect to the server using the connection URI that has the following format:
amqp://<username>:<password>@<host>:<port>
If the port number is not provided, the default value is 5672. Check out this link for more advanced URI connection options.
You can also use a JSON object with the connection options:
{
  protocol: 'amqp',
  hostname: 'localhost',
  port: 5672,
  username: 'guest',
  password: 'guest',
  locale: 'en_US',
  frameMax: 0,
  heartbeat: 0,
  vhost: '/',
}
Based on the credentials created in the previous tutorial, our connection URI is amqp://admin:MyStrong-P4ssw0rd$@rabbitmq.tericcabrel.com

Create a file named rabbitmq-connection.ts and add the code below:
import amqplib from 'amqplib';

export const connectToRabbitMQ = async () => {
  return amqplib.connect('amqp://admin:MyStrong-P4ssw0rd$@rabbitmq.tericcabrel.com');
};
Update the file src/index.ts to make the connection to the RabbitMQ server when the server starts.
import { Connection } from 'amqplib';
import { connectToRabbitMQ } from './rabbitmq-connection';

let rabbitConnection: Connection;

// Express server initialization code here...

app.listen(PORT, async () => {
  rabbitConnection = await connectToRabbitMQ();

  console.log(`Application started on URL ${HOST}:${PORT} 🎉`);
});
Run yarn start to launch the application, check out the credentials if there is a connection error.
Send a message in the queue
We need two things to send a message in the queue:
- The queue name
- The message to send in the queue represented as a string
We want to send in the queue the message we will be using to send an email to the user. Below is the shape of the JSON object to send,
{
    "fullName": string,
    "emailAddress": string,
    "confirmationCode": number
}
The queue name will be user-registration.
Update the file src/index.ts to add the code below:
app.post('/register', async (req, res) => {
  const { email, name } = req.body;

  // TODO save register in the database

  const QUEUE_NAME = 'user-registration';
  const messageData = {
    fullName: name,
    emailAddress: email,
    confirmationCode: Math.floor(Math.random() * 900000) + 100000,
  };
  const messageDataAsString = JSON.stringify(messageData);

  const channel = await rabbitConnection.createChannel();

  channel.sendToQueue(QUEUE_NAME, Buffer.from(messageDataAsString));

  return res.json({ message: 'User registered successfully' });
});
Before running this code, we will create the queue using the Web administration interface.
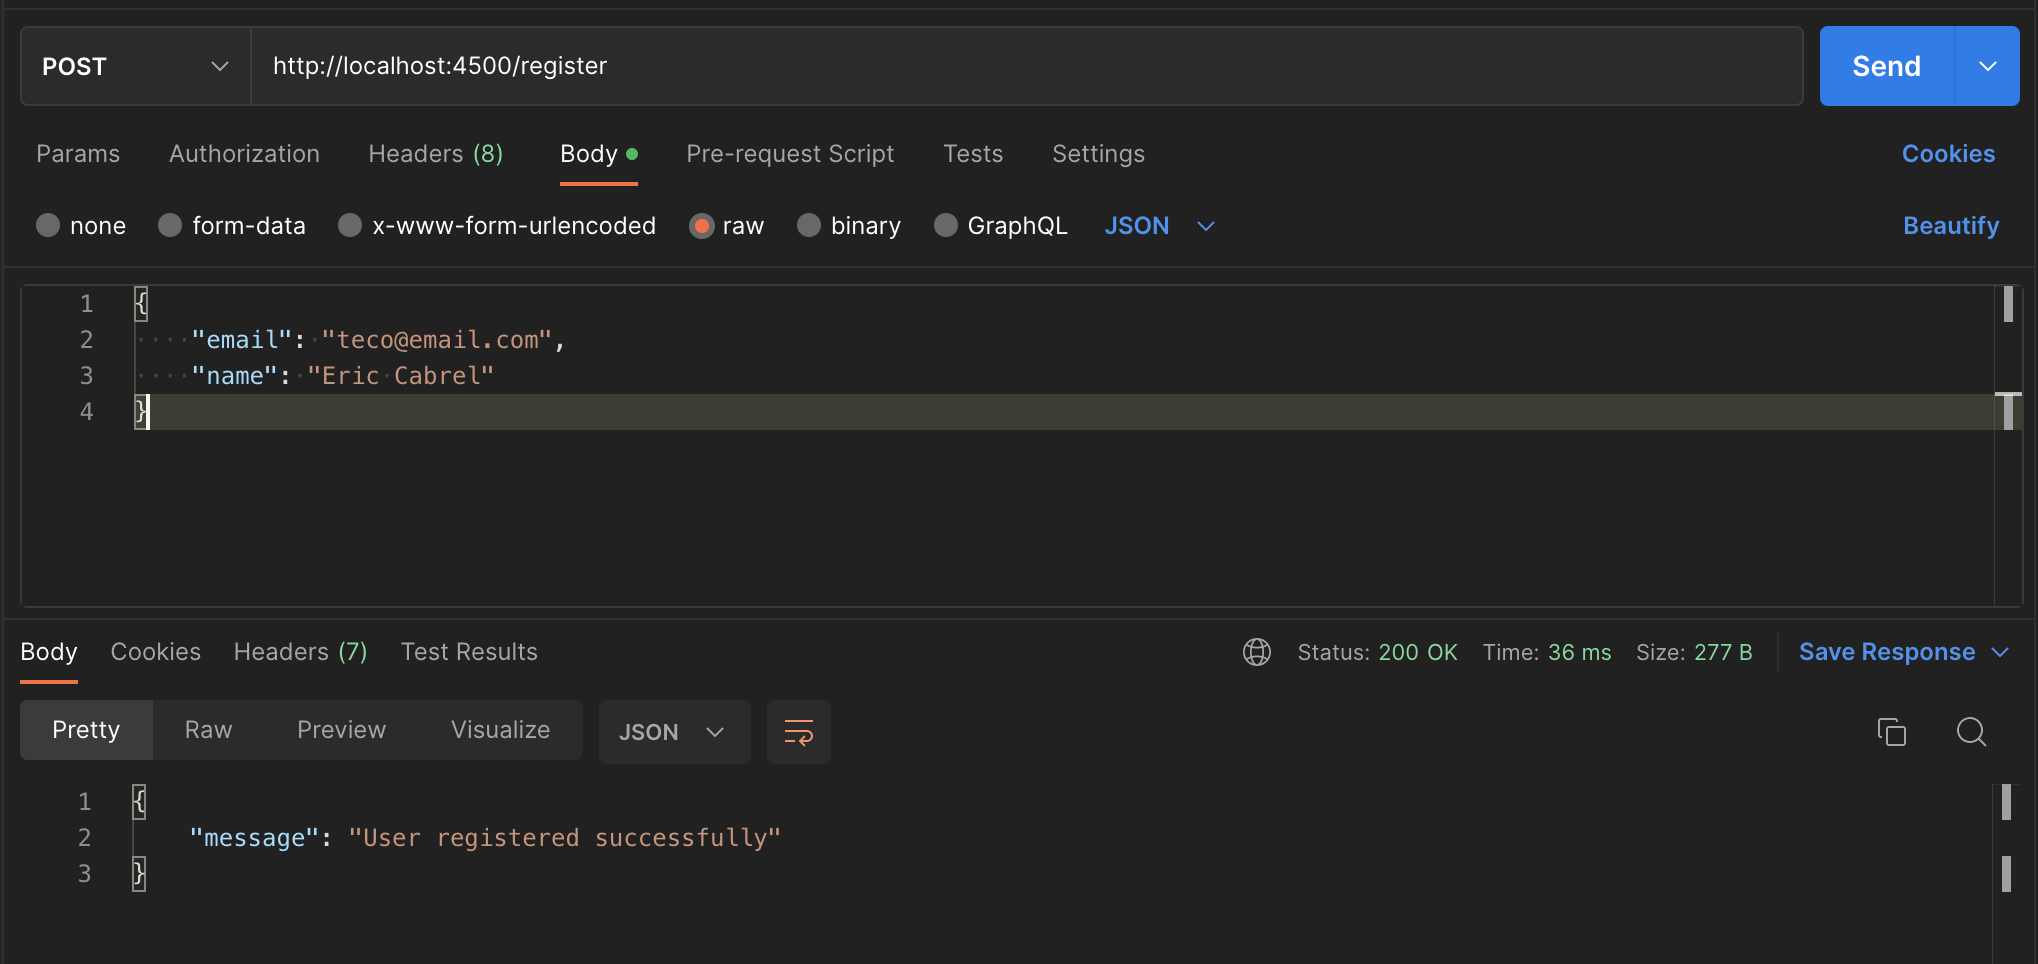
Start the application and open an HTTP client to send a POST request to http://localhost:4500/register
From the Web administration interface, we can browse messages available in the queue user-registration.
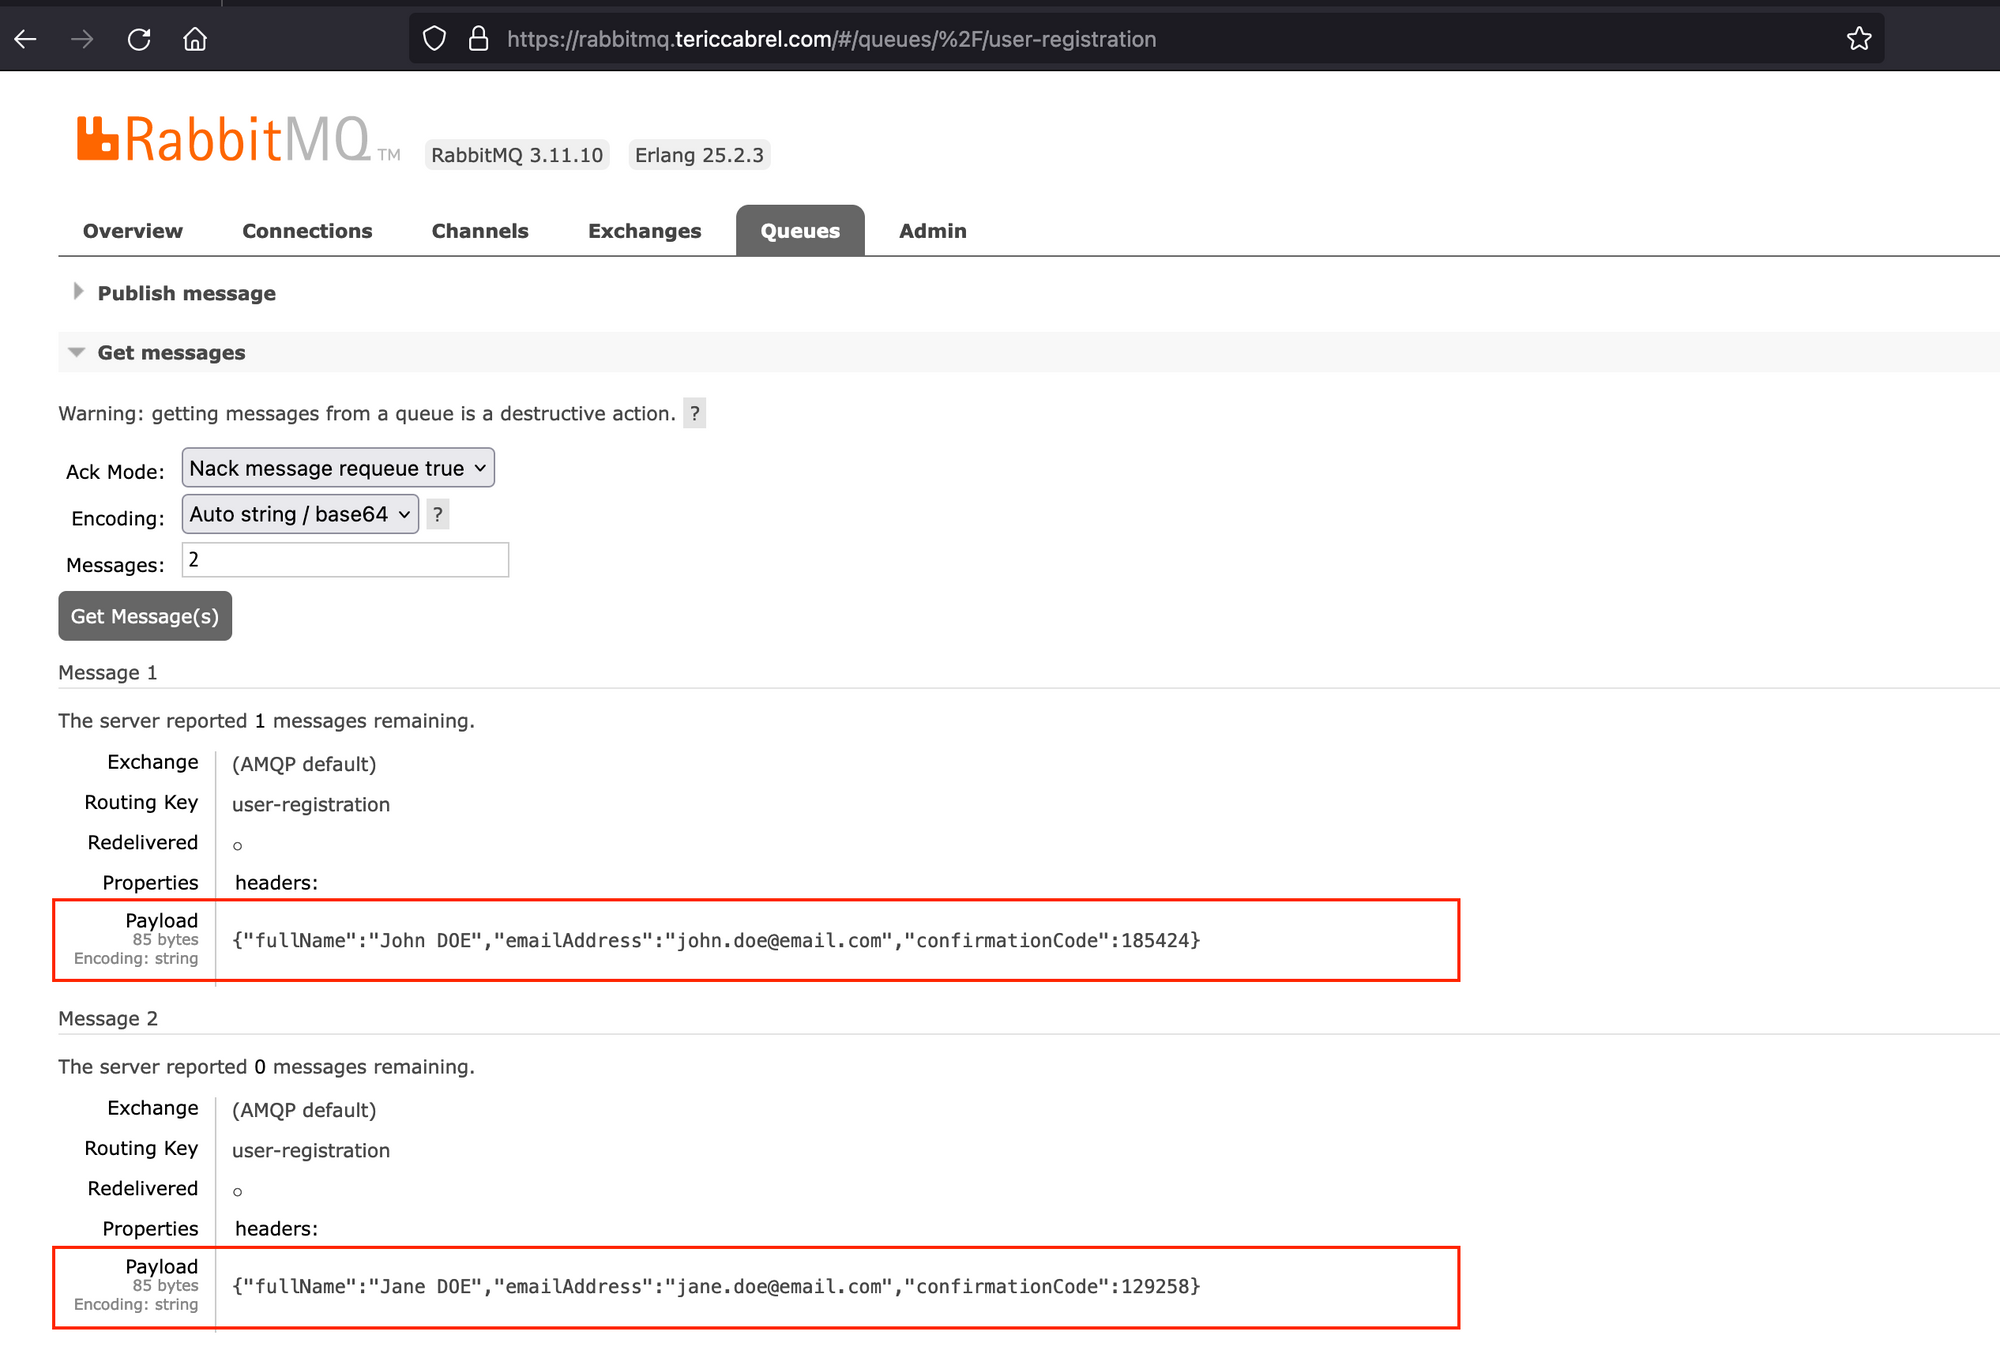
These messages are waiting to be consumed by another application, usually called the consumer.
Read a message in the queue
Let's set up a new Node.js project from our boilerplate starter, but we don't Express in this case. We will name the project app-consumer.
git clone https://github.com/tericcabrel/node-ts-starter.git app-consumer

cd app-consumer

yarn install

yarn start
Let's install the AMQP Node.js package.
yarn add amqplib
yarn add -D @types/amqplib
Create a file src/rabbitmq-connection.ts and add the code below:
import amqplib from 'amqplib';

export const connectToRabbitMQ = async () => {
  return amqplib.connect({
    username: 'admin',
    password: 'MyStrong-P4ssw0rd$',
    port: 5672,
    hostname: 'rabbitmq.tericcabrel.com',
    vhost: '/',
  });
};
Instead of connection URI, we used the JSON properties to define the connection options just to see in action. Using the connection string will still work, such as the producer.
Replace the content of the file src/index.ts with the code below:
import { connectToRabbitMQ } from './rabbitmq-connection';

(async () => {
  const rabbitConnection = await connectToRabbitMQ();

  console.log('Successfully connected to RabbitMQ server!');
})();
Run the command yarn start to launch the application and ensure there is no connection error printed in the console.
In the Web administration interface, you can view the list of the applications connected to the RabbitMQ server by clicking on the tab "Connections"
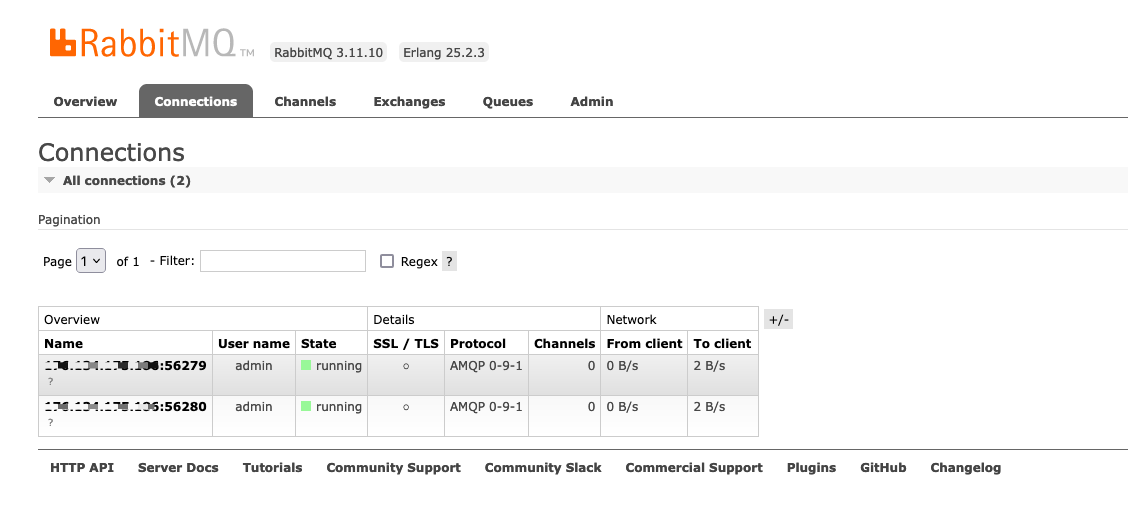
We see two connections, one from the app-producer and one from the app-consumer we use the username to distinguish the application, but I used the same credentials for both applications. Keep in mind to create a new user for each application.
Let's update the code of the file src/index.ts to read messages from the queue.
import { connectToRabbitMQ } from './rabbitmq-connection';

(async () => {
  const QUEUE_NAME = 'user-registration';

  const rabbitConnection = await connectToRabbitMQ();

  console.log('Successfully connected to RabbitMQ server!');

  const channel = await rabbitConnection.createChannel();

  await channel.assertQueue(QUEUE_NAME);

  await channel.consume(QUEUE_NAME, async (message) => {
    if (!message) {
      console.error('Consumer cancelled by server!');
      return;
    }

    const data = JSON.parse(message.content.toString());

    console.table(data);

    // TODO send an email using the data
  });
})();
We create a channel, assert that the queue exists, and finally consume messages from the queue and perform some action with the message received.
We will not cover the email sending here, but I wrote a post on how to do that in Node.js.

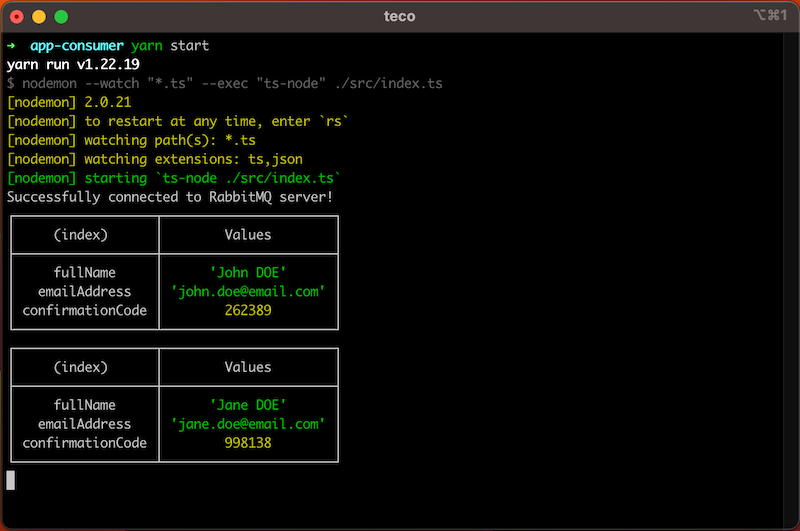
Let's test it by running the app-consumer with the command yarn start.
Send a request from Postman to the app-producer, and you will see the output in the console of the app-consumer.
Message Queue Acknowledgement
In the demo, the producer sent two messages in the queue, and the consumer application received them as expected. Now, restart the consumer application; we will see the same messages printed in the console as if they were just published.
This happens because when the message is received by the app consumer, the Rabbit MQ server doesn't know if the message has been processed successfully, so it doesn't delete the message in the queue but changes the state from ready to unacked so other applications listening to this queue cannot read this message.
To fix this, the consumer application must send a confirmation to the RabbitMQ server. We can do this with a single line of code:
channel.ack(message);
We usually place this instruction in last, but it can vary depending on your use case (You explicitly republish the message in the queue when there is an error).
This is the complete code of the file src/index.ts
import { connectToRabbitMQ } from './rabbitmq-connection';

(async () => {
  const QUEUE_NAME = 'user-registration';

  const rabbitConnection = await connectToRabbitMQ();

  console.log('Successfully connected to RabbitMQ server!');

  const channel = await rabbitConnection.createChannel();

  await channel.assertQueue(QUEUE_NAME);

  await channel.consume(QUEUE_NAME, async (message) => {
    if (!message) {
      console.error('Consumer cancelled by server!');
      return;
    }

    const data = JSON.parse(message.content.toString());

    console.table(data);

    // TODO send an email using the data

    channel.ack(message);
  });
})();
In the same way, if you want to unacknowledge a message so that it can be consumed by other applications listening to the queue, you can use the code below:
channel.reject(message, true);
The second argument indicates whether we want to re-queue the message or not.
Wrap up
RabbitMQ made it easy for two applications to communicate asynchronously. We used the Node.js package for the AMQP to make two Node.js applications communicate, and here are the takeaways:
- The connection options can be provided as a URI or a JSON object.
- You should manually create the queue in the Web Administration interface before using it in your applications.
- The producer must send the message as a string.
- The consumer should always send an acknowledgment message to the server so the message can be deleted from the queue.
- You can manually reject a message to re-queue it.
You can find the code source on the GitHub repository.
Follow me on Twitter or subscribe to my newsletter to avoid missing the upcoming posts and the tips and tricks I occasionally share.