
Connect a Serverless API to MySQL using the PlanetScale HTTP API


Building serverless APIs has been common in the past years; although it comes with great benefits, developers using it must deal with some challenges, especially when interacting with a database such as:
- Optimize the connection opening and closing to the database.
- Handling the database connection pool limit.
- Mitigate the impact of the data query on the serverless execution time.
- Clearly understand the serverless paradigm to work efficiently with advanced concepts like caching.
To continue providing the best developer experience when building applications with a MySQL database on PlanetScale, the engineering team released a serverless driver for JavaScript that allows you to interact with your database and execute queries over an HTTP connection.
The driver is published on NPM as a Node.js package and allows you to execute CRUD operations and database transactions. The developer offloads the connection pooling management to the PlanetScale infrastructure, which is awesome.
In this post, we will build a serverless API that interacts with a MySQL database on PlanetScale using the serverless driver for JavaScript.
The use case
We want to build a bookstore API that exposes endpoints for adding, retrieving, updating, and deleting books. The API must be built with AWS Lambda and connected to a PlanetScale database.
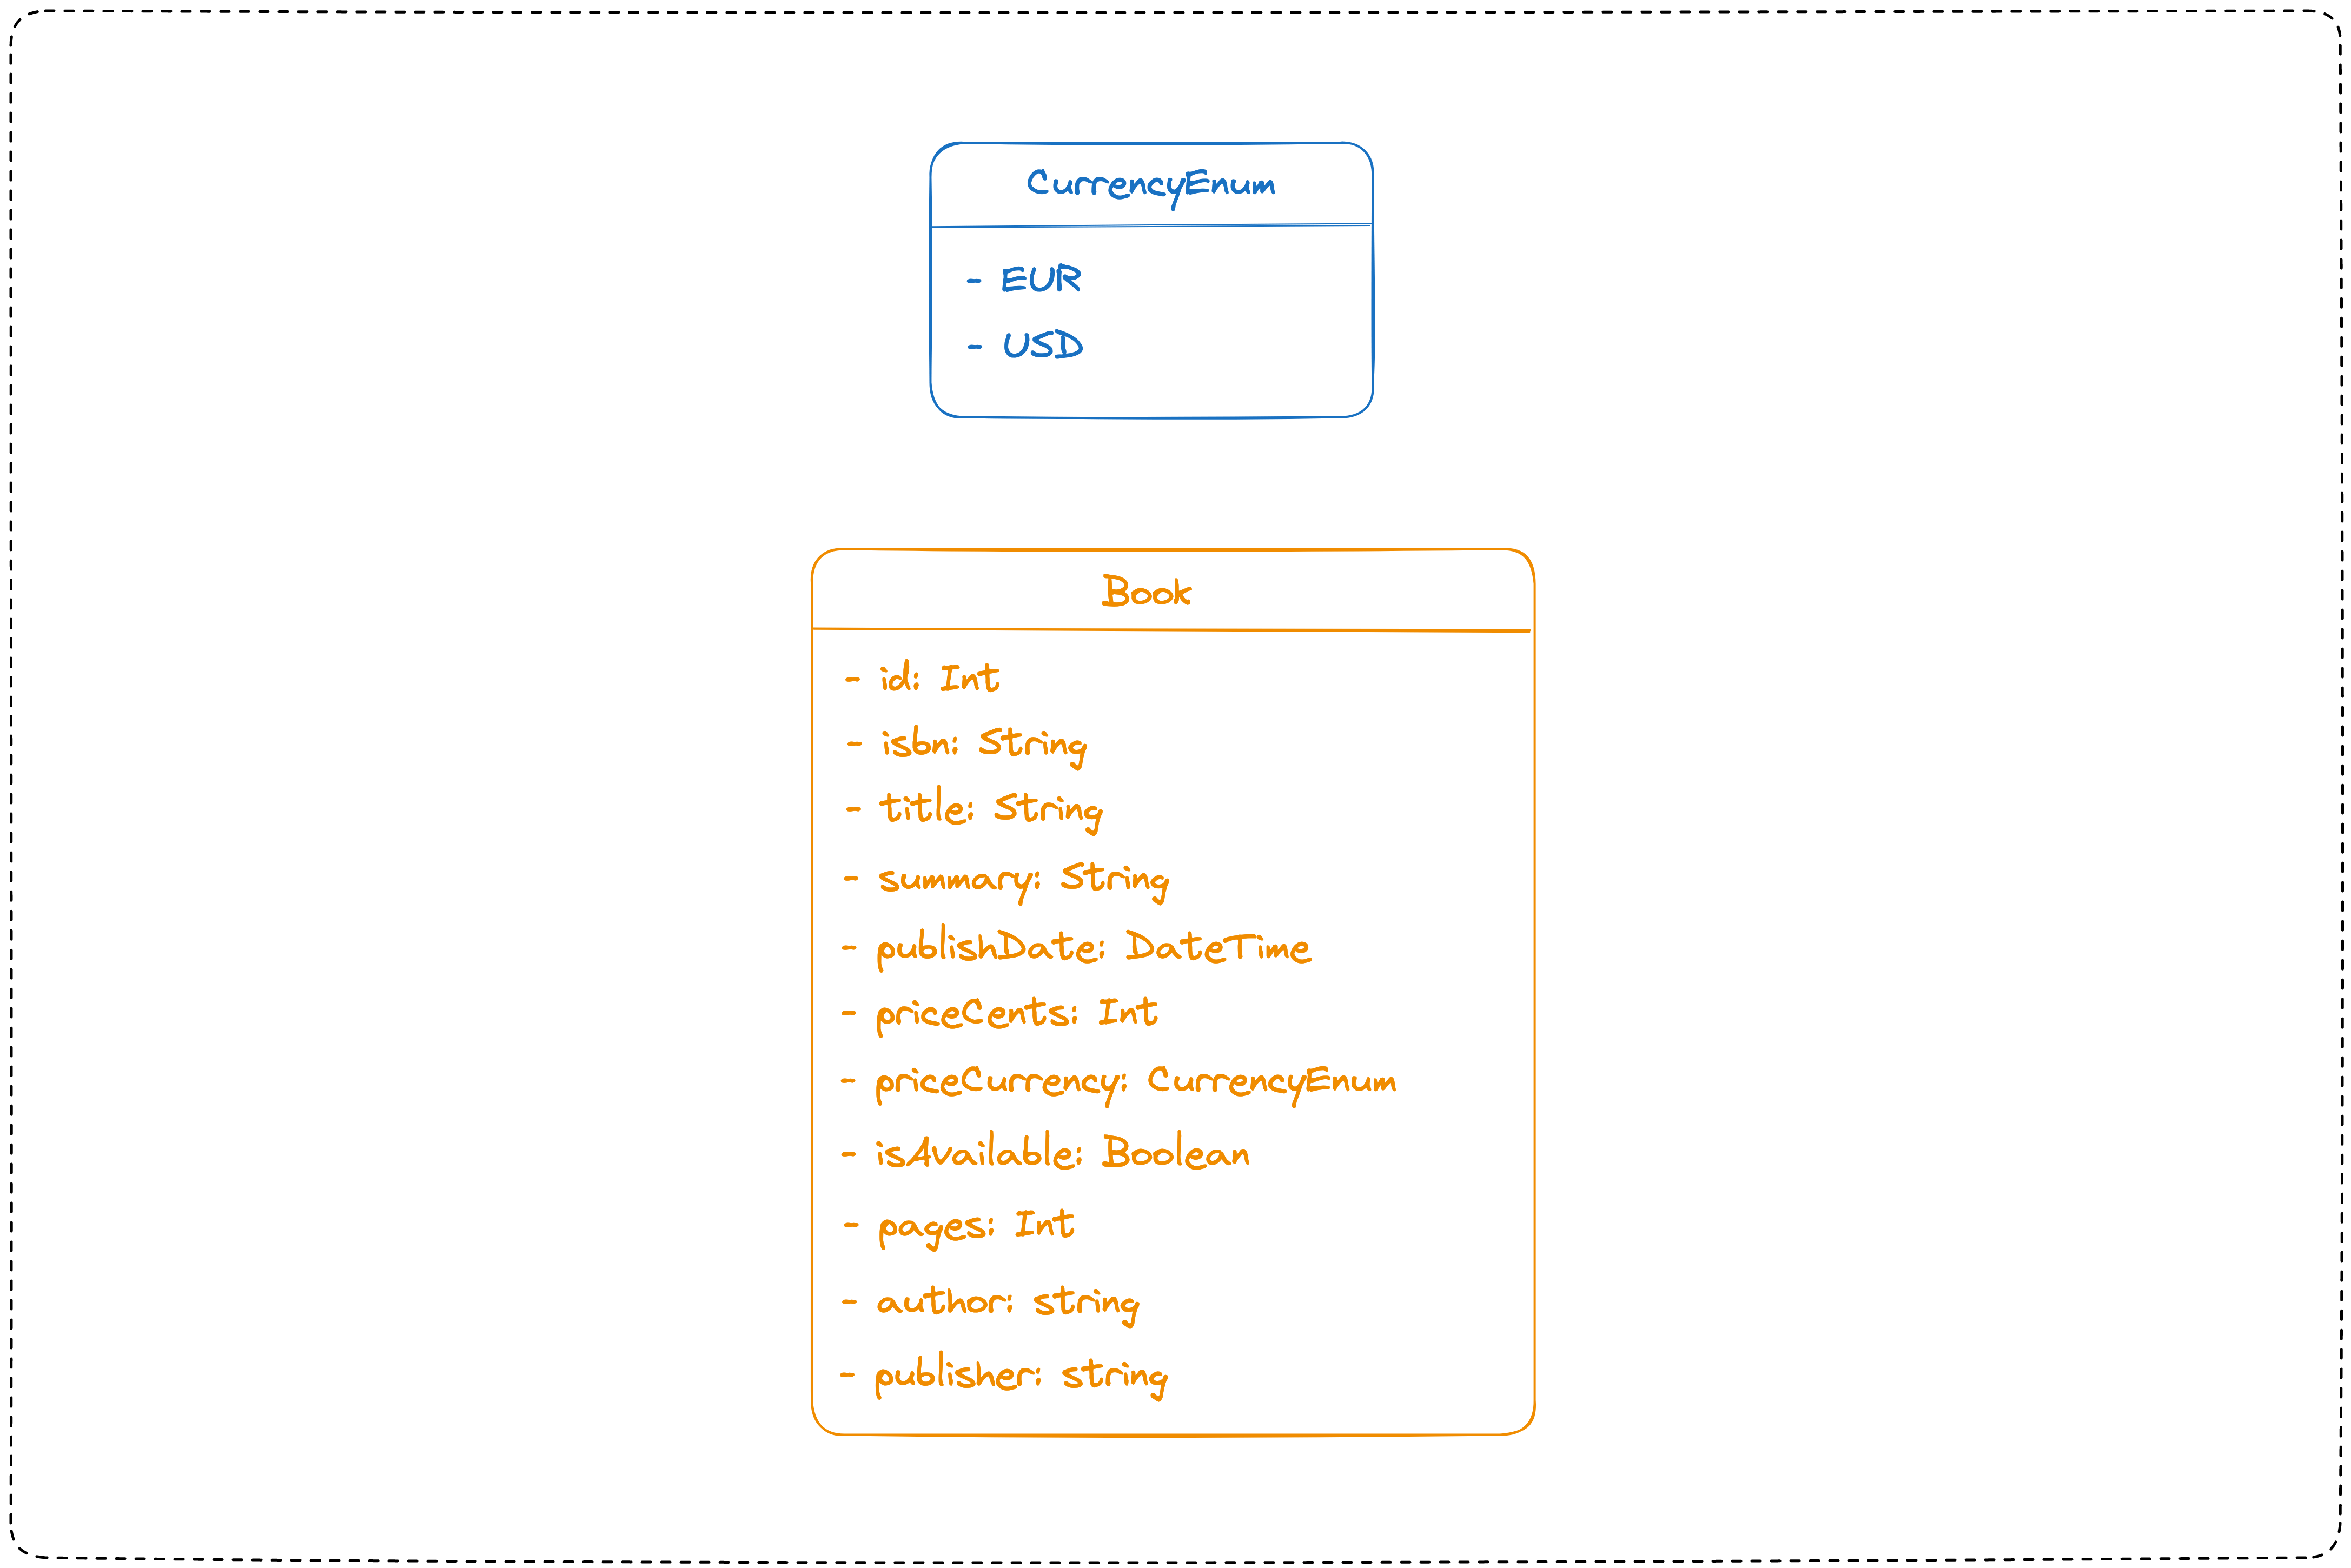
The database schema consists of a single table named "books" having the structure below:
The API endpoints
The table below summarizes the list of endpoints the API will expose
| API Endpoint | Description |
|---|---|
| [POST] /books | Add a new book |
| [PATCH] /books/{id} | Update a book (title, summary, price, isAvailable) |
| [DELETE] /books/{id} | Delete a book |
| [GET] /books | Retrieve the books list |
| [GET] /books/{id} | Retrieve a single book |
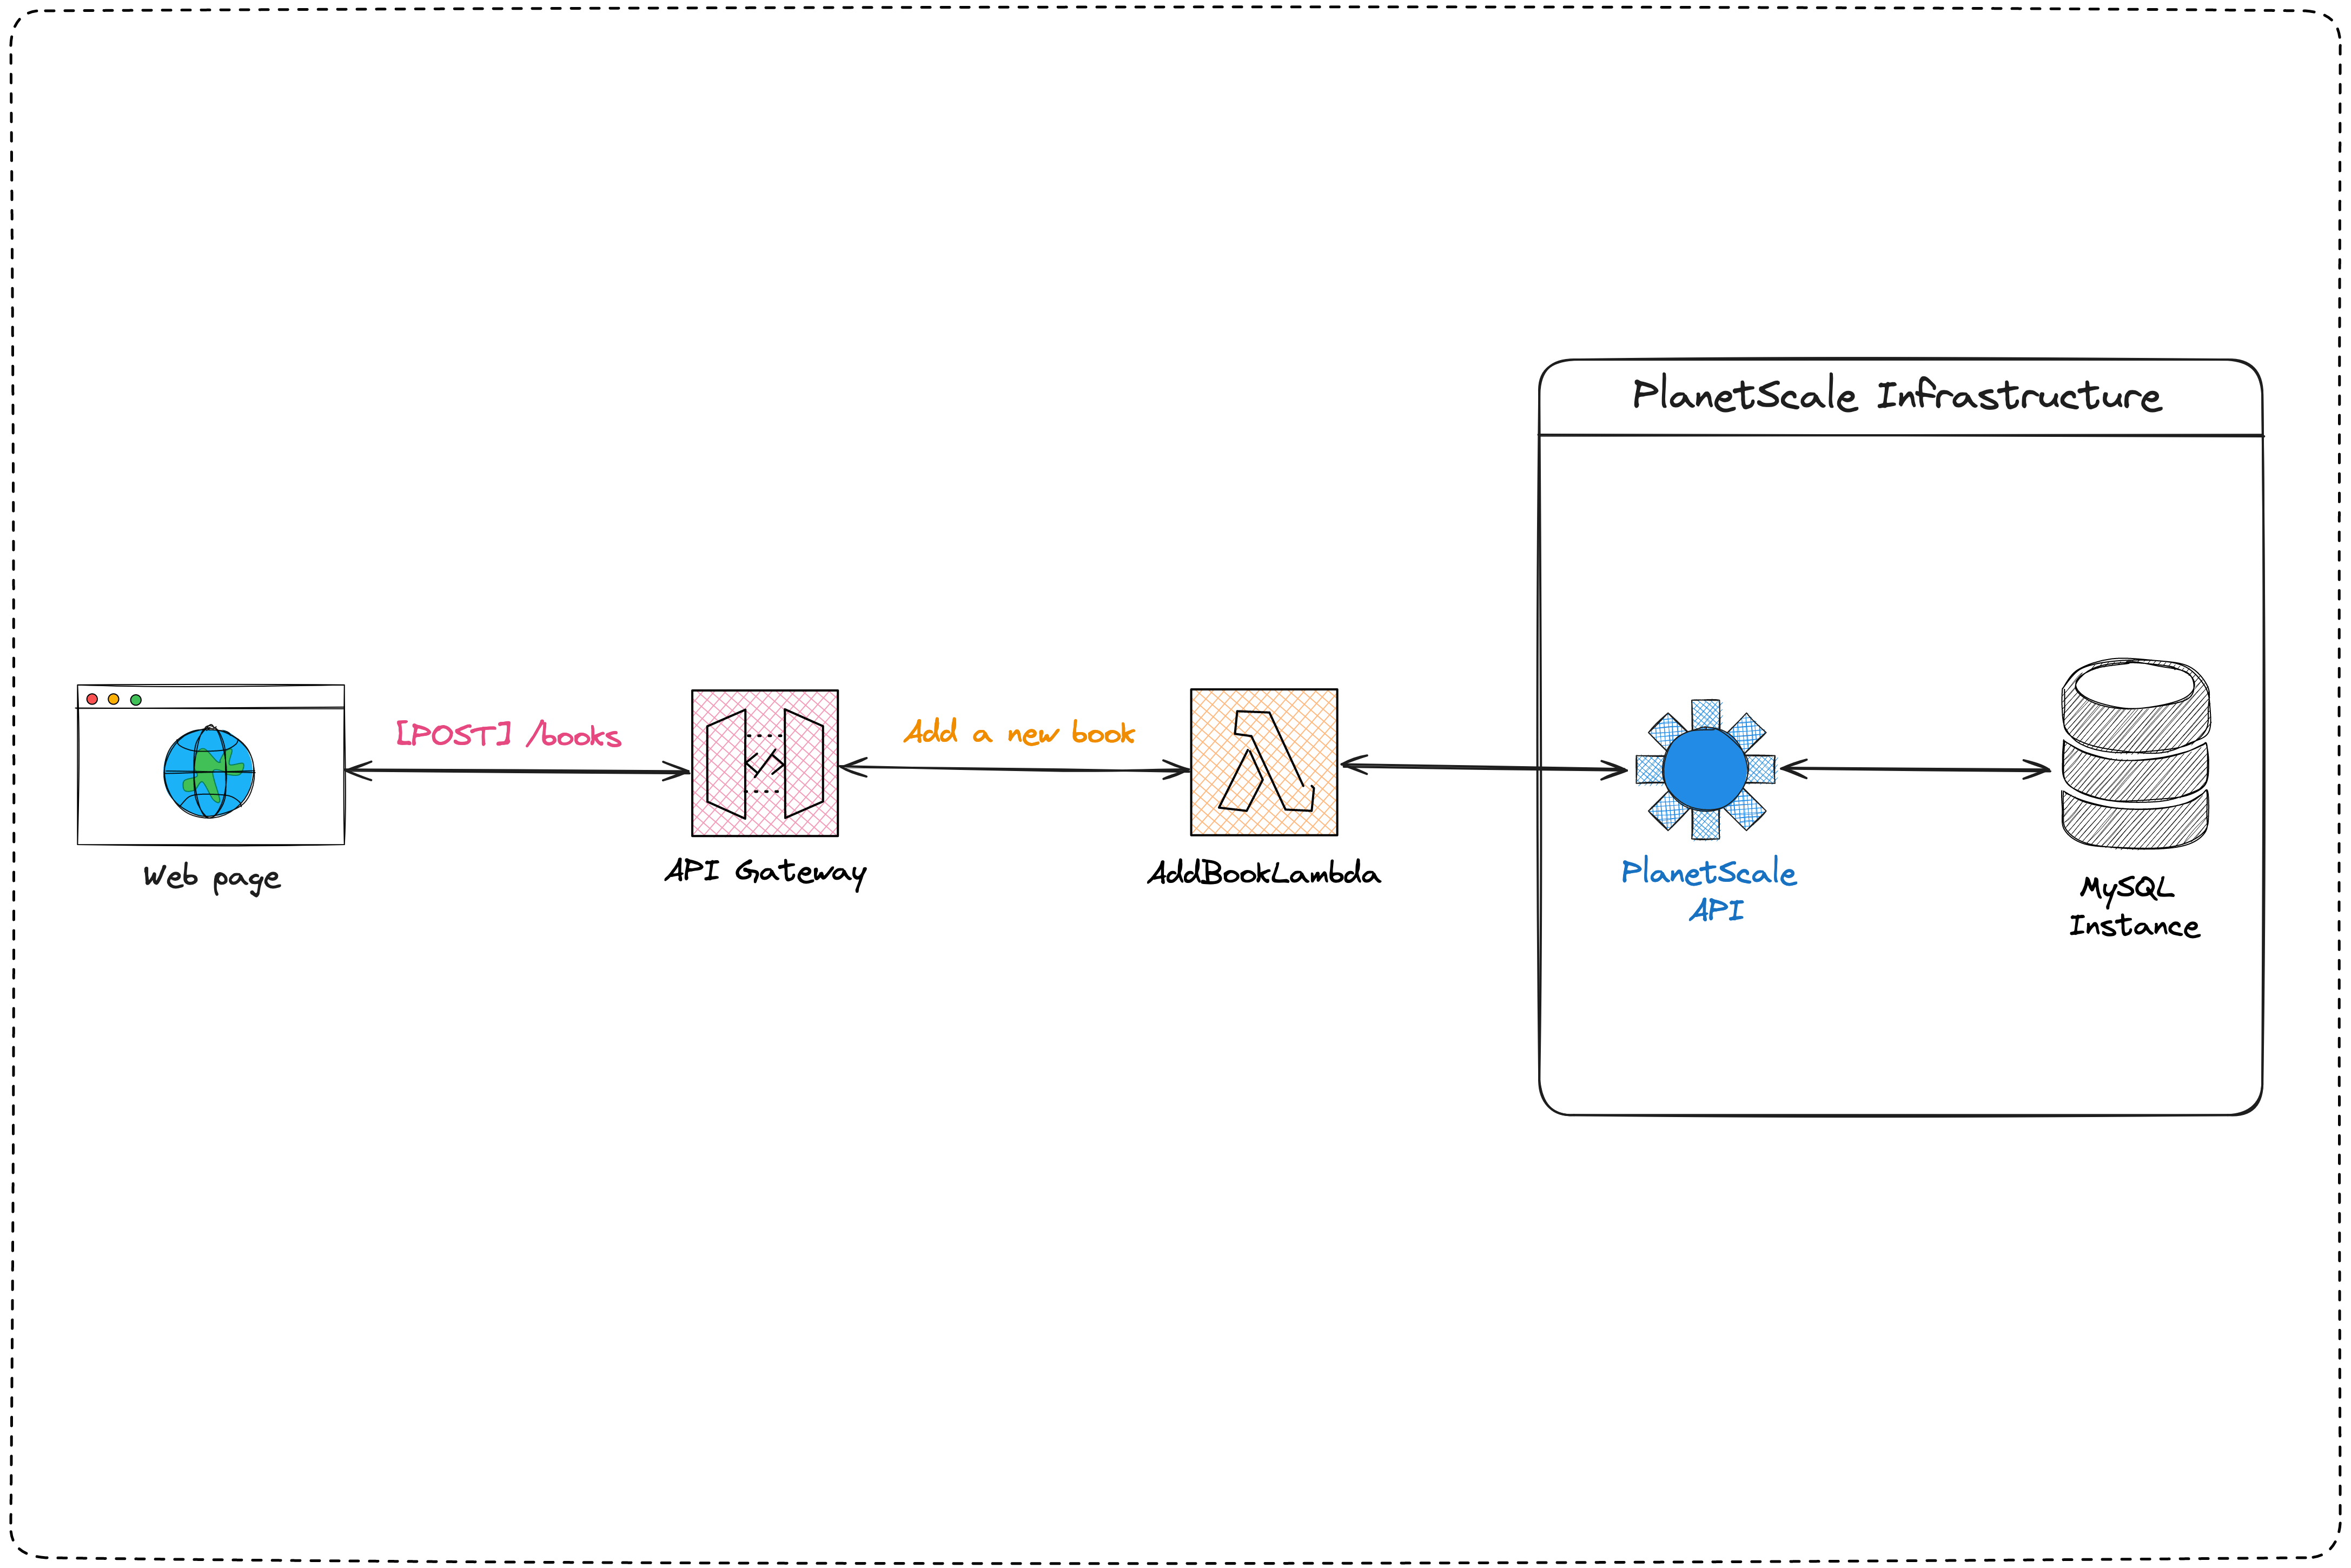
Architecture diagram
The system will have one Lambda function per route and be served through an API Gateway. The Lambda function will connect to a MySQL database on PlanetScale to write and read the data.
The picture below shows the interaction flow for the add book use case.
Prerequisites
To follow this tutorial, make sure you meet the following requirements:
- You have an AWS account to deploy the serverless API; a free tier is enough
- You have a PlanetScale account.
- AWS CLI configured (check out my blog post to see how to do it)
- Node.js 20.6+ is installed on your computer, or you can download it
- Docker is installed on your computer for the Prisma shadow database.
If you don't have a PlanetScale account and want to create one, follow my tutorial, where I will help you create your account and your first database.
Set up the project
The AWS CDK CLI v2 provides a command to create a project to declare resources you will deploy on AWS.
Let's create one to declare the Infrastructure of the Lambda functions by running the following commands.
mkdir bookstore-api

cd bookstore-api

cdk init app --language typescript

npm install @types/aws-lambda
The above commands create the required files and folders, then install the Node.js modules. This is what the folder structure looks like.
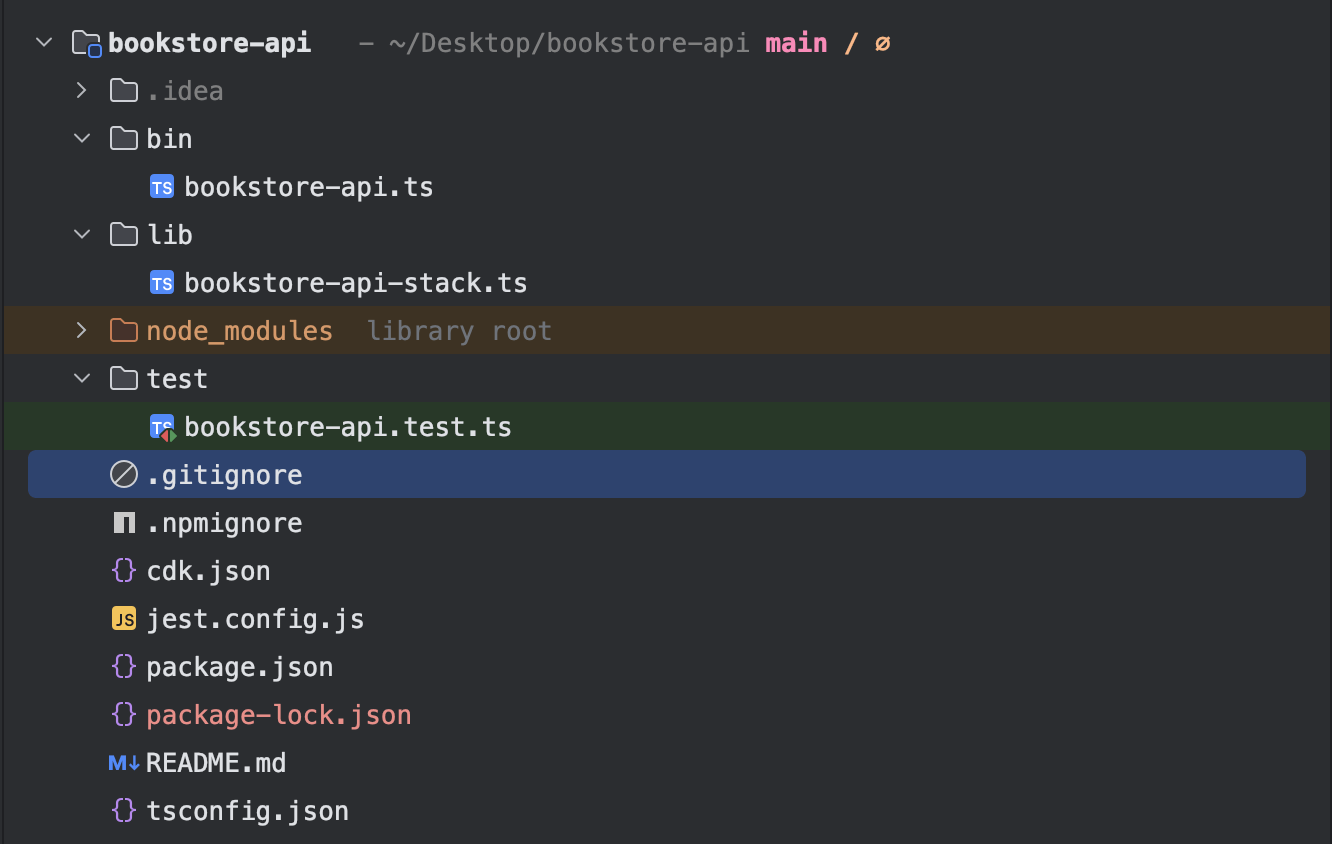
Create a folder "src" in the project root folder to hold the Lambda Function's application logic.
Create the database Schema
We will use ORM Prisma, which allows for the declarative definition of the database structure in a file named "schema.prisma," which will then generate the related SQL code (DDL).
Run the following commands to install and initialize Prisma:
yarn add -D prisma

yarn prisma init --datasource-provider mysql
The second command creates a Prisma schema and a .env file to set the environment variables to inject into the application.
We set the data source provider to "mysql" because the Serverless API will connect to a MySQL database.
Define the database schema with Prisma
Update the file prisma/schema.prisma with the code below:
generator client {
  provider = "prisma-client-js"
}

datasource db {
  provider          = "mysql"
  url               = env("DATABASE_URL")
}

enum PriceCurrency {
  EUR
  USD
}

model Book {
  id            Int           @id @default(autoincrement())
  isbn          String
  title         String
  summary       String        @db.Text
  publishDate   DateTime      @map("publish_date")
  priceCents    Int           @map("price_cents")
  priceCurrency PriceCurrency @default(USD) @map("price_currency")
  isAvailable   Boolean       @default(true) @map("is_available")
  pages         Int
  author        String
  publisher     String

  createdAt DateTime @default(now()) @map("created_at")
  updatedAt DateTime @default(now()) @updatedAt @map("updated_at")

  @@map("books")
}
Generate and execute the database migrations
Now that the Prisma schema is defined, the following steps are:
- Generate the SQL queries to create the database tables
- Execute the SQL queries on our database in PlanetScale.
Using the PlanetScale CLI, you can connect to a remote database branch by creating a tunnel from our local computer to the remote branch.
Check out the installation guide for Linux and Windows users. For MacOS users, run the following commands:
brew install planetscale/tap/pscale

brew install mysql-client
The MySQL client installation is optional as it only required to run some commands with the PlanetScale CLI.
Once the installation is completed, check the version using the command pscale --version.
The PlanetScale CLI is installed; run the commands below to perform these actions:
- Authenticate to PlanetScale from the CLI.
- Create a new database branch named "create-books-table"
- Create a tunnel from the local computer to the remote database branch.
pscale auth login

pscale branch create core-db create-books-table

# Wait for a few seconds for the database branch to be ready

pscale connect core-db create-books-table
This is an output example after running the above commands.
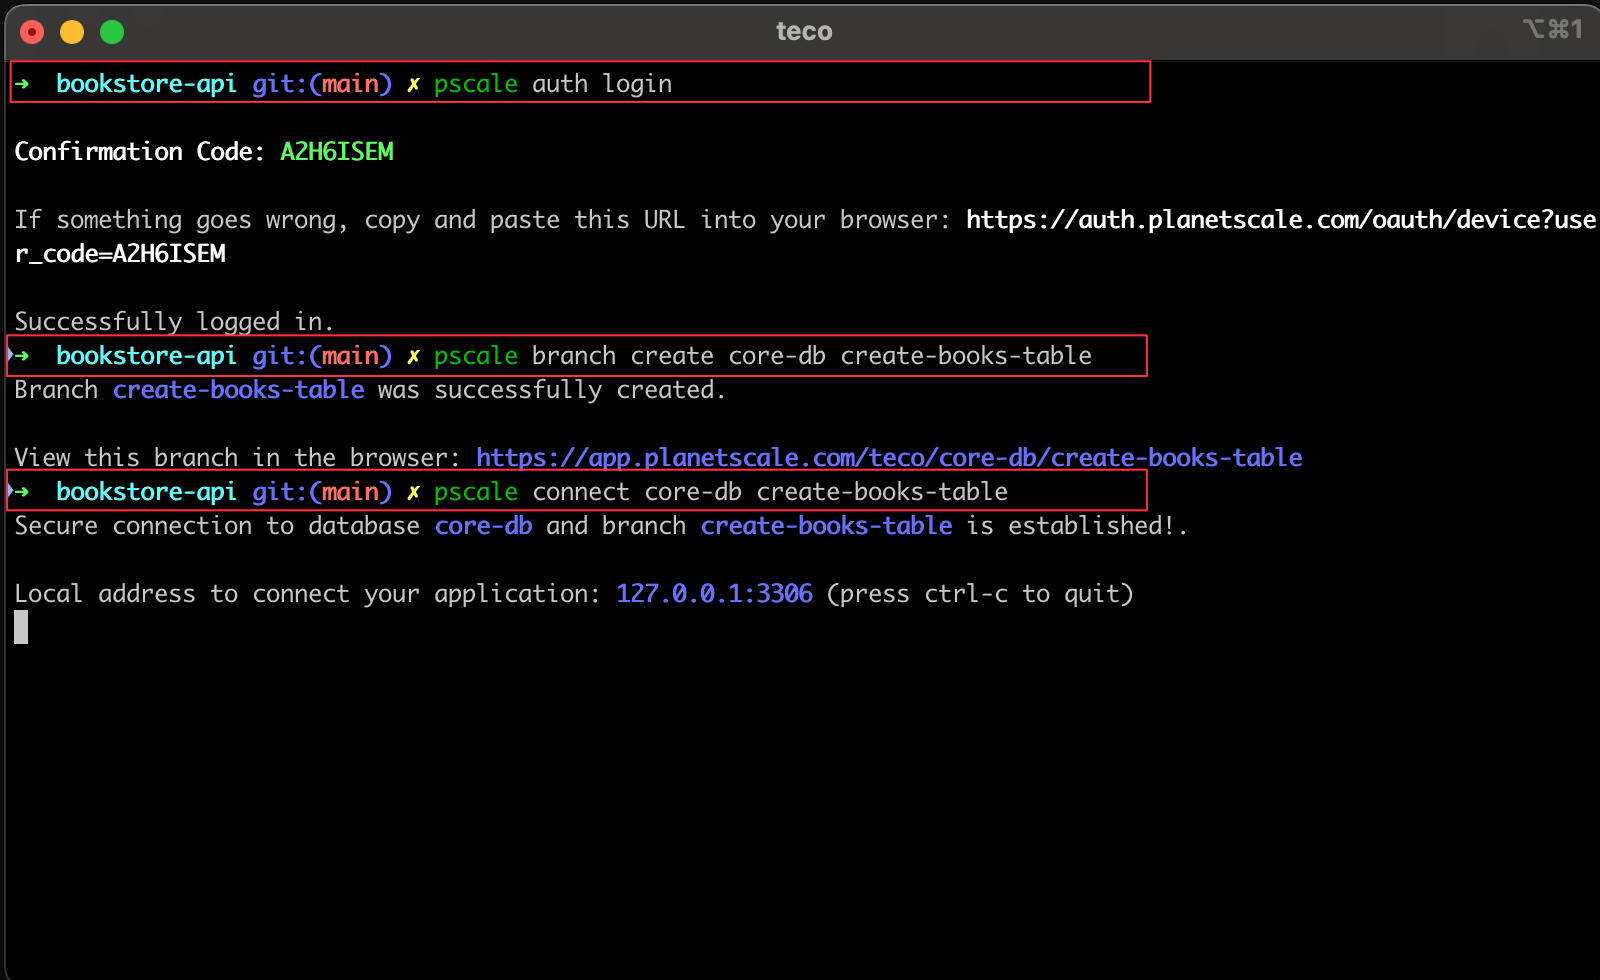
The database is accessible through port 3306, and the connection URL is mysql://root@localhost:3306/core-db
Open the ".env" file and replace the database value of the DATABASE_URL field with the above value.
DATABASE_URL=mysql://root@localhost:3306/core-db
To generate and execute the migration in a PlanetScale database using Prisma, we must have a second database instance called "shadow".
Use Docker to run a container of a MySQL database using the command below:
docker run -d -e MYSQL_ROOT_PASSWORD=secret -e MYSQL_DATABASE=bookstore --name bookstore-shadow-db -p 3307:3306 mysql:8.0.37
Based on the above command, the connection string is: mysql://root:secret@localhost:3307/bookstore
Open the .env file, add a field named SHADOW_DATABASE_URL, and set the value to the connection URL of the MySQL database instance running in Docker.
SHADOW_DATABASE_URL=mysql://root:secret@localhost:3307/bookstore
Update the schema.prisma file to set the shadow database URL
datasource db {
  provider          = "mysql"
  url               = env("DATABASE_URL")
  shadowDatabaseUrl = env("SHADOW_DATABASE_URL")
}
Run the command below to generate and execute the database migration
yarn prisma migrate dev --name create-books-table
You get the following output:
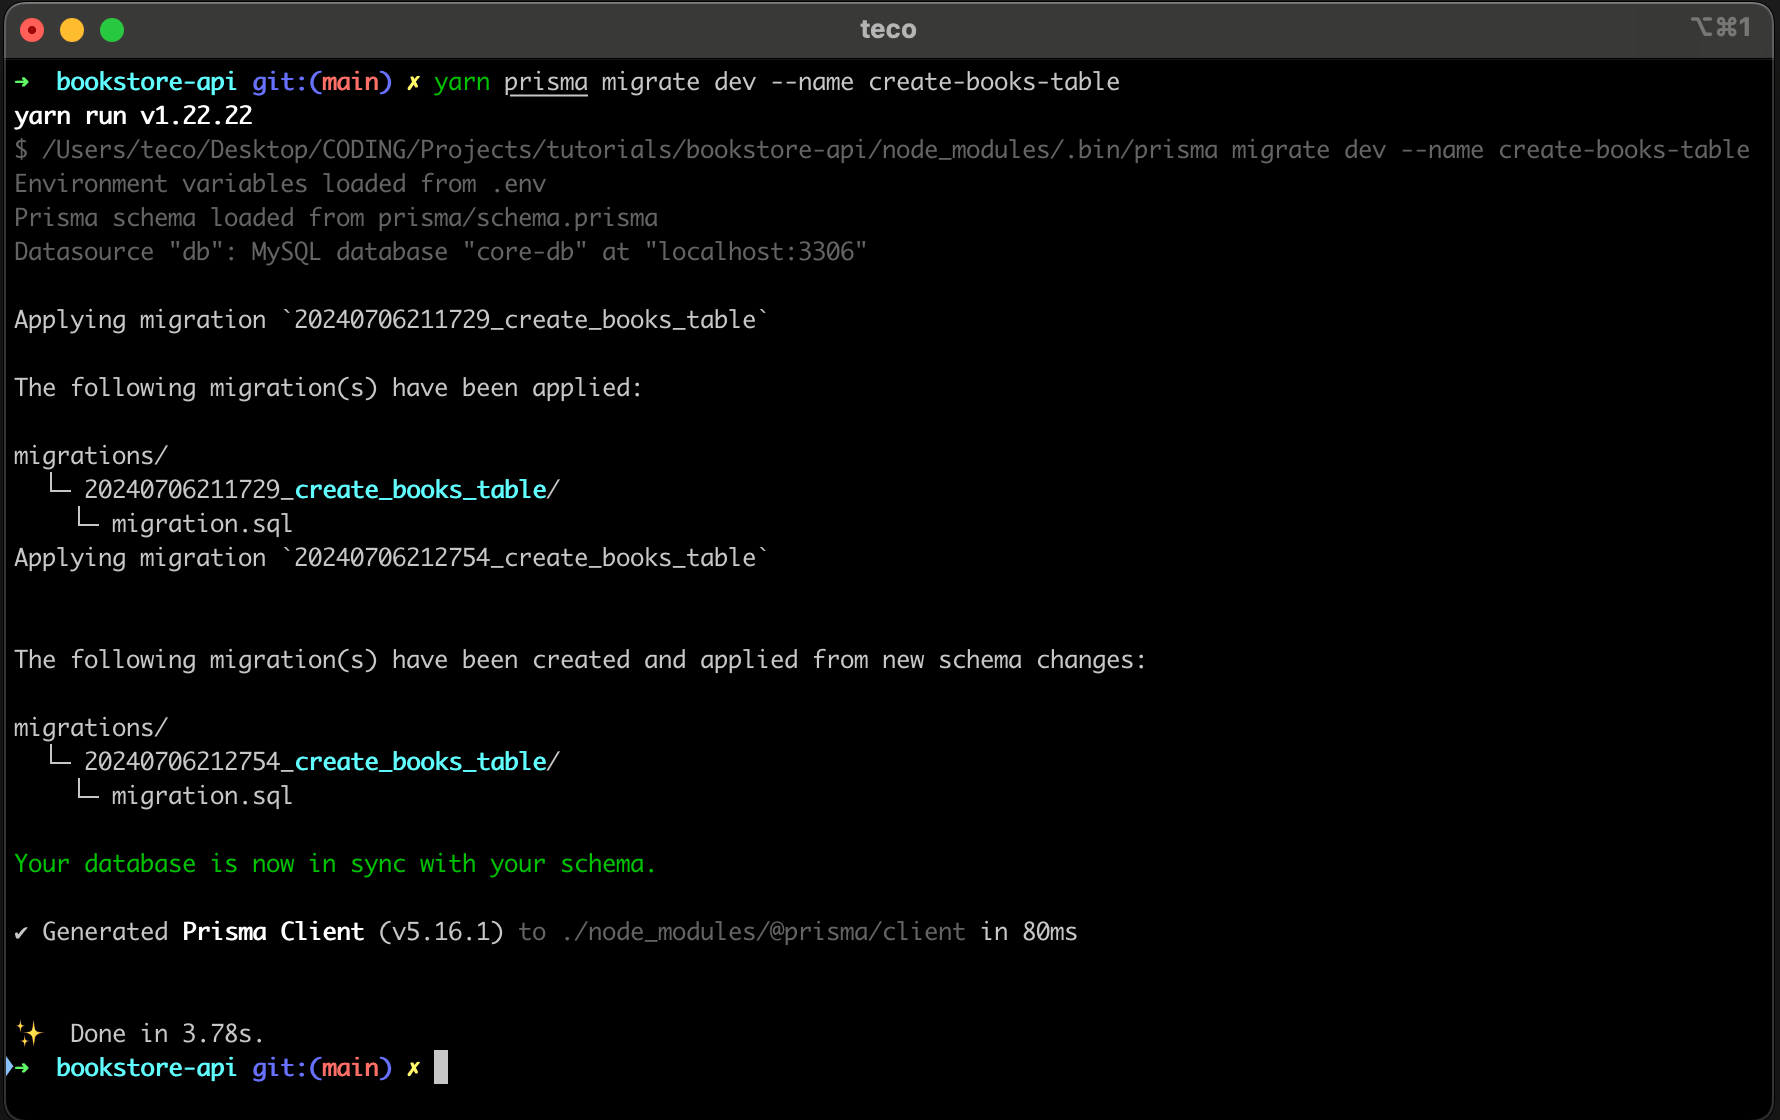
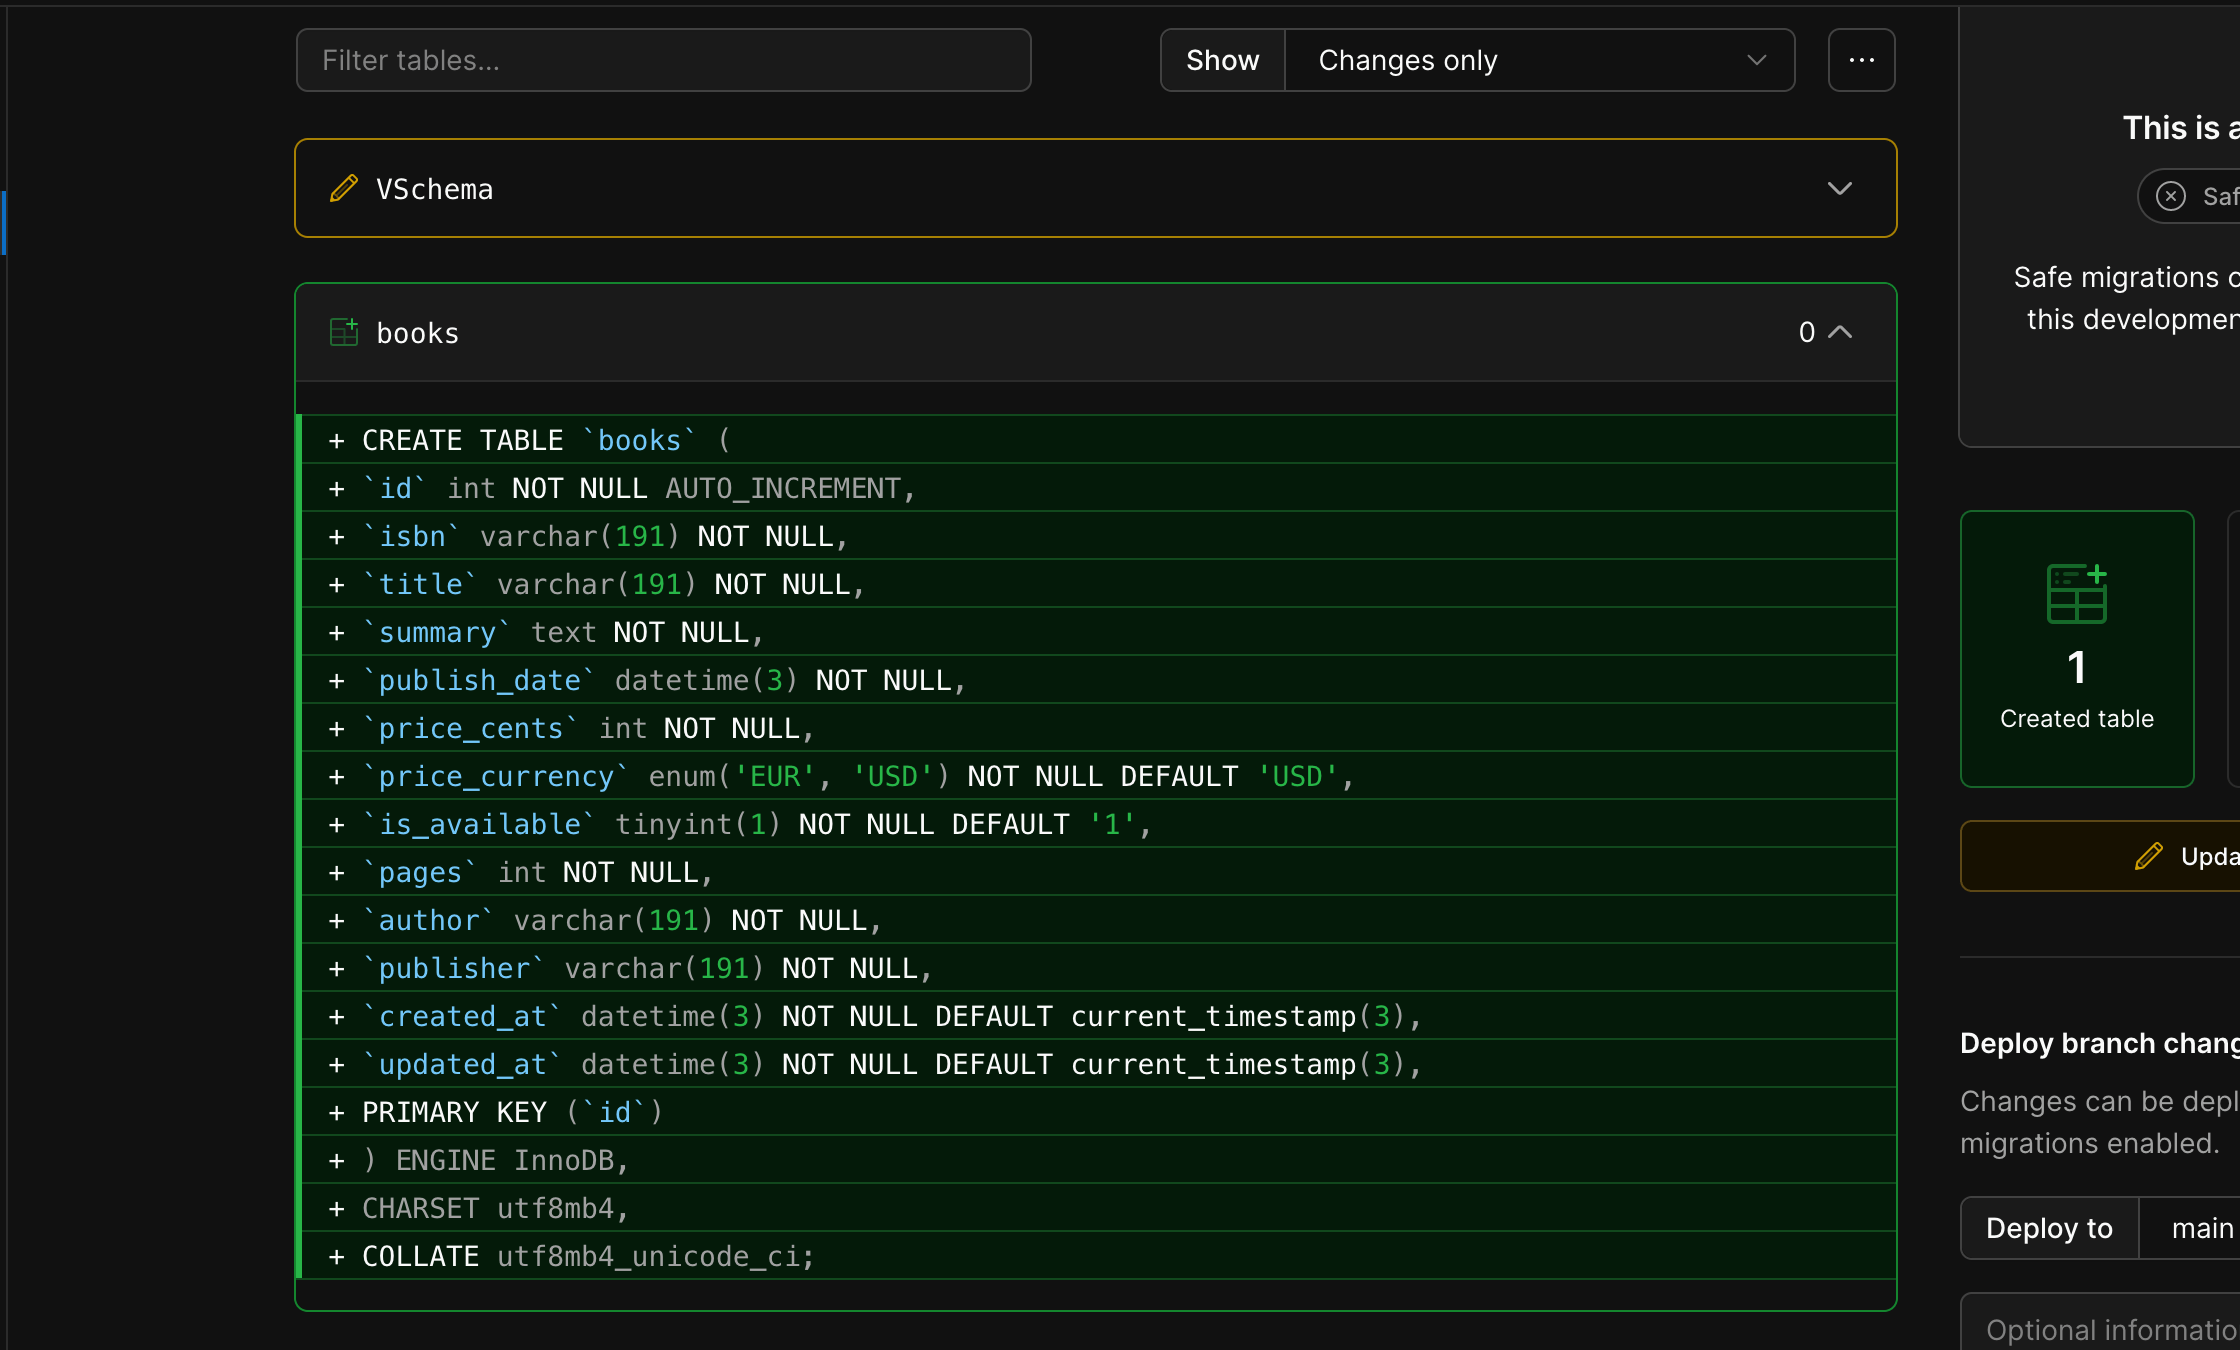
The table "books" is created in the PlanetScale database branch "create-books-table"; if you browse the database branch in the PlanetScale web console, you can see the SQL query that has been executed.
We can now build the APIs that will interact with the database.
Install the PlanetScale driver
The PlanetScale database driver is available as an NPM package, so let's install it with the following command:
yarn add @planetscale/database
To query the database, you must create a connection using the database credentials and execute your SQL query.
To retrieve the database credentials, go to the PlanetScale web console, select your branch, and click on the "Connect" button
On the page displayed, click on the button "Create Password"; the database and the password will be displayed. On the framework selection, choose "database-js"
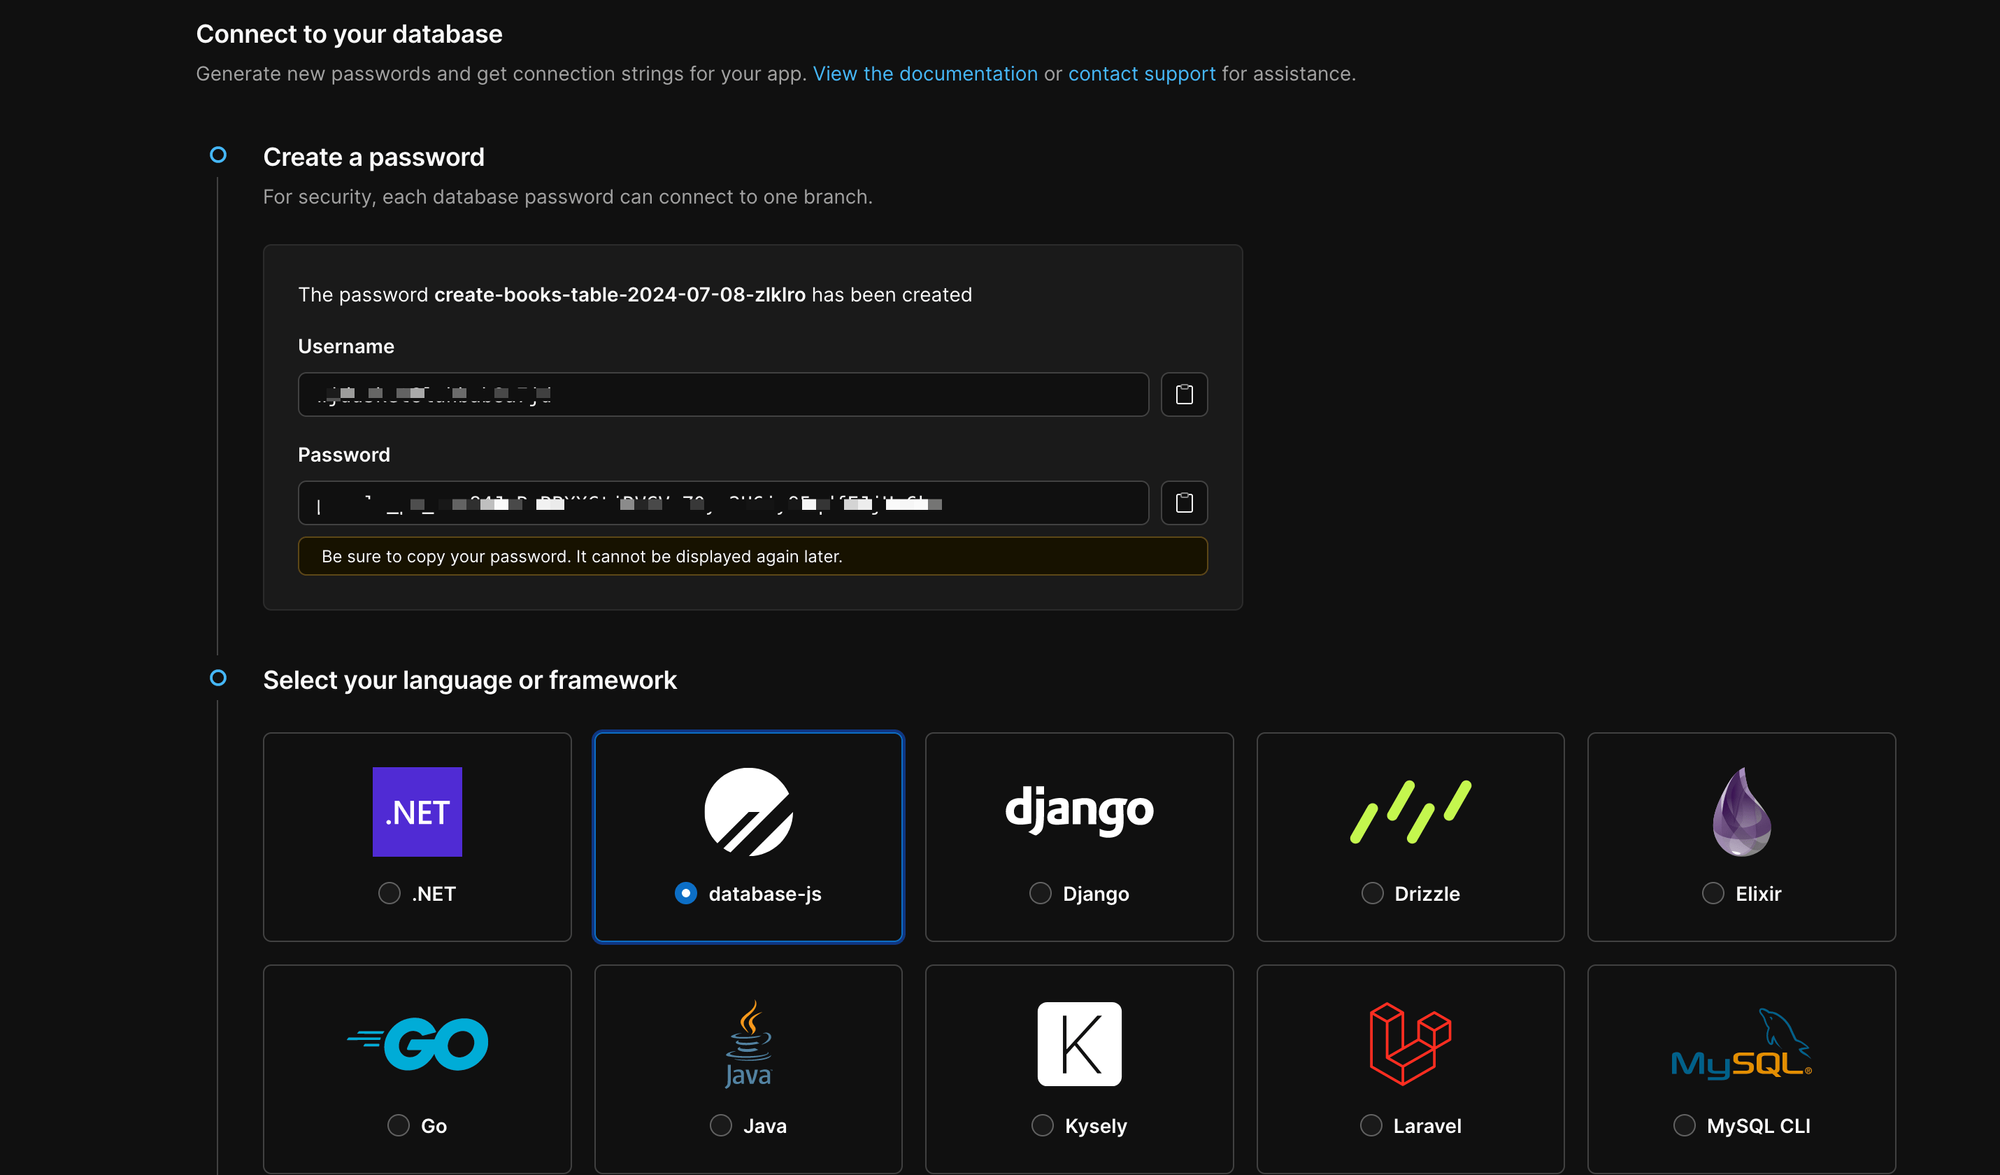
Scroll down and copy the following respective values for the database host, username, and password, then update your ".env" file to set them like this:
DATABASE_HOST=<your_db_host>
DATABASE_USERNAME=<your_db_username>
DATABASE_PASSWORD=<your_db_password>
The code below shows how to connect to the PlanetScale database branch and perform an SQL query:
import { connect } from '@planetscale/database';
const config = {
host: process.env.DATABASE_HOST,
username: process.env.DATABASE_USERNAME,
password: process.env.DATABASE_PASSWORD
};
const conn = connect(config);
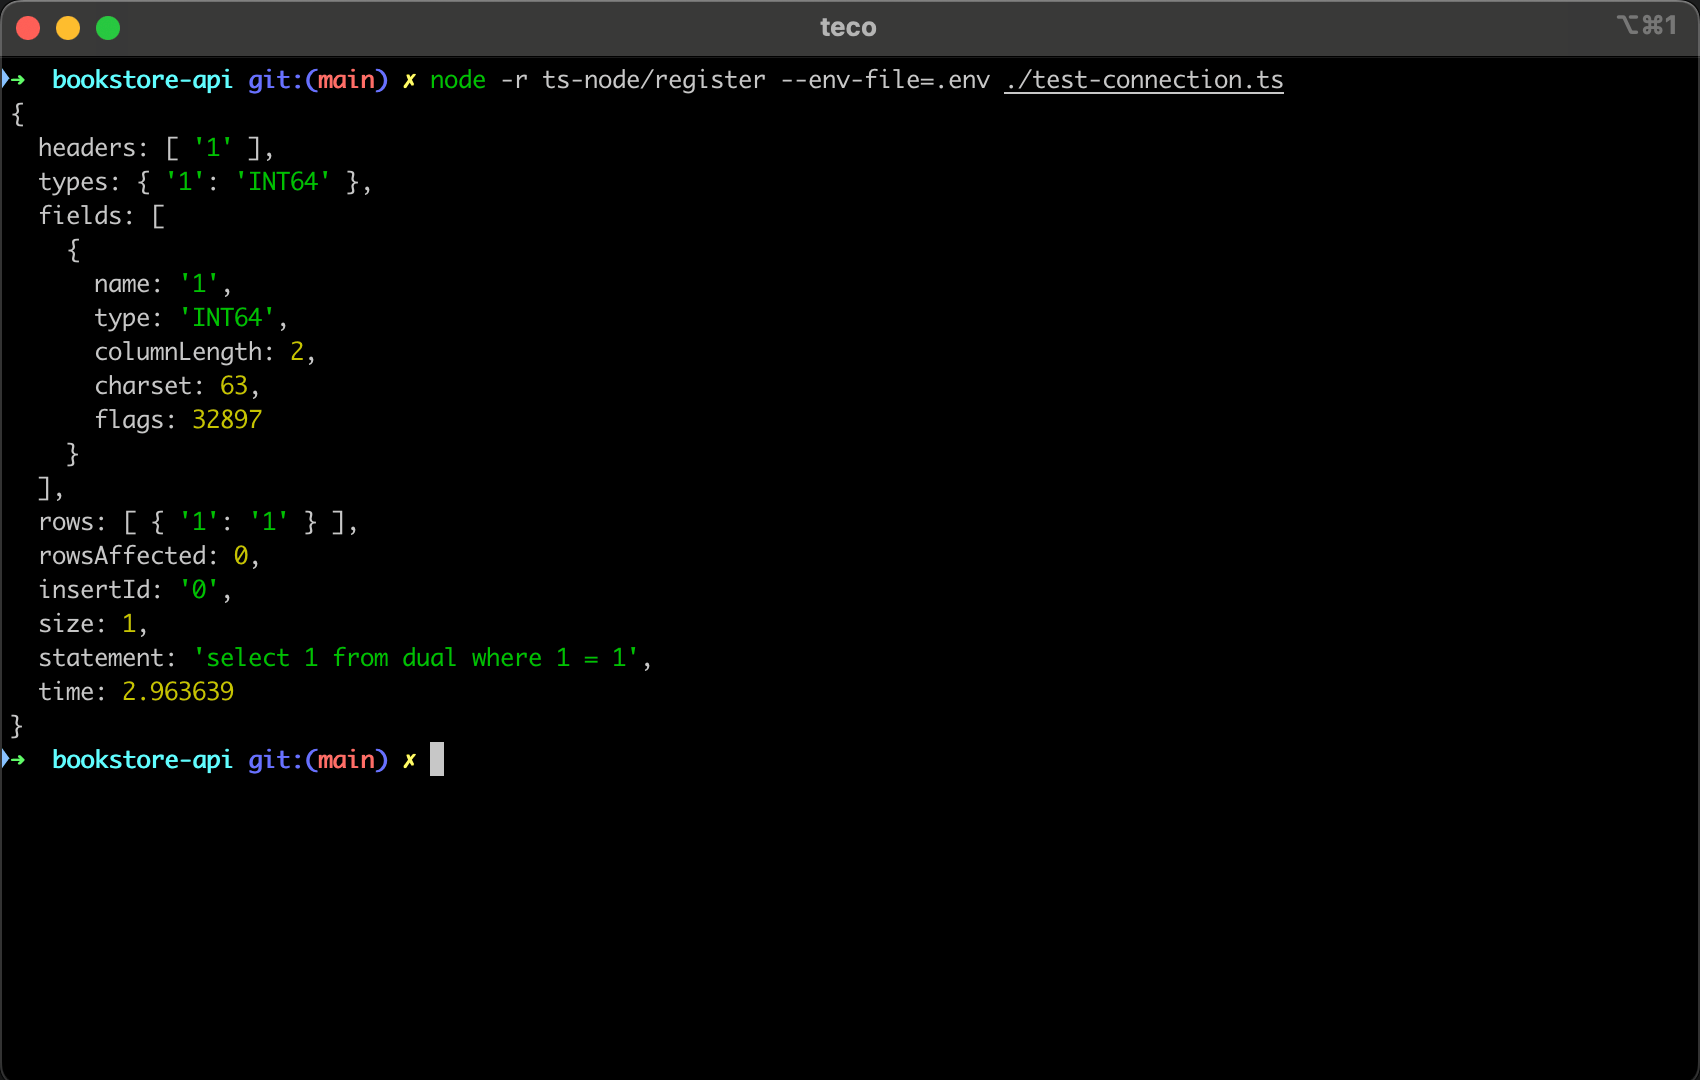
const results = await conn.execute('select 1 from dual where 1 = ?', [1]);
Create a file "test-connection.ts", then add the above code, and run the command below to execute the file.
node -r ts-node/register --env-file=.env ./test-connection.ts
You get the following output:
Create the Serverless API routes
Each API route triggers a Lambda function and forwards the HTTP request information (body, query parameters, etc.), which will then insert, update, delete, or retrieve data from the database.
Create a folder "src/handlers" that will contain all the Lambda functions.
mkdir -p src/handlers
Add a book
The book information is extracted from the request payload and then inserted in the database using the PlanetScale JS driver.
Create a file "src/handlers/add-book.ts" and add the code below:
import { APIGatewayProxyHandler } from 'aws-lambda';

import { connect } from '@planetscale/database';

const config = {
  host: process.env.DATABASE_HOST,
  username: process.env.DATABASE_USERNAME,
  password: process.env.DATABASE_PASSWORD
};

const connection = connect(config);

type AddBookInput = {
  isbn: string;
  title: string;
  summary: string;
  publishDate: string;
  priceCents: number;
  priceCurrency: 'EUR' | 'USD';
  isAvailable: boolean;
  pages: number;
  author: string;
  publisher: string;
};

export const handler: APIGatewayProxyHandler = async (event, context) => {
  context.callbackWaitsForEmptyEventLoop = false;

  const data = JSON.parse(event.body ?? '{}') as AddBookInput;

  const query = `INSERT INTO books (isbn, title, summary, publish_date, price_cents, price_currency, is_available, pages, author, publisher) VALUES (?, ?, ?, ?, ?, ?, ?, ?, ?, ?)`;
  const params = [
    data.isbn,
    data.title,
    data.summary,
    data.publishDate,
    data.priceCents,
    data.priceCurrency,
    data.isAvailable,
    data.pages,
    data.author,
    data.publisher
  ];

  const results = await connection.execute(query, params);

  return {
    statusCode: 200,
    headers: { "Content-Type": "text/json" },
    body: JSON.stringify({
      message: 'Book added successfully',
      bookId: results.insertId
    }),
  };
};
Retrieve all books
The API must return the list of books sorted from the most to the least recently published.
Create a file "src/handlers/list-books.ts" and add the code below:
import { APIGatewayProxyHandler } from 'aws-lambda';

import { connect } from '@planetscale/database';

const config = {
  host: process.env.DATABASE_HOST,
  username: process.env.DATABASE_USERNAME,
  password: process.env.DATABASE_PASSWORD
};

const connection = connect(config);

type Book = {
  id: number;
  isbn: string;
  title: string;
  summary: string;
  publish_date: string;
  price_cents: number;
  price_currency: 'EUR' | 'USD';
  is_available: boolean;
  pages: number;
  author: string;
  publisher: string;
  createdAt: string;
  updatedAt: string;
};

export const handler: APIGatewayProxyHandler = async (event, context) => {
  context.callbackWaitsForEmptyEventLoop = false;

  const query = `SELECT * FROM books ORDER BY publish_date DESC`;

  const results = await connection.execute<Book>(query);

  return {
    statusCode: 200,
    headers: { "Content-Type": "text/json" },
    body: JSON.stringify({
      message: 'Book added successfully',
      data: results.rows
    }),
  };
};
From the above code, you can define a TypeScript type when calling the execute() function to describe the shape of the data returned by the database.
Update a book
The API route must allow updating the following fields: "title", "summary", "availability" and "price".
Create a file "src/handlers/update-book.ts" and add the code below:
import { APIGatewayProxyHandler } from 'aws-lambda';

import { connect } from '@planetscale/database';

const config = {
  host: process.env.DATABASE_HOST,
  username: process.env.DATABASE_USERNAME,
  password: process.env.DATABASE_PASSWORD
};

const connection = connect(config);

type UpdateBookInput = {
  title: string;
  summary: string;
  priceCents: number;
  isAvailable: boolean;
};

export const handler: APIGatewayProxyHandler = async (event, context) => {
  context.callbackWaitsForEmptyEventLoop = false;

  const bookId = event.pathParameters.id;

  const results = await connection.execute(`SELECT id FROM books WHERE id = ?`, [bookId]);

  const book = results.rows[0];

  if (!book) {
    return {
      statusCode: 404,
      headers: { "Content-Type": "text/json" },
      body: JSON.stringify({ message: `No book found with the ID "${bookId}"` }),
    };
  }

  const data = JSON.parse(event.body ?? '{}') as UpdateBookInput;

  const query = `UPDATE books SET title = ?, summary = ?, price_cents = ?, is_available = ? WHERE id = ?`;
  const params = [
    data.title,
    data.summary,
    data.priceCents,
    data.isAvailable,
    bookId
  ];

  await connection.execute(query, params);

  return {
    statusCode: 200,
    headers: { "Content-Type": "text/json" },
    body: JSON.stringify({ message: 'Book updated successfully' }),
  };
};
Delete a book
The API route deletes a book given its ID.
Create a file "src/handlers/delete-book.ts" and add the code below:
import { APIGatewayProxyHandler } from 'aws-lambda';
import { connect } from "@planetscale/database";

const config = {
  host: process.env.DATABASE_HOST,
  username: process.env.DATABASE_USERNAME,
  password: process.env.DATABASE_PASSWORD
};

const connection = connect(config);

export const handler: APIGatewayProxyHandler = async (event, context) => {
  context.callbackWaitsForEmptyEventLoop = false;

  const bookId = event.pathParameters.id;

  await connection.execute(`DELETE FROM books WHERE id = ?`, [bookId]);

  return {
    statusCode: 204,
    headers: { "Content-Type": "text/json" },
    body: undefined,
  };
};
Deploy and test the API routes
The link of API routes to the Lambda functions we created is done in Infrastructure as code definition with the AWS CDK v2.
For the sake of brevity, I will not cover that part in this tutorial; however, you can find the complete IaC code in the final repository or read my complete blog post on the topic below.

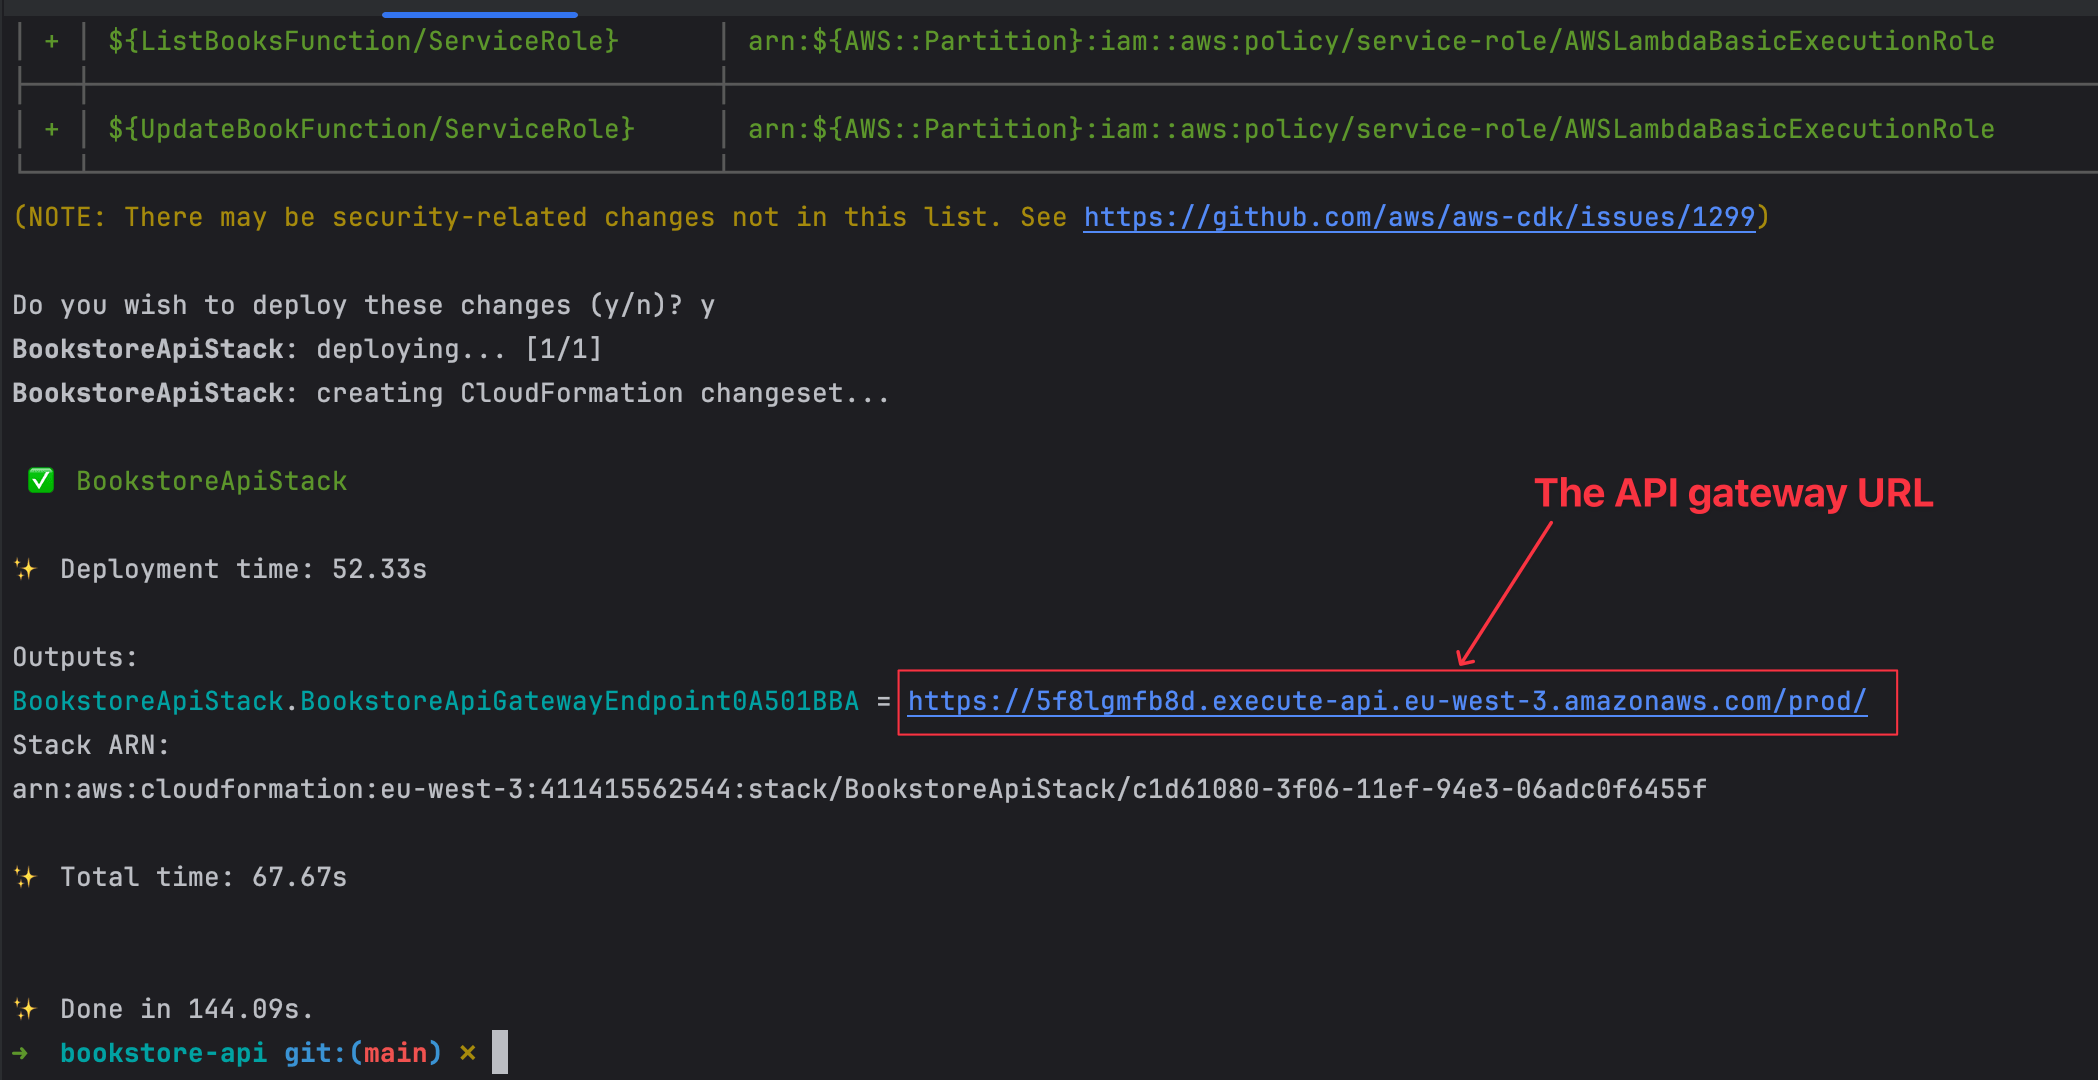
The IaC code is defined; let's deploy the code on AWS by running the following commands:
aws ecr-public get-login-password --region us-east-1 | docker login --username AWS --password-stdin public.ecr.aws

yarn cdk bootstrap

export $(grep -v '^#' .env | xargs) && yarn cdk synth

export $(grep -v '^#' .env | xargs) && yarn cdk deploy
When the last command succeeds, it will print the URL of the API Gateway to test our API.
Use your favorite HTTP client to test the API routes by creating, updating, retrieving, and deleting books. Below is the demo using Postman.
Test the API routes for managing books.
Destroy the stack
All the services used in this post have a generous free tier, so you can test the project without fear. To delete all the resources created on AWS, run the command below from the project root directory:
yarn cdk destroy
Confirm the deletion and wait for resources to be deleted.
Wrap up
The PlanetScale serverless driver for JavaScript allows the building of Serverless APIs that interact with a PlanetScale database without dealing with issues related to database connection handling. It helps build more reliable and consistent Serverless APIs.
In this post, we covered how to perform CRUD operations on a PlanetScale database using the serverless driver for JavaScript. To go further, you can:
- Try to implement a database transaction using the PlanetScale serverless driver.
- Use the Node.js library kysely-planetscale to improve your experience writing SQL queries.
For more, check out the PlanetScale serverless driver documentation.
You can find the code source on the GitHub repository.
Follow me on Twitter or subscribe to my newsletter to avoid missing the upcoming posts and the tips and tricks I occasionally share.