
Send and receive messages from a Spring boot applications using RabbitMQ


Photo by Brice Cooper / Unsplash
AMQP is the protocol used to allow communication between many applications through a RabbitMQ server. To support most programming languages, connectors will enable you to interact with the server by exchanging messages with others applications using your favorite programming language.
We will use the Spring dependency for RabbitMQ to make two Spring Boot applications communicate together.
The use case
RabbitMQ is great for event-driven applications, which will act as the bridge to exchange information between applications.
Let's say we are building a website application where the core back-end communicates with a notification service responsible for emailing users. When a user register, we must send a confirmation email with a confirmation code. The email sending should not block the response to the client.
The picture below shows the system architecture.
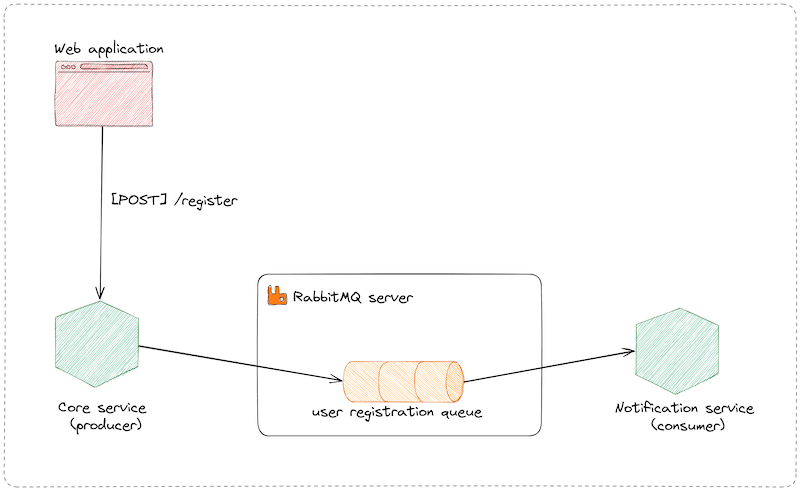
In the event-driven architecture, we use the term producer and consumer to designate the application that sends the message into the queue and the one that reads the message from the queue.
You must need these tools installed on your computer to follow this tutorial:
- JDK 17 or higher - Download link
- Maven 3.8 or higher - Download link
- An HTTP client such as Postman, Insomnia, cURL, etc...
Set up the project
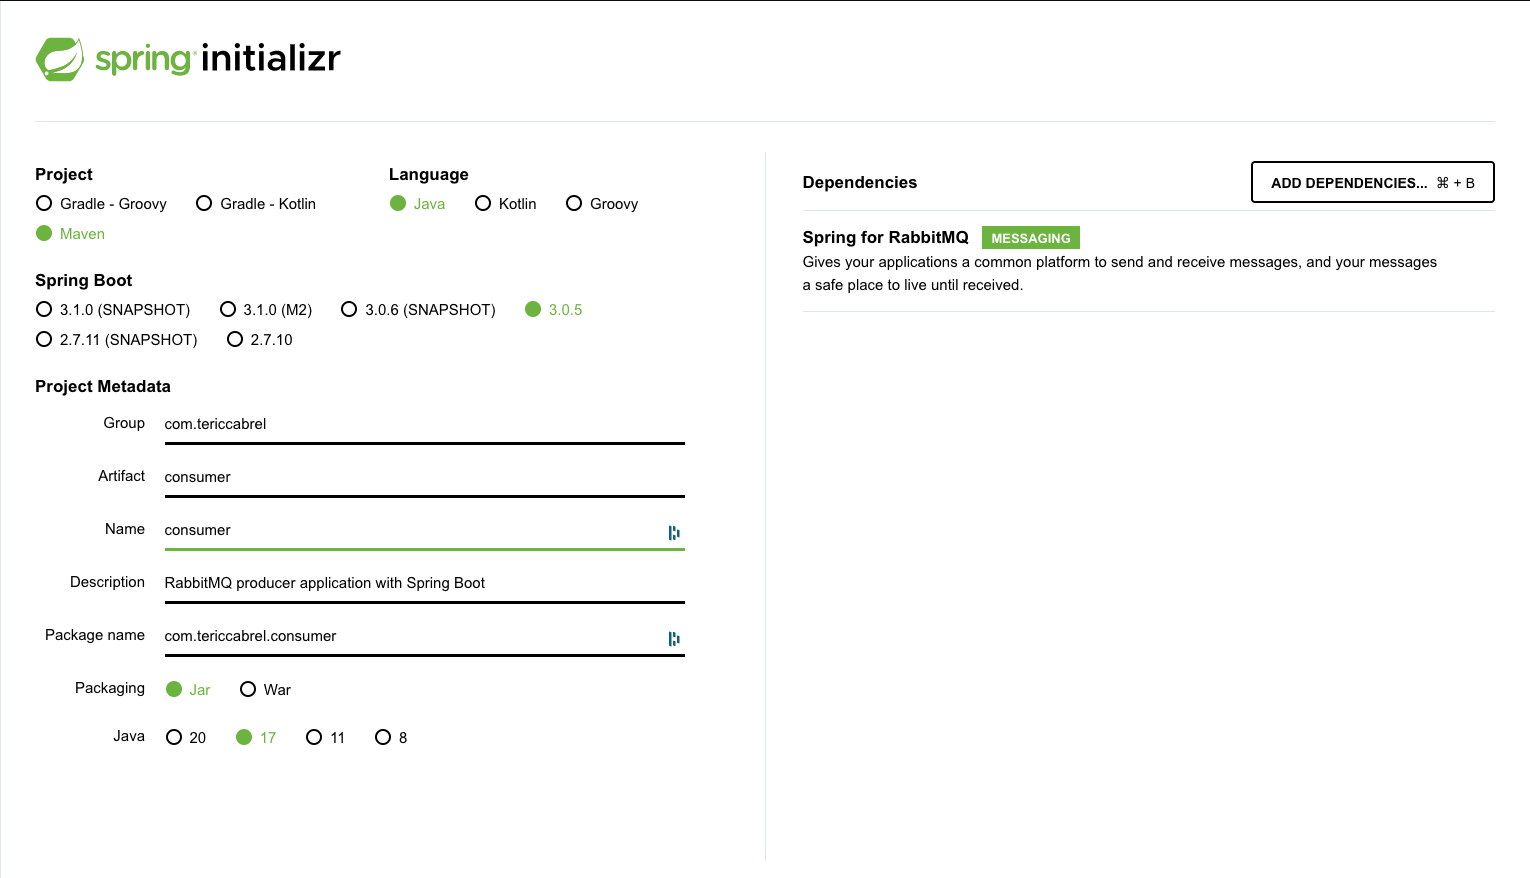
There is an online project generator to create a Spring Boot project with the required dependencies. You can also create a new project from the IDE IntelliJ. I guide you on how to do that in the post below:
We need two dependencies:
- The Spring Web: will allow us to create an API route for user registration that will publish a message in a RabbitMQ queue.
- The Spring for RabbitMQ: will allow the connection to the RabbitMQ server, and send and receive messages from the queue.
Using the first method, go to the URL start.spring.io to generate a new project.
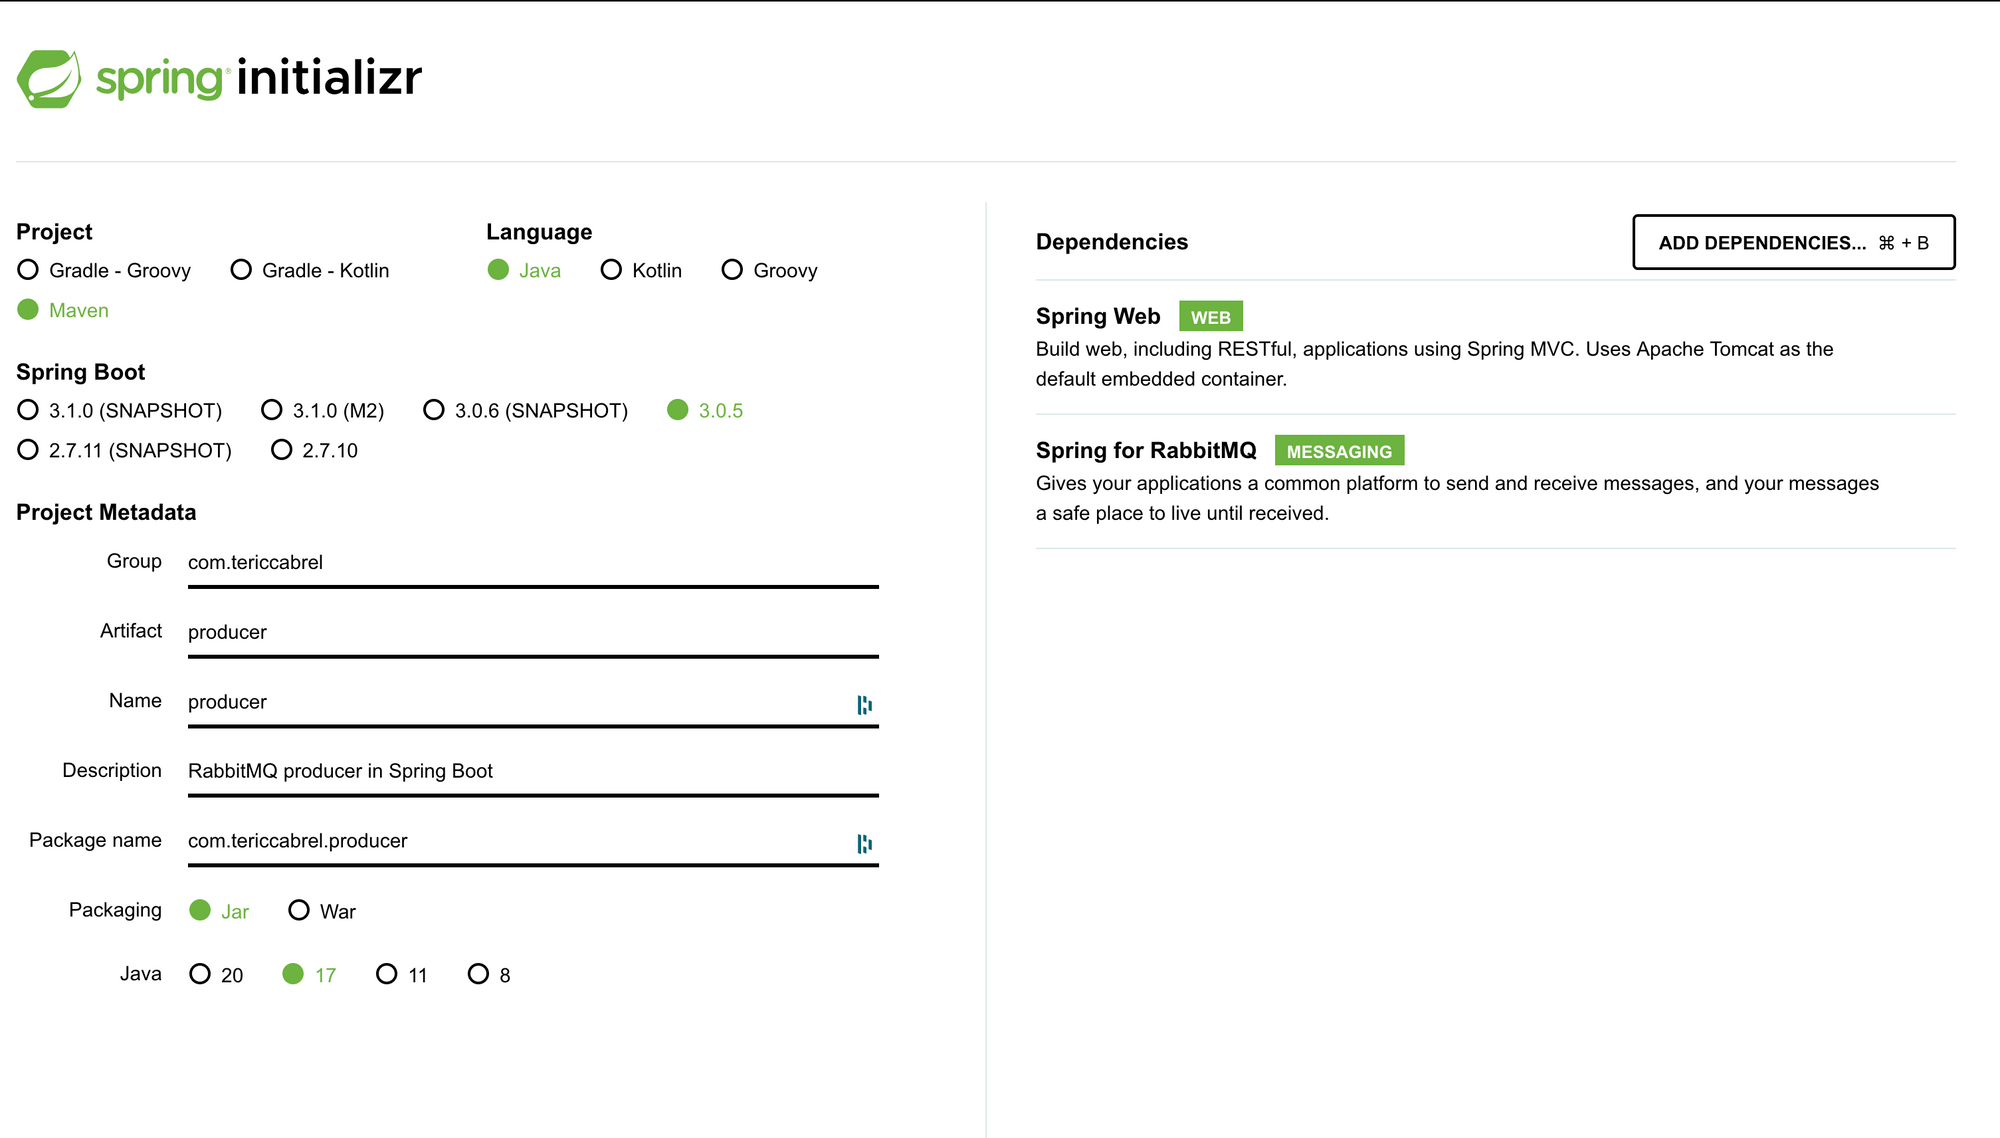
Click on the button "Generate" to download the project and open it in your IDE.
Connect to the RabbitMQ server
To connect to the server from the Spring Boot application, we must define the connection settings in the application.properties.
In a previous tutorial, we saw how to set up a RabbitMQ server on Ubuntu, and I shared the credentials in the post so you can use them if you don't have a server ready to use.
Based on the credentials created in the tutorial above, this is what the settings look like:
spring.rabbitmq.host=rabbitmq.tericcabrel.com
spring.rabbitmq.username=admin
spring.rabbitmq.password=MyStrong-P4ssw0rd$
spring.rabbitmq.port=5672
spring.rabbitmq.virtual-host=/
Now, create a new Java package called configs and create a file RabbitMQConfig.java which will be responsible for setting using the connection settings to create a connection to the RabbitMQ server. Add the code below inside:
package com.tericcabrel.producer.configs;

import org.springframework.amqp.rabbit.connection.ConnectionFactory;
import org.springframework.amqp.rabbit.listener.SimpleMessageListenerContainer;
import org.springframework.context.annotation.Bean;
import org.springframework.context.annotation.Configuration;

@Configuration
public class RabbitMQConfig {
    @Bean
    SimpleMessageListenerContainer container(ConnectionFactory connectionFactory) {
        SimpleMessageListenerContainer container = new SimpleMessageListenerContainer();
        container.setConnectionFactory(connectionFactory);

        return container;
    }
}
Run the application using mvn spring-boot:run and check the connection has been established successfully.
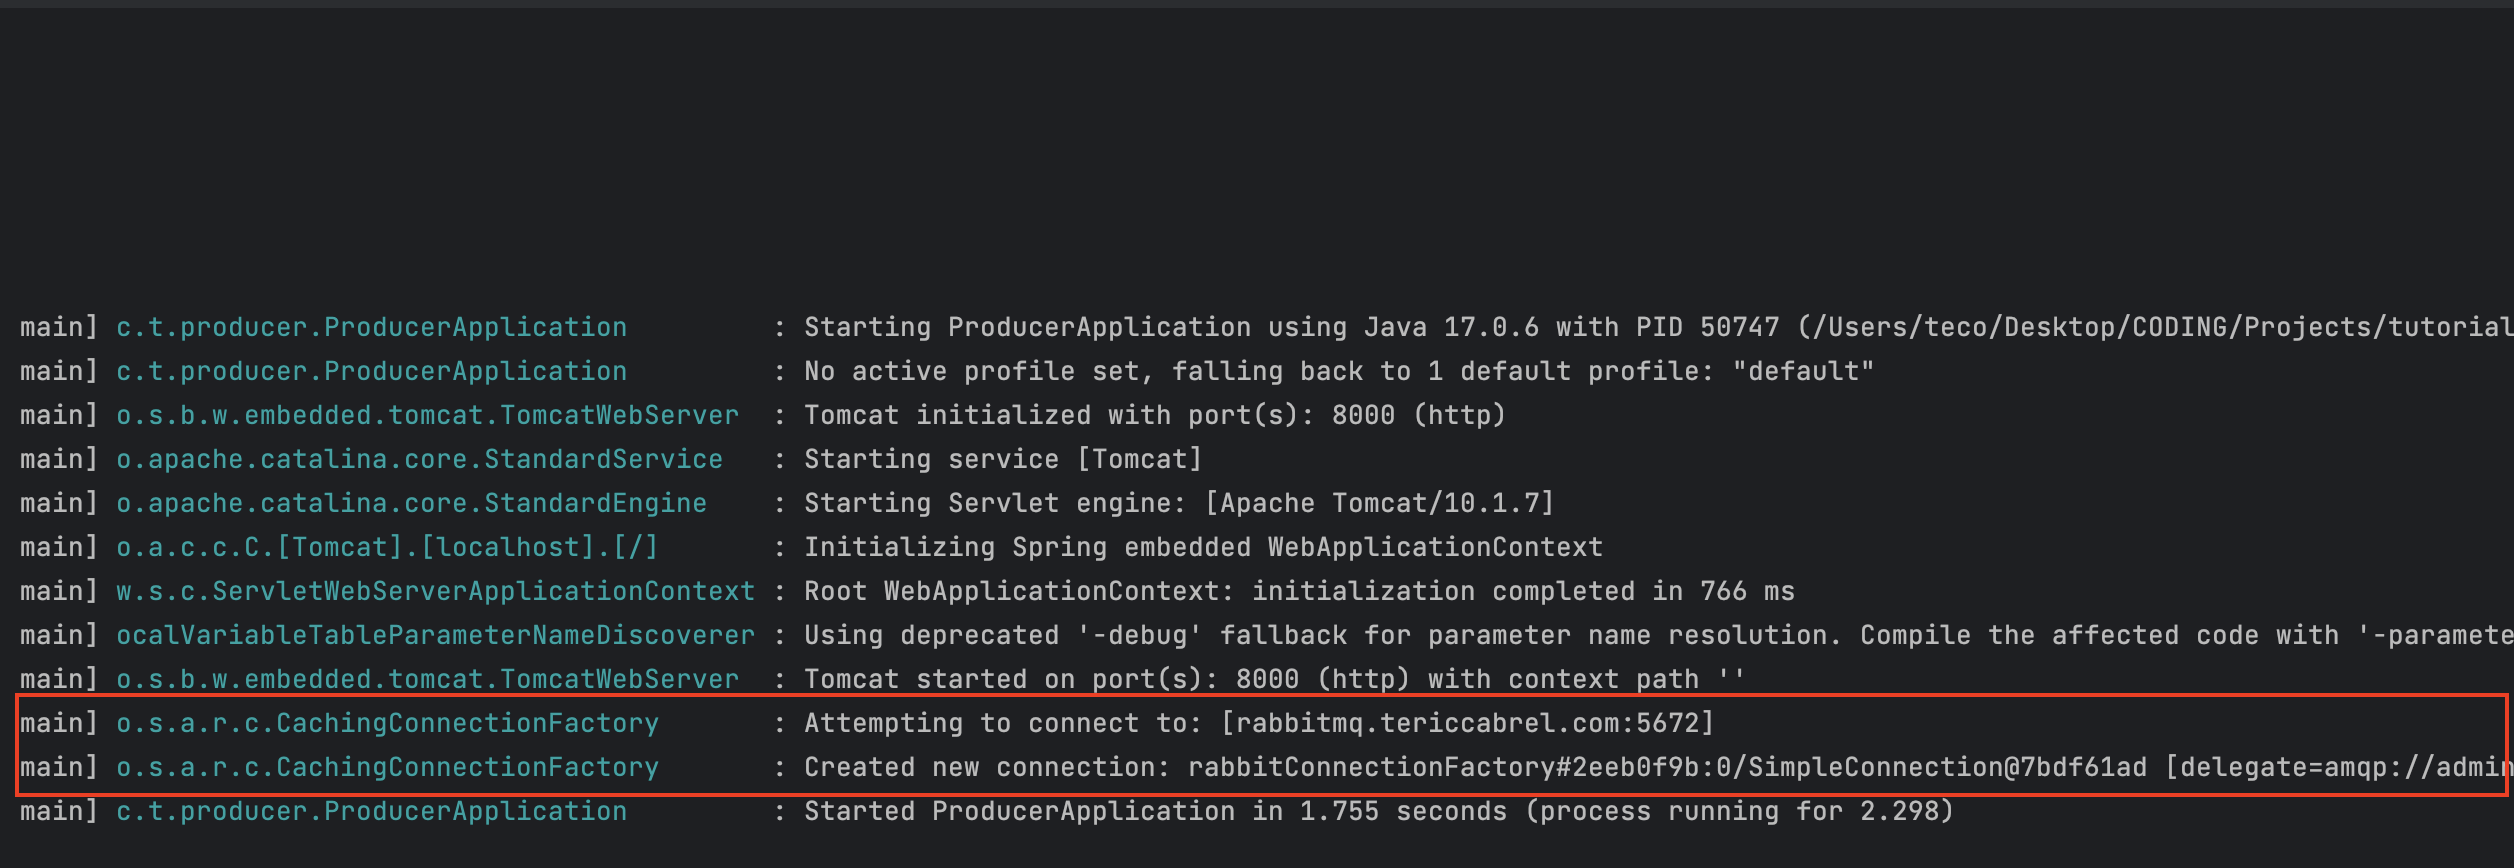
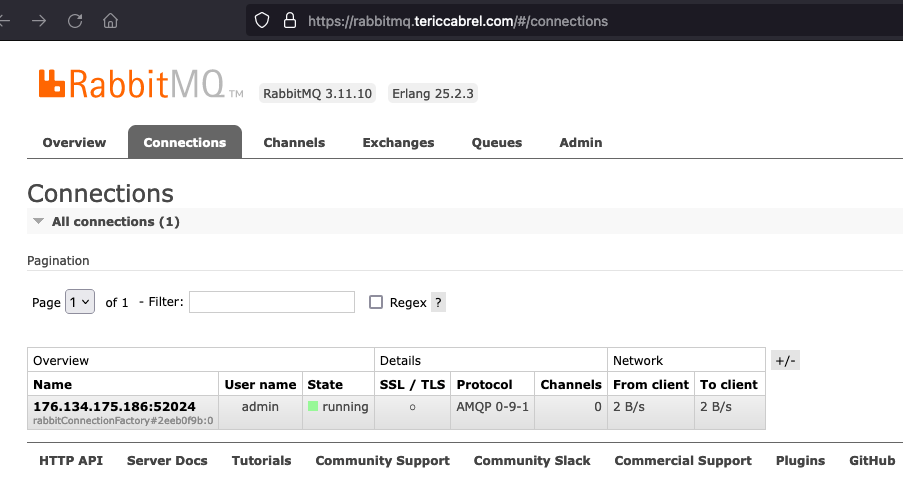
You can also the connections from the Web administration interface of the RabbitMQ server.
Send a message in the queue
To send a message in the queue, we need the queue name and the message to send into.
We want to send in the queue the message that will be used to send an email to the user. Below is the shape of the JSON object to send:
{
    "fullName": string,
    "emailAddress": string,
    "confirmationCode": number
}
The queue name will be user-registration.
We will receive the full name and email address from the body of a POST request and will generate a random confirmation code.
Create a package controllers and create a file named UserController.java and add the code below:
package com.tericcabrel.producer.controllers;

import com.fasterxml.jackson.core.JsonProcessingException;
import com.fasterxml.jackson.databind.ObjectMapper;
import com.tericcabrel.producer.dtos.RegisterUserDto;
import com.tericcabrel.producer.dtos.UserRegisteredPayload;
import org.springframework.amqp.rabbit.core.RabbitTemplate;
import org.springframework.http.ResponseEntity;
import org.springframework.web.bind.annotation.PostMapping;
import org.springframework.web.bind.annotation.RequestBody;
import org.springframework.web.bind.annotation.RestController;

import java.util.HashMap;
import java.util.Map;
import java.util.Random;

@RestController
public class UserController {
    static String QUEUE_NAME = "user-registration";

    private final RabbitTemplate rabbitTemplate;

    public UserController(RabbitTemplate rabbitTemplate) {
        this.rabbitTemplate = rabbitTemplate;
    }

    @PostMapping("/register")
    public ResponseEntity<Map<String, String>> registerUser(@RequestBody RegisterUserDto registerUserDto) throws JsonProcessingException {
    	// TODO save user in the database

        Random random = new Random();
        int confirmationCode = random.nextInt(900000) + 100000;

        UserRegisteredPayload queuePayload = new UserRegisteredPayload(
                registerUserDto.name(),
                registerUserDto.email(),
                confirmationCode
        );

        ObjectMapper objectMapper = new ObjectMapper();
        String queuePayloadString = objectMapper.writeValueAsString(queuePayload);

        rabbitTemplate.convertAndSend(QUEUE_NAME, queuePayloadString);

        Map<String, String> response = new HashMap<>();
        response.put("message", "User registered successfully!");

        return ResponseEntity.ok(response);
    }
}
When we receive a POST at the route /register, these are what is done:
- The request body is mapped to the object
registerUserDto. - We create the payload of the message to be sent in the queue from the
registerUserDto. - We use the
objectMapperfrom the Jackson library to convert the UserRegisteredPayload object to a JSON string. - We use the
rabbitTemplateto send the message in the queue nameduser-registration. - Send a response to the client.
Below is the code of the class RegisterUserDto:
package com.tericcabrel.producer.dtos;

public record RegisterUserDto(String name, String email) {

}
Below is the code of the class UserRegisteredPayload:
package com.tericcabrel.producer.dtos;

public record UserRegisteredPayload (String fullName, String emailAddress, int confirmationCode) {

}
The queue name must be created from the Web administration interface.
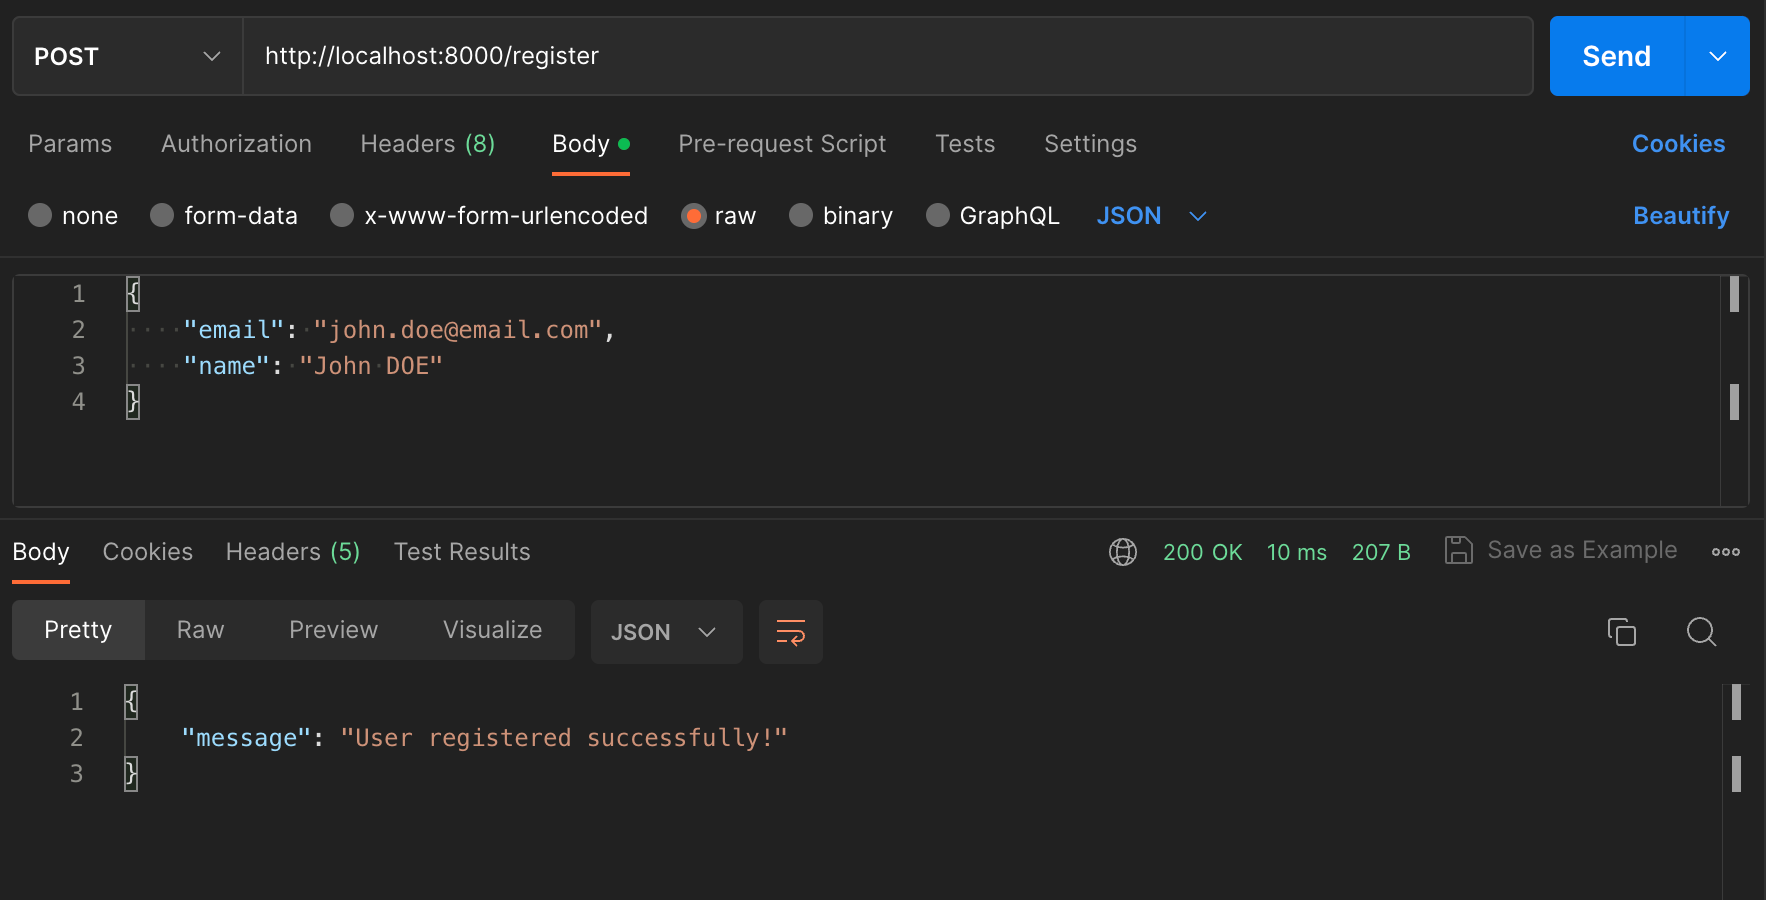
Start the application and open an HTTP client to send a POST request to http://localhost:8000/register
From the RabbitMQ Web administration interface, we can browse messages available in the queue user-registration.
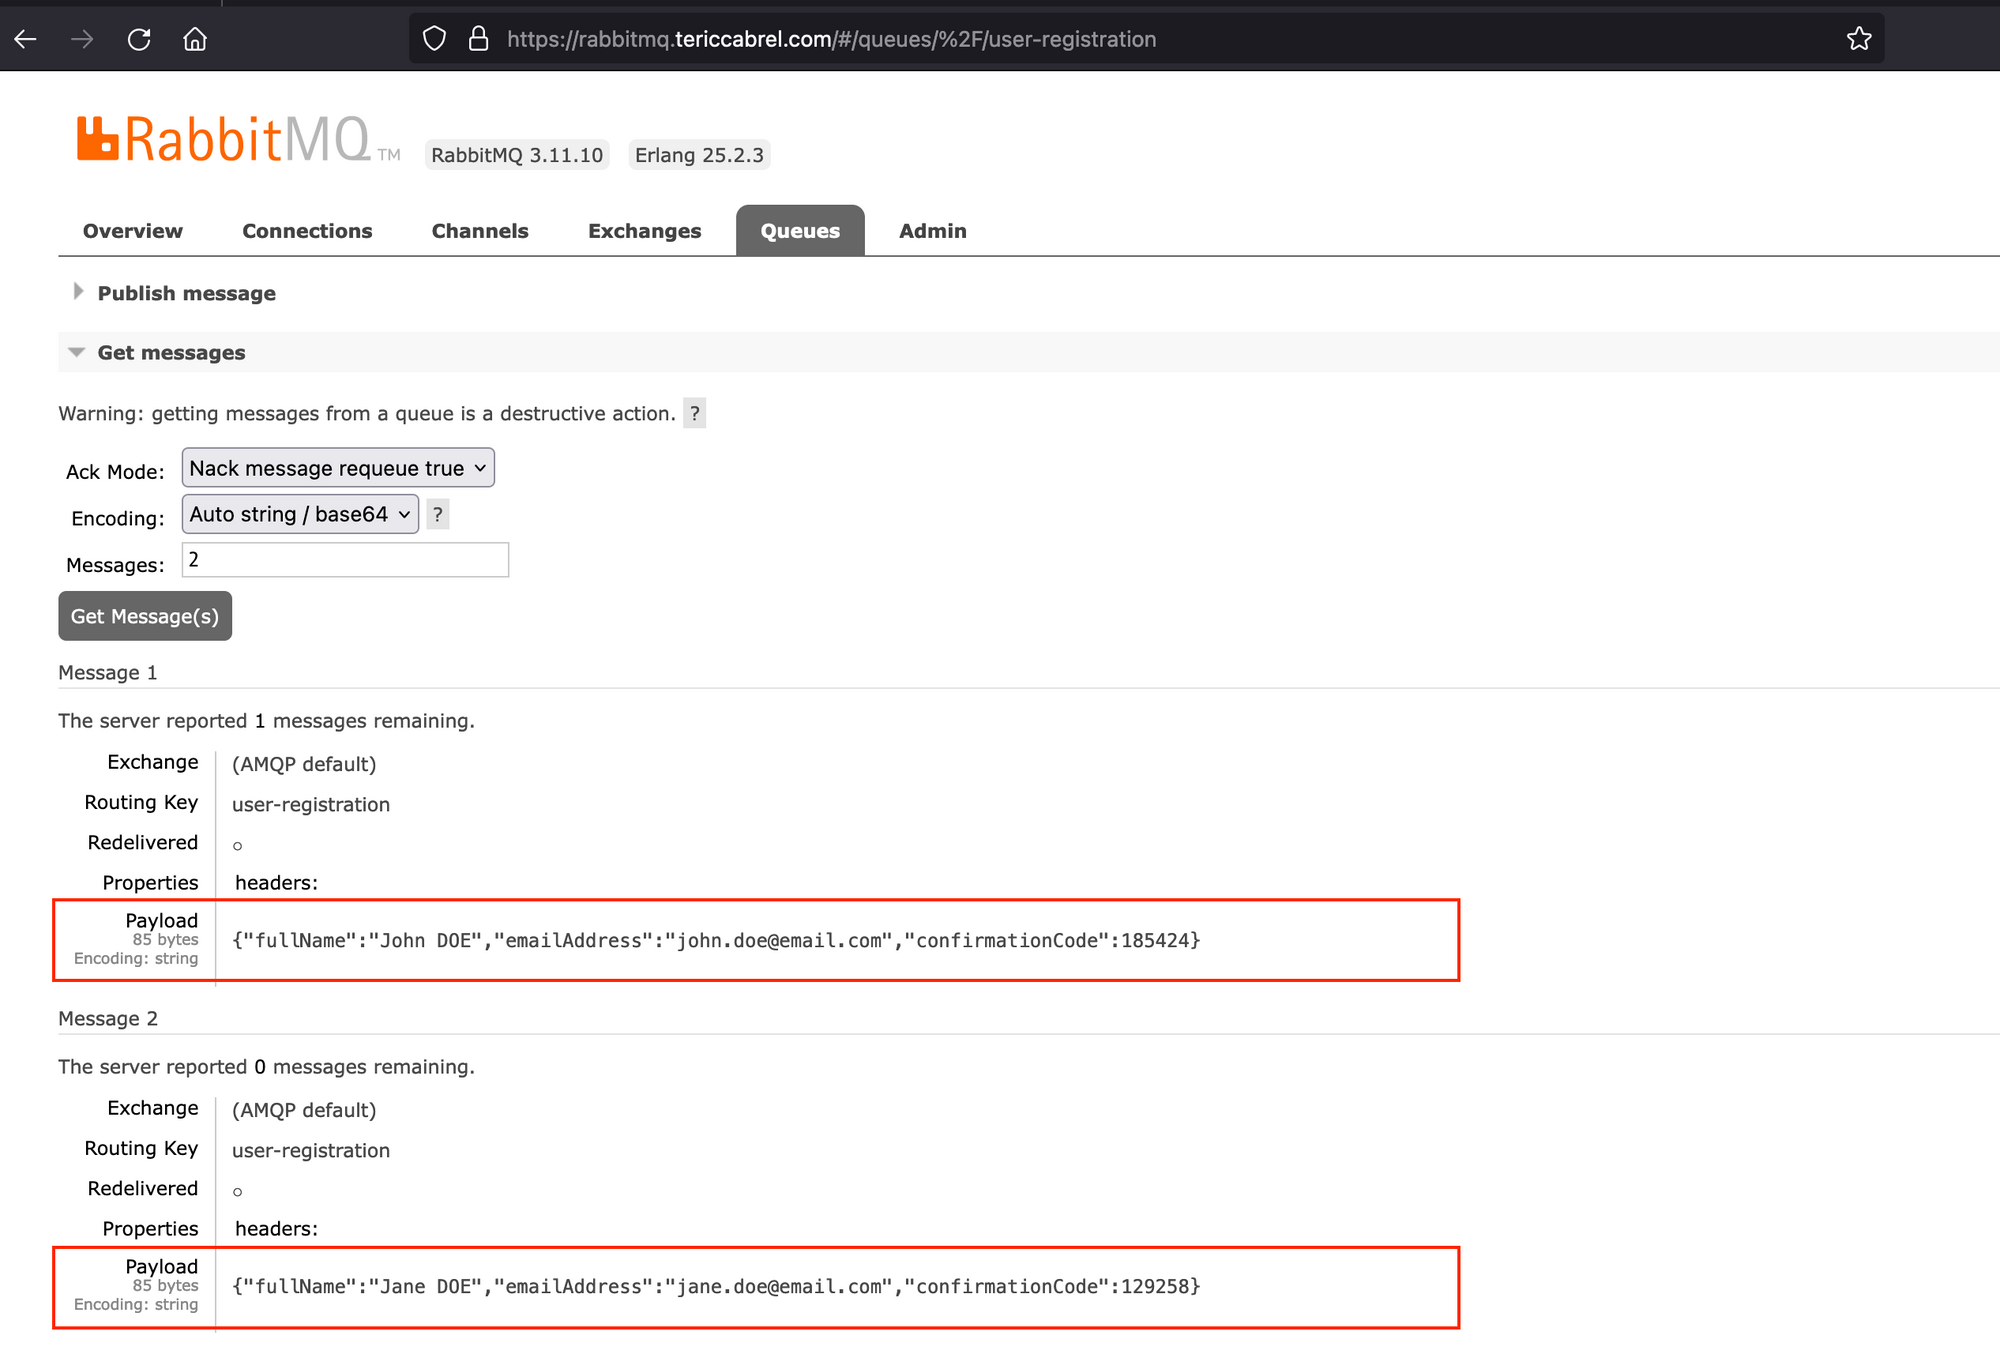
These messages are waiting to be consumed by another application, usually called the consumer.
Read a message in the queue
Let's create a new Spring Boot project from the online starter project, and we will add only one dependency: The Spring for RabbitMQ.
Click on the button "Generate" to download the project and open it in your IDE.
Open the file application.properties and add the code below to set the RabbitMQ server connection settings:
spring.rabbitmq.host=rabbitmq.tericcabrel.com
spring.rabbitmq.username=admin
spring.rabbitmq.password=MyStrong-P4ssw0rd$
spring.rabbitmq.port=5672
spring.rabbitmq.virtual-host=/
Now, create a new Java package called configs and create a file RabbitMQConfig.java and add the code below:
package com.tericcabrel.consumer.configs;

import com.tericcabrel.consumer.listeners.UserRegisteredListener;
import org.springframework.amqp.rabbit.connection.ConnectionFactory;
import org.springframework.amqp.rabbit.listener.SimpleMessageListenerContainer;
import org.springframework.amqp.rabbit.listener.adapter.MessageListenerAdapter;
import org.springframework.context.annotation.Bean;
import org.springframework.context.annotation.Configuration;
@Configuration
public class RabbitMQConfig {
    @Bean
    SimpleMessageListenerContainer container(ConnectionFactory connectionFactory, MessageListenerAdapter listenerAdapter) {
        SimpleMessageListenerContainer container = new SimpleMessageListenerContainer();

        container.setConnectionFactory(connectionFactory);
        container.setMessageListener(listenerAdapter);

        container.setQueueNames("user-registration");

        return container;
    }

    @Bean
    MessageListenerAdapter listenerAdapter(UserRegisteredListener listener) {
        return new MessageListenerAdapter(listener, "onMessageReceived");
    }
}
The configuration is similar to the producer application, except we added a new Bean taking into argument an instance of the class UserRegisteredListener. This class contains a method onMessageReceived() that will be executed when a message is consumed from the queue.
It is inside this method that we will write our logic; let's create a package named listeners then create a file named UserRegisteredListener.java and finally, add the code below:
package com.tericcabrel.consumer.listeners;

import org.springframework.stereotype.Component;

@Component
public class UserRegisteredListener {
    public void onMessageReceived(String message) {
        System.out.println("Received [" + message + "]");

        // TODO send an email using the data
    }
}
We just print the message received from the queue. We will not cover the email sending here, but I wrote a post on how to do that in Spring Boot and Thymeleaf.

Run the application, then send a POST request to the producer application, you will see the message printed in the console of the consumer.
Parsing the message received
The message received is a JSON string that should be transformed into a Java object to be used. We will use the Jackson library to do that; in the pom.xml, add the dependency:
<dependencies>
    <!-- ....... -->
    <dependency>
		<groupId>com.fasterxml.jackson.core</groupId>
		<artifactId>jackson-databind</artifactId>
		<version>2.14.2</version>
	</dependency>
</dependencies>
Install the dependency by running the command mvn install.
Update the code of the file UserRegisteredListener.java with the code below:
package com.tericcabrel.consumer.listeners;

import com.fasterxml.jackson.core.JsonProcessingException;
import com.fasterxml.jackson.core.type.TypeReference;
import com.fasterxml.jackson.databind.ObjectMapper;
import com.tericcabrel.consumer.dtos.UserRegisteredPayload;
import org.springframework.stereotype.Component;

@Component
public class UserRegisteredListener {
    public void onMessageReceived(String message) throws JsonProcessingException {
        ObjectMapper objectMapper = new ObjectMapper();

        TypeReference<UserRegisteredPayload> mapType = new TypeReference<>() {};
        UserRegisteredPayload payload = objectMapper.readValue(message, mapType);

        System.out.println("Message received");
        System.out.println("User full name:    " + payload.fullName());
        System.out.println("Email Address:     " + payload.emailAddress());
        System.out.println("Confirmation code: " + payload.confirmationCode());

        // TODO send an email using the data
    }
}
Now we received a message, we can access each property of the payload, as you can see in the picture below.

Wrap up
We used RabbitMQ two send and receive messages asynchronously between two Spring Boot applications. We used the Spring dependency for RabbitMQ and the AMQP to establish the connection to the server, send and receive messages. Here are the takeaways:
- The connection options are set in the application.properties and are automatically handled by the dependency Spring for RabbitMQ.
- You should manually create the queue in the Web Administration interface.
- The producer must send the message as a string.
- The consumer receives the message and parses it to a Java object before using it.
You can find the code source on the GitHub repository.
Follow me on Twitter or subscribe to my newsletter to avoid missing the upcoming posts and the tips and tricks I occasionally share.