
Connect a Node.js application with MongoDB using Prisma


Photo by Vikas Meena / Unsplash
Prisma is an ORM that supports many popular databases; MongoDB is one among them. When building a Node.js application that connects to a MongoDB database, Mongoose is the defacto choice for many developers.
Today we will use Prisma and see how it makes the interaction more straightforward, from defining the schema to performing queries to the database.
What we will build
We will build the backend of a community blog where users can:
- Create posts
- See the number of views for a post
- Comment a post
- Upvote or downvote a comment.
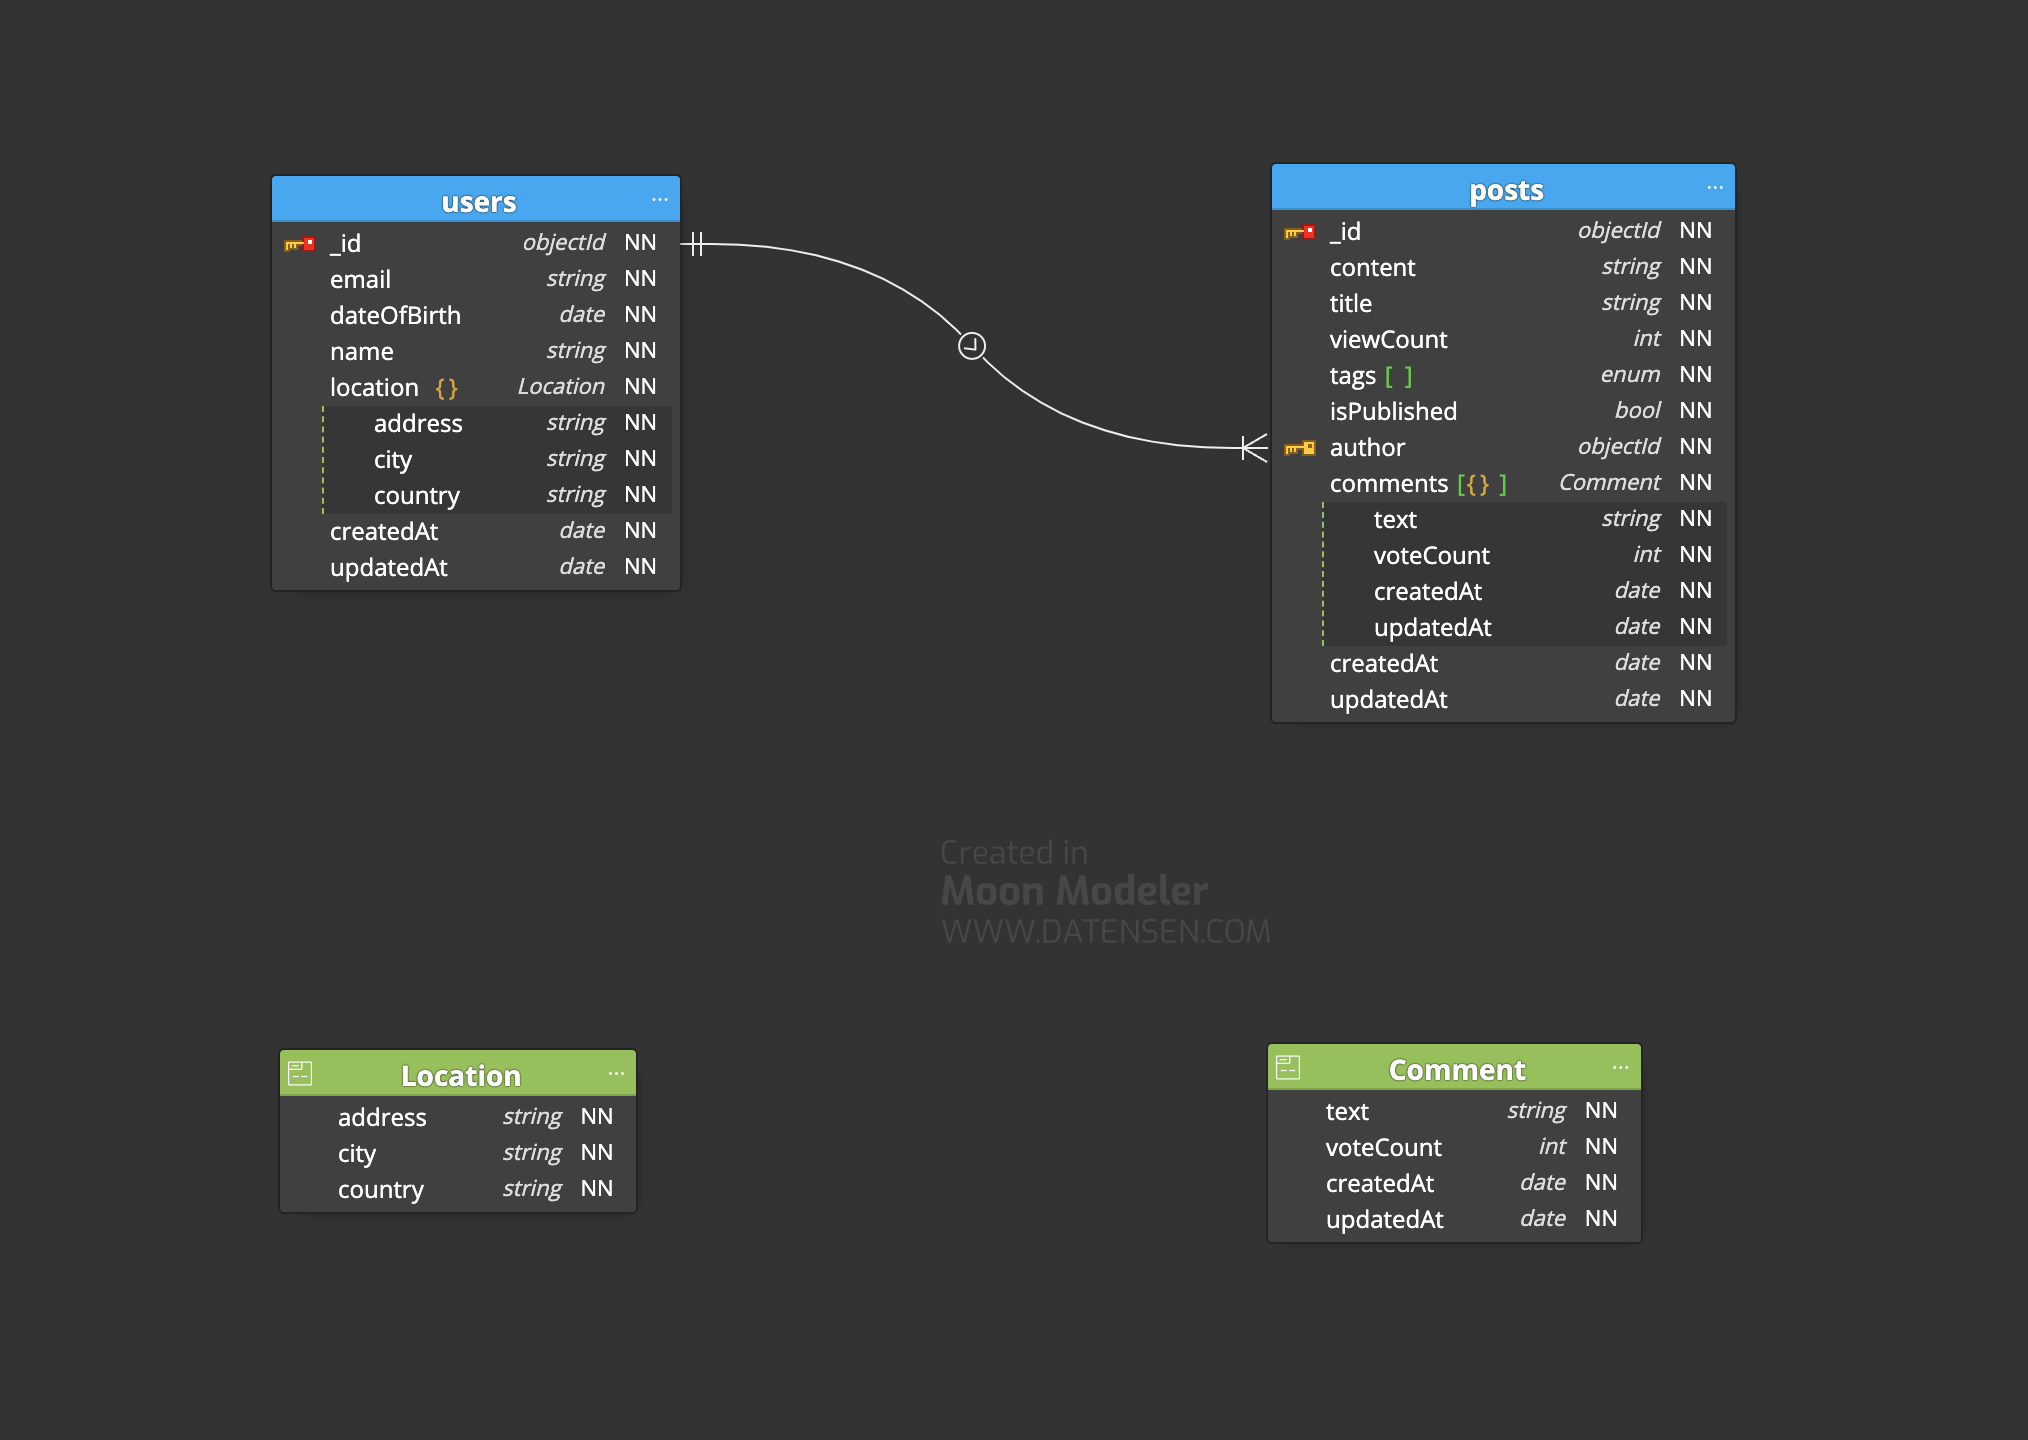
Here is the schema of the application's database designed with Moon Modeler.
Prerequisites
You must install the following tools on your computer to follow this tutorial.
- Node.js 12+ - Download's link
- NPM or Yarn
- MongoDB 4+ with a replicate set configured. You can configure a replica set manually or use MongoDB Atlas, which offers a free MongoDB instance with a replica set.
 Eric Cabrel TIOGO
Create the project
In this tutorial, we built a starter project for Node.js with Typescript and will use it to initialize the project.
Run the command below:
git clone https://github.com/tericcabrel/node-ts-starter.git node-prisma-mongo

cd node-prisma-mongo

yarn install

yarn start
Set up Prisma
Inside the project directory, install the Prisma CLI
yarn add -D prismaInitialize Prisma for our project:
yarn prisma initThis command will create a Prisma schema and a .env file to set the environment variables to inject into the application.
Replace the content of the file prisma/schema.prisma with the code below to set the provider to MongoDB:
// This is your Prisma schema file,
// learn more about it in the docs: https://pris.ly/d/prisma-schema

generator client {
  provider = "prisma-client-js"
}

datasource db {
  provider = "mongodb"
  url      = env("DATABASE_URL")
}
Open the .env file and update the database URL to the connection string of the MongoDB instance you created on Atlas.
DATABASE_URL="mongodb+srv://<user>:<password>@cluster0.gbgfd.mongodb.net/<database_name>?retryWrites=true&w=majority"Replace <user>, <password>, <database_name> with the credentials of your MongoDB Atlas instance.
Create the database schema
From the picture of the database schema, we have two collections users and posts.
Update the file prisma/schema.prisma with the code below:
// This is your Prisma schema file,
// learn more about it in the docs: https://pris.ly/d/prisma-schema

generator client {
  provider = "prisma-client-js"
}

datasource db {
  provider = "mongodb"
  url      = env("DATABASE_URL")
}

enum Tag {
  NodeJS
  Java
  React
  GraphQL
  Spring
  Typescript
  Express
  Docker
  Jest
  Jenkins
  AWS
}

type Location {
  address String
  city    String
  country String
}

type Comment {
  text        String
  voteCount   Int
  createdAt   DateTime @default(now())
  updatedAt   DateTime @updatedAt()
}

model User {
  id            String  @id @default(auto()) @map("_id") @db.ObjectId
  email         String
  dateOfBirth   DateTime
  name          String
  location      Location[]
  createdAt     DateTime @default(now())
  updatedAt     DateTime @updatedAt()

  @@unique([email])
  @@map("users")
}

model Post {
  id            String  @id @default(auto()) @map("_id") @db.ObjectId
  title         String
  content       String
  viewCount     Int
  isPublished   Boolean
  tags          Tag[]
  createdAt     DateTime @default(now())
  updatedAt     DateTime @updatedAt()
  comments      Comment[]
  author        User   @relation(fields: [authorId], references: [id])
  authorId      String @db.ObjectId

  @@index([author])
  @@map("posts")
}
Generate Types from the schema
We will first install the Prisma client that provides the API to easily perform database queries from your models.
yarn add @prisma/clientWe will now generate the types from the Prisma schema.
yarn prisma generateThe command above generates the types defined in the folder node_modules/.prisma and the @prisma/client import these types.
Insert data
Insert data consist in creating a User and Post. In the folder src, create a file insert-data.ts and add the code below:
import { PrismaClient, Tag, Prisma } from '@prisma/client';

const prisma = new PrismaClient();

export const insertUserAndPost = async () => {
  const userInput: Prisma.UserUncheckedCreateInput = {
    email: 'jon.snow@got.com',
    name: 'Jon Snow',
    dateOfBirth: new Date(1995, 1, 23),
    location: {
      address: "2 Rue de l'opera",
      city: 'Paris',
      country: 'FRA',
    },
  };

  const createdUser = await prisma.user.create({
    data: userInput,
  });

  const commentsInput: Prisma.CommentCreateInput[] = [
    {
      text: 'My first comment',
      voteCount: 14,
      updatedAt: new Date(),
    },
  ];

  const postInput: Prisma.PostUncheckedCreateInput = {
    authorId: createdUser.id,
    comments: commentsInput,
    content: 'My first post text content',
    isPublished: false,
    tags: [Tag.NodeJS, Tag.Docker, Tag.GraphQL],
    title: 'My first post title',
    viewCount: 23,
  };

  const createdPost = await prisma.post.create({
    data: postInput,
  });

  console.log(createdUser);
  console.log(createdPost);
};

insertUserAndPost().then();
Run the command below to execute the file:
yarn ts-node src/insert-data.tsWe got the following output:

Add comment to post
Comments are children of a post, also called embedded documents. How do we add a new comment to an existing post using Prisma Client?
Append the code below in the file insert-data.ts
// ....code to create user and post
const newComment: Prisma.CommentCreateInput = {
  text: 'A new comment in the post created above',
  updatedAt: new Date(),
  voteCount: 32,
};

const updatedPost = await prisma.post.update({
  where: {
    id: createdPost.id,
  },
  data: {
    comments: {
      push: [newComment],
    },
  },
});

console.log(updatedPost);
Clean your database before re-running the code; otherwise, the app will crash because the user's email address is unique.
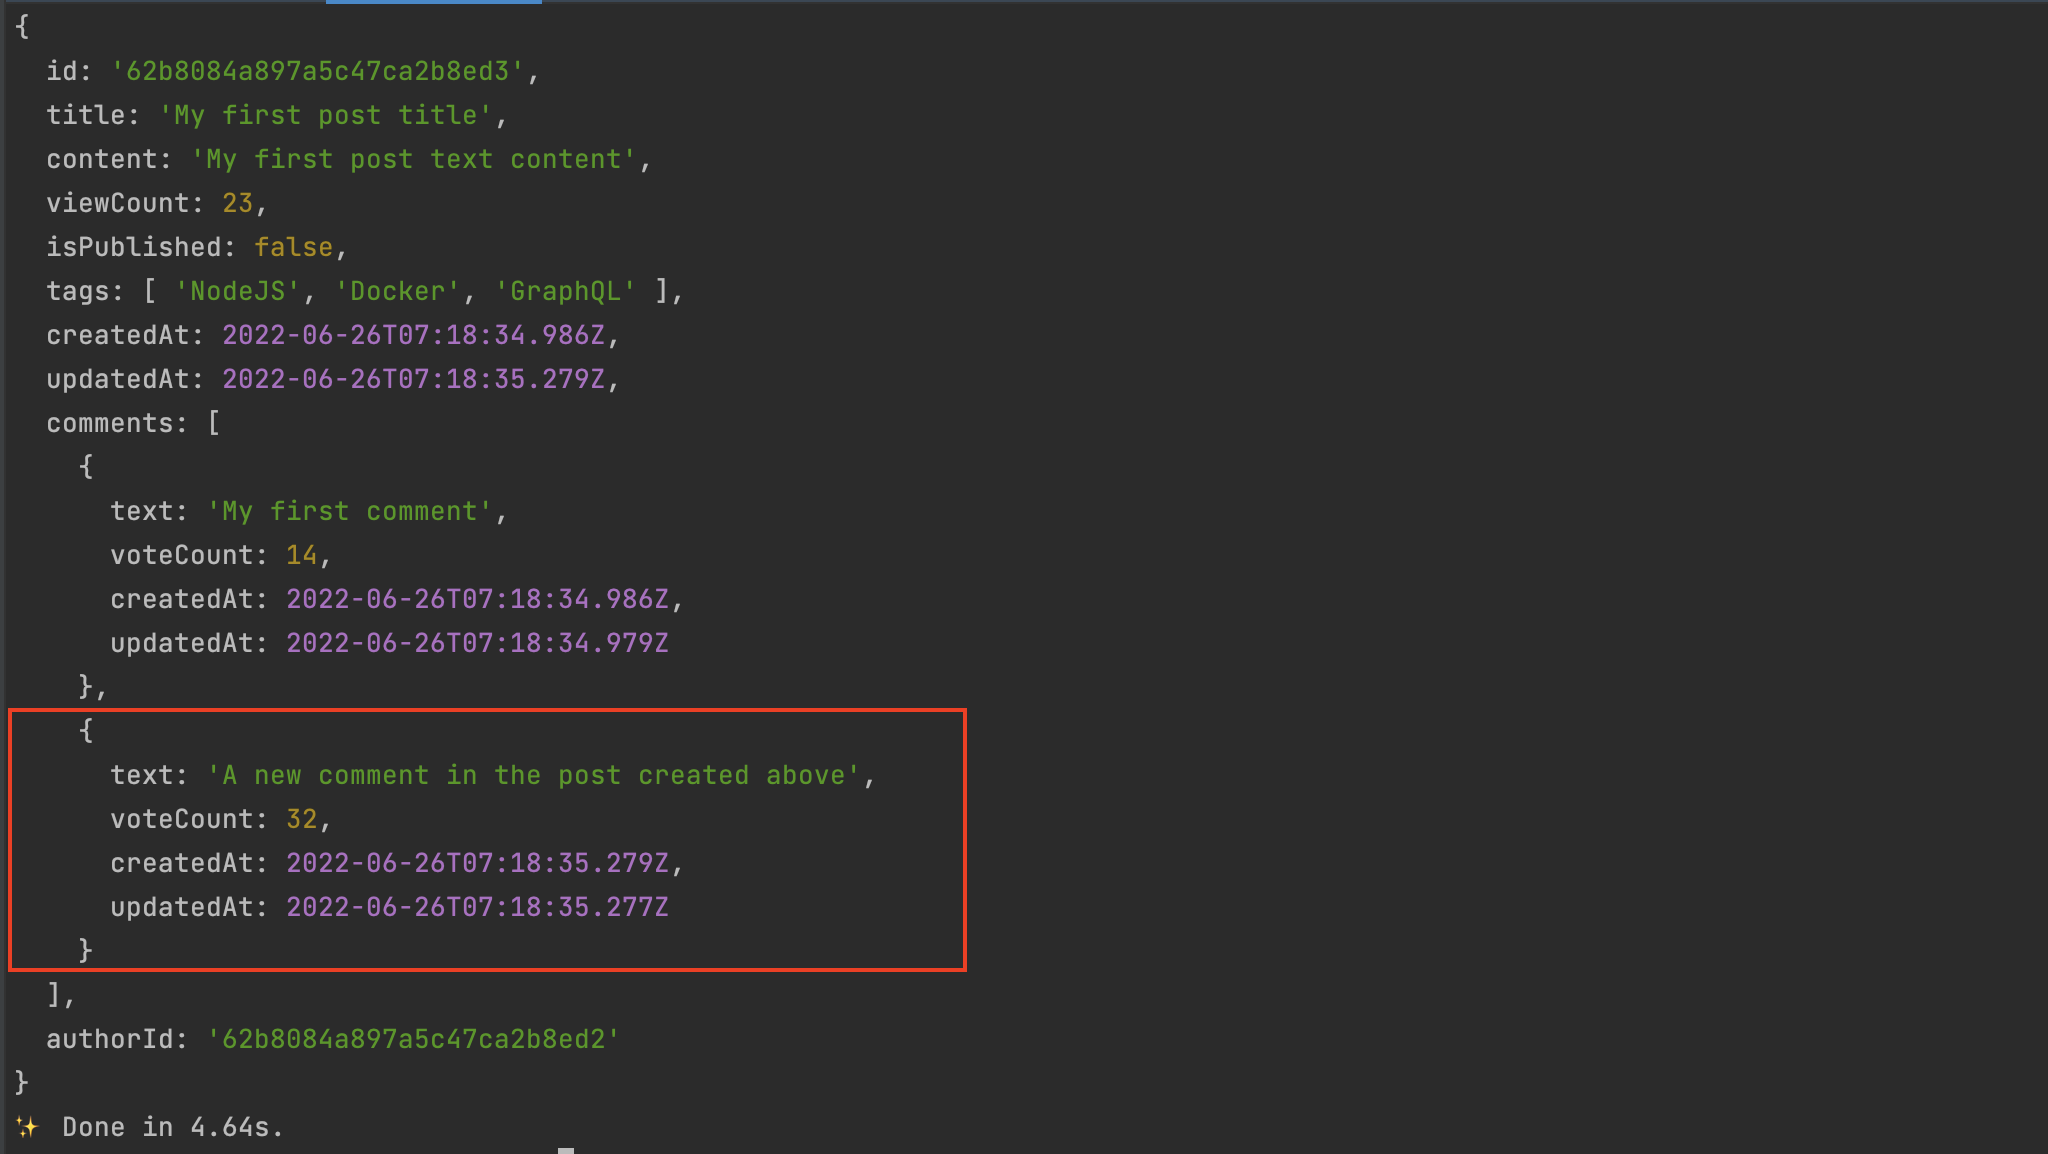
Re-Run yarn ts-node src/insert-data.ts and we get the following output:
Retrieve data
Below are some queries to retrieve data from the database, create a file retrieve-data.ts and add the code below:
import { PrismaClient, Tag } from '@prisma/client';

const prisma = new PrismaClient();

export const retrieveData = async () => {
  // Find all users
  const allUsers = await prisma.user.findMany();

  // Find a user by his Id
  const [user] = allUsers;
  const userById = await prisma.user.findUnique({ where: { id: user.id } });

  // Find a user by his email
  const userByEmail = await prisma.user.findFirst({ where: { email: user.email } });

  // Find a user by his email and return only his email and the name
  const partialUserByEmail = await prisma.user.findUnique({
    where: {
      email: user.email,
    },
    select: {
      email: true,
      name: true,
    },
  });
  // console.log(partialUserByEmail);

  // Find user living in France order by creation date Descending
  const users = await prisma.user.findMany({
    where: {
      location: {
        some: {
          country: 'FRA',
        },
      },
    },
    orderBy: { createdAt: 'desc' },
  });
  // console.log(users);

  const [firstUser] = users;
  // Find all post of a user and also fetch the author data (.populate('author'))
  const allUserPosts = await prisma.post.findMany({
    where: {
      authorId: firstUser.id,
    },
    include: {
      author: true,
    },
  });
  // console.log(allUserPosts);

  // Find all post of a user and also fetch the author data but only his name
  const allUserPostsWithPartialAuthor = await prisma.post.findMany({
    where: {
      authorId: firstUser.id,
    },
    include: {
      author: {
        select: {
          name: true,
        },
      },
    },
  });
  // console.log(allUserPostsWithPartialAuthor);

  // Find published post with viewCount greater than 20 order by creation date Ascending
  const ascPosts = await prisma.post.findMany({
    where: {
      isPublished: true,
      viewCount: {
        gt: 20,
      },
    },
    orderBy: {
      createdAt: 'asc',
    },
  });

  // Find post with tags containing Node and Docker and viewCount Greater than between 20 and 30
  const postsWithTags = await prisma.post.findMany({
    where: {
      tags: {
        hasSome: [Tag.NodeJS, Tag.Docker],
      },
      viewCount: {
        gte: 20,
        lte: 30,
      },
    },
  });
};

retrieveData().then();
Run the command yarn ts-node retrieve-data.ts
Update data
Create a file update-data.ts and add the code below:
import { Tag, PrismaClient } from '@prisma/client';

const prisma = new PrismaClient();

export const updateData = async () => {
  const [firstUser] = await prisma.user.findMany();

  const updatedUser = await prisma.user.update({
    where: {
      id: firstUser.id,
    },
    data: {
      location: {
        set: {
          address: '',
          country: 'US',
          city: 'San Francisco',
        },
      },
    },
  });

  console.log(updatedUser);

  const [userPost] = await prisma.post.findMany({
    where: {
      authorId: firstUser.id,
    },
  });

  const updatedPost = await prisma.post.update({
    where: {
      id: userPost.id,
    },
    data: {
      isPublished: true,
      tags: [Tag.GraphQL, Tag.AWS, Tag.Jest],
    },
  });

  console.log(updatedPost);
};

updateData().then();
Delete data
Deleting data is pretty straightforward with the Prisma client; create a file delete-data.ts and add the code below:
import { PrismaClient } from '@prisma/client';

const prisma = new PrismaClient();

export const deleteData = async () => {
  await prisma.user.delete({
    where: {
      id: '601e6711225a273142039d2a',
    },
  });

  await prisma.user.delete({
    where: {
      email: 'jon.snow@got.com',
    },
  });

  // Delete all the posts of an author
  await prisma.post.deleteMany({
    where: {
      authorId: '601e6711225a273142039d2a',
    },
  });

  // Delete all posts where the title content "how to"
  await prisma.post.deleteMany({
    where: {
      title: {
        contains: 'how to',
      },
    },
  });
};

deleteData().then();
Note about integrity constraint
One of the main differences between a NoSQL and a relational database is the enforcement integrity constraint on the latter. If you try to delete a user who is the author of some posts, the action will fail because you should delete all his posts first.
In a NoSQL database, the deletion will succeed, but when using Prisma, the behavior of the relational database is replicated when you define the relationship between the user and the Post.
To delete a user with all his posts, update the relationship on the Prisma schema to allow cascade deletion.
model Post {
  id          String    @id @default(auto()) @map("_id") @db.ObjectId
  // ... other properties
  author      User      @relation(fields: [authorId], references: [id], onDelete: Cascade)
  authorId    String    @db.ObjectId

  @@index([authorId])
  @@map("posts")
}
Wrap up
If you have already used Prisma on a relational database, you realize the usage with a NoSQL database is not that different. This is great because by keeping the same mental model regardless of the database you use:
- You don't need other ORMs for SQL and NoSQL database
- No cognitive load of writing different syntax depending on the database engine
- The migration from a SQL database to a NoSQL database or vice-versa required lesser changes in the code base.
You can find the code source on the GitHub repository.
Follow me on Twitter or subscribe to my newsletter to avoid missing the upcoming posts and the tips and tricks I occasionally share.