
Handle database transactions in Node.js with Prisma ORM


A database transaction is an execution of many operations (insert, update, or delete) as a single unit, taking the database from a consistent state to a consistent one. If one operation fails, all the previous operations are canceled.
The properties of a transaction are Atomicity, Consistency, Isolation, and Durability (ACID).
When building a backend API interacting with a database, you may need to perform some actions atomically in the database. Prisma ORM supports transactions whether you are using a NoSQL database like MongoDB or a relational one like MySQL or PostgreSQL.
This tutorial will show how to write database transactions on a MySQL database using the Prisma ORM in a Node.js application.
The use case
To showcase the use of the database transaction with the Prisma ORM, let's take the use case of an e-commerce website where users can order products, proceed to the payment, and get a delivery. A simplified database schema can look like the one in the picture below.
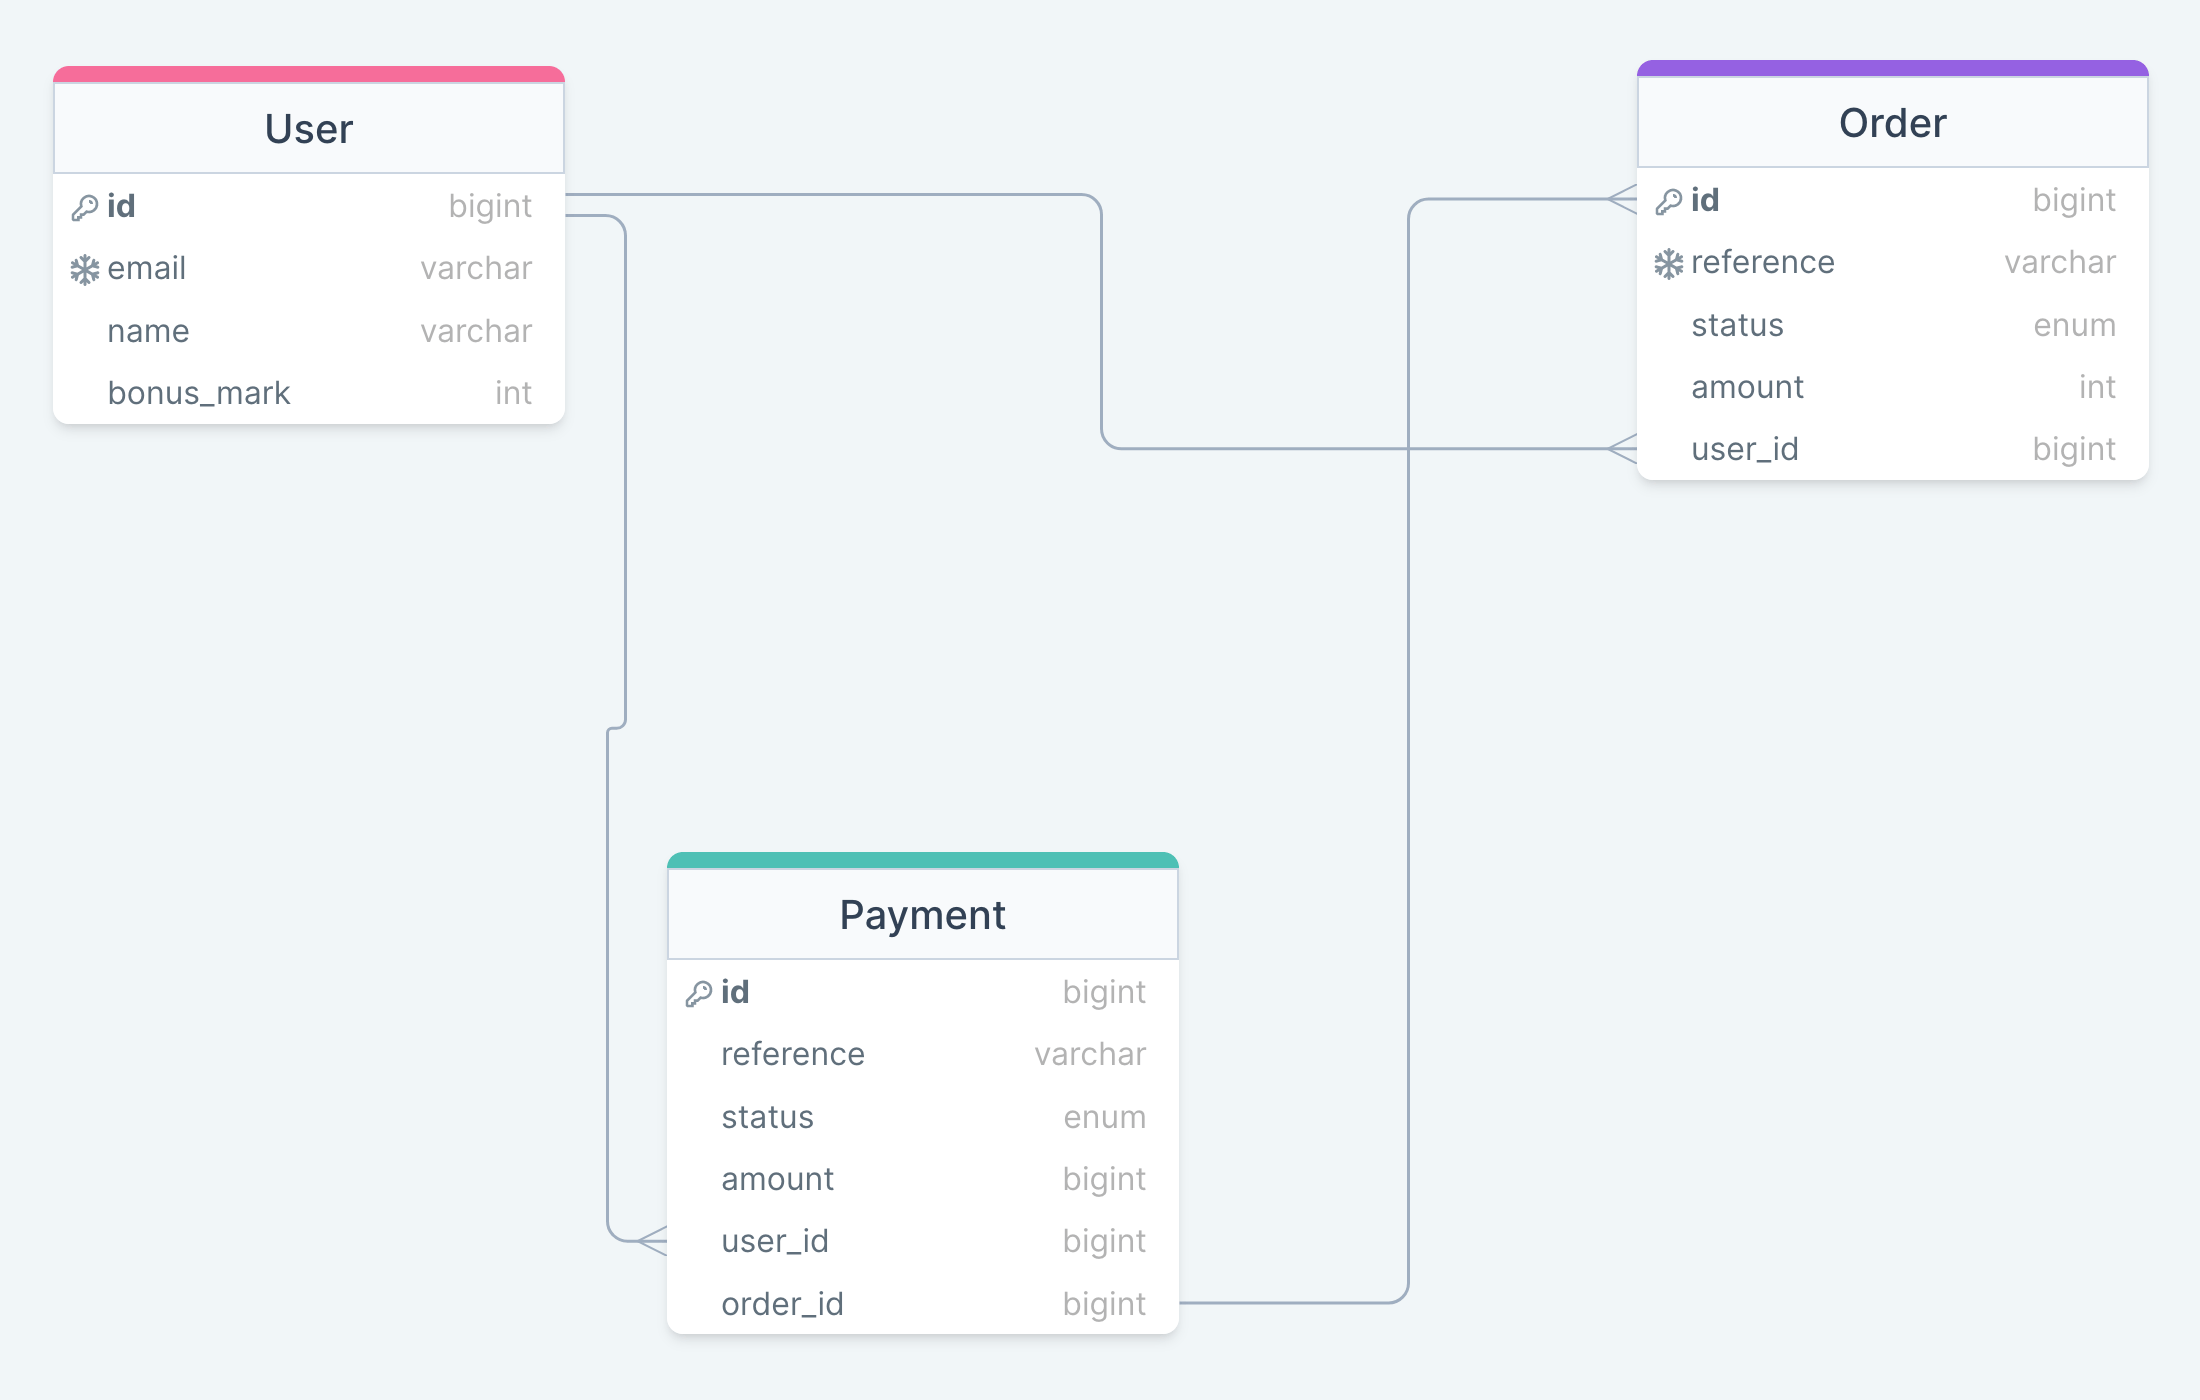
Let's explain the relationships between the database entities:
- A user can make one or many orders.
- An order is related to one or many payments (when the payment fails and we try with a new method, pay many times).
Scenario to implement
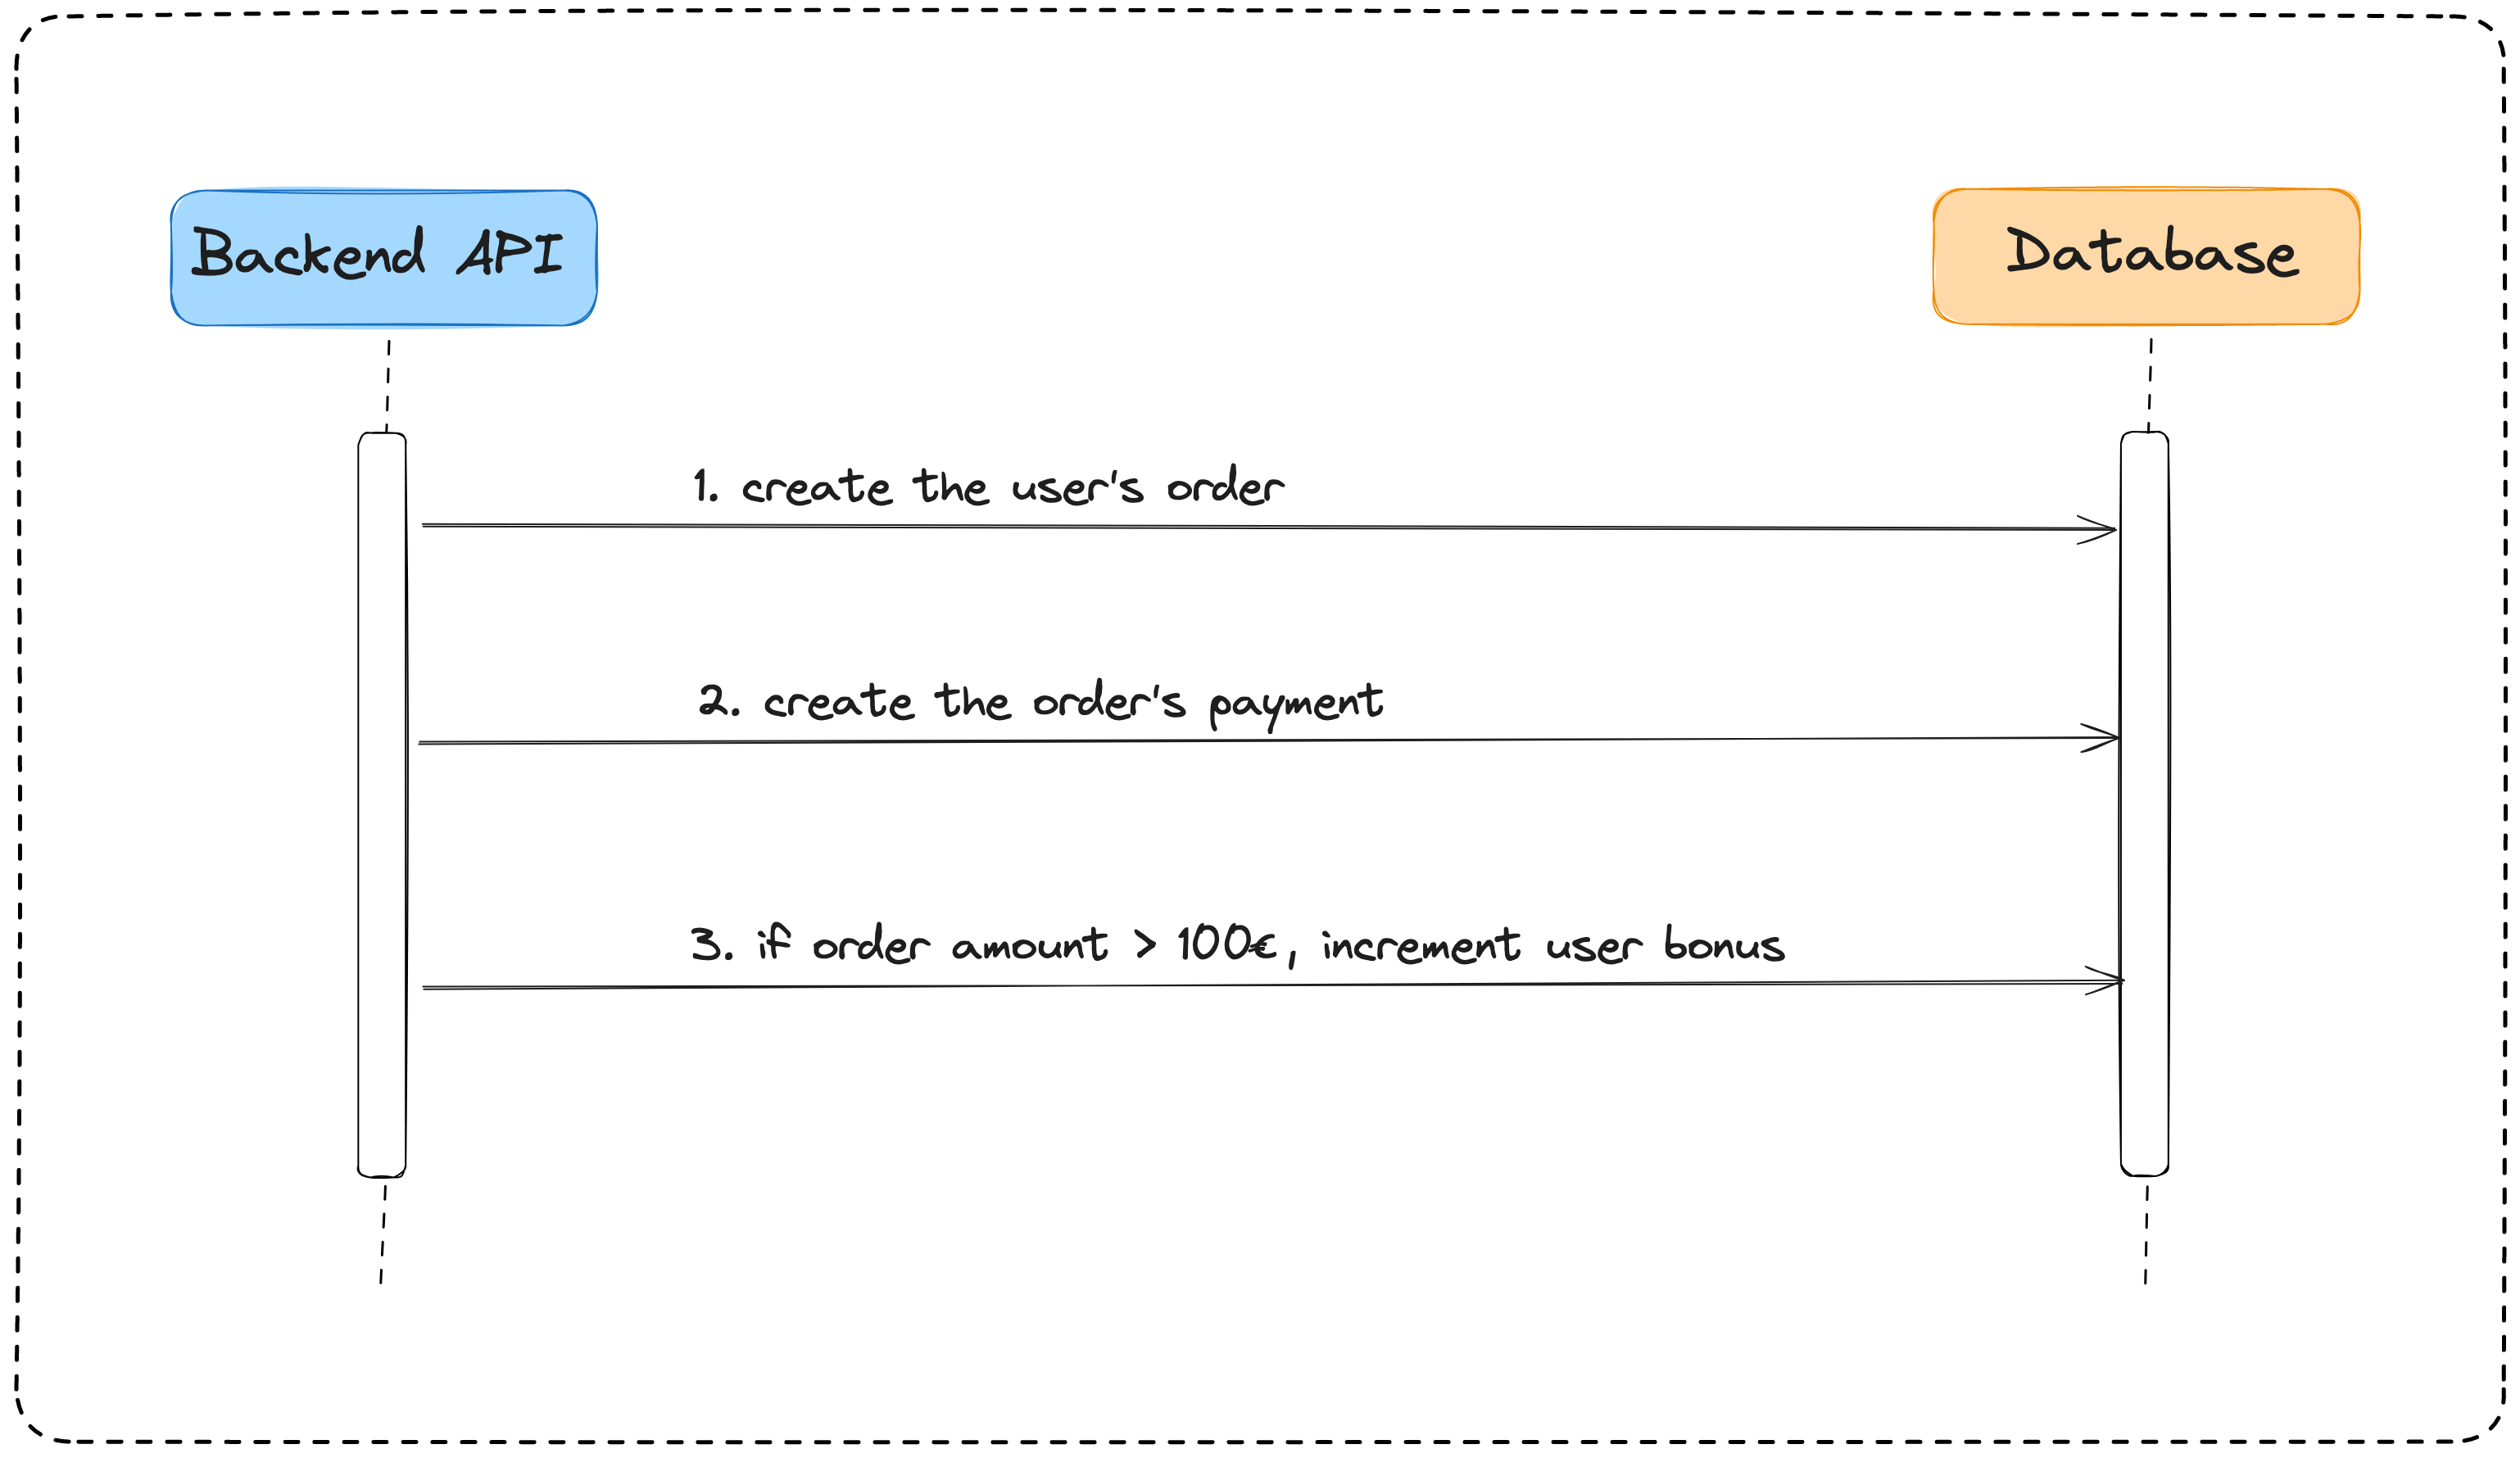
When a user places his order and makes the payment successfully, we save the order and the payment details in the system. Finally, if the order amount exceeds 100 euros, he gets a 5-mark bonus.
This is the sequence diagram of the scenario described:
Why do you need a database transaction?
The sequence diagram above shows that the product ordering scenario has three steps that must be fully completed.
What will happen if there is a failure at any execution step? Let's analyze it.
- Step 1: If the application fails to create the order (duplicate order reference, insufficient permissions, etc.), the other steps will not continue and leave the database as it is.
- Step 2: If the application fails to create the payment associated with the order, the system will have orders without payment, which can cause problems for inventory and billing management.
- Step 3: If the payment exceeds €100 and the application fails to increment the user bonus mark, you will have angry customers shouting everywhere that your promotion is a scam.
To conclude, all these steps must succeed at once to keep the database consistent. If there is a failure at any step, we must roll back the previous changes.
Using the database transaction feature is helpful to achieve that; let's see it in action with Prisma ORM.
Prerequisites
To follow this tutorial, make sure you have the following tools installed on your computer.
- Node.js 18 or higher
- A Node.js package manager like NPM, I will use Yarn.
- Docker to run a container of the database.
Run the command below to start the Docker container from the MySQL image:
docker run -d -e MYSQL_ROOT_PASSWORD=secret -e MYSQL_DATABASE=ecommerce --name mysqldb -p 3307:3306 mysql:8.0
Although we focus on MySQL, this also applies to a PostgreSQL database.
Set up the project
We will use the Node.js and TypeScript starter project we built in this tutorial. Run the command below to set up the project.
git clone https://github.com/tericcabrel/node-ts-starter.git node-prisma-transaction

cd node-prisma-transaction

yarn install

yarn start
Set up Prisma ORM
Run the following command to install the Prisma CLI and initialize it in the project.
yarn add -D prisma

yarn prisma init
This command will create a Prisma schema and a .env file to set the environment variables to inject into the application.
Replace the content of the file prisma/schema.prisma with the code below to set the provider to MySQL.
You can skip this part if you use PostgreSQL, the default provider.
generator client {
  provider = "prisma-client-js"
}

datasource db {
  provider = "mysql"
  url      = env("DATABASE_URL")
}
Open the .env file and update the database URL to the connection string of the MySQL database instance running in Docker.
Based on the Docker container of the MySQL database we created earlier, the connection string is: mysql://root:secret@localhost:3307/ecommerce
Define the database schema with Prisma
We must define the Prisma schema that will generate the database structure of our e-commerce system. Update the file prisma/schema.prisma with the code below:
generator client {
  provider = "prisma-client-js"
}

datasource db {
  provider = "mysql"
  url      = env("DATABASE_URL")
}

model User {
  id        Int      @id @default(autoincrement())
  email     String   @unique @db.VarChar(100)
  name      String   @db.VarChar(100)
  bonusMark Int      @map("bonus_mark") @default(0)
  createdAt DateTime @default(now()) @map("created_at")
  updatedAt DateTime @updatedAt @map("updated_at")

  orders   Order[]
  payments Payment[]

  @@map("users")
}

enum OrderStatus {
  CREATED
  PROCESSING
  SHIPPED
  CANCELLED
}

model Order {
  id        Int         @id @default(autoincrement())
  reference String      @unique @db.VarChar(15)
  status    OrderStatus @default(CREATED)
  amount    Int
  createdAt DateTime    @default(now()) @map("created_at")
  updatedAt DateTime    @updatedAt @map("updated_at")
  user      User        @relation(fields: [userId], references: [id], onDelete: Cascade)
  userId    Int         @map("user_id")

  payments Payment[]

  @@map("orders")
}

enum PaymentStatus {
  CREATED
  SUCCEED
  FAILED
}

model Payment {
  id        Int           @id @default(autoincrement())
  reference String        @unique @db.VarChar(15)
  status    PaymentStatus @default(CREATED)
  amount    Int
  createdAt DateTime      @default(now()) @map("created_at")
  updatedAt DateTime      @updatedAt @map("updated_at")
  user      User          @relation(fields: [userId], references: [id], onDelete: Cascade)
  userId    Int           @map("user_id")
  order     Order         @relation(fields: [orderId], references: [id], onDelete: Cascade)
  orderId   Int           @map("order_id")

  @@map("payments")
}
Apply the database schema
From the Prisma schema, let's generate the SQL code of the database schema (DDL) containing instructions to create tables and integrity constraints.
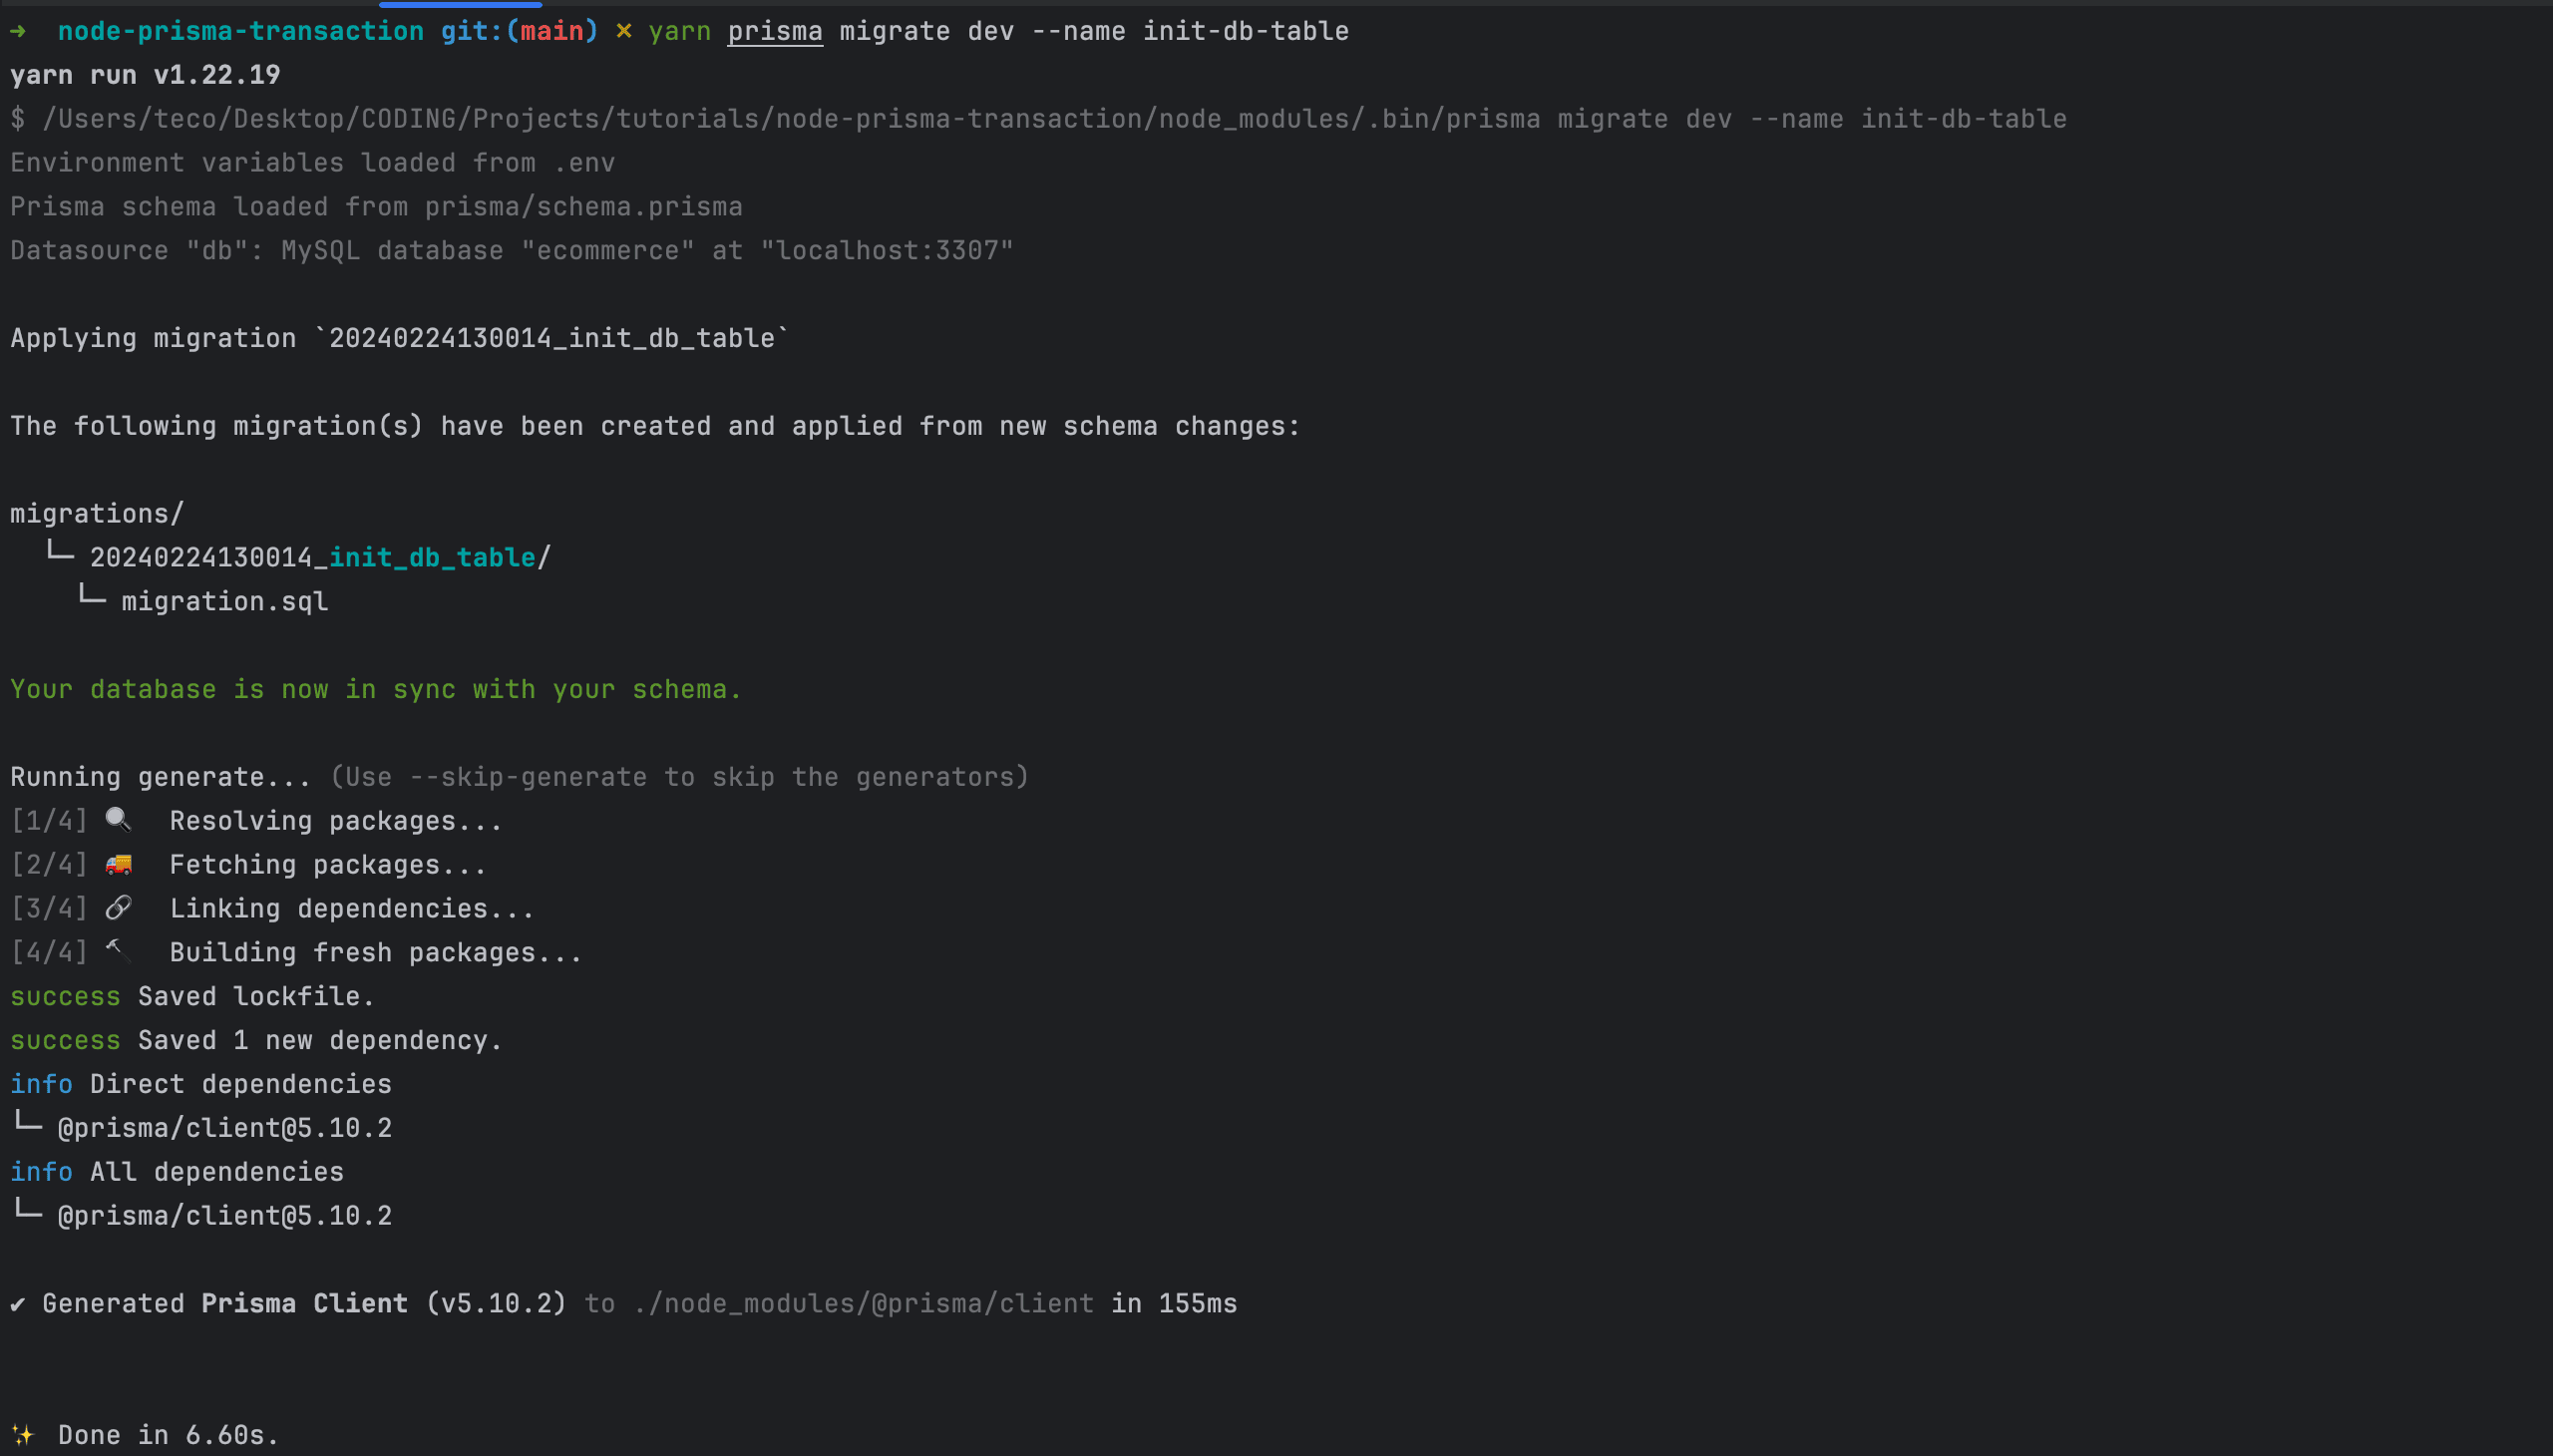
After the migration file is generated, the Prisma CLI will execute it against the MySQL database and generate the TypeScript types.
yarn prisma migrate dev --name init-db-table
We get the following output when everything looks good.

Seed the database with some data
Creating an order requires a user and at least one product; we will seed the database with some users and products to focus on the database transaction.
Create a file prisma/seed.ts and add the code below:
import { OrderStatus, PaymentStatus, Prisma, PrismaClient } from '@prisma/client';

const prisma = new PrismaClient({ errorFormat: 'pretty' });

const loadUsers = async () => {
  const usersInput: Prisma.UserCreateManyInput[] = [
    { name: 'Bob', email: 'bob@email.com', bonusMark: 0 },
    { name: 'Alice', email: 'alice@email.com', bonusMark: 0 },
  ];

  await prisma.user.createMany({
    data: usersInput,
  });
};

const loadPayments = async () => {
  const userId = 1;

  const createdOrder = await prisma.order.create({
    data: {
      amount: 60,
      status: OrderStatus.CREATED,
      reference: 'ord-ref-0001',
      user: {
        connect: {
          id: userId,
        },
      },
    }
  });

  await prisma.payment.create({
    data: {
      id: createdOrder.id,
      amount: createdOrder.amount,
      reference: 'pay-ref-0001',
      status: PaymentStatus.CREATED,
      userId: createdOrder.userId,
      orderId: createdOrder.id,
    },
  });
};

const main = async () => {
  await loadUsers();

  await loadPayments();
};

void main();
Run the command below to seed the database
yarn ts-node prisma/seed.ts
After the execution, you will see two users, one order, and one payment in the database.
How to write a DB transaction with Prisma?
Prisma offers two ways of writing database transactions:
- Sequential transactions: allow execution of many database queries that are unrelated in terms of table column relationships and thus do not have any dependency among them, but still must all succeed or fail.
The syntax to write a sequential transaction with Prisma is the following:
const [queryResult1, queryResult2, queryResult3] = await prisma.$transaction([
  prisma.entity1.query(),
  prisma.entity2.query(),
  prisma.entity3.query()
])
For example, let's take a blogging platform; when an author edits a post, we must create a history. The two updates are unrelated but must succeed for the system to be consistent.
An example of the implementation with Prisma will look like this:
const [postResult, postHistoryResult] = await prisma.$transaction([
  prisma.post.update({ where: {...}, data: {...} }),
  prisma.postHistory.create({ where: {...}, data: {...} }),
])
- Interactive transactions: allows executing database queries related to the way that the following query needs information from the previous query to be executed, and you can compute some data before saving them or decide if we must stop the execution.
The syntax to write an interactive transaction with Prisma is the following:
prisma.$transaction(async (tx) => {
  await tx.entity1.query();

  const total = calculTotalItems();

  await tx.entity2.query({ data: { total } });

  const shouldContinueTransaction = checkIfCanContinueTransaction();

  if (shouldContinueTransaction) {
    await tx.entity3.query();
  }
});
As you can see, the interactive transaction gives us more flexibility when writing our database transactions. The tutorial use case fits well with this transaction method, so let's continue to see a concrete example.
Simulate a database transaction failure
To see the transaction in action, we will first simulate a failure case where the saving of payment details in the database fails because we used an existing reference that must be unique.
This can be a real issue in a real-world application when you generate the payment reference from the payment ID in the table.
We expect no data to be saved in the database after the execution. Replace the code in the file src/index.ts with the one below:
import { OrderStatus, PrismaClient, PaymentStatus } from '@prisma/client';

const prisma = new PrismaClient({ errorFormat: 'pretty' });

const userId = 2; // ID of "the second user" in the database table

export const processUserOrder = async () => {
  try {
    await prisma.$transaction(async (transaction) => {
      console.log('Step 1: create the order with order items');

      const createdOrder = await transaction.order.create({
        data: {
          amount: 125,
          status: OrderStatus.CREATED,
          reference: 'ord-ref-0002',
          user: {
            connect: {
              id: userId,
            },
          },
        },
      });

      console.log('Step 2: create the payment');
      await transaction.payment.create({
        data: {
          id: createdOrder.id,
          amount: createdOrder.amount,
          reference: 'pay-ref-0001',
          status: PaymentStatus.CREATED,
          userId: createdOrder.userId,
          orderId: createdOrder.id,
        },
      });

      console.log('Step 3: Update bonus mark');
      if (createdOrder.amount > 100) {
        await transaction.user.update({
          where: {
            id: createdOrder.userId,
          },
          data: {
            bonusMark: {
              increment: 5,
            },
          },
        });
      }
    });
  } catch (error) {
    console.error('Failed to create the order => ', error);
  }
};

void processUserOrder();
Run the command below to start the application:
yarn start
A live demo of the execution will look like this
Demo of the database transaction failure.
As we can see, the execution throws an error at step 2, and when we check the database, no data have been inserted in the table orders and payments; the user bonus mark has not been updated.
Execute a database transaction successfully
To make the database transaction succeed, we update the payment reference to set a unique one like pay-ref-0002.
console.log('Step 2: create the payment');
await transaction.payment.create({
  data: {
    id: created order.id,
    amount: createdOrder.amount,
    reference: 'pay-ref-0002',
    status: PaymentStatus.CREATED,
    userId: createdOrder.userId,
    orderId: createdOrder.id,
  },
});
By re-running the code now, you will see the transaction is executed successfully
Demo of the database transaction success.
Wrap up
Prisma makes it easy to write database transactions using the Prisma transaction API. You can choose between sequential and interactive transactions; the latter gives you more flexibility for transactions where you must compute data between two transactions.
There are some caveats about running transactions with Prisma, such as avoiding running slow queries and performing network calls because they can increase the execution time of a transaction, which can lead to concurrency issues and deadlock.
To go further, check out the Prisma transaction documentation.
You can find the code source on the GitHub repository.
Follow me on Twitter or subscribe to my newsletter to avoid missing the upcoming posts and the tips and tricks I occasionally share.