
Using Prisma ORM to build a Node.js application with MySQL


Photo by Tino Rischawy / Unsplash
Productivity is essential for developers, and when it comes to building an application that interacts with a database, there are repetitive CRUD (Create, Read, Update, Delete) actions; these tasks can be boring for those who already know SQL and want to focus on the business logic.
Moreover, the SQL written can be exposed to SQL injection if we don't pay attention. Another issue is when you want to change the database, you must rewrite your SQL queries for the target database. These are problems ORMs try to solve.
There are many ORMs in the Node.js ecosystems, such as TypeORM, and today, we will focus on Prisma, one of the best in the class.

Prisma features
Prisma makes it easy for developers to interact with the database in their backend application by providing interesting features such as:
- Manage the database migrations by defining them in a schema.
- A query builder to write complex SQL queries easily.
- Handle database integrity constraints at the application level.
- A transaction API two write database transactions.
Check out this link to learn more about why Prisma is the ORM you are looking for.
Prisma supports the following database systems: MySQL, MariaDB, PostgreSQL, Microsoft SQL Server, CockroachDB, and MongoDB. Check out this link to see the supported database version.
Regarding programming languages, only JavaScript and TypeScript are supported. The support of TypeScript is great because you benefit from the type autocompletion.
Prisma provides various tools to improve the developer experience when working with databases.
With Prisma, you define your database schema using the Prisma Schema Language (PSL). This schema is used to generate the code related to the Database Access Layer and also migrations every time you update the schema:
- Prisma Client: Auto-generated and type-safe database client for use in your application.
- Prisma Migrate: A declarative data modeling and migration tool.
- Prisma Studio: A modern GUI for browsing and managing data stored in your database.
Prerequisites
You must need these tools installed on your computer to follow this tutorial.
- Node.js 18+ - Download link
- NPM or Yarn
- MySQL 8
We will need Docker to run a container for MySQL 8; you can skip it if MySQL is installed on your computer. Run the command below to start the Docker container from the MySQL image:
docker run -d --rm -e MYSQL_ROOT_PASSWORD=secret -e MYSQL_DATABASE=inventory --name prisma_db -p 3307:3306 mysql:8.0
What we build
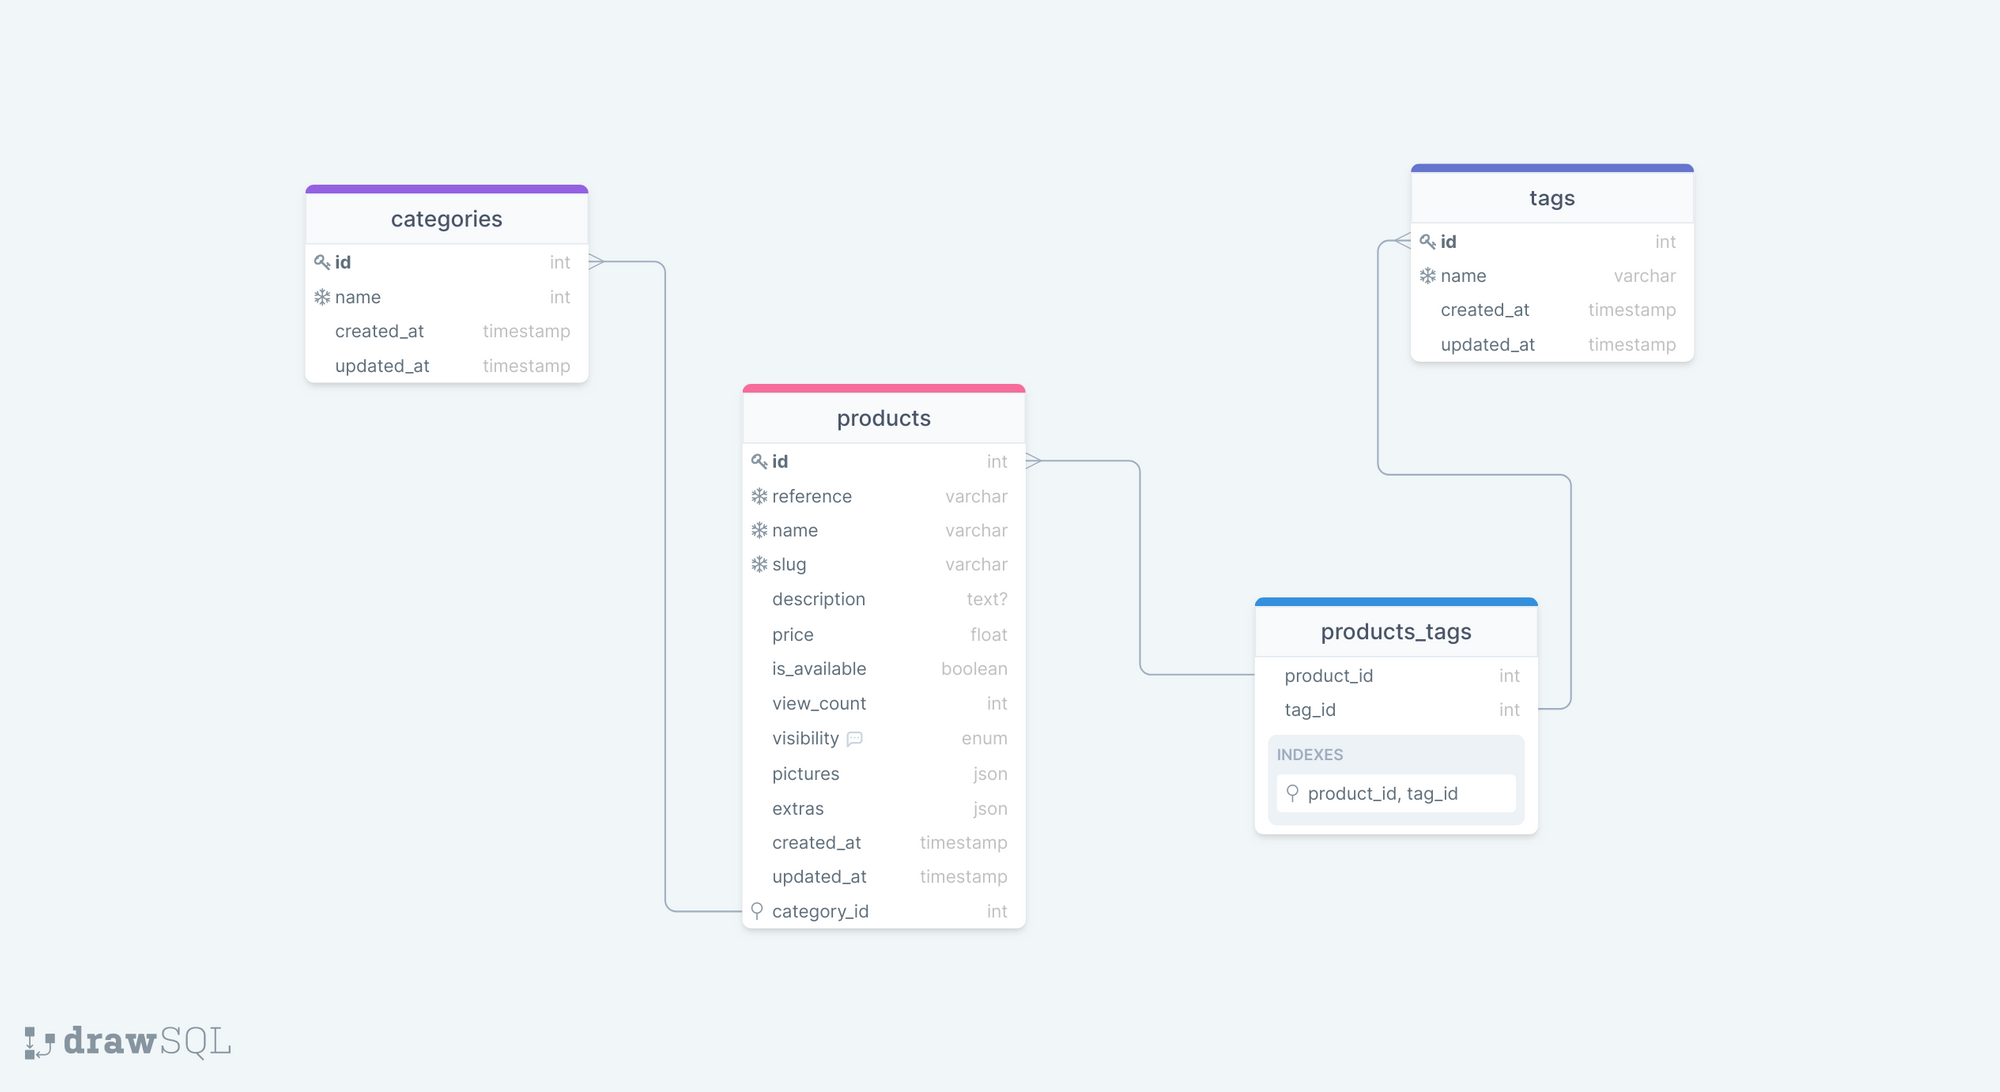
We will build a minimal product inventory system to see Prisma in action.
A product belongs to a category and can have many tags. Here is the database schema I drew with drawSQL. We will use Prisma to create migrations and then perform some CRUD operations.
Set up the project
We will use the boilerplate starter for a Node.js project with TypeScript; we built it on this previous tutorial.
git clone https://github.com/tericcabrel/node-ts-starter.git node-prisma-mysql

cd node-prisma-mysql

yarn install

yarn start
At this step, the Node.js application should work normally.
Set up Prisma
We will first install the Prisma CLI by running the command below:
yarn add -D prisma
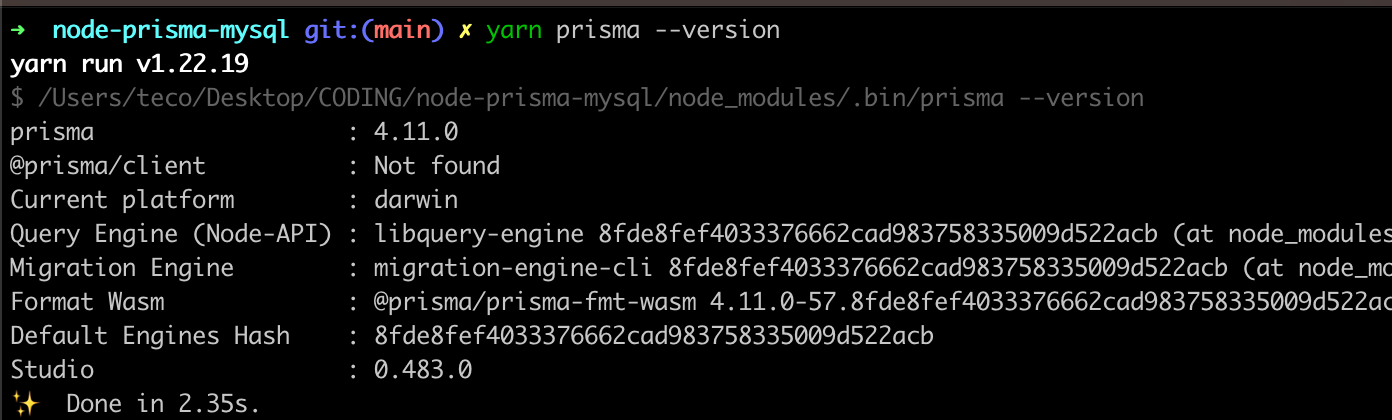
Check the Prisma version by running yarn prisma --version
Let's initialize Prisma by running the command below:
yarn prisma init
We got the output below:
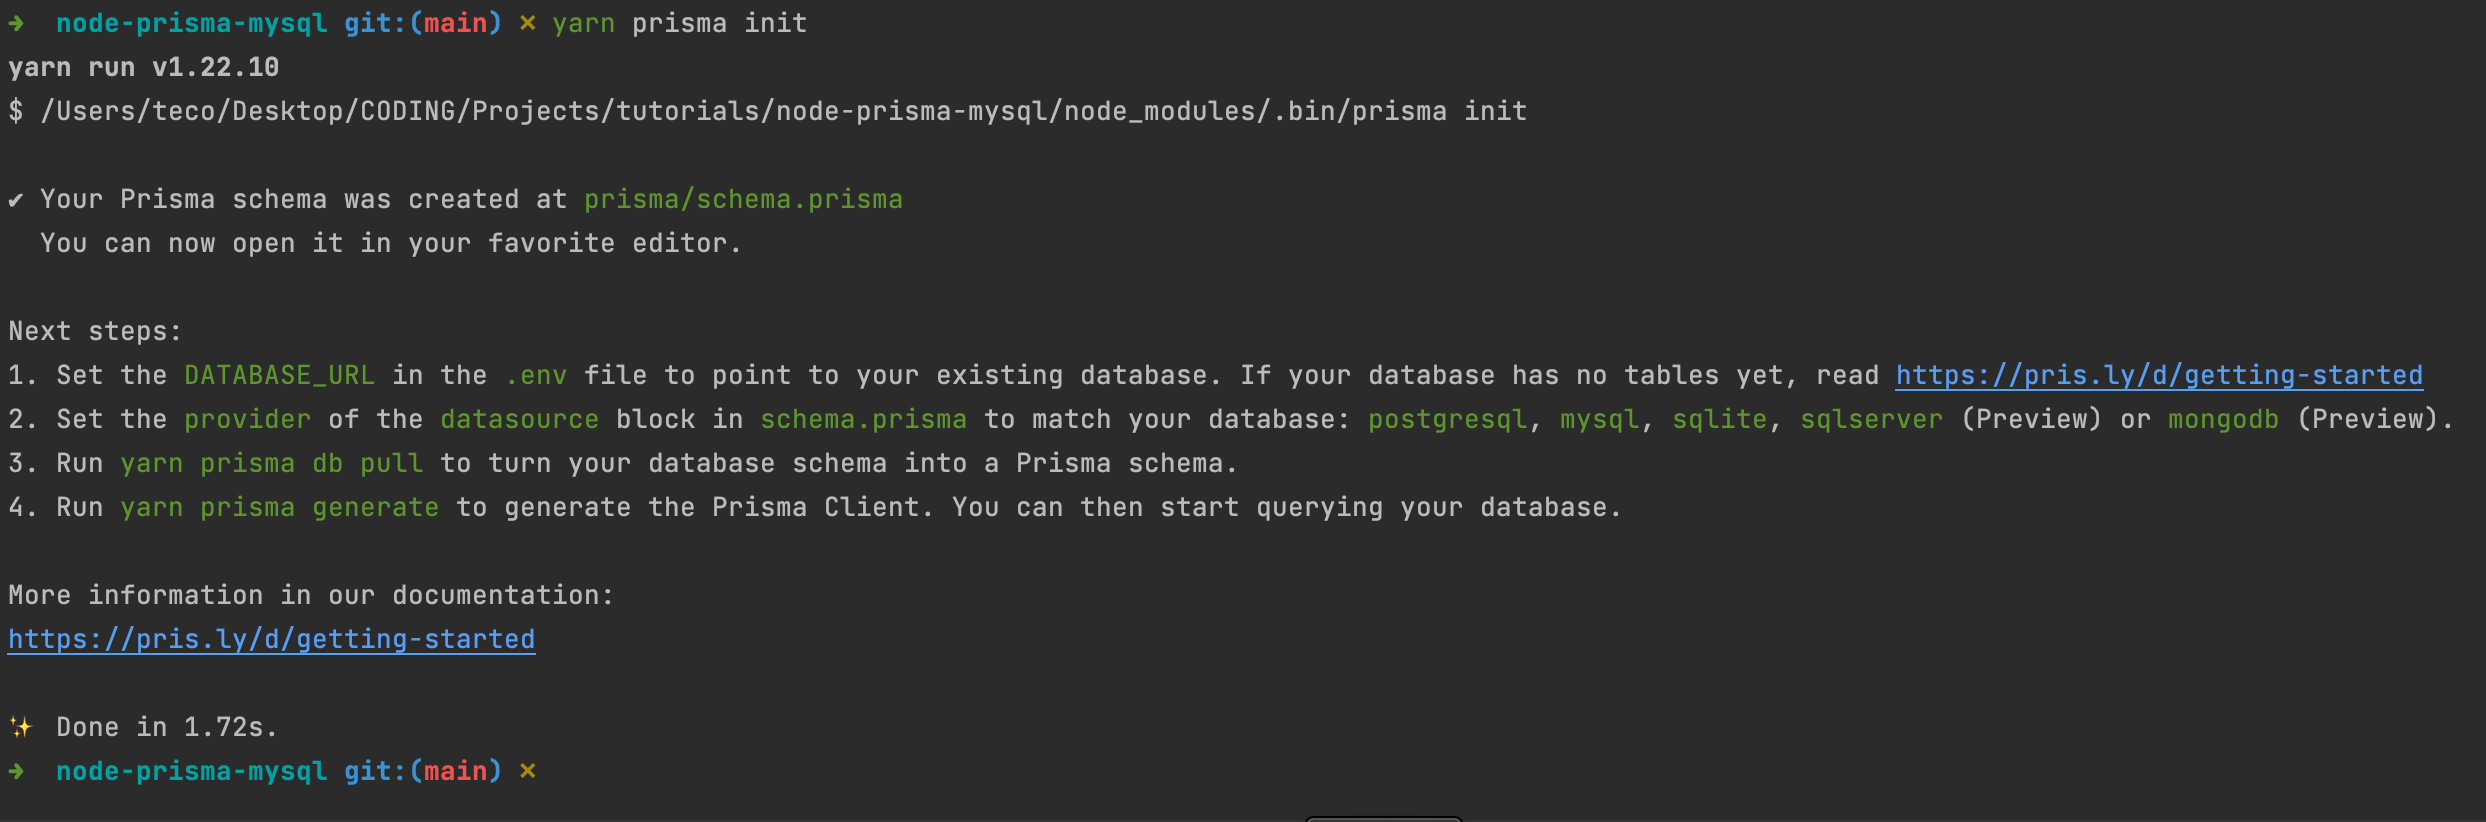
A folder named prisma was created, with a file named schema.prisma inside where we will write the schema definition of the database.
Also, a .env file was created, which contains the connection string to the database. Let's update it to match our local database.
DATABASE_URL="mysql://root:secret@localhost:3307/inventory"
This configuration matches with the MySQL instance running by Docker.
Now, open the file schema.prisma and replace the property's value called "provider" with "mysql" (actually PostgreSQL).

Create the Category and Tag tables
We will use the Prisma Schema Language to write the structure of our table; check out this link to see all the capabilities since we can't cover all of them.
There is a plugin for the PSL in some editors we can use to improve the experience. Check out this link to find the instructions for your editor. I use the plugin for the JetBrains IDE.
Open the file schema.prisma and the code below:
model Category {
  id        Int       @id @default(autoincrement())
  name      String    @db.VarChar(150) @unique
  createdAt DateTime  @default(now()) @map("created_at")
  updatedAt DateTime  @updatedAt @map("updated_at")

  @@map("categories")
}

model Tag {
  id        Int       @id @default(autoincrement())
  name      String    @db.VarChar(150) @unique
  createdAt DateTime  @default(now()) @map("created_at")
  updatedAt DateTime  @updatedAt @map("updated_at")

  @@map("tags")
}
We created the model Category and the model Tag along with their properties. Let's explain what @map and @@map are.
When designing your database, you want to have the table's name in plural and lowercase. The keyword @@map map, the model Category model to the database table named categories.
@map does the same thing but for the table columns.
Run the migration
Run the command below to create migration and execute it:
yarn prisma migrate dev --name create-categories-and-tags-table
This command will do two things:
- Generate the migration for these tables (
prisma generateis executed under the hood) - Once the migration is generated, it will be executed against the database.
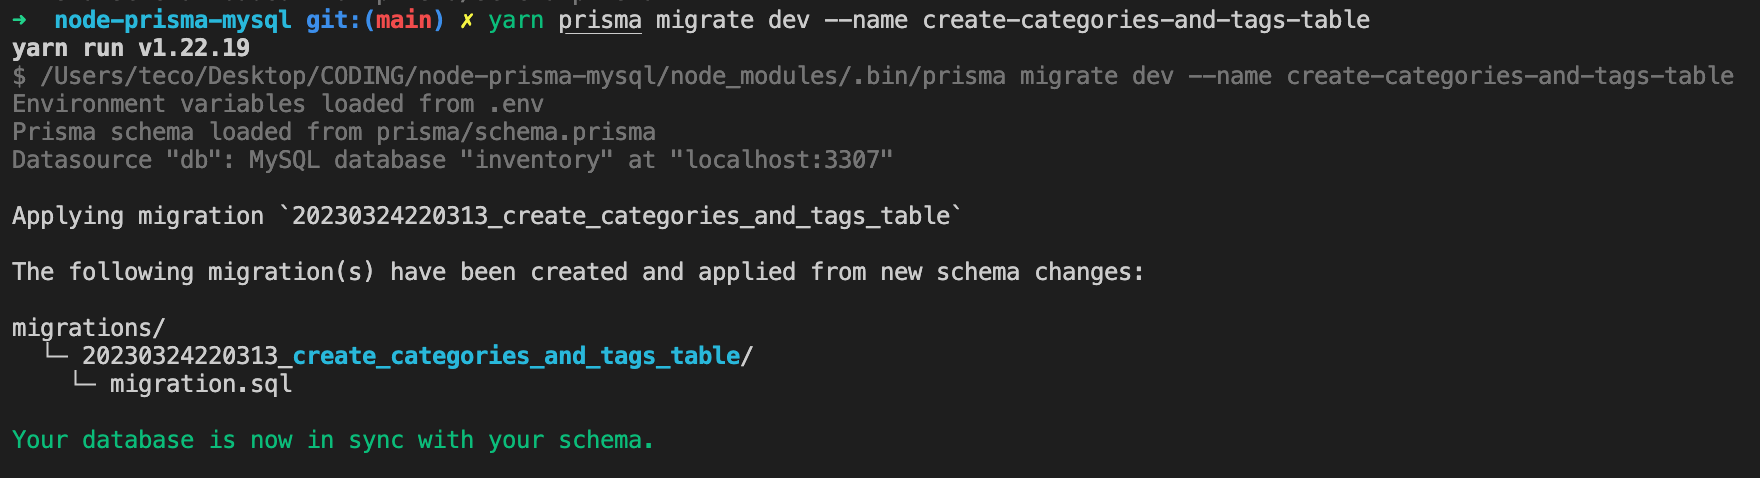
A folder named migrations is created inside the folder "prisma".
Create the Product table
Open the file schema.prisma and add the code below:
datasource db {
  provider = "mysql"
  url      = env("DATABASE_URL")
}

generator client {
  provider = "prisma-client-js"
}

model Category {
  id        Int      @id @default(autoincrement())
  name      String   @unique @db.VarChar(150)
  createdAt DateTime @default(now()) @map("created_at")
  updatedAt DateTime @updatedAt @map("updated_at")

  products Product[]

  @@map("categories")
}

model Tag {
  id        Int      @id @default(autoincrement())
  name      String   @unique @db.VarChar(150)
  createdAt DateTime @default(now()) @map("created_at")
  updatedAt DateTime @updatedAt @map("updated_at")

  productTags ProductTag[]

  @@map("tags")
}

enum Visibility {
  VISIBLE
  HIDDEN
  FEATURED
  DEAL
}

model Product {
  id          Int        @id @default(autoincrement())
  name        String     @unique @db.VarChar(200)
  slug        String     @unique @db.VarChar(200)
  reference   String     @unique @default(uuid()) @db.VarChar(50)
  description String?    @db.Text
  price       Float      @db.Float
  isAvailable Boolean    @default(true) @map("is_available") @db.TinyInt
  viewCount   Int        @default(0) @map("view_count") @db.Int
  visibility  Visibility @default(VISIBLE)
  pictures    Json
  extras      Json       @db.Json
  createdAt   DateTime   @default(now()) @map("created_at")
  updatedAt   DateTime   @updatedAt @map("updated_at")
  category    Category   @relation(fields: [categoryId], references: [id])
  categoryId  Int        @map("category_id")

  productTags ProductTag[]

  @@map("products")
}

model ProductTag {
  product   Product @relation(fields: [productId], references: [id])
  productId Int     @map("product_id")
  tag       Tag     @relation(fields: [tagId], references: [id])
  tagId     Int     @map("tag_id")

  @@id([productId, tagId])
  @@map("products_tags")
}
Run the migration to create the product and product's tags table:
yarn prisma migrate dev --name create-products-table
Working with the Prisma client
Now that our database schema is created, we will use the Prisma client to store and retrieve data. Run the command below to install it:
yarn add @prisma/client
Running this command might be optional for you.
The concept of migration doesn't exist for MongoDB, which is an oriented document database. You might wonder how we work with Prisma; check out my post about Prisma and MongoDB.

Seeding the database
We want to add some categories and tags to have predefined values before we launch the application. To do that, we need to seed the database with data.
Let's create a file seed.ts inside the folder prisma and add the code below:
import { PrismaClient } from '@prisma/client';
const prisma = new PrismaClient();

async function main() {
  await prisma.category.createMany({
    data: [{ name: 'Computers' }, { name: 'TV' }, { name: 'Storage' }, { name: 'Accessories' }],
    skipDuplicates: true,
  });

  await prisma.tag.createMany({
    data: [{ name: 'Apple' }, { name: 'IOS' }, { name: 'SSD' }, { name: 'Keyboard' }, { name: 'USB' }],
    skipDuplicates: true,
  });
}

main()
  .catch((e) => {
    console.error(e);
    process.exit(1);
  })
  .finally(async () => {
    await prisma.$disconnect();
  });
Open the package.json file and add the code below; the Prisma CLI will use it to execute the database seeding.
"prisma": {
  "seed": "ts-node prisma/seed.ts"
}
Run the command below to seed the database:
yarn prisma db seed
Verify the data are inserted in the database.
Insert the data
Inserting data is straightforward with the Prisma client. Create a file insert-data.ts inside the src folder and add the code below:
import { PrismaClient } from '@prisma/client';
const prisma = new PrismaClient();

async function main() {
  const insertResult = await prisma.tag.createMany({
    data: [{ name: 'Television' }, { name: 'Radio' }, { name: 'Printer' }],
  });

  console.log(insertResult.count); // 3

  const productCreated = await prisma.product.create({
    data: {
      name: 'Smart TV Full HD 40 Inch',
      slug: 'smart-tv-full-hd-40-inch',
      isAvailable: true,
      price: 455,
      extras: {
        width: 168,
        height: 109,
        energy: 'Class A+',
      },
      pictures: {
        'picture_one.png': 'picture_one_storage_path',
        'picture_two.png': 'picture_two_storage_path',
      },
      categoryId: 1, // Exist in the database from the seed
    },
  });

  console.log(productCreated);

  const productWithTagsCreated = await prisma.product.create({
    data: {
      name: 'Macbook Pro 2020 16 Inch',
      slug: 'macbook-pro-2020-16-inch',
      isAvailable: true,
      price: 2799,
      extras: {
        storage: '512GB',
        memory: '16GB',
        hasThunderbolt: true,
        osVersion: 11.2,
      },
      visibility: 'FEATURED',
      pictures: {
        'picture_one.png': 'picture_one_storage_path',
        'picture_two.png': 'picture_two_storage_path',
      },
      categoryId: 1,
      productTags: {
        createMany: {
          data: [{ tagId: 1 }, { tagId: 2 }],
        },
      },
    },
    include: {
      productTags: true, // include product tags in the object returned
      category: true, // also include category
    },
  });

  console.log(productWithTagsCreated);
}

main()
  .catch((e) => {
    console.error(e);
    process.exit(1);
  })
  .finally(async () => {
    await prisma.$disconnect();
  });
Execute the code in the file above by running the command below:
yarn ts-node src/insert-data.ts
We get the following output.
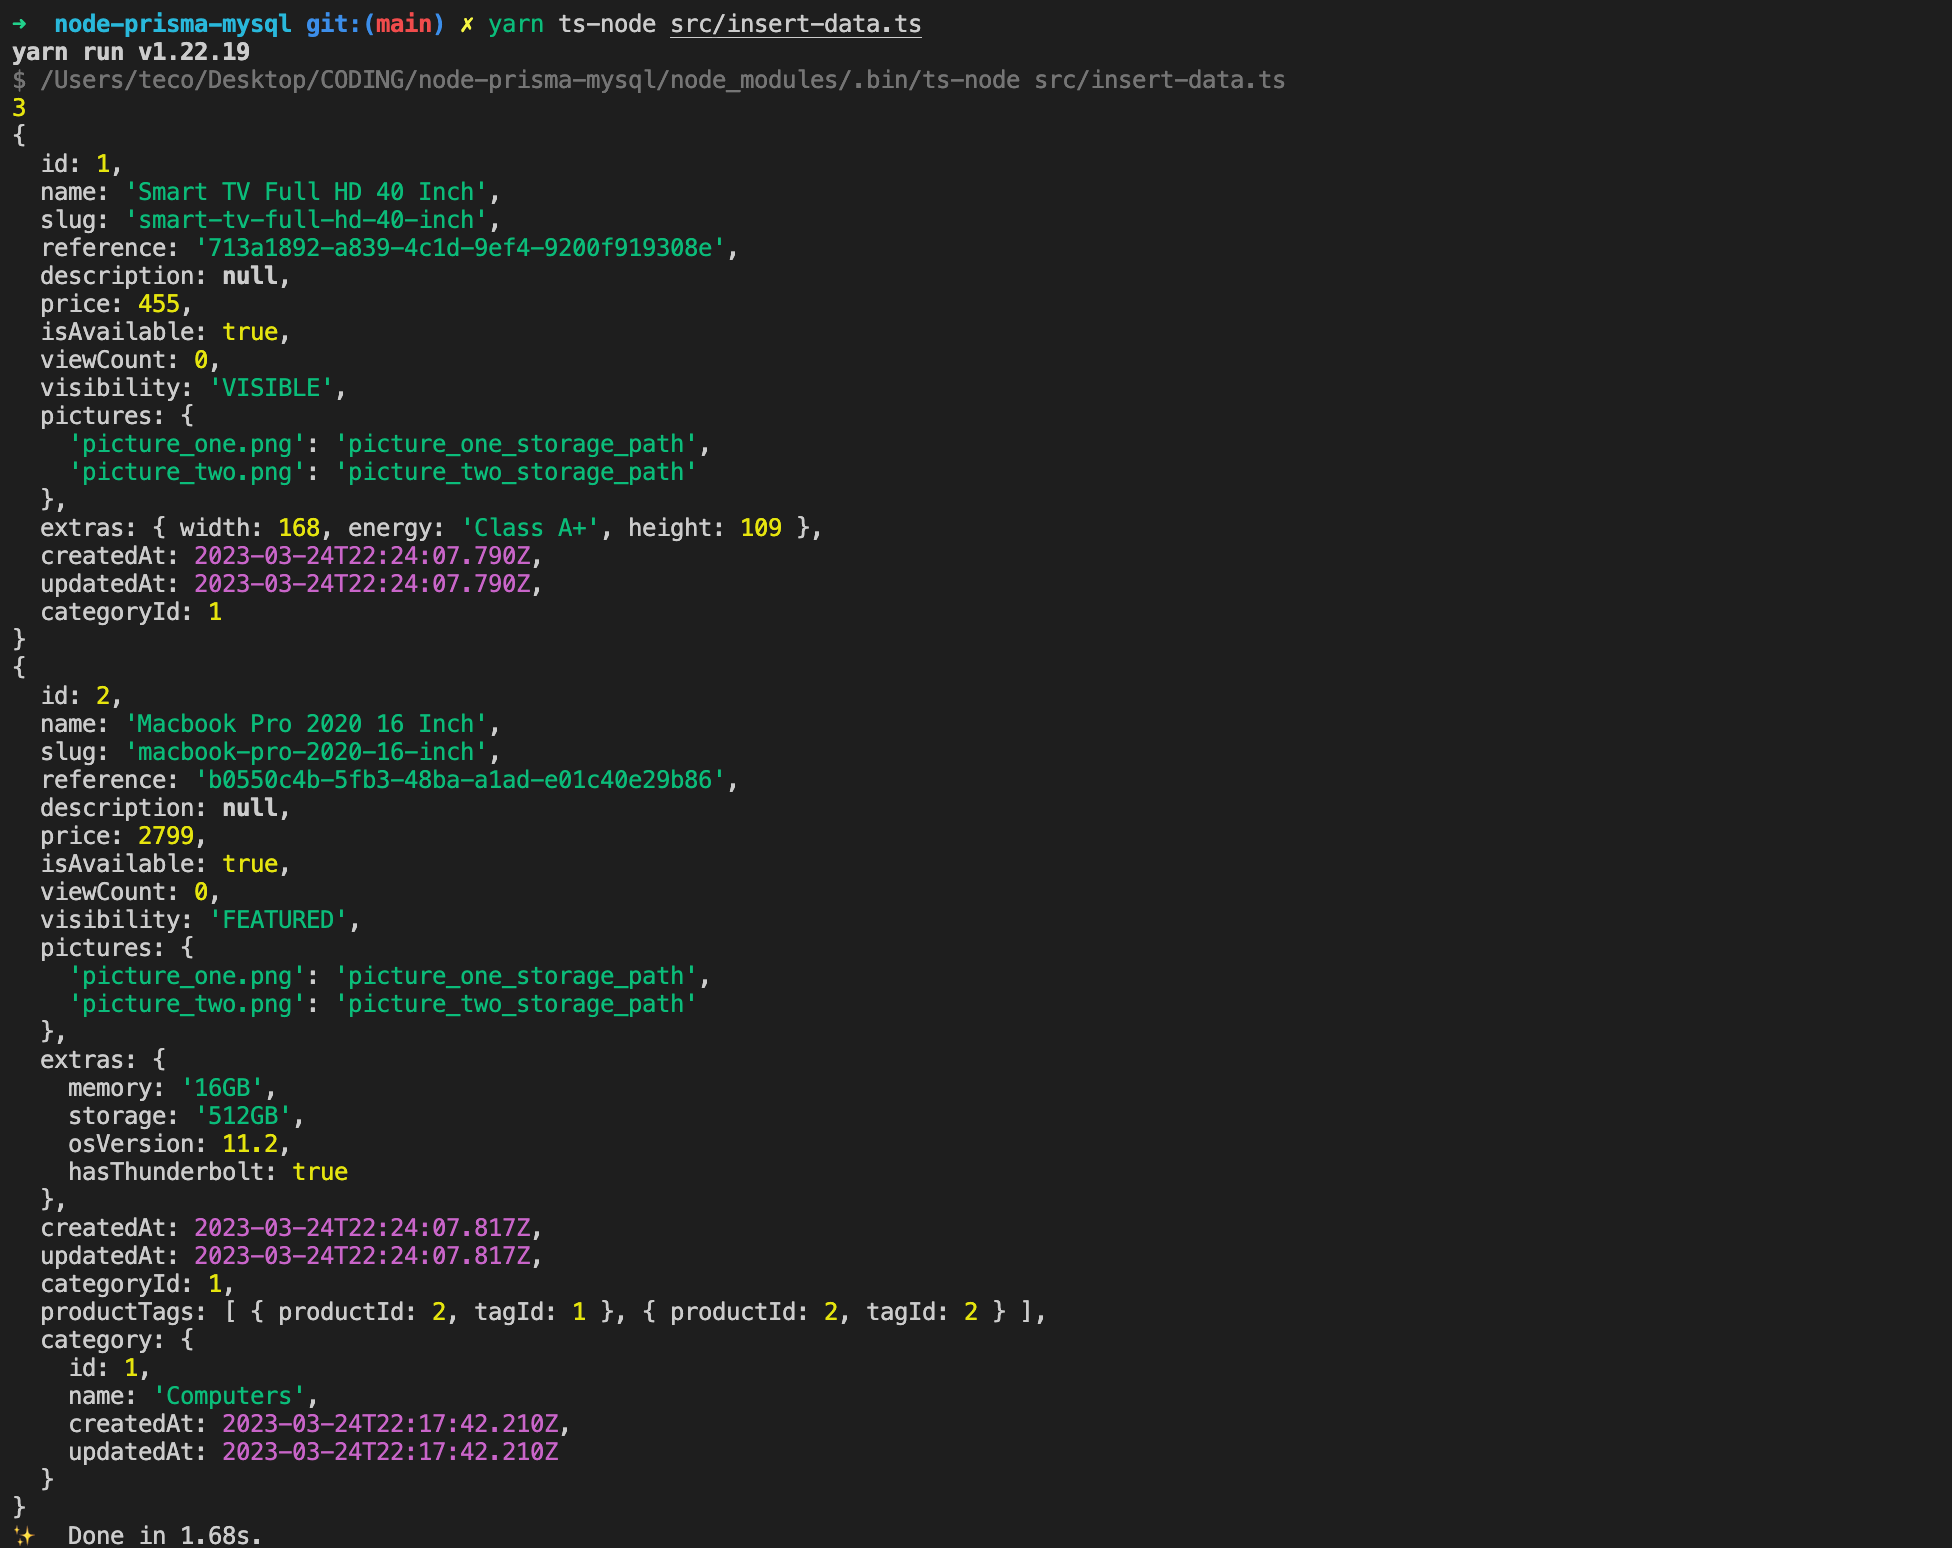
Note: the property reference in the product has a value, yet we didn't provide one when inserting the data. It is because we defined it as auto-generated with a random UUID.
Update the data
Create a file update-data.ts inside the src folder and add the code below:
const categoriesUpdated = await prisma.category.updateMany({
  where: {
    name: {
      contains: 'Iphone',
    },
  },
  data: {
    name: 'Apple Iphone',
  },
});

console.log(categoriesUpdated.count); // 2

const productUpdated = await prisma.product.update({
  where: {
    id: 2,
  },
  data: {
    viewCount: {
      increment: 1, // increment by one the current value of viewCount
    },
    isAvailable: true,
    visibility: 'DEAL',
  },
  include: {
    category: true,
  },
});

console.log(productUpdated);
Run the file with the command ts-node src/update-data.ts and see the output.
Delete the data
Create a file delete-data.ts inside the src folder and add the code below:
const tagDeleted = await prisma.tag.delete({
  where: {
    name: 'Iphone',
  },
});

console.log(tagDeleted);

const productsDeleted = await prisma.product.deleteMany({
  where: {
    viewCount: {
      lt: 5,
    },
    visibility: {
      in: ['VISIBLE', 'HIDDEN'],
    },
    OR: {
      isAvailable: false,
    },
  },
});

console.log(productsDeleted.count);

// Delete all products
await prisma.product.deleteMany();
Run the file with the command ts-node src/delete-data.ts and see the output.
Retrieve data
Create a file retrieve-data.ts inside the src folder and add the code below:
const tagFound = await prisma.tag.findUnique({
  where: {
    name: 'Iphone',
  },
});

console.log(tagFound);

const category = await prisma.category.findFirst({
  where: {
    products: {
      some: {
        viewCount: {
          gt: 100,
        },
      },
    },
  },
  orderBy: {
    createdAt: 'desc',
  },
});

console.log(category);

// Find all tags
const allTags = await prisma.tag.findMany();

console.log(allTags);

// Select a subset of fields
const partialProduct = await prisma.product.findUnique({
  where: {
    id: 2,
  },
  select: {
    id: true,
    name: true,
    reference: true,
  },
});

console.log(partialProduct);

// Find distinct category
const distinctCategories = await prisma.category.findMany({
  where: {
    products: {
      some: {
        visibility: {
          notIn: ['VISIBLE', 'FEATURED'],
        },
      },
    },
  },
  distinct: ['name'],
});

console.log(distinctCategories);
Run the file with the command ts-node src/retrieve-data.ts and see the output.
Conclusion
We reached the end of this tutorial, where we have seen how to use Prisma with a MySQL database. Here are some important key points:
- The Prisma Schema removes the need to create a class to map our database.
- It provides database versioning through migration.
- The Prisma client auto-generated from the schema has a good API and provides autocompletion, which is essential for productivity.
- You can use Prisma Studio to visualize the data stored in the database
We didn't cover many capabilities, and I highly recommend checking out the Prisma documentation, which I found very well-written.
Find the source code on the GitHub repository.
Follow me on Twitter or subscribe to my newsletter to avoid missing the upcoming posts and the tips and tricks I occasionally share.